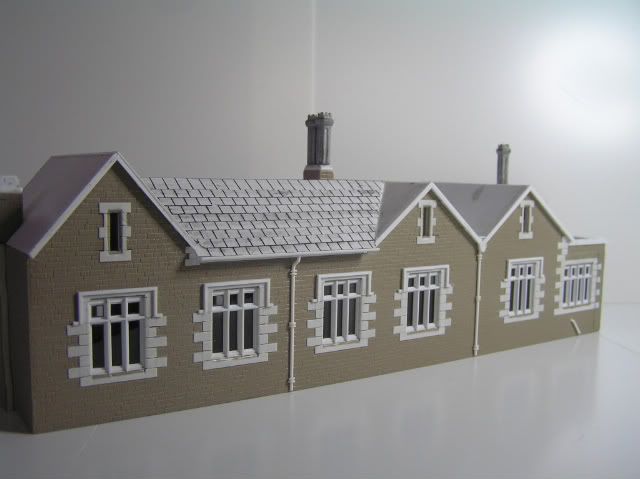
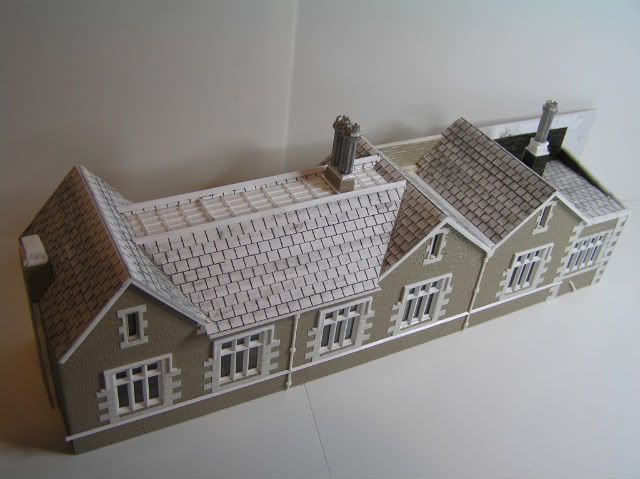
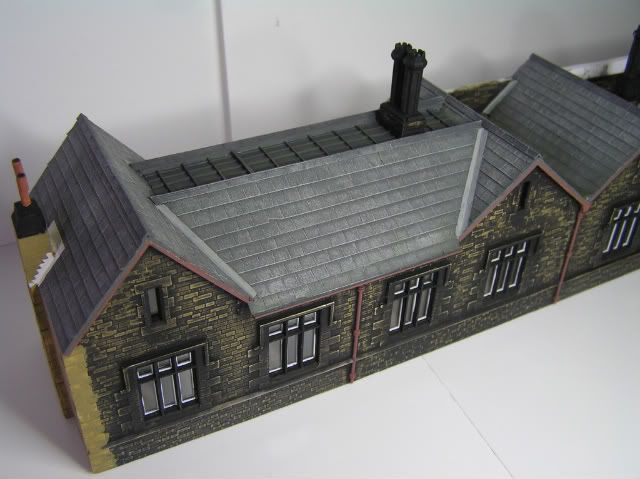
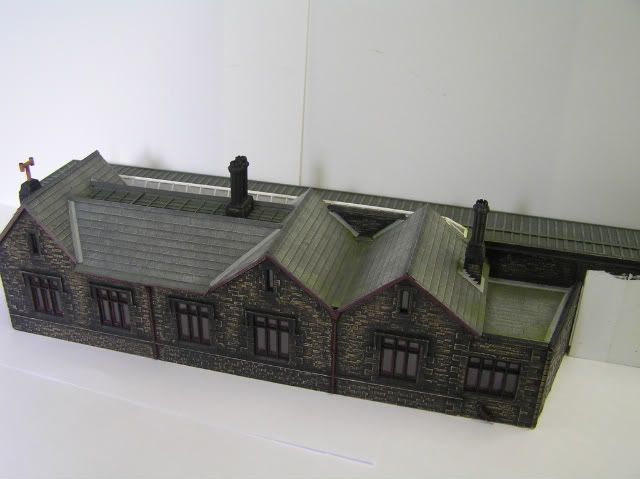
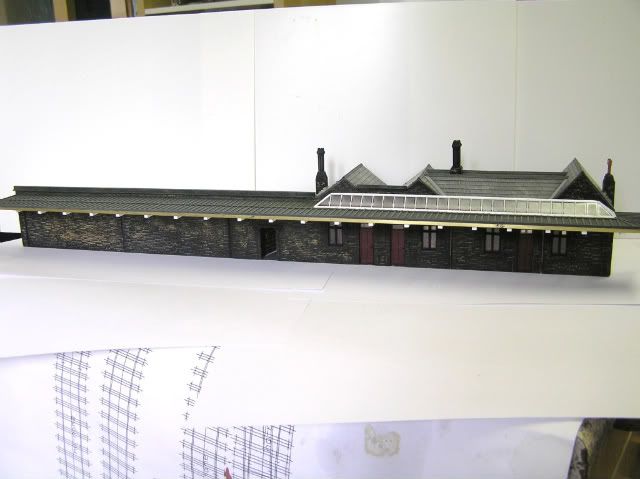
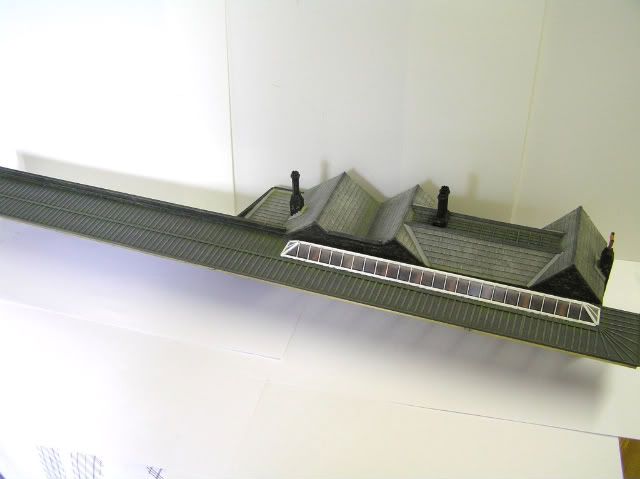
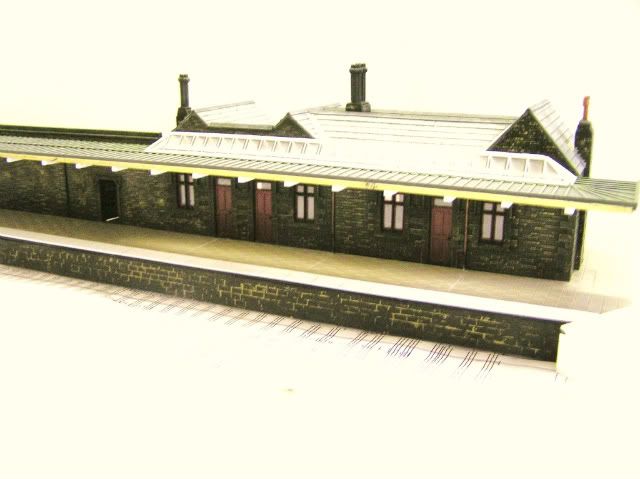
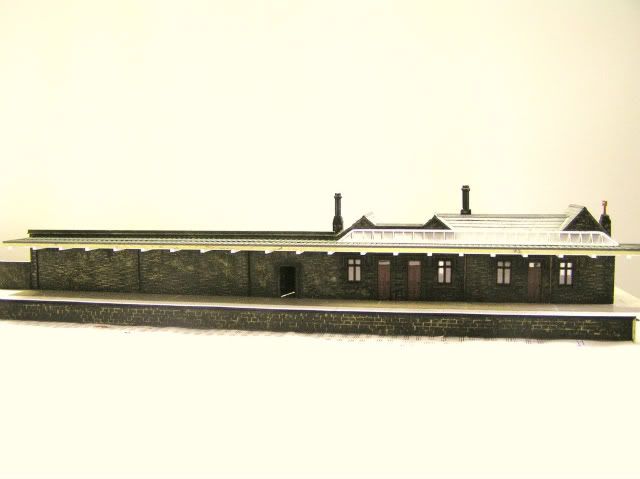
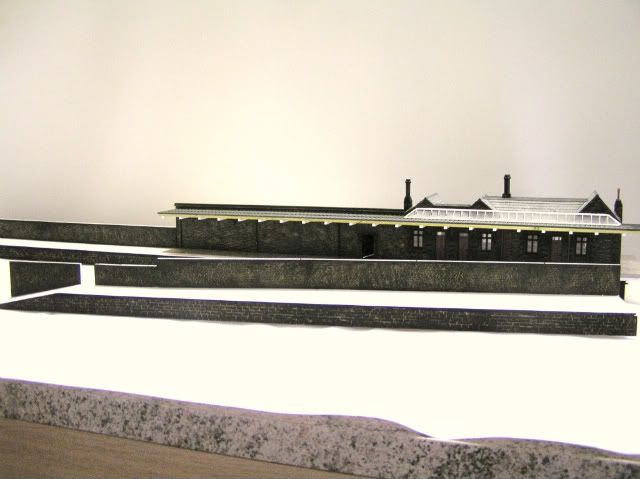
( Gravy Train ) Delph Delph station buildings 4mm. Entry posted by Gravy Train November 15, 2009 1,413 views Share More sharing options... Followers 0 Delph station buildings 4mm.
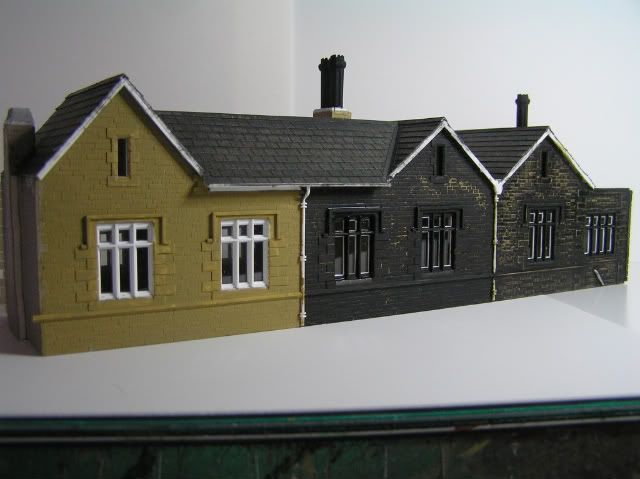
Guest jim s-w Posted November 15, 2009 That looks well dark and dingy Peter - Love it! Jim Link to comment
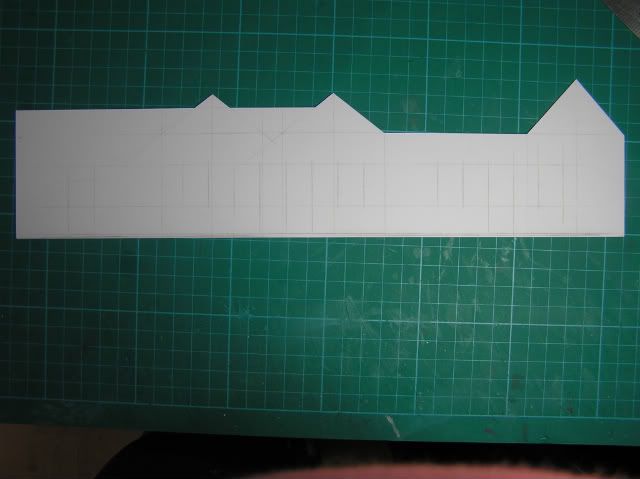
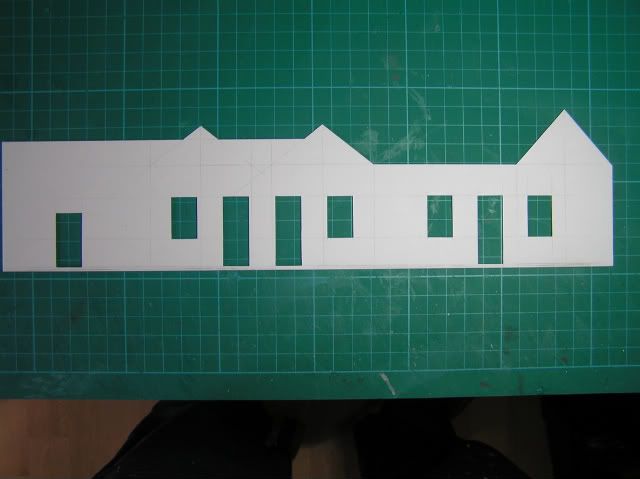
RMweb Gold Mikkel 24,393 Posted November 16, 2009 RMweb Gold Superb. And good to see the initial photos as well, showing how the sides are developed. Very good for instructive purposes Link to comment
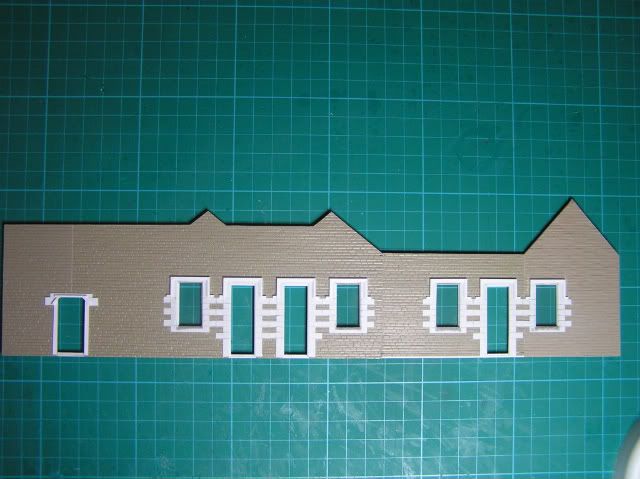
Phill Dyson (onslaught832) 2,474 Posted November 16, 2009 Very nice :icon_clap: , love the mucky stone :icon_thumbsup2: Link to comment
Gravy Train 4,875 Posted November 17, 2009 Very nice :icon_clap: , love the mucky stone :icon_thumbsup2: Cheers Phil, your comments apreciated. Its never easy trying to capture the likeness of a building with regard to its colour as the colour can change from day to day with the effects of weather and of course photo colour etc. cheers Peter Link to comment
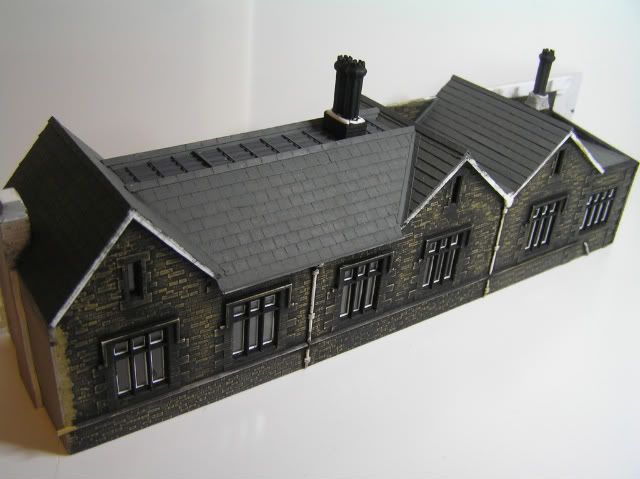
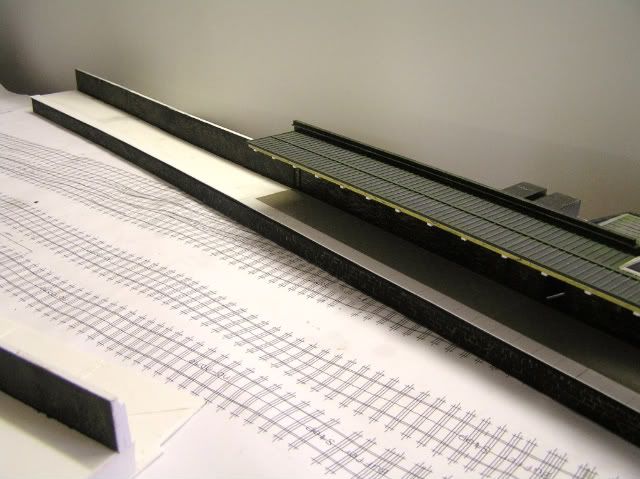
Gravy Train 4,875 Posted December 28, 2009 Delph Goods shed. More to follow as i retrieve them from my photobucket account. Link to comment
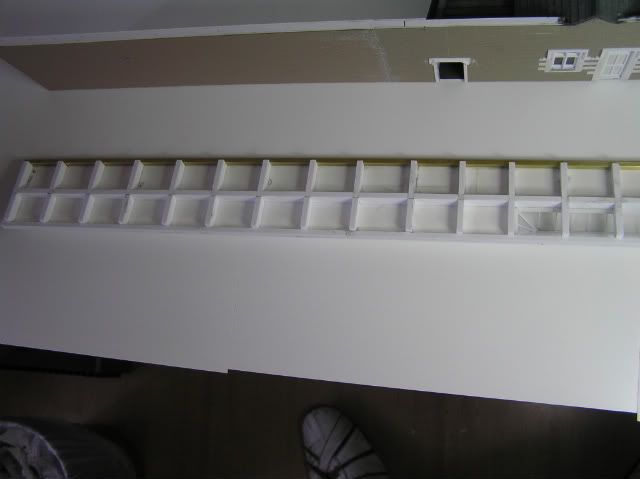
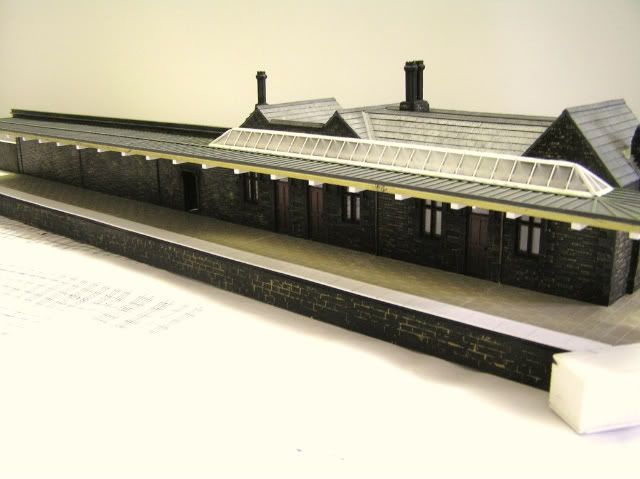
RMweb Gold Stubby47 40,594 Posted December 28, 2009 RMweb Gold Hi Peter, On the station building why have you added the drain pipes before painting, and why have you painted the building in sections ? Thanks in advance for your reply. Stu Link to comment
Gravy Train 4,875 Posted December 29, 2009 Hi Stubby47. I nearly allways fit the drainpipes to a building before painting, a few reasons really. 1 If i paint the drainpipe first then fit it to the walls there is a good chance the paint will spoil / react with the mek and ruin the finish so i nearly allways paint the walls not worrying about paint getting onto the down spouts as the downspouts would receive an initial undercoat before the top coat is applied. 2 I find it esier to cut in on the downspout when finishing off as opposed to cutting in the wall colour as it will have weathering dry brushed in which would otherwise spoil the downspout paint finish. With regard to the stage by stage paint job, this was done deliberately so as to show how i cane to get the desired finish i was after and also the possibility of using it in an article description in a book i am doing. I hope it all answers your questions clearly. cheers Peter Link to comment
hymek2 55 Posted January 20, 2010 Hi, fantastic buildings. A couple of questions..... Looking at the goods shed office, is the internal bracing "Evergreen" type strip? The picture that shows the inside of the goods shed looking at the plain internal wall appears to have large "X"s, is this simliar type bracing? And are the small black spots on the inner end wall small holes to allow a liquid cement through? How do you make your windows, skylights etc. Its the one thing I can never seem to make accurately. Any chance of a photo-strip session on how one is made? I seen note of a possible book...... I'd be interested..... Thanks. Link to comment
Gravy Train 4,875 Posted January 20, 2010 Hi Hymek2, Thanks for the kind comments. Yes, Evergreen strip 125x250 for the bracing, the little holes are for letting the vapour from the solvent escape as it is the vapour trapped in the box sections that do the damage. I glue both surfaces of the wall sections both the bracing and wall section with liquid poly to give that bit more time before going off, generally i use Mek Pak but for large areas liquid poly. Wherever i can i use etched or ready made windows but if in the case of a particular prototype 'like this model' i glue microstrip directly onto the clear plastic with mek pak avoiding the likes of plastic weld for this job as the mek runs freely ( capilliary action ), the plastic weld just freezes were you apply it so not good for this job. Skylights are done the same way although a bit more tedious but with practise you can get through the job quite quickly, it is worth using a mek-pak brush as it makes for easier aplication as the glue causes the bristles to form a point and it keeps hold of the solvent woithout it running off which can be the case with artists brushes. If you are intersted in the Architectural side of modelling i tutor a course on the subject at Hobby Holidays which is a weekend of hands on Architectural modelling covering all aspects of the subject, i will also be at BRM Doncaster as a demonstrator if you want to know more. I have started on the book si i guess its 'whatch this space'. cheers Peter A L. I Link to comment
Dave Holt 1,123 Posted January 21, 2010 Peter, Found it at last!!! I've run out of superlatives. All I can say is thank you very much. I'm sure these buildings will be the focal point of the layout - I just hope I can do them justice with the rest of it! Fantastic! Dave. Link to comment
hymek2 55 Posted January 22, 2010 Thanks for the answers to my previous questions. Most helpful. I do use MEK (my father used to run a model shop many years ago and used to buy it in large bottles from a chemist, then decant it into smaller bottles to sell on (probably wouldnt be allowed these days) I have a quantity left that should last my lifetime!). I am also trying Dl-limonene as recommended by Geoff Kent at Warley (bought from Wizard Models). Seems to be just as easy to use but smells of lemon so is more "family friendly" and applied with a proper MEK type brush which I agree gives much more control. What material are you using for the glazing? maybe that makes a difference. Keep up the good work - looking forward to a book one day! Link to comment
Dave Holt 1,123 Posted January 22, 2010 Peter, Now I'm showing my ignorance of all things plastic! For the coal drop pillars, I've been using Plastic Weld - till I knocked the bottle over on the work bench - and since then , some stuff called "Plastic Magic", bought from Squire's (I think), which contains dichloromethane (apparently). It seems quite agressive but doesn't appear to flow into large areas by capilliary action, as far as I can tell. Where do you still get MEK? ANd, what is a MEC brush? - I've just been using a small artists brush. Cheers, Dave. Link to comment
Gravy Train 4,875 Posted January 22, 2010 Hi David, Only just been able to get on RMweb. Mek-Pak can be purchased at Eileens emporium although the one i use is a bit more potent ( methyl Ethyl Ketone ), Daywat Poly can still be bought though i can't remember were i got it from. A Mek-Pak brush can be got at Modelex for around ??3.00 and well worth every penny and will last you a lifetime. Plastic weld is okay but you have to be careful not to over do it as it is heavy going and melts the plastic with eas, i prefare mek-pak as from experience it doesnt distort the plastic over a long period of time but if there is a golden rule ( don't rely on laminating to counter warping ). If you want to glue together larger areas of plastic eg,( fixing brick sheet to plastc as in a wall section ) try liquid poly applied to both peices as it is less ferocious and takes longer to go off giving you more time to fix the two parts together. If you have any more questions don't hesitate to ask away. cheers Peter Link to comment
railcardownunder 3 Posted September 11, 2011 G'Day David An excellent model if I may say so. My buildings of various materials are not to your standard but are let down by the roofing. A laser cut wood Goods Shed is coming together reasonably but applying the paper strip "shingles" supplied is not looking good. The slates are i think too small but despite guide lines I fail to get them square etc even when doing just 4-5 lines at a time. Do you cut your own or use a commercial product. I have some of the USA products but the sheets are too short and not wide enough. Any suggestions appreciated. PS I come from Noke Oxford but now live in tropical North Queensland where I model anything roughly Oxford railway related. Cheers Michael Link to comment


19 Comments
Recommended Comments
Create an account or sign in to comment
You need to be a member in order to leave a comment
Create an account
Sign up for a new account in our community. It's easy!
Register a new accountSign in
Already have an account? Sign in here.
Sign In Now