Jump to content
 
  • entries
    129
  • comments
    741
  • views
    181,766

Ropley - 50 Shades of Brown


TomE

1,896 views

11FEB13-004b_zps9f51bfb8.jpg

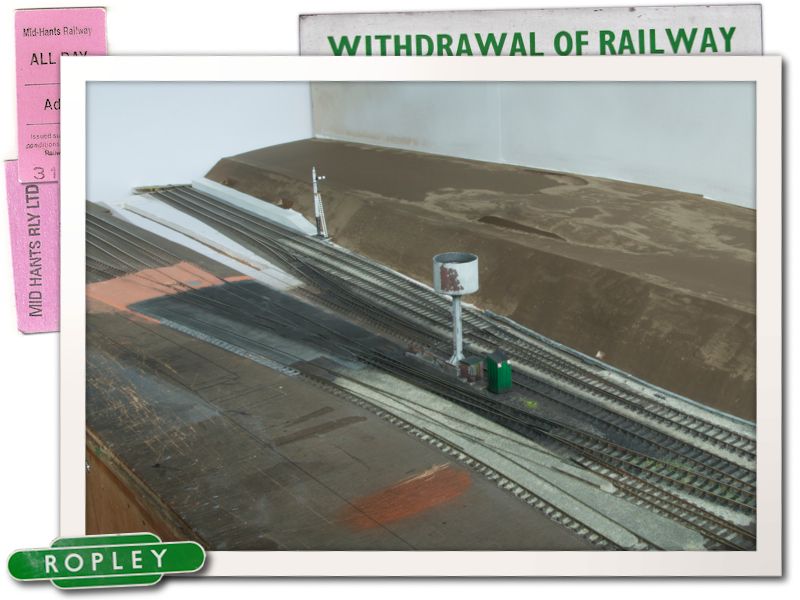
Landscaping for the rear embankment is now complete.


Hi All.


Things are moving slowing down at small scale Ropley at the moment, significantly slower than at the real location it seems! You may remember a while back that I was considering whether to keep up with the changing scene at Ropley and model the ex Kings Cross footbridge which is now in the final stages of being installed across the yard. It now seems that some significant tree clearance is taking place along the top of the embankment. How far this is going i'm not sure yet, but I suspect the number of tress I need to make is going to drop by quite a few!


This all became evident whilst looking through the images posted to Steam Tube by Tony Wood, a very useful resource for me thanks to the many photos taken from in and around the yard. This particular image shows the extent of the tree clearance along the top of the embankment:


9873.jpg


I'd always intended that the model would be somewhat flexible on timescale, the recent addition of the bridge requiring the reality distortion field to be dialed up a notch further when running stock which predates it's installation such as 60019 in green, and Std 5 73096, a stalwart of the line for many years up until 2011, but the removal of the trees may provide a final cut off point as for me this area loses some of its appeal without that line of green atop the embankment. The Spring steam gala at the start of March will provide the opportunity to try and work out what is happening in this area, and if it's something that I will want to replicate in miniature.


Anyway, back to the model, and the basic ground works for the embankment are now complete. This is a significant step forwards, as it means scenic work can now start in ernest (at least where things are not changing!) The method was the same as previously described, with a foam board top fixed to formers being used to help keep weight down. The path and track have had a thin skim of filler which was sanded smooth once dry before the whole lot was sprayed with sleeper grime.

11FEB13-002b_zps5d271685.jpg

The embankment complete. The roof on the Carriage and Boiler shop has warped beyond use and will be replaced.


The vertically challenged Down Inner Home signal is also now nearly complete bar a few minor details and some final tidying up. The cut out in the embankment where this is sited has been reproduced by applying a thin layer of filler to the sides, then having a small ball of tim foil pressed into it to try and replicate the stone seen in the real thing. Hopefully once painted this will look reasonably like the prototype! You can see the various staged of the construction of this signal in the 2mm workbench thread here. Well worth a look for the other superb work on show there!

11FEB13-003b_zpsdb092a8b.jpg

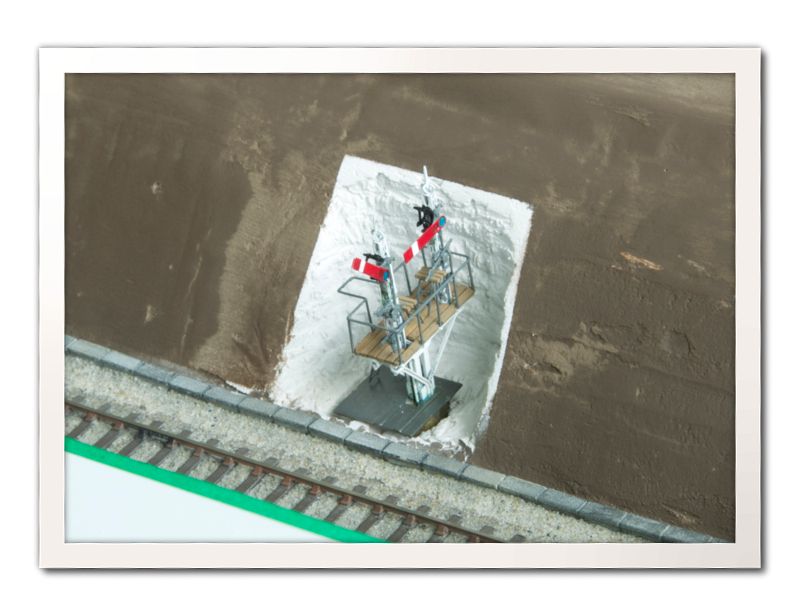
The Down Inner Home in its embankment cut out.

11FEB13-001b_zpsceb83d9f.jpg

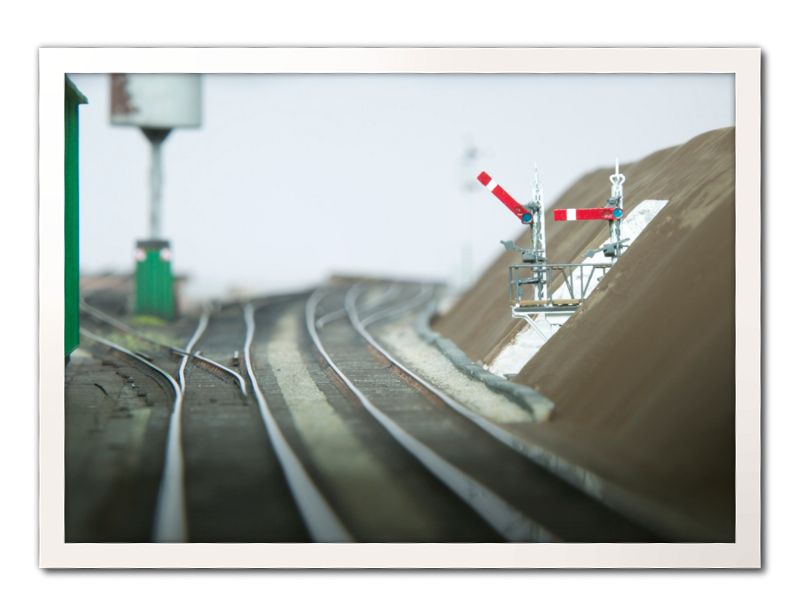
The view from the head shunt line.


The completion of the embankment has really spurred me on now to try any complete some of the scenic area towards the rear of the layout so that things can progress at the front without the risk of damage by leaning over. I also need to crack on and finish the Carriage and Boiler shed so that work can start on the main shed and wheel drop as well as finishing the ash pit, so, lots to do!


Cheers all,


Tom.

  • Like 15

11 Comments


Recommended Comments

That is a superb technique of the filler with the tin foil. Did you wait for it to dry a little first or apply and then go straight in? What brand of filler did you use? 

  • Like 1
Link to comment
  • RMweb Gold

Loving the title Tom!What's the plan for green stuff?Regards, Andy

Hi Andy.


Green stuff will be a mix of static grass & woodland scenics turf of varying grades. There may also be some random stuff thrown in there for good measure if it fits the bill! I have one of those fly swat applicators but I'm seriously considering spending the money and doing it properly as its quite an important part of the layout.


That is a superb technique of the filler with the tin foil. Did you wait for it to dry a little first or apply and then go straight in? What brand of filler did you use? 

Thanks Stephen! The foil was applied after about 5 minutes, just to give the filler chance to harden slightly. Any bits I wasn't happy with were redone with the help of an old knife blade once the plaster was fully set.


Cheers!


Tom.

  • Like 1
Link to comment

Nice (I'm minded to go for a 50-shades of somethingorother blog title in a minute or two)...


...I have been collecting shed clutter for you in a little tin. Remind me to bring it to Didcot. Of course you won't want too much of it, the Mid Hants is such a remarkably tidy place! I do have a scrap plastic cab that might help replicate the second picture, I think it came from a DelPrado Std. 4 so will of course be slightly undersized, but maybe detached, and out of context, from tender and boiler it wouldnt be too apparent?

  • Like 1
Link to comment
  • RMweb Gold

Looking great Tom.


Its amazing how a base coat of colour really starts to transform the scenery and hints of what is to become - can't wait to see the greenery applied.


The signal looks fab in its setting too.


Looking forward...

  • Like 1
Link to comment
  • RMweb Gold

Nice (I'm minded to go for a 50-shades of somethingorother blog title in a minute or two)...


...I have been collecting shed clutter for you in a little tin. Remind me to bring it to Didcot. Of course you won't want too much of it, the Mid Hants is such a remarkably tidy place! I do have a scrap plastic cab that might help replicate the second picture, I think it came from a DelPrado Std. 4 so will of course be slightly undersized, but maybe detached, and out of context, from tender and boiler it wouldnt be too apparent?


Awesome, thanks Will! I was only thinking the other day that I could do with some engines in a semi restored state to wheel out every now and again.


Beautiful earthworks. It almost looks edible :-)


Thanks Mikkel! Unfortunately it doesn't taste as good as it looks!!


Yummy. Handbuilt track always flows better and the last picture shows it beautifully. 


Thanks Richard! There are one or two little kinks which show up in that last photo, but I won't be going back to Peco, ever!!


Looking great Tom.


Its amazing how a base coat of colour really starts to transform the scenery and hints of what is to become - can't wait to see the greenery applied.


The signal looks fab in its setting too.


Looking forward...


Thanks Pete! Getting the full length of the embankment finished has really changed the feel of the layout now, and it's one less big job to worry about!!


Cheers,


Tom.

  • Like 2
Link to comment

If you are collecting 'spares' I have a small pot full of spoked wheels removed from Mathieson wagon axles that you are welcome to. That is if you want them?

  • Like 1
Link to comment
  • RMweb Gold

Hi Richard.


Thanks for the offer! I may well take you up on that at somepoint in the future! There have been various wheelsets seen around the yard over time.


Cheers,


Tom.

Link to comment

Create an account or sign in to comment

You need to be a member in order to leave a comment

Create an account

Sign up for a new account in our community. It's easy!

Register a new account

Sign in

Already have an account? Sign in here.

Sign In Now
×
×
  • Create New...