

Entry posted by londonbus
538 views
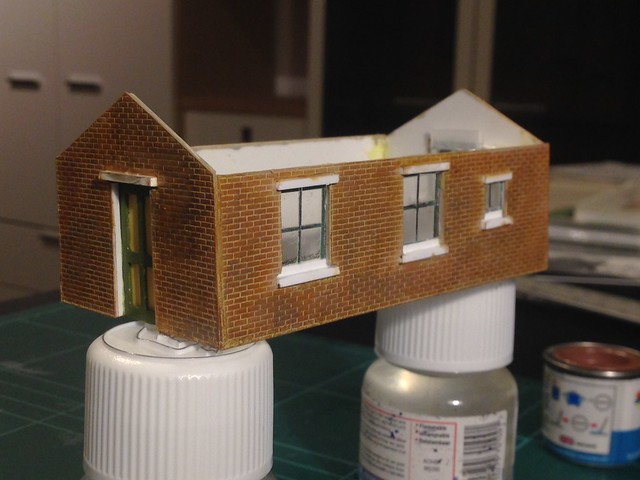
 I heard about this method on the RMWeb just after I read the advice about not making a building until you have sourced the windows so you know the size. Sound advice.
However the results here (on my first scratchbuilding and first dry brushing painting effort), although still in need of refinement, have given me some ideas to simplify and improve the process...
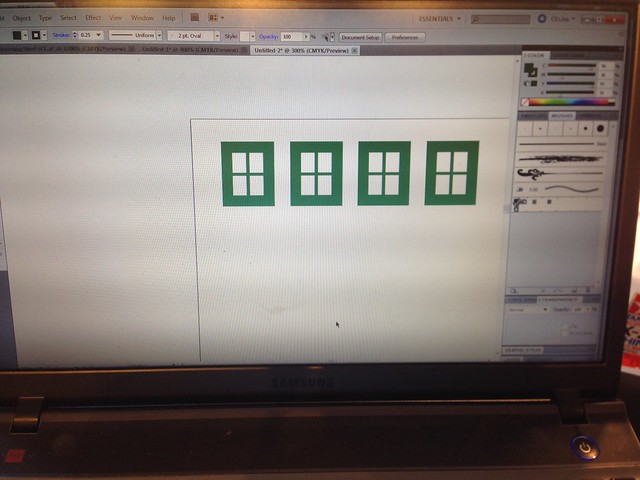
First I measured the window dimensions and created squares in Adobe Illustrator in the approximate colour required, the result was just a green square to the exact size of the opening . I then drew in a white box (the window pane) and copied it four times to give me what you see below.
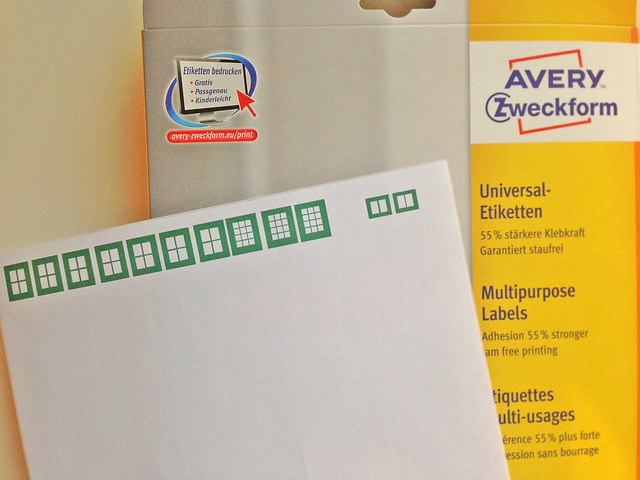
I printed this onto self adhesive (label) A4 paper using a normal inkjet printer on the highest quality setting. Then cut out the window from the A4 sheet and stuck it onto some plastic sheet (part of the packaging from some LED lamps I bought. As the paper is stuck quite well to the plastic you don't have to cut out the individual panes of glass you can cut through the grilles from top to bottom, they will stay in place.
I actual fact what I will do in future is not bother with drawing in the individual panes on the software leaving just a large box of colour with some guidelines outside of the coloured box as a guide for cutting. I found that as the grilles are very fine and after a few attempts at cutting with a steel rule and scalpel I was not able to cut accurately leaving some white on the grilles remaining. Also I will allow a few millimeters either side of the actual window dimensions, a simple error first time around.
You could easily do this without a PC and printer by colouring the paper with a pen or paint.
Of course I need to work on my gluing and I shall experiment more to see just how thin I can get the grilles. But for a first attempt i'm pretty satisfied. The lintels and sills haven't been painted. Roof and tiles....
I've taken much longer on this building as I suppose is necessery, but just wanted to experiment with the different painting techniques i've read about.
I don't have any slate tile sheets, although will be ordering a large supply of various Slaters products on my next trip to the UK. As an interim solution I popped into my local model shop (10 minutes walk) and picked up some Auhagen pantiles. It's thicker than i'm used to and not strictly prototypical, but looks OK. The plastic is a terracotta red and I painted Humbrol Matt 62 slightly thinned to let some of the terracotta come through. I did experiment with cutting out tiles from the self adhesive paper, but far too much work and the result wasn't satisfactory. Plastic sheet gives me the result i'm after to the standard i'm comfortable with.
Here are some of my preferences and methods i'll be bringing forward to future models.

Mortar goes on first as an only slightly thinned base coat (Humbrol Matt 103) Dry brushing goes on afterwards, (Humbrol 29, 62, 160 and I tried a little bit of Metal 53). After this some of the paint had covered over the mortar so I thinned some more 103 right down (when everything else had all dried) and with a very fine brush dabbed the paint over the required areas, the capillary action took the paint into the mortar course and added the contrast I wanted. I didn't bother cleaning off any excess from the bricks as it was so thin it marginally softened the reds.
I highlighted a few bricks with Vallejo 70.818 Luftwaffe Uniform WW2 (I bought this for the blue engineering bricks on the viaducts). The contrast was too much actually so next time i'll try a lighter colour or thin it down a lot more. When it was all dry I brushed on talc to soften it down a bit and then sprayed on some acyrlic varnish.
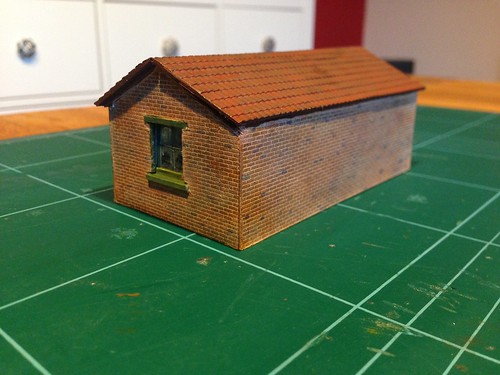
This evening i've added some Evergreen strip as the batons underneath the roof. Next mini-project will be to add some ageing to the pantiles and also work out how to get some moss on there. Drainpipes and then some overall weathering.
I'm very pleased with the results and have got a great deal of enjoyment from trying out and working out how best to do things. Not every step in the layout will be covered in this detail! Nothing here is new technique wise but it is for me.
-
 1
1

4 Comments
Recommended Comments
Create an account or sign in to comment
You need to be a member in order to leave a comment
Create an account
Sign up for a new account in our community. It's easy!
Register a new accountSign in
Already have an account? Sign in here.
Sign In Now