Jump to content
RMweb
 

J17 - Kit finally available


Fen End Pit

579 views

So, after literally years of work, I have finally completed the J17 kit and it has been released by my friends at Brassmasters. The kit was officially first available at ExpoEM and some people have purchased one to build. It was a good feeling to see Jim Smith-Wright build the test etches, make such a nice job of it and apparently enjoy the process. (Yes, the push rods for the sanding gear were put on before Jim had the instructions telling him which way up they were meant to go - sorry Jim!)

J17-loco%20and%20tender%203-4%20LHS.jpg


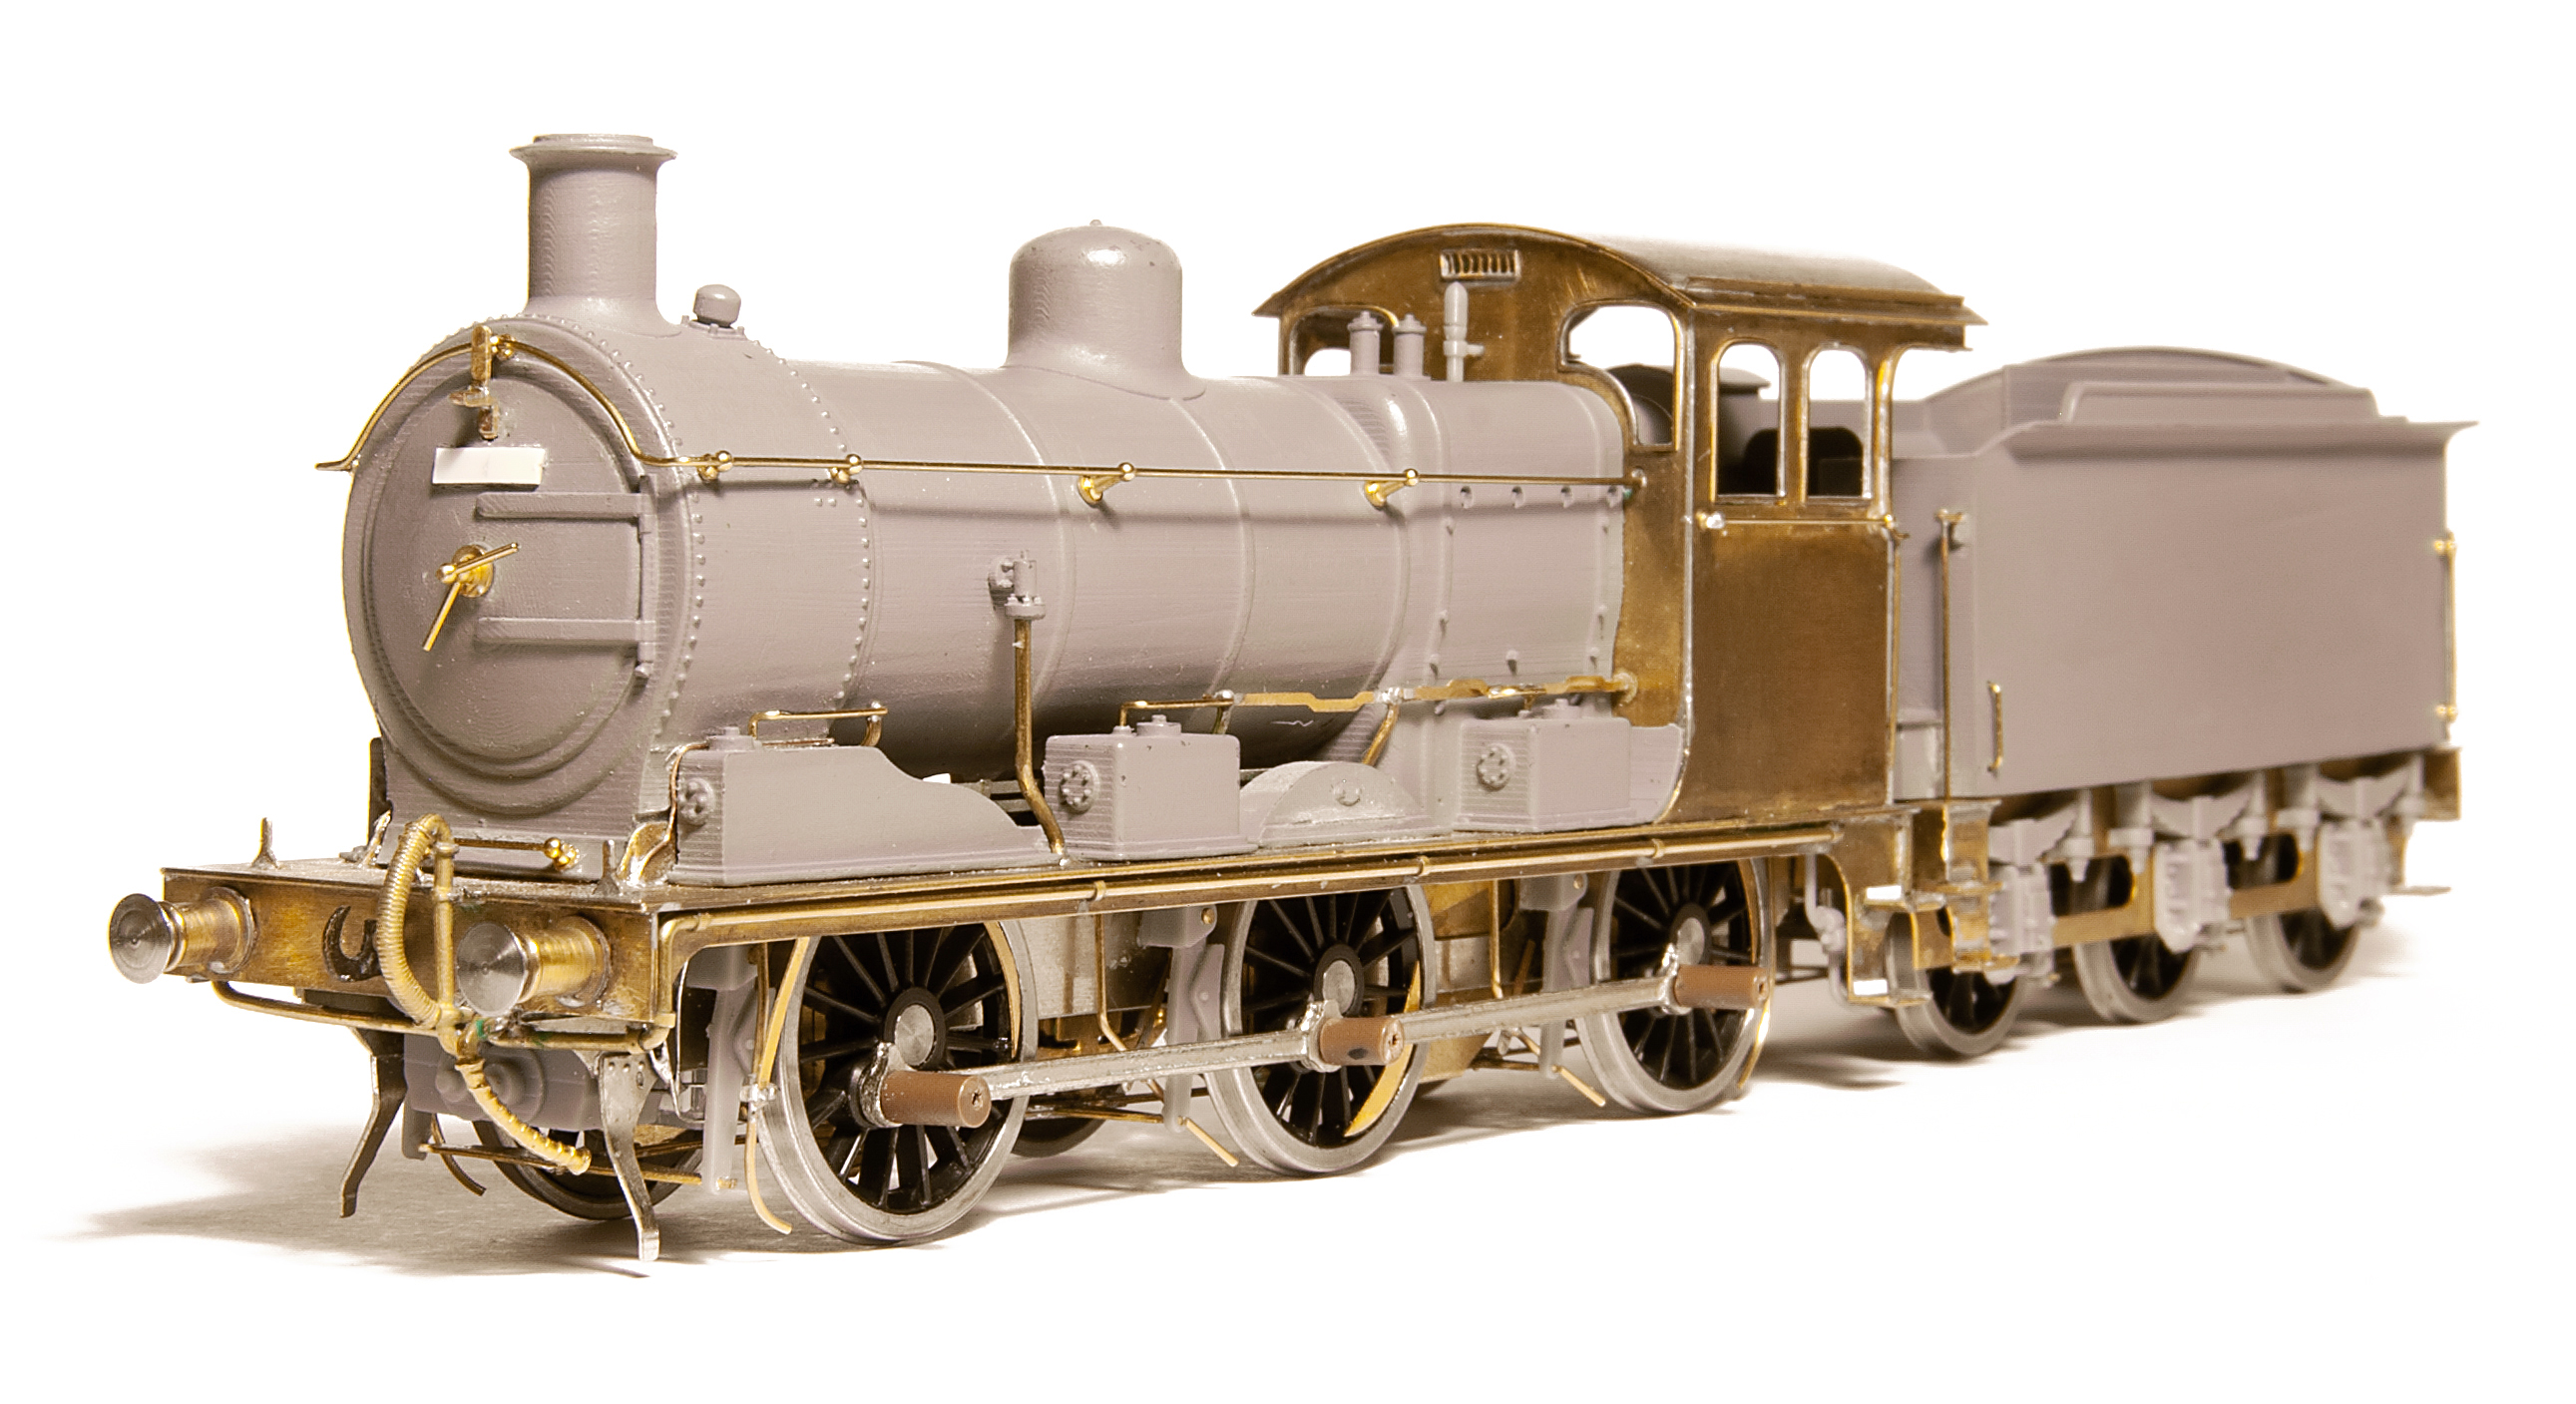
This all started when I started trying to build a PDK Kit for a J17 to P4 gauge. I rapidly had to abandon the instructions and many of the parts because the compromises made were just too much for me. Before long I was replacing large parts of the kit and designing replacements both in etch metal and with 3D prints. This lead to a conversation with Brassmasters about the possibility of making my design available as a kit. Modelling the firebox/boiler/smokebox in 3D case was quite a learning experience as the model was probably an order of magnitude more complex than anything I'd done before. I decided that I wanted to try and use the etch metal to give the appropriate strength and thinness to the foot plate and cab sides. I originally 3D printed the entire tender in one go but decided quite earlier on to instead etch the chassis, a decision which I was very happy with.


If you want to purchase one take a look at the Brassmasters' website https://www.brassmasters.co.uk/ger_j17.htm


ExpoEM was proceeded by a large amount of 3D printing to provide some kits 'for stock' and putting the final touches to the instructions. The show itself was very enjoyable with a good selection of layouts and excellent trade. I can't think of anything else which would make a trip to Bracknell so worthwhile.


In the best tradition of 'no peace for the wicked' I'm now working on an extra etch for the cab front to allow an alternative 3D print to make a round-boilered J16 together with more parts for a Coronation.


David


  • Like 12
  • Craftsmanship/clever 4
  • Round of applause 4

12 Comments


Recommended Comments

I like the look of this, I really have the feeling that it is time to replace my trusty old Bec kit (made when I was still at school, 60 years ago)!

Now for peace of mind for a luddite (please excuse me, (silly questions probably):

1) You model in P4, is it suitable for a 00 build.

2) It is a flexichas, is that necessary or can it be a solid chassis

3) For a number of reasons I won't use coreless motors. I do use HL gearboxes and have been very satisfied using them with the Cambridge Custom Transfers motors, (and similar examples from ebay that I have tried). Any idea if those would fit (they are quite compact, but the pic of the motor tucked down inside the frames makes me wonder)?


Sorry about the questions, you probably don't agree with my ways of doing it, but the hobby is a broad church and I do respect otherways of doing things.

Link to comment
  • RMweb Gold
1 hour ago, stewartingram said:

I like the look of this, I really have the feeling that it is time to replace my trusty old Bec kit (made when I was still at school, 60 years ago)!

Now for peace of mind for a luddite (please excuse me, (silly questions probably):

1) You model in P4, is it suitable for a 00 build.

2) It is a flexichas, is that necessary or can it be a solid chassis

3) For a number of reasons I won't use coreless motors. I do use HL gearboxes and have been very satisfied using them with the Cambridge Custom Transfers motors, (and similar examples from ebay that I have tried). Any idea if those would fit (they are quite compact, but the pic of the motor tucked down inside the frames makes me wonder)?


Sorry about the questions, you probably don't agree with my ways of doing it, but the hobby is a broad church and I do respect otherways of doing things.

Hi Stewart

I've described the kit as 'designed for P4/EM' but we have included frame spacers for OO. The tender chassis will need a little modification to solder the two side frames at a suitable OO width rather than just folding down. You also will need to file a little bit of the 3D print behind the front wheels to clear the narrower wheels.  The chassis uses Brassmasters' hornblocks and the 'Continous springy beam' principle to spring the chassis (not flexichas that uses equalizing beams). If you really want a solid chassis then you could ignore the CSB wires and just solder each bearing into the hornguide at a specific height (you could put a piece of round or square rod between the top of the bearing and the top of the horn guide to set the height). I really would recommend building it sprung as it is no harder. The boiler has a decent hole down the middle and a small mashima iron-core motor would fit. You probably won't be able to fit in all the cosmetic valve gear, but you should be able to narrow that 3D print so you at least get 'something' to fill the hole between the frames.

Hope that helps.

David

  • Interesting/Thought-provoking 1
Link to comment

Thanks for that very helpful description, you've made my mind up. The Bec one will be kept (I may even refit the Hornby chassis for nostalgia sake), but I shall be ordering the new one very shortly. That will be followed by the HL gearbox, and at the right time, the AG wheels. I have an outstanding order with AG at the moment, no quibble but he has problem sourcing the right spec of brass for his etching work.

Once again, thanks.

Stewart

Link to comment

I shall be getting one. Is now the time to start the pressure for a J19? 😊

Thanks

Alex

Link to comment

Start one by all means, hope it is a little while coming as I have to pay for the J17!

Link to comment
  • RMweb Gold
8 hours ago, stewartingram said:

Thanks for that very helpful description, you've made my mind up. The Bec one will be kept (I may even refit the Hornby chassis for nostalgia sake), but I shall be ordering the new one very shortly. That will be followed by the HL gearbox, and at the right time, the AG wheels. I have an outstanding order with AG at the moment, no quibble but he has problem sourcing the right spec of brass for his etching work.

Once again, thanks.

Stewart

On gearbox selection, the High Level LoadHauler+ which I've recommended is 10mm wide and the Brassmasters easichas bearings and etch overlay stick inside the frames by ~1mm each side. You might get away with that as there doesn't need to be any side-play on the rear axle. It is probably worth looking at the HiFlier+ which should fit and is 2mm narrower.

David

  • Like 1
  • Thanks 1
Link to comment
  • RMweb Gold
3 hours ago, wiggoforgold said:

I shall be getting one. Is now the time to start the pressure for a J19? 😊

Thanks

Alex

Hi Alex,

Not a lot of pressure required. The changes needed to the etched parts for the J19 are quite small (an extra 2mm either end on the frames and the widened section of footplate). It is definitely in my plan after I've done a 3D model for the round-topped boiler to allow the pre-grouping folks to make a J16.

David

  • Like 1
  • Round of applause 1
Link to comment

I'm definitely up for a J19. At the moment I have a running resin kit on a Hy chassis, and a 2nd one, with a damaged footplate (which should repair ok) which might get the etched chassis from the old Bec J17. But I would rather have an up to date model.

  • Like 1
Link to comment

J17 ordered, it  will be despatched next week by RM Special Delivery. No rush on my part but be nice when I see it.

Link to comment

Had to take the wife to an appointment at the hospital today. Just my luck that RM wanted a signature on the delivery, which I couldn't give. They are trying again tomorrow!

Link to comment

Create an account or sign in to comment

You need to be a member in order to leave a comment

Create an account

Sign up for a new account in our community. It's easy!

Register a new account

Sign in

Already have an account? Sign in here.

Sign In Now
×
×
  • Create New...