


Entry posted by Will Vale
967 views
I've been sitting on some limpets for a while (ouch!) and thought I should make a start on dirtying them up:
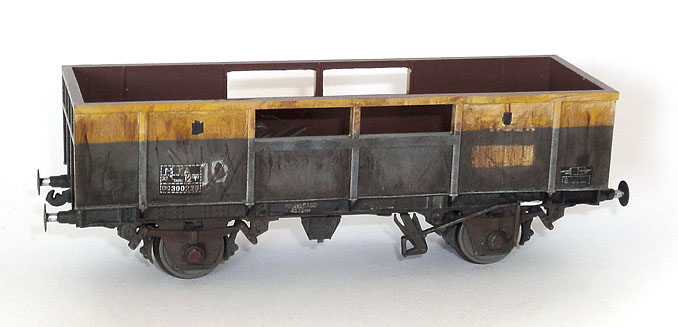
The real things seem to be utterly filthy - I think other spoil wagons hang out with them since it makes even the muckiest PNA look classy by comparison. After a false start searching for ZKA images and not really finding any, I discovered that Limpets ended up coded MKA, which was a lot more fruitful. I started with this picture of 390327 by Richard Jones as a reference.
I've only done the body so far - the underframe in the picture is borrowed from one the MTAs I did last year. The only thing I've used to this point is acrylic paint and ink. It's quite high contrast (partly because the GW inks dry glossy) but I'm assuming that a gentle application of powders and some matt varnish will take this back a bit. I'm pleased with the hand-lettered "TIGER" branding cut off by the yellow stripe. Less pleased perhaps with my attempts at the "M" for MKA, although I've seen a couple with data panels which have been recoded without the benefit of a stencil so it's not wildly incorrect.
The real problem is I don't think I've got the base colour right. I patch-painted the grey below the cutouts to get some variation, but I can't work out what the base colour for the other panels is supposed to be - whether it's ARC mustard or departmental grey I have no idea - there's so much rust that it's hard to tell. It looks OK on the model, and Bachmann's grey is warmer than the neutral colour I used for the patches so it hits the right notes as far as hues.
The other thing I tried with this one was bowing out the panels at the bottom somewhat to represent digger damage. I used a halogen desk lamp and held the wagon up to it (the bulb's shielded behind glass in the one I have) for 10 to 11 seconds before pushing from the inside with my thumb and a dental tool. It's very hard work, and not entirely worthwhile since you can't see any evidence in the picture  I used a cardboard mask so that I was only heating one panel at a time, which stops the ribs bending, but the mouldings are thick and you're basically fighting against physics to get the bend in the right place - it should bow out more at the bottom than higher up, but that's where the most plastic is so it doesn't really happen. I sort of want to do them all to get a nice effect when you look down the rake and see the bulges, but it was so much trouble I might only manage one more!
Next job is to tackle the underframe and apply some post-1998 warning flashes when they arrive. Then powders and varnish to dull it all down a bit. Comments and criticism very welcome since I have another half dozen to do and lots of room to improve. Particularly hints on the base colour would be good - is it paint, rust, or something else?
1 Comment
Recommended Comments
Create an account or sign in to comment
You need to be a member in order to leave a comment
Create an account
Sign up for a new account in our community. It's easy!
Register a new accountSign in
Already have an account? Sign in here.
Sign In Now