Jump to content
 
  • entries
    44
  • comments
    445
  • views
    94,049

Another Deltic Detailing project in OO... the next phase P4 Deltic Pt 1


Jon020

2,979 views

5044358371_735496d1d7.jpg

Some of you may be familiar with my previous postings associated with detailing and weathering Bachmann Class 55 Deltics. Much of the detailing used scratch-built components with a couple of Brian Hanson’s parts thrown in when some of his development extreme-etches were kindly provided. The Shawplan range of extreme etches has recently been expanded to include a wide variety of class 55 items to improve on the Bachmann offering and it is with a number of these items that I recently acquired at Scaleforum, that the next stage of locomotive “improvement†commenced. I’d like to add my thanks to Mike from Shawplan for the good long chat we had as I slowly browsed the items on offer.


Before I start, I will also mention that in a bid to improve on the model’s looks, I’m also considering conversion to P4 with finescale wheels. However, I’ve yet to find out more about this and determine whether this can be accommodated within the bogies… so the decision’s yet to be finalised. Chris Pendleton’s article in MRJ has left me in no doubt that a new fully compensated bogie may be the best way to go, but this is well beyond my current skill set.


So, for now, I will concentrate on the planned conversion. Please note that Brian’s extreme etches include a number of items that I haven’t felt brave enough to tackle at this stage; including replacement roof sections and louvers and grills; there’s also a new resin nose section… maybe one day I’ll give these a go too.


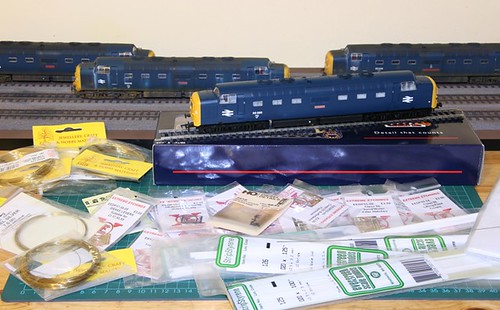
The picture above shows the next-in-line Deltic for conversion, another model of Nimbus in BR Blue, but with the all-important full side cab screens, and in blue. I’ve split the work into two areas, namely the body and the chassis. The following is a brief list of the work to be tackled, but it is as yet in no particular work package order.


Body:


1. Re-profile bonnet tops;

2. Fit new bonnet top access hatch (extreme etch);

3. Fit new headcode panel frames (extreme etch);

4. Fit lifting point covers (extreme etch);

5. Fit brake exhausters access hatch cover at No. 1 end (extreme etch);

6. Fit data plates below cab windows – etch if found, scratch from plasticard if not;

7. Move No. 1 end fire pull surround

8. Fit ETH bracket to nose ends (extreme etch);

9. Scratch build ETH connection units to fit to bracket, and sockets to under-nose area;

10. Fit upper headcode brackets (extreme etch);

11. Fit lower headcode brackets (extreme etch)… retain lower lamp brackets;

12. Cut out and re-profile nose-end foot step

13. Fit nose end (bufferbeam) steps (extreme etch)

14. Cut out/hollow out body to accept sand filler access ports and water filling ports (extreme etch);

15. Buffer housing access plates and step plates (extreme etch);

16. Buffer re-profile and stroke shorten, or replace;

17. Fit handbrake levers and chains once complete (extreme etch);

18. Add cab bulkhead behind driver and secondman seats (plasticard);

19. Remove existing BR Arrows (too large), renumber, rename;

20. Detail horns, or replace.


Chassis:


1. Reduce bogie ride height;

2. Fit bogie steps (extreme etch), including one with speedo cable protector plate (plasticard);

3. Fit speedo pickup and cable through to body (scratch wire and plastic rod);

4. Fit mileage recorder to rear axle of No. 1 end bogie (plasticard);

5. Fit new catch-bars (cow catchers – what are these called?) after removing existing ones off bogie fronts. (Still in development may try plasticard or some form of metal… not yet sure);

6. New bufferbeam (extreme etch);

7. New supplementary pipework and airbrake pipes (brass wire);

8. New screwlink coupling (cosmetic Hornby – and/or working Smiths?);

9. Brake exhauster exhaust pipes to No. 1 end (brass wire);

10. Sanding pipes between chassis and bogies (I still need to fully research this. There are photos of the bogie attachment, which I’d imagine to be identical to the CL37, but the hopper outlets behind the nose are difficult to see in any references. Research continues). May use USB wire or elastic (TBD).

11. Fit EE cast bogie towing brackets;

12. Etch out lower seam to fuel tanks;

13. Fuel tank and water tank pipe work at ends and above tanks (brass wire).

14. Re-wheel.

15. Once completed, attach brake chains and determine possibility of fitting bogie sway-brace cables to body – hooks under lifting point covers (TBD).

Then, repaint, renumber, re-badge… and weather.


I’ll continue to post updates as this project develops. I expect to hit some “now-what?†stages, but hopefully there wont be too many.

14 Comments


Recommended Comments

A straight wheel swap will have you a deltic running to P4 standards. The issue is really the Chassis, if the bogies are the original Bo1 or the newer Co/AWD arrangement. You may find the later AWD design rocks on the center axle which can lead to a 'Ballast Happy' conversion. There are various bodges and work-arounds involving adding some slop to the center axle, or using a smaller diameter wheel on the center axle.


The society view of Springing/ compensation being desirable, but not necessary really does hold true.


What should be noted, is Brian Hanson was the person behind the idea for coil sprung bogies, which Chris Pendleton then produced. Brian has grand plans to produce and etched kit to spring the English Electric Equalized bogies, which is more than certain to be destined for the Hornby class 50 mech.


I'm looking forward to seeing your developments.


Regards


Matt

Link to comment

Matt, thanks for the response and comments. This loco's a B1-1B rather than the latter C-Cs so hopefully that'll work... although I note that Chris did convert his to a C-C with extra gearing on the bogies. Ah, so Brian was behind that and its springing too... fair do's... I'm not going to compete with that :rolleyes: .

Hmmm more bits to ponder on then... I understand some flush glazing may be on the way too... that'll be good for the body sides!

Have just spend a couple of hours removing all glazing and rubbing down one nose section to the correct profile - or as close as I could get to it. I think it looks ok... will post an update at some point. This is also the first time I've removed all glazing... it's horrible how it creeks as it is put under strain - all out without damage... fortunately.

Link to comment

Jon superb news! It sounds a mega project! I look forward to seeing you get started. I've actually got some progress on project Shed to share later so it sounds as if our two Type 5 projects may progress in parallel, at the two ends of the diesel spectrum.

Link to comment

Oh and I've just realised one downside to you doing an improved, improved Deltic, won't it make all your others need a re-fit too? That's something I always find with my Class 37s!

Link to comment

Hi Jon,

Looks like a few extra bits going into this one, I will be following your progress.


Cheers Peter.

Link to comment

James..., ah, there's nothing like a type 5 ;) . It'll be interesting to see how our projects develop. Yes, you're right that the previous models may now seem "simple" by comparison, but I'll leave these in OO for now, and maybe part with them if necessary... we'll see how this one develops. Thanks for the comments.

Peter, again, thanks... hope I can meet the expectations of readers... and mine :unsure: . Fingers crossed and taking this one slowly.

Link to comment
Matt, thanks for the response and comments. This loco's a B1-1B rather than the latter C-Cs so hopefully that'll work... although I note that Chris did convert his to a C-C with extra gearing on the bogies. Ah, so Brian was behind that and its springing too... fair do's... I'm not going to compete with that :rolleyes: .

Hmmm more bits to ponder on then... I understand some flush glazing may be on the way too... that'll be good for the body sides!

Have just spend a couple of hours removing all glazing and rubbing down one nose section to the correct profile - or as close as I could get to it. I think it looks ok... will post an update at some point. This is also the first time I've removed all glazing... it's horrible how it creeks as it is put under strain - all out without damage... fortunately.


I think the Bo1's convert better than the AWD bogies with a straight wheel swap. I agree with Chris Pendleton though, I desire my diesels to be fully sprung, but it certainly isn't a requirement. While I work on detailing / rebuilding the bodies of most of the loco's I have, most if not all run currently with just straight rewheeling.


There are some very exciting developments coming from shawplan on the laser glazing front. I'm sure you noticed the Aircon Mk2's and the Mk3 and Mk4's at scaleforum. Last I spoke to Brian he was so happy with the developments he was going to do the same for the Bachmann Mk1's.


Yes the Bachmann glazing is a pig to remove, but the joy of working in plastic, is any cracks, cuts or gaps resulting from being over zealous with a file, can be easily fixed with some styrene, liquid poly and wet and dry.


Regards


Matt

Link to comment

Matt, yes, Mike showed me the glazed Mk2s and Mk 3 at scaleforum... and what an improvement - Brian was enjoying Barrow hill. We did discuss the possibility of glazing for the 55... which will probably mean me getting the window frames too... Now that I've started reprofiling the bonnet top I realise that perhaps I should've got the windscreen surrounds aswell :rolleyes: . I'm sure I can wait until Warley for those. Have just made up a small sanding tool - 6mm wide plasticard, 3mm thick and about 4cm long with a piece of 600 grade wet and dry attached to one face ... to give me more control when sanding close to the windscreen frame - I think it still needs some more profiling. The amount of glue of the transparencies seems to vary so much with Bachmann... some bits practicall fall out - others are well stuck! I lost only two windscreen wipers - which I had to drill out, but these may still be slavaged - or replaced - others ok.

Having fun getting stuck in.... and enjoying being free from toothache for the first time in a month or so and therefore able to concentrate again. Will try some more once kiddies are in bed tonight.

I can see how springing the models would make them run so well... but my ultimate aim is (at the moment) for a diesel depot only, so long distance carefree running shouldn't be an issue... although maybe I'll use one smiths screw-link instead of two Hornby cosmetics so that it can haul at some point in the future - never say never eh B) .

Thanks again.

Link to comment
  • RMweb Gold

Hi Jon


If you decided to re do your earlier Deltics you would be better selling them. I am totally convinced you would get more than enough for a new one, all the parts required and some cash to spare. You could sell them one at a time although to be honest I am not sure how much better you could make them. They look pretty perfect to me mate!:blink:


Chris

Link to comment
  • RMweb Gold

Jon - that's a big mission to take on but I am sure judging by your results to date, then it will be worth it - please keep us updated with regular posts and piccies - hope to catch up with you at the Uckfield exhibition in a couple of weeks.

Link to comment

Chris, thanks for the comment and opinion, but there's always room for improvment, the point I've not decided on yet is how good is good enough?... As to the parting with some of the first batch, it's something I'm pondering at the moment... and will be investigating further


Pete, yes, this one's likely to take a little longer than the first batch. It's amazing how having done one thing, something else jumps out... last night I finished reprofiling the No. 1 bonnet top then looked carefully at the bufferbeam cutout and after some measuring realised that it was about 1.5mm undersize.... now about right after some judicial filing and sanding. This will open out the bufferbeam area to give more room for those pipes and Brain Hanson's etched bufferbeam. I've also noticed that the windscreen cutouts are even - so maybe I'll have to open these out and go fro Brian's etch.... and the headcode panel is about 1/2mm too low... but this is something I'll leave. The resin repalcement nose would be the ultimate solution, but I've yet to gain the confidence to go that far. The lower headcode brackets were sanded off... ready for the new etches, and the nose footstep has been hollowed out a bit more... not entirely happy with the shape, but a little in-fill with material into the top corners should sort that out.The roof fans/grills/walkways are now out... and may also be replaced.. but the louvre grills and side grills are again going to puch my inexperience too far... one day, maybe.

Once I've something more to show, I'll post a photo or two on here... A couple of weeks time - yes, that's come around quickly. Looking forward to it!

Link to comment

Hi Jon, I'll be following your conversion work with interest, as I have 3 Nimbus's here awaiting conversion and detailing to pre-TOPS blue machines. I've yet to see Brian's etchings, particularly of the sandbox covers, or perhaps make up a tool to impress them all with.

Link to comment

Dear Wibble, I went for these etchings too... I understand you could just lay them on top, but I may etch out a small hollow to accept them. On my last model (Tulyar) I cut these out and back filled them - see the link posted by Pete above... go to Projects then Bachmann Deltic.... this gave me the ideas for my original Nimbus and I followed these processes to some extent - was nice to meet up with the model and the modelmaker Pete Johnson - just by chance, at Ali Pali earlier this year when seeing it on the Wibdenshaw layout...So, yes Pete.. I am familiar.. B)

Oh, and Wibble, be careful removing the headcode Dominoes from the glazing... sometimes they're really well stuck and wont budge without serious creaking and cracking.... I sliced into the melted bits and prized them out... but it's a chance that they may crack. Good luck

Link to comment

Create an account or sign in to comment

You need to be a member in order to leave a comment

Create an account

Sign up for a new account in our community. It's easy!

Register a new account

Sign in

Already have an account? Sign in here.

Sign In Now
×
×
  • Create New...