

My workbench

Entry posted by marsa69
391 views
marsa69's 7mm WB
by marsa69
__________________________________________
??? posted on Sun Sep 21, 2008 10:33 pm
Hi all ![]()
and welcome to my very small 7mm workbench. So small in fact that I sometimes lose it ![]() I'm an infrequent modeller at best, as my work and family commitments are very demanding (me and a million others I hear you cry). Therefore this thread will be a labour of love with postings probably on a monthly basis.
I'm an infrequent modeller at best, as my work and family commitments are very demanding (me and a million others I hear you cry). Therefore this thread will be a labour of love with postings probably on a monthly basis.
Having completed a Parkside Grampus wagon it spurred me on to complete a second one, well nearly complete as I've just got a few small fixtures to add to the second wagon. Then they can both be painted as I've finally got my Halfords grey primer this weekend. Next up will be a GJH Plant ZCV Clam and a ZKA Limpet wagons. Providing I can make sense of the enclosed instructions (If anyone has built one of these kits and can give me a few pointers I would very grateful).
Also in my fleet I have 3 x Lima Cl33 and the obligatory Triang Hymek. One of the 33's has had paint stripper applied and been seperated from it's bogies. The plan being to use a Nigel Stanley 26/27 conversion kit. As Onslaught832 can testify from my posts on his thread the instructions in this kit are none existant.
Like a lot of modellers out there I tend to have little spurts of modelling zeal then a complete withdrawal for a couple of weeks. I'm one of these that needs a good few hours of uninterrupted space to get into the modelling swing, one single distraction and I turn off. Running parallel to my workbench will be my layout thread, but I'll start that tomorrow as I think I've had one too many white wine spritzers tonight (that and the 6 cans of beer ![]() ).
).
I'm the friendly sort who usually has a million questions so don't be surprised all you other 7mm modellers if I come knocking on your thread (onslaught832 and Ian G I'm looking at you right now ![]() )
)
toodle pip,
Mark
Photo showing my second Grampus wagon half built. It actually is virtually complete and just needs buffers and door springs attaching
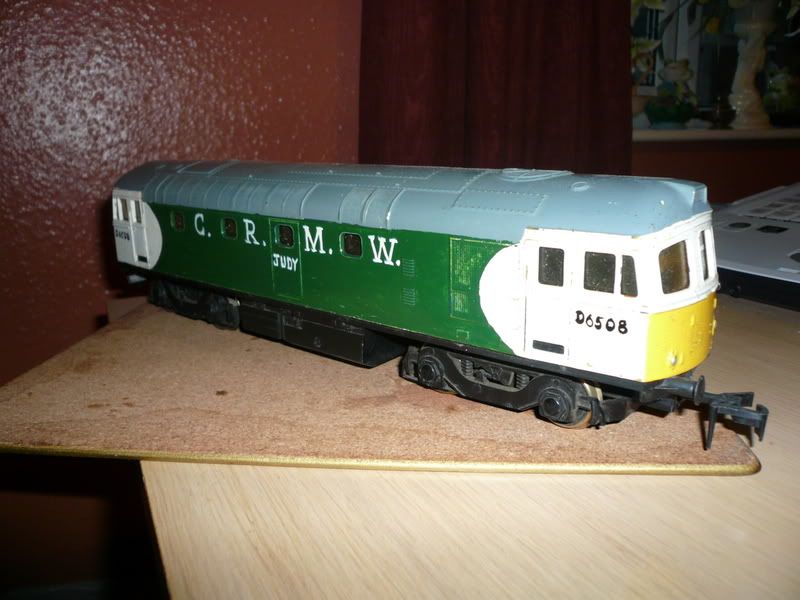
Cl33 as purchased
Same 33 with a mud pack on ![]()
__________________________________________
Comment posted by Ian G on Mon Sep 22, 2008 5:52 pm
Im sure i can help when needed.
ian G
__________________________________________
??? posted on Mon Sep 22, 2008 6:34 pm
Well for starters I could do with help on this one Ian, it's a link to the Help & Advice section on RMWeb ![]()
http://www.rmweb.co....php?f=5&t=29912
P.S. At the mo I'm making some homemade track setting guides for the flexitrack on my layout. Done a 4ft radius (well 4 of them) and am knocking together some 4'6" and 5' ones. Rather do them myself than pay ??????‚??7 a pop just for one ![]()
__________________________________________
Comment posted by Ian G on Tue Sep 23, 2008 7:31 pm
These may help Mark
Ian G
__________________________________________
Comment posted by onslaught832 on Tue Sep 23, 2008 7:37 pm
I thought a certain RTR 0 gauge maufacturer were producing a 33 when I saw that pic ![]()
Cheers Phill ![]()
__________________________________________
??? posted on Tue Sep 23, 2008 8:30 pm
Ian - thanks for the photo's, they're spot on.
Phill - hope your blood pressure didn't get too high ![]()
__________________________________________
Comment posted by Ian G on Tue Sep 23, 2008 9:08 pm
the brake yokes where from the wagon and carriage stand at shows, i pick a handfull up every now and then.
I intend to scratch build a few Limpets using plastic card, fittings will more than likely come from PMRPR wagon irons from Four Track or Bill Bedford.
Ian G
__________________________________________
Comment posted by 87023velocity on Tue Sep 23, 2008 9:31 pm
Hi Mark, I think I have the same workbench as you then. If its not on the kitchen table, then I am using the what space is available on the computor desk. Your thread has reminded me, I have a Parkside grampus up in the loft which has been built and just requires painting. (Its only been built for 7 years mind ![]() ) Keep meaning to get it done, then something else crops up!
) Keep meaning to get it done, then something else crops up!
Simon
__________________________________________
??? posted on Tue Sep 23, 2008 9:44 pm
7 yrs ![]() And I thought I was bad taking 12 months for two wagons
And I thought I was bad taking 12 months for two wagons ![]() I think we'll get along just fine
I think we'll get along just fine ![]()
Mark
__________________________________________
??? posted on Sun Nov 02, 2008 4:56 pm
Hi all ![]()
Just a quick update. Here's a few pics of where I'm upto. You can see my proud fleet of two completed Parkside grampus wagons. The wagon on the right doesn't sit square on the track as one of the sideframes didn't quite sit flush whilst the glue was setting. This gives a bit of a wobbly running appearance but I'll get round this by fixing in place one of the axleboxes with a spot of superglue. All they need is paint and transfers. The painting bit will wait until I've completed my current build which is a GJH ZKA Limpet. Like that I'll spray all three together and save a bit of time As far as the Limpet goes I've cleaned up the body and filed down the axlebox castings so as to give a snug fit onto the body. The wheels and bearings you can see in the photo are not being used now as the bearings are way too long, so I've ordered some new wheels direct from GJH. I've got a week of night shift coming up so I'll have the house to meself during the day so once the new wheels turn up I should get the Limpet cracked and upto the pre-paint stage alongside my Grampus wagons. I might even get my GJH ZCV Clam done this week as well, so that will be an impressive four wagons I'll have, all in BR departmental livery. All they'll need now is a home to live on (Note to self - must crack on with my layout when I get chance ![]() )
)
Current wagon fleet
Here I've attached the axleboxes on a dry run to make sure they're a snug fit
This time next week there will hopefully be four wagons to show off,
toodle pip,
Mark
__________________________________________
??? posted on Wed Nov 12, 2008 11:39 am
A small update to a small workbench ![]()
One Limpet with the running frame and axles complete(ish). Just needs couplings and buffers fitting. Word of warning. Some of the parts can be quite brittle as I found out when I snapped a brake lever and also the pipes off the brake actuator ![]() . What follows is some VERY suitable language but not if you've got an audience nearby
. What follows is some VERY suitable language but not if you've got an audience nearby ![]()
Now with buffers but still no couplings
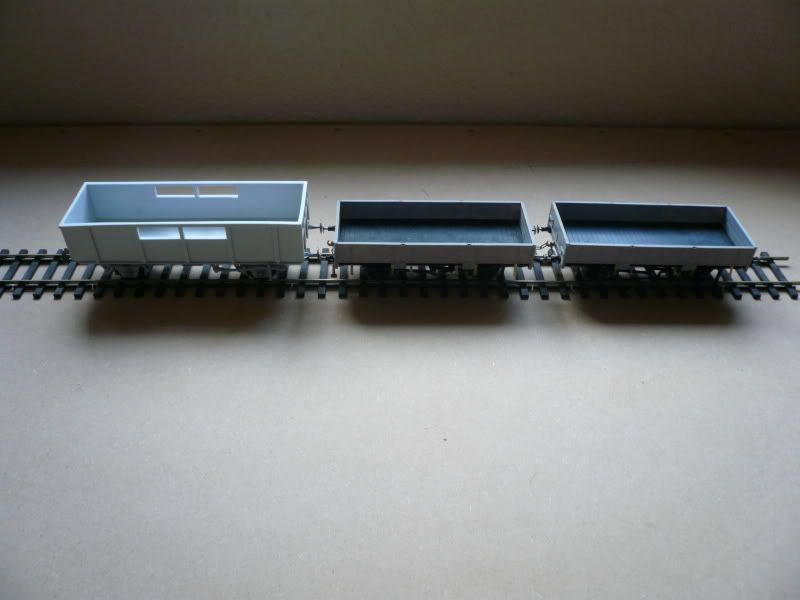
And wagon fleet times 3 ![]()
I was going to crack on with the Clam but had to rob one of the buffer springs to complete the Limpet. The original has gone on safari somewhere in the carpet ![]() I'll probably still make start anyway. I'm starting to turn my thoughts back to my locos. I think at least one of the 33's and the 35 will be losing some of their bodyside mouldings and having some more prep work done to them. One of the 33's I've got is going to become a fictional 33/3 sub-class for my infrastructure operator, a la DRS
I'll probably still make start anyway. I'm starting to turn my thoughts back to my locos. I think at least one of the 33's and the 35 will be losing some of their bodyside mouldings and having some more prep work done to them. One of the 33's I've got is going to become a fictional 33/3 sub-class for my infrastructure operator, a la DRS ![]() . The idea being that the company bought it second hand and have modified it for spot hire work. We'll see how it goes,
. The idea being that the company bought it second hand and have modified it for spot hire work. We'll see how it goes,
regards,
Mark ![]()
__________________________________________
Comment posted by Ian G on Wed Nov 12, 2008 4:41 pm
They are coming on nicely
Ian G
__________________________________________
??? posted on Wed Nov 19, 2008 2:18 am
Thanks for that Ian. Kit building has taken a bit of a back seat at the mo with me concentrating on the layout side of things. Check out my thread in the layouts section (unashamed plug I know ![]() )
)
http://www.rmweb.co....php?f=9&t=33310
regards,
Mark
__________________________________________
??? posted on Fri Nov 21, 2008 11:12 pm
Right, where were we?
Ah! Kit building. Seeing as I've got my track plan sorted out and it's going to be Mon/Tues before my track templates arrive I might as well crack on with some more stock. I'm going to do a bit more on my Clam but I'm going to make a start on my PRMRP 'Shark' ballast plough. The kit was one of the first things I bought last year, but the basic instructions put me off making a start. Until now ![]() . Peter at PRMRP has released new instructions which are available online to download. After having a read I feel up to having a bash at constructing my first brass kit. How it turns out is a different matter
. Peter at PRMRP has released new instructions which are available online to download. After having a read I feel up to having a bash at constructing my first brass kit. How it turns out is a different matter ![]()
As always, pics to follow, once I've made a start,
regards,
Mark ![]()
P.S. Anyone happen to know what size/type wheels I'd need for above mentioned kit? ![]() Please let it be 3'1"
Please let it be 3'1" ![]()
__________________________________________
Comment posted by F-UnitMad on Fri Nov 21, 2008 11:35 pm
![]() I must've ducked back behind the Caboose in time...
I must've ducked back behind the Caboose in time... ![]()
![]()
Hi Gang! ![]()
Nice neat work there Mark- one thing I like about Parkside kits is that they include decals (sorry, transfers) unlike Slater's for example.
Well you've seen my thread on my first Brass kit ![]() and at least you're doing things the right way by trying a wagon first; go for it I say!!!
and at least you're doing things the right way by trying a wagon first; go for it I say!!! ![]()
__________________________________________
??? posted on Sat Nov 22, 2008 1:47 pm
Cheers Jordan for the comments,
Too late! You stuck your head out from behind the caboose ![]() I'm on to you now
I'm on to you now ![]()
The man at Marcway is just too efficient. I only ordered my track templates yesterday afternoon and they arrived this morning ![]() Ah well, I'll spend the afternoon adjusting my track plan then have a play with my kit tonight methinks
Ah well, I'll spend the afternoon adjusting my track plan then have a play with my kit tonight methinks ![]()
ttfn,
Mark ![]()
__________________________________________
??? posted on Thu Jul 02, 2009 7:12 pm
Hi all,
been a long time since my last post but to say I've been busy is an understatement ![]() I won't bore you with details about house moves, family illness and chaos at work. What I will say is that I've got the modelling bug back and more importantly the time (as soon as I get back from Scotland in 2 weeks) to do it
I won't bore you with details about house moves, family illness and chaos at work. What I will say is that I've got the modelling bug back and more importantly the time (as soon as I get back from Scotland in 2 weeks) to do it ![]()
My last post I said that I was wanting to start on my 'Shark' break, but guess what? I never. Now that I've re-assembled two of my three layout boards I decided to crack on with some track building. Now bear in mind that the only track I've built previously was 20 odd yrs ago, as a teen, and involved nowt so grand as only soldering straight rails to copperclad sleepers. I decided to ease myself in with the track building malarcky. I went straight for a C+L 7mm 3-way turnout ![]() The 3-way was central to my track plan and it had to be compatible with PECO track so that ruled out Marcway unfortunately. Added to that C+L no longer did custom build jobs 'cos they were too busy with there core business of selling bits and bobs to us lot
The 3-way was central to my track plan and it had to be compatible with PECO track so that ruled out Marcway unfortunately. Added to that C+L no longer did custom build jobs 'cos they were too busy with there core business of selling bits and bobs to us lot ![]() . So I duly ordered one around 5/6 mths ago from the very nice chap there Brian. The kit promptly turned up, I opened the box, checked the bits, looked at the drawings and alarmingly panicked and re-packed the whole lot. My get up and go got up and went
. So I duly ordered one around 5/6 mths ago from the very nice chap there Brian. The kit promptly turned up, I opened the box, checked the bits, looked at the drawings and alarmingly panicked and re-packed the whole lot. My get up and go got up and went ![]()
However this week it came back ![]() . So much so that I actually got all the bits out, photocopied the drawings and proceeded to start Lincolnshires very latest piece of infrastructure assembly. I thoroughly read the instructions, which are really the only downside to one of these kits as they only describe the building of a simple turnout. Not the 3-way monster I've got. But this did not deter me. Armed with my small store of knowledge and with grateful thanks to RMweb members, dikitriki & Will, whose own turnout exploits have been a godsend over in the infrastructure section, I went off into the unknown.
. So much so that I actually got all the bits out, photocopied the drawings and proceeded to start Lincolnshires very latest piece of infrastructure assembly. I thoroughly read the instructions, which are really the only downside to one of these kits as they only describe the building of a simple turnout. Not the 3-way monster I've got. But this did not deter me. Armed with my small store of knowledge and with grateful thanks to RMweb members, dikitriki & Will, whose own turnout exploits have been a godsend over in the infrastructure section, I went off into the unknown.
I'm not going to make this a blow by blow account of turnout construction as there are more skilled people out there to show you. But I will post my progress to hopefully encourage others to have a crack and for others to advise me me if they see me making an error or if they know a better way to do something. All help gratefully received. I started by laying the timbers and fixing the critical stock rail in place. This was chosen to be the rail with the tightest curve. I then installed the first common crossing vee as per the second photo. Now I'm a bit undecided where to go next. Either fix in place the common crossing between the centre road and the other turn off or the common crossing between the turn off I'm working on and the centre road? I'm leaning towards the second option but would really like some advice if anyone is out there who's got some ![]()
Best regards,
Mark ![]()
P.S. Seems like the site doesn't want me to upload any photos from Photobucket. Does anyone know if there is a problem somewhere?
__________________________________________
Comment posted by Mod5 on Thu Jul 02, 2009 7:18 pm
You are far better using the forum software. Tutorial here viewtopic.php?f=28&t=21614
Regards Mod5
__________________________________________
Comment posted by Andy Y on Thu Jul 02, 2009 7:24 pm
Some image hosting services throttle the traffic to high usage sites like this. We pay for adequate drive space and bandwidth to deliver a more reliable service than you sometimes get from free sites.
Apart from when I break the image path. ![]()
__________________________________________
??? posted on Thu Jul 02, 2009 7:29 pm
Hi Andy & Mod 5,
thanks for the replies. I wasn't having a pop or anything, I was just curious as I tried umpteen times to post with the images added. I'll try again later and if still no joy try irfanview,
regards,
Mark
__________________________________________
??? posted on Thu Jul 02, 2009 7:56 pm
Righto, time to try again,
here's where I started
(62.45 KiB)
then the timbers were placed
(72.14 KiB)
then the critical stock rail fitted
(58.22 KiB)
then the first of three common crossing vee's
(77.17 KiB)
So thats where I'm upto at the moment ![]() So like I said in my last post I'm a little undecided which way to go next? But I've got two weeks away to decide,
So like I said in my last post I'm a little undecided which way to go next? But I've got two weeks away to decide,
toodle pip ![]()
Mark
P.S. Irfanview works! Thanks for the tip Mod 5 ![]()
__________________________________________
Comment posted by lancer1027 on Fri Jul 03, 2009 7:39 pm
Hi Mark ![]() . Looks great. I will be watching your thread with interest, especially watching the building of points. I may have to build some for my Penzance project but never done it before so not looking forward to it. Hopefully you may be able to inspire me
. Looks great. I will be watching your thread with interest, especially watching the building of points. I may have to build some for my Penzance project but never done it before so not looking forward to it. Hopefully you may be able to inspire me ![]() . Keep up the great work and keep sending in those progress pics
. Keep up the great work and keep sending in those progress pics ![]()
Rob
__________________________________________
??? posted on Sun Jul 19, 2009 10:59 pm
Hi all ![]()
now I'm back from my sunnily wet two weeks in northern Scotland I thought I'd update you as to tonights progress on my trackwork ![]()
Sorry for the poor quality but its late. Here I've fitted the second crossing vee on the R/H road. I carefully measured each rail end and used my track gauges to ensure that it was parallel to the stock rail. Each rail also had some slight pressure applied from the trusty thumb/forefinger combo to put the slightest of bends in the rails.
(69.47 KiB)
The original rail on the newly installed vee was too short to meet up with the first vee I had installed ![]() So I cut it back and used an offcut of rail to fill in the gap between the two fitted crossing vees.
So I cut it back and used an offcut of rail to fill in the gap between the two fitted crossing vees.
(81.7 KiB)
The gap on the left hand side of the photo will hopefully be filled with some solder. I had thought to use a cosmetic fishplate but I didn't think this would look prototypical, unless anyone knows differently? Here is the rail freshly installed.
(77.04 KiB)
The instructions and other tips I've found online say that the check rails can be fitted last. I decided to fit this one as the space for the chairs was getting tight and you can only cut them back so much before they break. This does make things a lot easier when fitting the next rail for the centre road. To my eyes the gap between check rail and stock rail looks oversize but as I have already said I couldn't cut back the chairs any thinner. Here is where someone comes along and tells me of a better way to do it ![]()
(85.72 KiB)
And finally for this evening you can see that I've finished by laying the nearest rail of the centre road to the crtical stock rail. The third crossing vee in the top left of the photo is loosely fitted for gauging purposes. You can also see that this rail has some chairs missing. These will be added last as they are made by cutting down and shaping the supplied chairs and will be purely cosmetic.
(112.56 KiB)
So far I'm happy with the way it's going ![]() I've taken my time and constantly checked and double checked with my track gauges and steel rule. Also my favourite tool which is the Mk1 eyeball has been extensively used. I keep looking along the lines of the rails and from any angle I can think of. If it doesn't LOOK right then it probably isn't. As it stands at the mo my test wheels and gauging wagon run through the installed track fine but the acid test will come when I run my first loco through it.
I've taken my time and constantly checked and double checked with my track gauges and steel rule. Also my favourite tool which is the Mk1 eyeball has been extensively used. I keep looking along the lines of the rails and from any angle I can think of. If it doesn't LOOK right then it probably isn't. As it stands at the mo my test wheels and gauging wagon run through the installed track fine but the acid test will come when I run my first loco through it.
As always comments, observations and advice gratefully received,
best regards,
Mark
P.S. How do you edit the title of the thread again? ![]()
__________________________________________
??? posted on Mon Jul 20, 2009 10:42 pm
Hello peeps ![]()
More progress today with the final crossing vee measured, trimmed and installed. Also the final section of rail for the centre road exit has been fitted as well. Please don't cringe TOO much when you see some of the gaps between rails ![]() ........ I'm slowly getting better and my test wheels/wagon run along the track fine (for now
........ I'm slowly getting better and my test wheels/wagon run along the track fine (for now ![]() )
)
Crossing vee freshly measured and trimmed and waiting for fitting
(68.45 KiB)
And here it is in its new home ![]()
(76.9 KiB)
And the centre road exit all complete (including some horrendous gaps ![]() ) Although the gaps on the track plan are a lot bigger than mine!
) Although the gaps on the track plan are a lot bigger than mine!
(74.67 KiB)
Back to work tomorrow on nights so I doubt that I'll get much more done until the weekend.
Best regards and could somebody please remind me how to edit the title of this thread ![]()
![]()
Mark
__________________________________________
Comment posted by mines a pint on Mon Jul 20, 2009 11:05 pm
Enjoyed watching the point coming together!
-the main thing is that its in gauge- any cosmetic slip ups ( you mentioned a new rail between the 2-vees) can be tidied up later- tho' to be honest on a three way point I dont see how you could have avoided that extra bit of rail ![]()
__________________________________________
0 Comments
Recommended Comments
There are no comments to display.
Create an account or sign in to comment
You need to be a member in order to leave a comment
Create an account
Sign up for a new account in our community. It's easy!
Register a new accountSign in
Already have an account? Sign in here.
Sign In Now