


Entry posted by Jon020
3,322 views
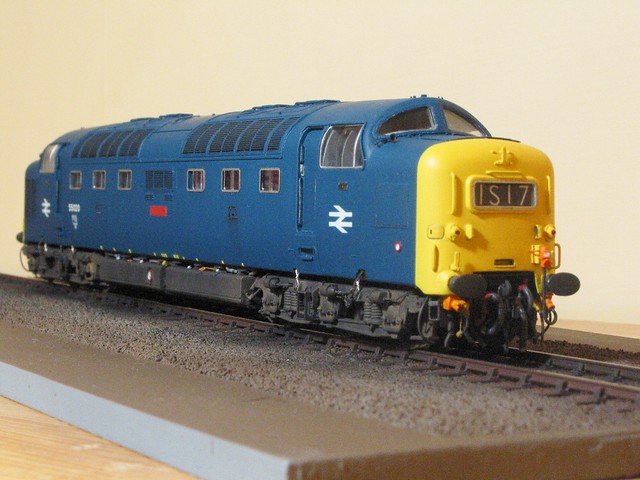
My Nimbus, detailed by Nimbus20, on Flickr
Well, it’s been a while since I last updated this blog and my last entry had my Deltic at a BR “blue” stage with a half-decent finish which I decided to stick with. Since then, I’ve made some headway... well, almost finished in fact, and sampled some proper Twin Napier haulage at the deltic 50 event at the East Lancs Railway... which was a weekend to remember and gave me some more inspiration to crack on and get this project finished... I’ve some photos on my flickr pages if anyone’s interested.
Having a short run in “Gordon’s” cab was great; although haulage with 14,850 HP up front (from the front coach) was hard to beat... oh the noise, oh the clag!
http://www.flickr.com/photos/nimbus20/sets/72157627933023922/
Markings were applied with a mixture of success, all waterslide from Fox (numbers), Modelmaster (arrows) and Precision (TOPS and shed panel). After this, I drew up a list of jobs to do... which was: Fit headcode surrounds; fit brake chains; fit speedo harness to body; fit glazing – cab side, windscreens and laserglaze to bodyside; glue buffers in; fit bodyside window surrounds (I had some fun with these – not); create some bogie-body shackles, and; weather.

It was still quite a list... but hopefully the final list.
Some might note that missing from the list is “fit DCC sound chip”. I’d been thinking about this, but I’ve hit a snag – as I’ve fitted bulkheads, it might not fit in the space left inside the body above the chassis... I’m going to seek more advice on this as I don’t want to lose the red fans that are apparent through the grills... my aim was for visual appearance, and I won’t want to lose that at the cost of sound... or even digital control. I discussed this with Brian Hanson this evening and I think the conclusion is that it should fit ok... so maybe an order will be placed.
Highlights:
Brake chains – previously, I created a new link for the chain from 0.2mm wire, but this time, I just opened up one link (carefully cut through one side) and hooked this to the rest of the links and through the hole in the brake lever.
Bodyside windows – these are new laserglaze items from Brian Hanson... the part cover the bodyside windows and windscreens. I didn’t fit the windscreen items as I hadn’t fitted the etch screen as originally intended (next time maybe).. for these I retained the original glazing (despite them not being so good) but the bodyside windows are worth the effort. 12 Pieces are provided, two per “window” ... an inner and outer pane... make sure you get them the right way around, the outer pane is always towards outer ends of the loco. Each was fitted, inner first, then outer... and then set in place with some Kleer.

It’s important to ensure that the outer pane is left flush, of just recessed, of the outer body surface, after which the window surrounds can be fitted... again with Kleer. OK... this was my first attempt at this and getting these surrounds to stick in place – and stay stuck was a bit of a problem; they’re still prone to annoyingly falling off if lightly knocked, although the final coat of Kleer over the whole glazing and into the etch edged has helped (fingers crossed).

Brian Hanson recommended polishing these before fitting to better represent the real chrome finish, and I tried but clearly didn’t find a good polishing agent, so left them as they were. However, the change in appearance with these windows is noticeable – they’re much larger and suite the bodyside look much better that the originals. I took the opportunity to leave one window slightly open to ventilate the interior. I’m very grateful to Brian for providing these samples... they’re well worth the effort. Next time, I’ll do the windscreen surrounds properly and fit the flush glazing there too. The cab side windows are originals; as I’m doing Nimbus, I did not need to add the handle or extra plates (Nimbus didn’t get these)... so a little extra paint was all that was necessary.
The headcode surrounds fit on with a little Kleer... as usual, and the headcodes themselves are the basic Domino units but with Precision Labels alpha-numeral codes stuck over the top... codes selected to represent the up and down Scotsman... which could be a reasonable working for Nimbus (I must check the Chronicles of Napier website and the 1974 timetables).
I did briefly swap these out and put in Precision domino panels ... as these were better than the original Bachmann ones... and more representative of the locos as I remember them... but I reverted back to 4-digit codes as I think these look nicer... although it will make life trickier for all my other locos... c’est la vie!
The buffers were glued in at the rear... I wasn’t bothered about them “springing” and was more interested in getting them straight and at a reasonable stroke length, which I think I got. The shanks were painted with a dark metal mix, and front ends coated with silver/black mix, swirled as before... left to go off, coated with a thin black and then scraped with a blunt edge to cut through to the “grease” below.
The Shawplan windscreen wipers were folded to shape after the blades marked with a black marker pen... and fitted (after weathering) with some glue and glaze.
One final item worth mentioning is that of the bogie-body shackles. When I made the body and bogie mods, I added small hooks to take these shackles in case I wanted to give them a try, considering that it might be a bit much to attempt in 4mm. However, I fitted body to chassis to check the distance and made up a small jig using 0.6mm wire, which I held in a small bench vice. 0.2mm wire was then wound around the jig’s prongs and then wrapped around the centre ... creating a wrapped figure of 8 dual loop.

Cut and cleaned up, these were hooked onto the body pieces. They take a little fiddling once the body/bogie is assembled, but once weathered I think that the extra “tie” between the body and bogies will be worth the effort – and they don’t actually seem to restrict bogie movement... which is good – although they do need a bit of time to fit properly.. and disassembling is now not a task to take lightly.


Finally, there’s the weathering ... but I’ll write a separate (and final?) entry for that.
Finally... at Scaleforum I picked up a turnout kit (Exactoscale/P4 track company) to try my hand at a P4 turnout. The kit is well packaged and I went for a “long” turnout for two very good reasons: 1) I wanted the turnout to be long enough to allow a co-co to negotiate it easily – David Furmage, who made Longcarse West ( a small layout I found very inspirational) used A6 turnouts and David said that this made it ok for bo-bos, but would be tight for anything else, and 2) they’d run out of shorter turnout kits. So, I got a C10 turnout. The radius of this is 3820mm, giving a full scale radius of 14 ½ chains; as the Deltic minimum curve was 6 chains, I think I’ll be ok with mine, even with the bogie shackles... but time will tell.
Photo showing the turnout kit, point motor adapters and the photo plank already put together using C&L track that I already had

Ok... a final shot... or two

Right – thanks for bearing with me – blog written as promised... hope it’s of use/interest!

Any comments welcomed... as always
I'll post a seperate weathering blog entry and then (in 2011 challege style) I'll add a summary entry to identify all the bits done in this project.. and quite a project it's been... and I'll add my acknowledgements to all of you then... you know who you are, you've all been a big help along the way.
BRs... Jon
-
 9
9

12 Comments
Recommended Comments
Create an account or sign in to comment
You need to be a member in order to leave a comment
Create an account
Sign up for a new account in our community. It's easy!
Register a new accountSign in
Already have an account? Sign in here.
Sign In Now