Jump to content
 

Experiments with C+L track


Mikkel

7,829 views

001b.jpg

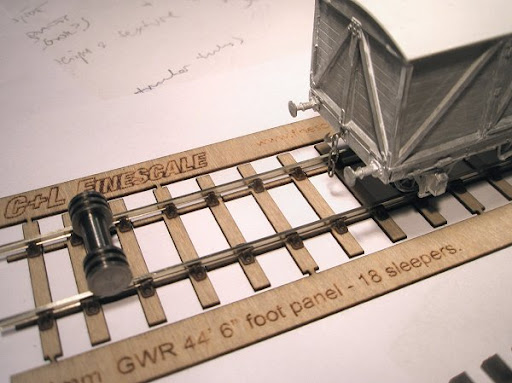
Time to get some track in place for The depot. For a pragmatic modeller like myself, it's easy to dismiss finescale track as something for the purists only. A little too easy, perhaps! With this in mind, I'm currently taking a closer look at some of the C+L track components. The idea is to see whether this sort of thing works for me, and how much it adds to the overall impression of the GWR in the 1900s. It's still OO, and so far only straight track, as that is all I need for the scenic part of The depot.


002b.jpg

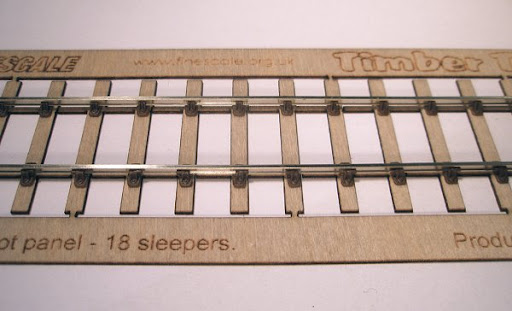
After some helpful advice from Brian Lewis at C+L, I decided to experiment with the Timber Tracks system of laser-cut track panels, onto which you build the rail, chairs etc. The photos above show the GWR 44' 6" straight panels. These have the 8' 6" sleepers used after WW1, whereas the 1900s saw use of 9' sleepers. But since the gauge is OO, the visual result will hopefully look about right. Nothing is actually fixed in place on the Timbertracks panel, so some chairs etc are a little out of alignment.


003.jpg

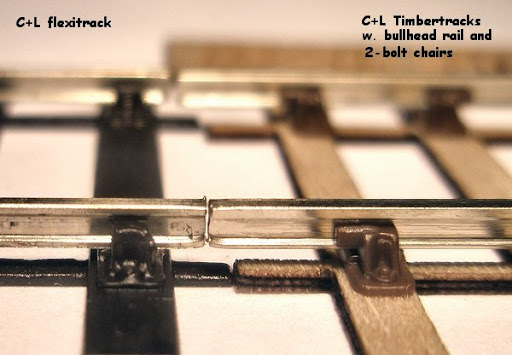
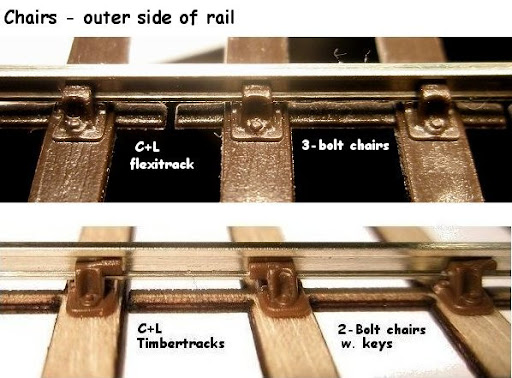
Apart from the Timbertracks system I am also trying out the C+L ready-built flexitrack. This is strictly speaking not suitable for the GWR as it has a different sleeper spacing and uses 3-bolt chairs rather than the keyed 2-bolt chairs used by the GWR. On the plus side, it is quicker to lay and the big question is of course just how much of this detail is really noticeable once it's all weathered and in place.


The following photos show various detail differences between Peco, C+L flexitrack and C+L hand-build track in close-up.


004.jpg


005d.jpg


index.php?app=core&module=attach&section=attach&attach_rel_module=blogentry&attach_id=95019


index.php?app=core&module=attach&section=attach&attach_rel_module=blogentry&attach_id=94992


In fairness it should be said that the Peco track seen here is the Code 100, which I have been stubbornly using until now (bought a large quantity very cheaply some years ago). I currently have some Peco Code 75 track on order for use in the fiddle yard. Once it arrives I'll post some birds eye-view photos of the various track types for overall comparison. So far, though, I'm rather liking the Timbertracks system and the unexpected pleasures of track building...

  • Like 4

20 Comments


Recommended Comments

Hi Mikkel<BR>Interesting - I've not had a chance (yet) to see the track panels. I've used C&L products on the dairy layout - one of the problems with the plastic sleepers is their 'blackness' - using ply means they can be stained. However I'm seriously considering returning to 'rivet & ply' construction in future - particuarly for pointwork - as i think it is more flexible' - i.e. it can be more easily adjusted for minor errors in gauge. That said, the track really looks good when laid & ballasted -it's amazing how realistic the keyed chairs look. Could be I'll go for panels on plain track and 'rivet & ply' for pointwork (C&L chairs can be split for cosmetic coverage).<BR><BR>Looking forward to seeing your modules re-laid<IMG class=bbc_emoticon alt=:D src="http://www.rmweb.co.uk/community/public/style_emoticons/default/biggrin.gif"> !<BR><BR>Regs<BR><BR>Ian

Link to comment
  • RMweb Gold

Hi Ian.


Based on your comment I've just been trawling through RMweb to look closer at the rivet and ply approach (eg http://www.rmweb.co.uk/community/index.php/topic/23668-first-steps-in-ply-and-rivet-track-building/).


Handbuilt track is all very new to me, and I hadn't really realized just how many options there are (for the record, most seem to be listed here : http://www.rmweb.co.uk/community/index.php/topic/23746-the-definitive-survey-on-handbuilt-track/page__mode__show and here: http://www.rmweb.co.uk/community/index.php/topic/31751-copperclad-ply-and-rivet-glued-up-plastic/page__p__333914__hl__%22ply+and+rivet%22__fromsearch__1?do=findComment&comment=333914). Your point about rivet and ply being a more flexible method is certainly appealing for a newcomer such as myself! Something to keep in mind for when I get into pointwork.


From what little I know so far, I agree completely about the visual benefits of the ply and chairs. These are the two things that really stand out for me as making a difference in appearance, compared to ready-made track. There is something very delicious about working with real wood, and I look forward to experimenting with staining. On the chairs it is not really the different bolt patterns that make a visual impact, but rather the keys which seem very obvious even from a certain distance.

Link to comment
  • RMweb Gold

I used ply and rivet in EM but changed to C+L in 0 gauge. It works well for me. I have used C+L flexi for plain track but would now used the individual components in station areas at least. For someone like yourself where taking photos seems to be a big part of the pleasure for you, I think you will find the C+L chairs with the wooden sleepers may be more satisfying.

Don

Link to comment

Mikkel,<div><br></div><div>I know what you mean about the pleasures of track building, of threading on the chairs and getting them in correct direction at the end of each track panel. On my layout <b>Hallatrow</b>, although  it's P4, the track is made from 'Exactoscale' full depth sleepers and 2 bolt chairs. It surprised us what a  difference there was between the full depth and half depth sleepers.</div><div><br></div><div>And don't let anyone tell you the ply sleepers and glued chairs won't last - I've got a short demo length of track built over 20 - 30 years ago and the chairs stuck and still to gauge.</div><div><br></div><div>Dave</div>

Link to comment
  • RMweb Gold

Don: Good to hear this works for you. You are quite right: These layouts are designed to be viewed close up and at eye-level height - both in photographic terms but also for "live" viewing. So it suddenly dawned upon me that the good old "3-foot rule" doesn't really apply here, and that detailed track might therefore make a relatively big difference in appearance (quite apart from the fact that it is also pleasant work).


Dave: Thanks for gently pointing me towards a couple of issues here. Re full- and half-depth sleepers: I see what you mean. As far as I can see the Timbertracks sleepers are 0.8 deep, whereas the Exactoscale sleepers (and I assume the C+L "thick" sleepers) are 1.6. That is quite a difference. However as this will be a yard area I am planning to have the ground almost up to the sleeper tops, so perhaps it will not be an issue?


As for getting chairs in correct direction at the end of each track panel - uh-oh, good point! For the trial panels I have threaded the chairs on in alternating directions as I believe would be typical for two-way travel, but I can see that the arrangement at the ends should allow room for fishplates, and hence have the outermost key facing "inwards" (I think?).


PS: Argh! Just noticed I have the keys on the inside of the far rail in the photos above. Must have turned the rail the wrong way around after threading on the chairs :rolleyes:. Good thing nothing is fixed down. That'll teach me to pay attention! (EDIT: Now corrected in most of the photos).

Link to comment

Good to see you getting into real track, Mikkel. I think it will make a real difference when viewed close up. I use ordinary Peco stuff for my HO fantasy layout, but have been using C+L and Exactoscale components for EM and P4 for three years and don't think I could ever go back to flexi track for these.


It's also reassuring to read Dave's comment that it will last for 20-30 years. I've read so many comments from rivet users that glued plastic chairs on wood sleepers won't last, but it always sounds like prejudice rather than experience. Similarly, comments about needing the strength of rivets; what do these people subject their track to? I can see the need for soldering at board joints and do solder turnout vees to a small plate glued to the timbers but, otherwise find the plastic on wood quite strong enough. Again, you read comments about soldering allowing adjustments to be made. I'm afraid my reaction is to say build it right first time and you don't need adjustments. If you really do, it's easy enough to lift a plastic chair by slipping a scalpel underneath.


Don't worry about the chairs on the wrong side, inside keyed track was still to be found on quieter parts of the GWR up to and after WW1. The only problem you might find with it is wheel flanges hitting the tops of the keyed side.


Nick

Link to comment
  • RMweb Gold

Hi Nick, I can see the case for both sides. I like the idea of being able to tweak things - but if the glued chairs can easily be lifted that of course changes matters. Looks like one of those things that can only be decided by trying it out.


For the time being I'll try out glued chairs on the straight Timbertracks panels, and see how that goes. I'm not anywhere near getting into pointwork yet. The advantage of trying out handbuilt track on "The depot" is that I get a very manageable learning curve: The on-scene track-plan is just three lengths of straight track, of which two are virtually hidden behind the decks! I'll probably use Peco Code 75 for the fiddle yard, and save the pointwork fun for "The sidings" (next layout).


I was planning on going with outside keyed track, so have corrected the panel and replaced some of the photos above accordingly. I am assuming outside keys would be appropriate for a medium-sized station (which Farthing is supposed to be) around 1907. But I had better re-check the books. Incidentally I just tested some stock on the inside keys before correcting them. Gibson-wheeled rolling stock seemed to manage without problems.


Now to find some sort of replacement for/variety of Butanone, as UK suppliers are not allowed to ship it overseas and I don't think we have it by that name here.

Link to comment

Yes, I also found Gibson wheels to be fine over inside keyed track. It's my impression that insidekeyed trackwork is a leftover from the 19th century, though I have no dates for its use in new work. By 1907 it would have been quite rare other than in quiter locations and sidings. There was some at Camerton around that time. Places like that might even have had the occasional bit of baulk track such as on the colliery siding at Radford, about a mile west of Camerton.


AFAIK, butanone is the same thing as MEK, but some sources have implied that some of the solvents sold as MEK for modelling purposes are somehow weaker than the stuff supplied by C+L.


Nick

Link to comment

Mikkel, given that I received a large package in the post from C&L last night, your posting is very timely. So far I've yet to venture into the timber tracks products; I'm still dabbling, but it's only a matter of time. I used C&L OO bullhead flexi track for my photo plank - no room for a small layout yet, and I still like the look of this, once painted, weathered and ballasted (not in that order mind). Yesterday, the same arrived but in S4... so I'll have something to sit my current deltic project on too. I can see the advantage of the timber track, and will probably venture that way eventually, but I will probably give a turnout kit a go first... although which I'm not yet sure :blink: .

As for supply - I've nothing but praise for C&L... ordered Sunday night (late)... confirmed disptach mid monday.... arrived Tuesday - I think that rivals that liverpudlian outfit for service! As for glue supply - I'd go with the above comments - maybe using the right glue determined wether the plastic/wood bond lasts :huh: ... sounds like it will with Butanone.

A colleague of mine - a member of the permanent way institute, I think mentioned a while ago about key placement: If the keys are on the inside, they can all be checked by walking up the 4'... if on the outside, you need to be in the 6' to check each side seperately (although there were issues with this.. can't remember what though)... and yes, there's the creep issue. I'll show him this post when he's next back in t'office.


BRs.... Jon

Link to comment
  • RMweb Gold

Hi Jon, that's quite a coincidence. Just had another look at "Napier Lane", and the C+L flexitrack certainly looks good. If I didn't know what chairs they were it would be hard to say from that distance! Will be interesting to see it in S4.


I did read somewhere recently about the advantages and disadvantages of inside/outside keyed track, but now I can't remember where (was it on here maybe?).


On the issue of rail creep, Stephen Williams suggests that ad hoc maintenance could lead to an "almost random" pattern of keys on branches etc, while main routes followed the principles much more closely.

Link to comment

Re Scanmans's comment about the colour of plastic sleepers, I have found that the way to overcome this is to spray the laid track with grey acrylic primer, the to paint with raw umber artist acrylics.This gives a good approximation of weathered , creosoted sleepers. You can then paint the rail and chairs in a slightly different colour for maximum effect. Personally, I find that ply sleepers will absorb solvent better than MDF....mainly because this is already full of resin.

gerrynick

Link to comment

Very informative as usual Mikkel. I have been considering a mini OO layout using C&L track. Love the look of the wooden sleepers.

Link to comment
  • RMweb Gold

Interested to hear that you use acrylics for painting the sleepers, gerrynick. I do something similar with the Peco track, but was not sure if it would work on the C+L plastic.


Tom, yep the wooden sleepers really look good in the raw. Will try Carr's wood stain on them tomorrow. That minilayout sounds interesting, hope you're not abandoning Kingsbridge though!


Pugsley/Nick, thanks for the tips re MEK - and for finding some on ebay! It does seem to be subject to postal restrictions though, but now I know what to look for.

Link to comment

No, got to get K'bridge done for June! You could try your local plumbing supplies store for the MEK- They must have plastic drainpipes in europe surely?

Link to comment
  • RMweb Gold

Thanks, I will check in a local store that should have it. Yes, we do have plastic drain pipes :).


Link to comment

Mikkel,


You are right, in yards and on branches the keys were not always in the direction of travel as on main lines. However there are photographic examples where the track was 'inside keyed'.


Just to add to your deliberations if you are modeling totally 1908 some yards and even branches were still laid with 'baulk road'. In the book on the Mortenhampstead branch it states that the branch was relaid with standard track between 1910-12 and there is a picture of Newton Abbot yard in the 1920's with baulk road sidings.

Link to comment
  • RMweb Gold

Thanks for this, Dave.


The idea of modelling some baulk road track is very appealing. I had originally considered doing it at some distant point in the future on a possible engine shed layout, inspired by some of the wonderfully evocative photos of the old engine sheds at Truro, Taunton etc just before they were replaced around 1900. In those photos, the baulk road plays an important part.


But the future (like the past) is another country, and maybe it would be interesting to do it sooner, eg already on "The sidings" (next planned layout). The baulks could come from the BGS.


It would be nice to have both types of track on one layout, eg a couple of sidings in standard track with another siding alongside still with baulks. Not sure if that would be prototypical though. I suppose in principle it would all have been replaced in one go, but on the other hand I seem to remember seeing photos of both types of track alongside each other, although they elude me at the moment.

Link to comment

G,day Mikkel


Came across your blog whilst using google. I knew about RM Web but not about the nice blog feature. I'm very impressed with your modelling skills (If you are a beginner then I'm in a LOT of trouble!! ). I'm doubly impressed because of your chosen rail company and time period. My thing is for around the turn of the century, can't go past Mid Chrome Green and Indian Red. Have been a member of Scalefour for a few years and plan modelling to that gauge. I thought my chosen period was passe (at least it would appear by the RTR prototypes chosen by Hornby).


Regarding plastic chairs versus rivets, It really is down to preference, though P4 modellers I have seen use rivets at either end of the assembled track / turnout for use as extra strength and electrical contact for droppers and under turnout frogs. I figure those guys know best so when the time comes that is the method I will employ. By the way, this book on constructing track by Iain Rice may help Building 4mm Finescale Track


cheers


Mark

Link to comment
  • RMweb Gold

Hi Mark, and welcome to blog-land here on RMweb :).


Mid Chrome Green and Indian Red in P4 sounds very good indeed ! One of the things I like about RMweb is that people are interested in each other's work across chosen time periods and scales, so I'm sure many people on here would be very interested to hear more about your modelling.


For my own part it's still OO, but experimenting with some finer scale track at the moment. Thanks for the reminder about Ian Rice's book. Once I get to building points it might be a good idea to get hold of it. So far it's all just straight track though: Things don't exactly progress fast in my modelling world. In fact, "The depot" was intended for the 2010 RMweb modelling challenge. Now there's a 2011 challenge, but I'm fairly sure it won't be finished in time for that deadline either :rolleyes: .

Link to comment

Create an account or sign in to comment

You need to be a member in order to leave a comment

Create an account

Sign up for a new account in our community. It's easy!

Register a new account

Sign in

Already have an account? Sign in here.

Sign In Now

×
×
  • Create New...