Jump to content
 

Low-tech coach restoration (3)


Mikkel

3,299 views

A couple of the coaches I’m restoring had buckled or sagging rooves, so I’ve been rolling and detailing some new ones from Plastikard. It’s one of those pleasing tasks where you get the satisfaction of making something from scratch without things getting too stressful - although with brass rooves it can of course be a bit more tricky. Here's a brief illustration of what I've been doing.


P1066552.jpg


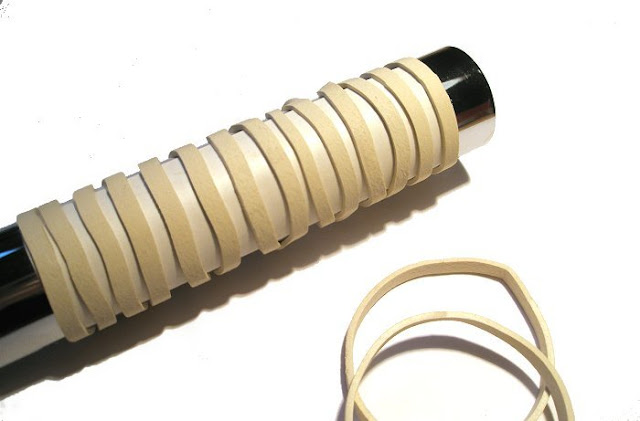
“So tell me dear, should I be worried?“ In retrospect, I can see why my wife was slightly concerned! But what we have here is of course just the Plastikard roof cut to shape and rolled tight around a tube. This particular tube is 3.1 cm across, and is in fact a bit of plumbing from a sink.


P1066555b.jpg


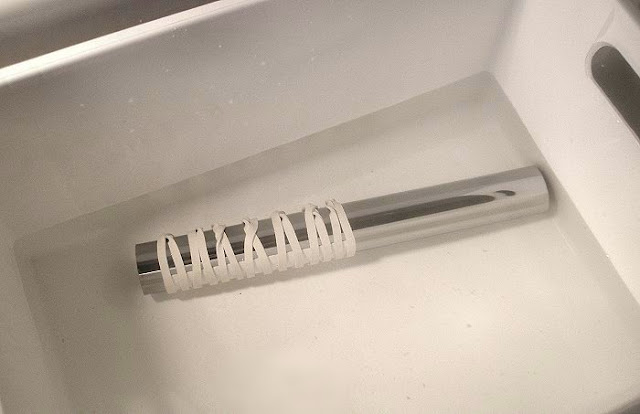
The tube immersed in a tub of boiling hot water, left for 10 minutes and then cooled down quickly under the tap.


P1066562d.jpg


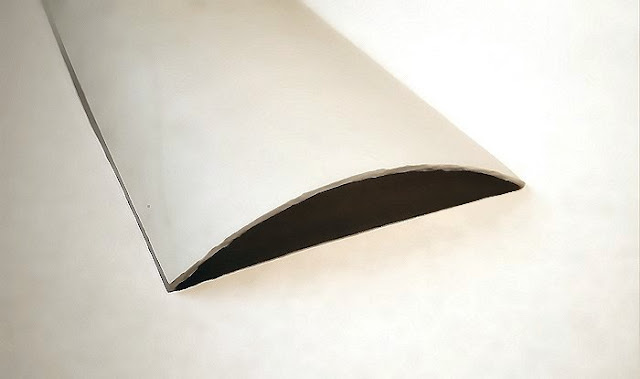
The resulting curve works out right for the single-arc roof profile on these coaches. The Plastikard is 0.5 mm which I think is the thinnest I can get away with while still keeping it relatively sturdy.


P1076511b.jpg


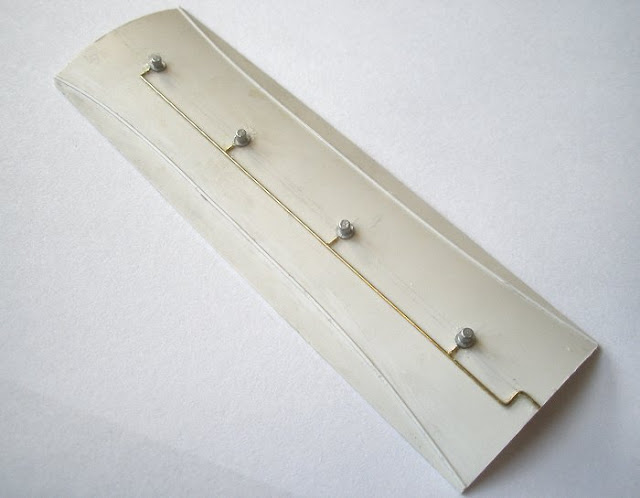
Gas piping from Alan Gibson straight brass wire (should it have been a smidgen thinner?) and lamp tops from IKB. The rainstrips are plastic strips from Evergreen.


P1016538.jpg


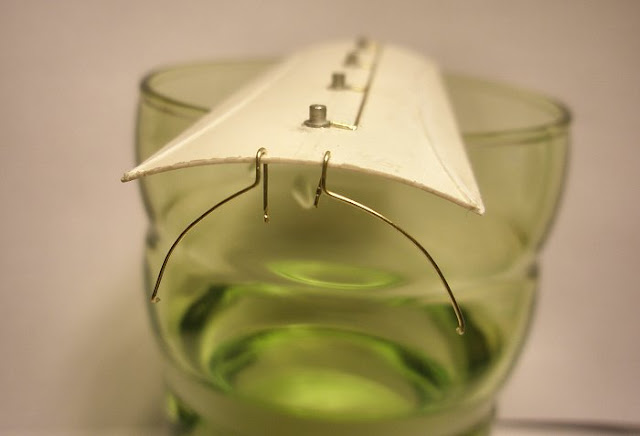
I’ve been ambivalent about grab rails on coach ends (life is hard for the railway modeller!). Partly because it can sometimes look too obtrusive on models: If you look at a real coach, it is not really something that captures the eye. And partly because I like to have my rooves removeable, and the rails gets in the way of that. So some of my coaches only have the grab rails indicated. But now I’ve decided I want it there in full, so the rooves will just have to be fixed in place.


P1016551b.jpg


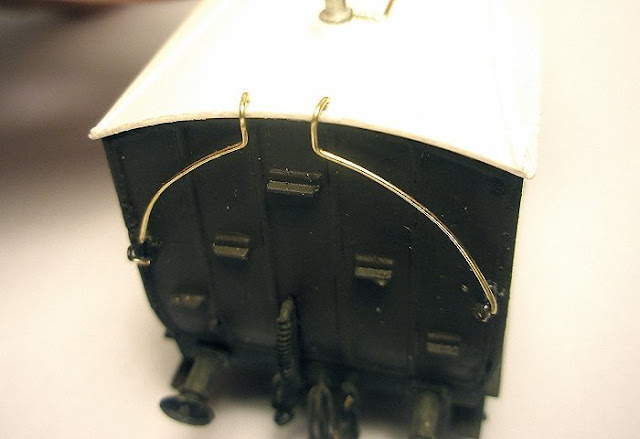
A trial fit and things look OK. But it seems I’ve gone and squashed the lamp brackets – hope I can get them straightened out!


Pb256510.jpg


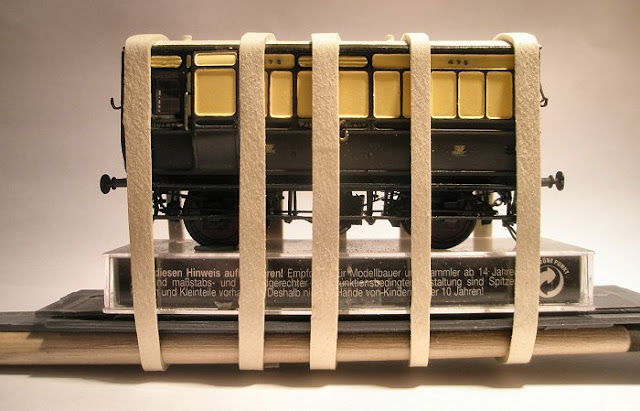
Glueing down the roof on a V2 that I finished some time ago. I kept the original roof on this one. The coach is on a flat surface with bits and pieces stuck in below to get just the right tension on the elastic bands - enough to keep it tight but not so much as to bend/damage the roof.


I realize that plastic rooves are not as good as brass ones, and they require good internal support. But so far I haven't had problems with other rooves I've done in the past, so it seems to work.


Go to part 4

  • Like 29

23 Comments


Recommended Comments

  • RMweb Gold

Superb Mikkel.Any tips on bending the end grab rails as it always takes me a few go's to get mine decent.

Link to comment
  • RMweb Gold

Ahem... yes grab rails not gas pipes as originally written!


I'm sure your technique is as good as mine. I get the curve by bending the wire around a tube, and then do the angles by bending over a thin steel ruler/strip. It does  take a few goes for me too.

Link to comment

Nice modeling again.

Although not possibly for me, I look always at the way people try to solve the problems and the techniques they use.

Your blog is in this way always of interest for me.

Link to comment
  • RMweb Gold

Lovely work as ever.


One dodge for the end handrails is to not glue them into the top hole, just popping them in place (with a sufficiently long end bit) so that they can be tweaked out again if the roof needs to be removed. I've done that on a few of my coaches.


I agree that they are never all that visible in photos but I find them a pleasing detail in model form, especially as it was one of those touches that you never got on RTR coaches.

  • Like 2
Link to comment
  • RMweb Gold

Job, I very much agree with your approach. It's nice to follow each others work, but take mine with a grain of salt as the approaches are sometimes a bit half-baked :-)


One dodge for the end handrails is to not glue them into the top hole, just popping them in place


BT that is a great idea - I'll try that. Thanks :-)

Link to comment

They look very good Mikkel. I like your idea for the hand rail.


I hope you put the pipe back before pouring the water down the sink?

Link to comment

It's nice to follow each others work, but take mine with a grain of salt as the approaches are sometimes a bit half-baked :-)


If it works and you're happy with the result I cannot see how your approach can be half-baked.

Interestingly you say that these coaches are brass and have been glued together - many would say that's a half-baked approach but as they're still in one piece after many years of use it just shows that soldering isn't always the only way to join two pieces of metal. (If anyone wants me I'll be in the corner wearing a tin hat!)


Paul.

  • Like 1
Link to comment
  • RMweb Gold

I hope you put the pipe back before pouring the water down the sink?


Ah... that explains why I got wet feet :-) 

Link to comment
  • RMweb Gold

Paul I agree. And yes these coach bodies are still square and solid, and a good proof of what you are saying. I call my own approaches half-baked because there are no doubt more "correct" ways to do some of these things - such as using brass rooves, soldering everything in place etc.

Link to comment
  • RMweb Premium

Hi Mikkel,


Wonderful restoration work going on there - or should I say preservation work?


I should image that a lot of these old collections get binned, which is such a shame considering the amount of work that was invested in the building of them.  It just goes to show how long this hobby of ours has been going.


Great stuff.

Link to comment
  • RMweb Gold

Evening Mikkel,


Really lovely watching these carriages being restored.


Will certainly look good in one of your Farthing Tales.


Cheers,


Mark

Link to comment

Lovely work there Mikkel and I will certainly be using your roofing technique when I eventually get round to building some early coaches for Hemyock. As for the handrails I always like to add them as it just finishes  them off, I've still got a lot of them to add yet as well - yet more things to do!


Jim

Link to comment
  • RMweb Gold

Aha, giving me ideas for details on the 'Luxury Toad' family in N gauge!!


Eh? I assume we are talking about brake vans? (I googled "luxury toad" and got a recipe for toad in the hole!). Looking forward to seeing that, Will :-)


I should image that a lot of these old collections get binned, which is such a shame considering the amount of work that was invested in the building of them.  It just goes to show how long this hobby of ours has been going.


Couldn't agree more PR. Some of it deserves getting binned of course, but some of it deserves a second chance. Plus, it's environmentally friendly. Oh, and quick ;-)


Will certainly look good in one of your Farthing Tales.


Hi Mark. I hope so. I finished the first batch some time ago so they have been running on "The bay" for a while. I had to sell them recently to finance something else, but the new batch should look good on a special train of some kind.


when I eventually get round to building some early coaches for Hemyock. 


Jim with the work you are doing in plastics of various kind I can only imagine that both rooves and coaches will look fantastic. The neatness of your carriage shed is amazing.

  • Like 1
Link to comment

Thanks for sharing your work with us. Reading these blogs has been inspiring. Things appear achievable to mere mortals without needing six hands and eyesight worthy of GCHQ.. I'm really enjoying this vignette approach to creating a believable model reality.

Link to comment
  • RMweb Gold

Thanks dogs :-)  I  think you've hit the nail on the head there. Farthing is exactly an attempt to make a model railway universe with fairly simple methods, and to keep moving ahead without me getting stunned by performance anxiety! I'm as much in awe of those with great technical skills as anyone else, and we should obviously strive to do better all the time, but for some of us it works best to take one small step at a time - certainly for me :-)

Link to comment

Not my scale, not my period and not my chosen geographic area...


But I love it!! :D


When you spend such time and care to restore someone else's work, it's no surprise that your own stuff is so wonderfully evocative.

  • Like 1
Link to comment
  • RMweb Gold

Thanks Tony! I'm off to see how things are going with Brafferton :-)

Link to comment

I wouldn't agree that brass is the panacea for roofs; I happily use aluminium, plastic and wood as well as brass (and sometimes a mixture!) - each has its own merits, and each has its drawbacks.  Although, as you say, 0.5mm is, strictly speaking, a little thick for what (IIRC) were 7/8" boards, it's really not noticeable on the model. 


However, if it's something your eye gets drawn to, then a couple of strokes along a big file to thin the edges before you form the curve in water would be an effective ruse.

Link to comment
  • RMweb Gold

Interesting. Especially the wooden roof, and the mixture. Sounds like a fun project. Are there any examples in your RMweb gallery?


Thanks for the tip about thinning the edges. I use it for other tasks but had not thought of doing it with rooves. 


(it feels very GWR to say "rooves" rather than "roofs", not unlike "shewing"!).

Link to comment

Yes, this coach came with a profiled hard wood roof which is designed to slot between the ends - prototypically incorrect  as it should overhang. I annealed and shaped then soldered 1.5mm brass L-angle onto the ends and made good with filler.

index.php?app=core&module=attach&section


If you're going to say 'rooves' (which was probably considered archaic when Brunel was building his bridges) then you're going to have to say 'break vans' for consistency!  ;)

  • Like 1
Link to comment
  • RMweb Gold

Thanks very much, that image saved my day. What a sight, an extraordinary model as always. The roof looks good, I wouldn't have known it was actually wood. I must admit this kind of weathering is something I'd like to do more of.


I didn't know 'rooves' was that much out of date in the UK! Shews my ignorance  :D

Link to comment

Your excellent blog fascinates me, Mikkel.


Both entertaining and educational.


'Tis indeed a gem.


Best wishes,


Jonte

Link to comment

Create an account or sign in to comment

You need to be a member in order to leave a comment

Create an account

Sign up for a new account in our community. It's easy!

Register a new account

Sign in

Already have an account? Sign in here.

Sign In Now

×
×
  • Create New...