Jump to content
 

LSWR 10 ton sliding door van


Mikkel

5,692 views

blog-0101263001402781277.jpg
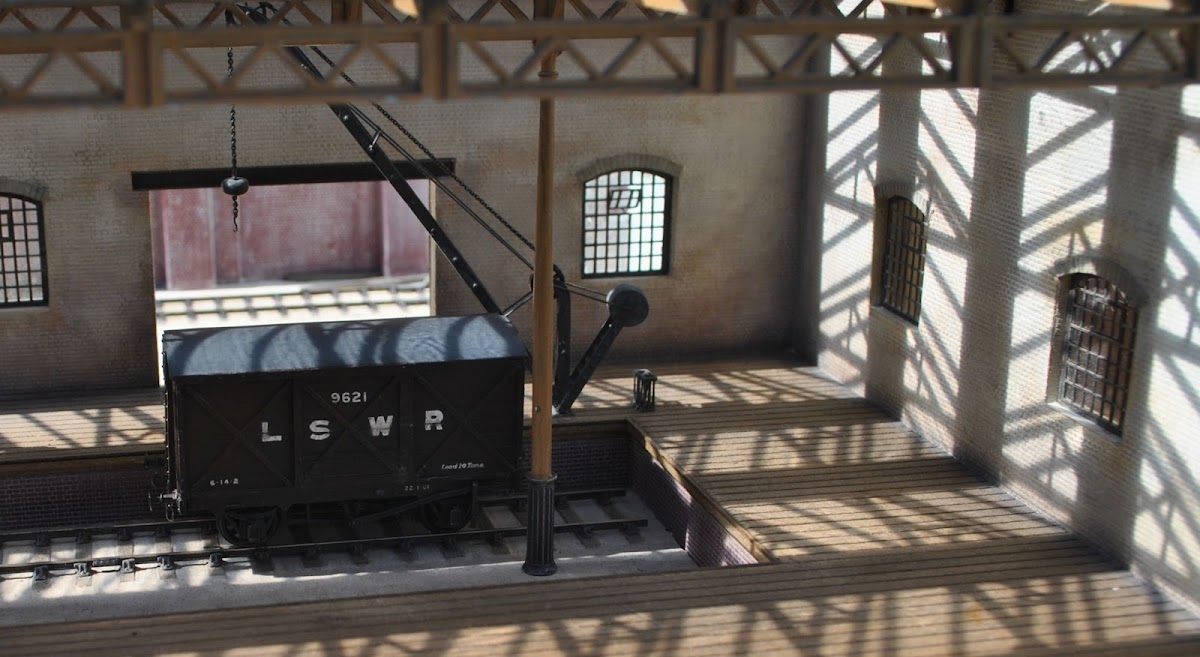
The LSWR was the biggest of the GWR's neighbours at Farthing, so I thought I'd better make myself some stock from that company for my 1900s goods depot. Last night I finished my LSWR sliding door van, to SR diagram 1410, built from the David Geen whitemetal kit.


IMG_3065.jpg


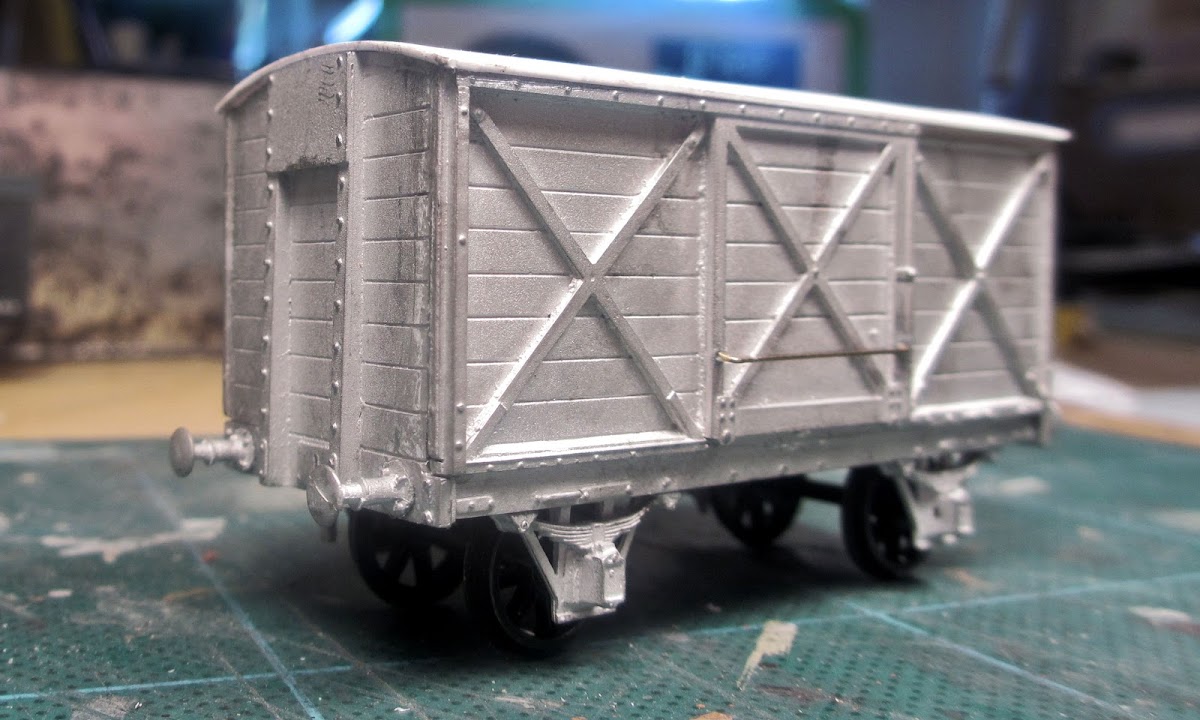
Above is the kit assembled as it comes. Having done that, I realized that a couple of details didn’t match the photos and drawings in my newly acquired “Illustrated History of Southern Wagons, Vol 1”. The kit has the door rail below the roof, while all photos I have seen show it in front of the roof. Likewise, the kit has the vent covers below the roof, while most (though not all) photos show them flush with the roof top.


IMG_3080large.jpg


It's possible that the kit is correct for some vans at some point in time. Nevertheless, I decided to lightly modify it to match the photos I had available. I filed back the roof and original door rail, and added a new rail from scrap brass. The vent covers were extended to the roof top with a sliver of plasticard.


IMG_3092.jpg


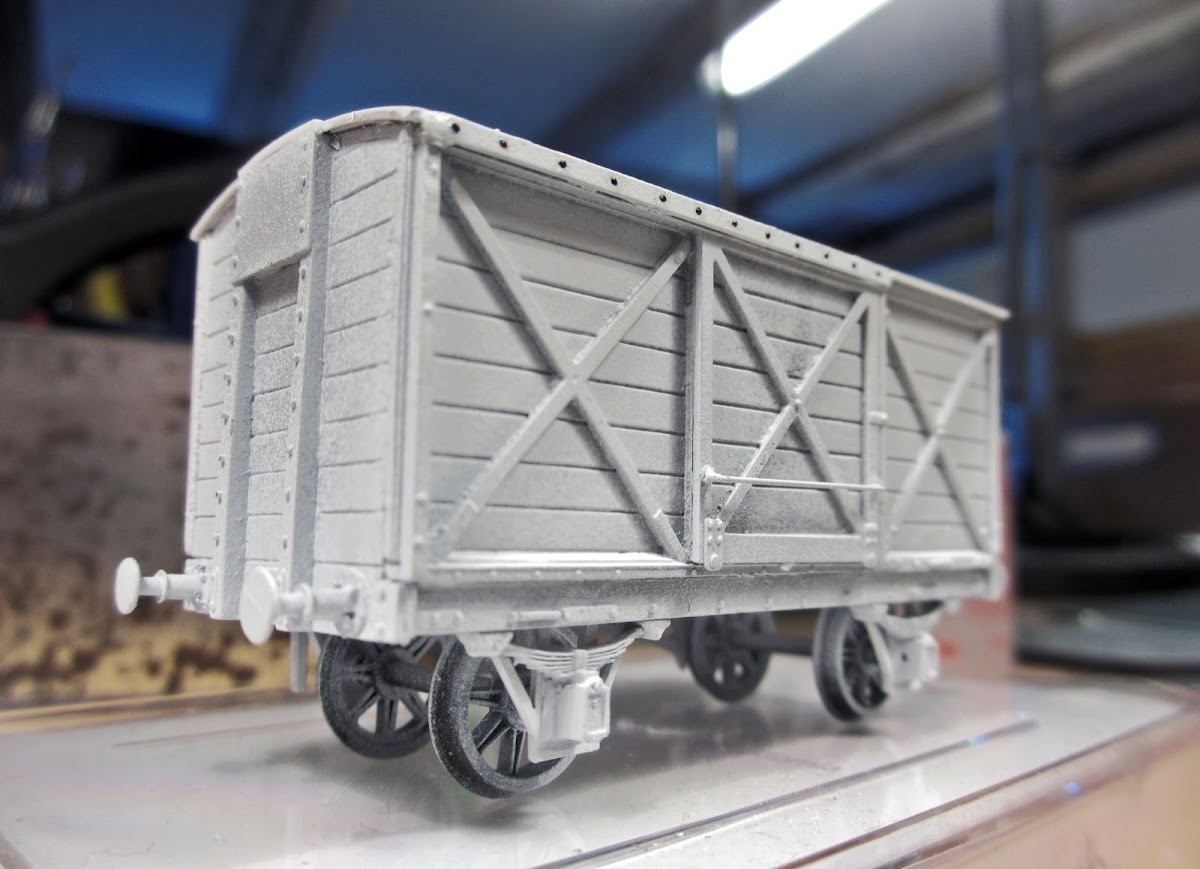
After a first light coat of primer, Archer’s rivets were added to the door rail – 12 little devils each side. For all its bad reputation, rivet counting can actually be quite fun! Can you tell I was in a hurry when I did the priming? :fool:


IMG_3105.jpg


I was confused about the brake gear. A sketch in the instructions show that for a single lever arrangement, the arms should be fitted left over right. So that’s how I initially fitted them, but it seemed wrong: The only photo I can find of a 1410 van with single-lever, one-side brakes has them right over left, and so do other single-lever LSWR (and GWR) vans and wagons. So eventually I re-fitted them right over left. Did I get it right though?


IMG_3196b.jpg


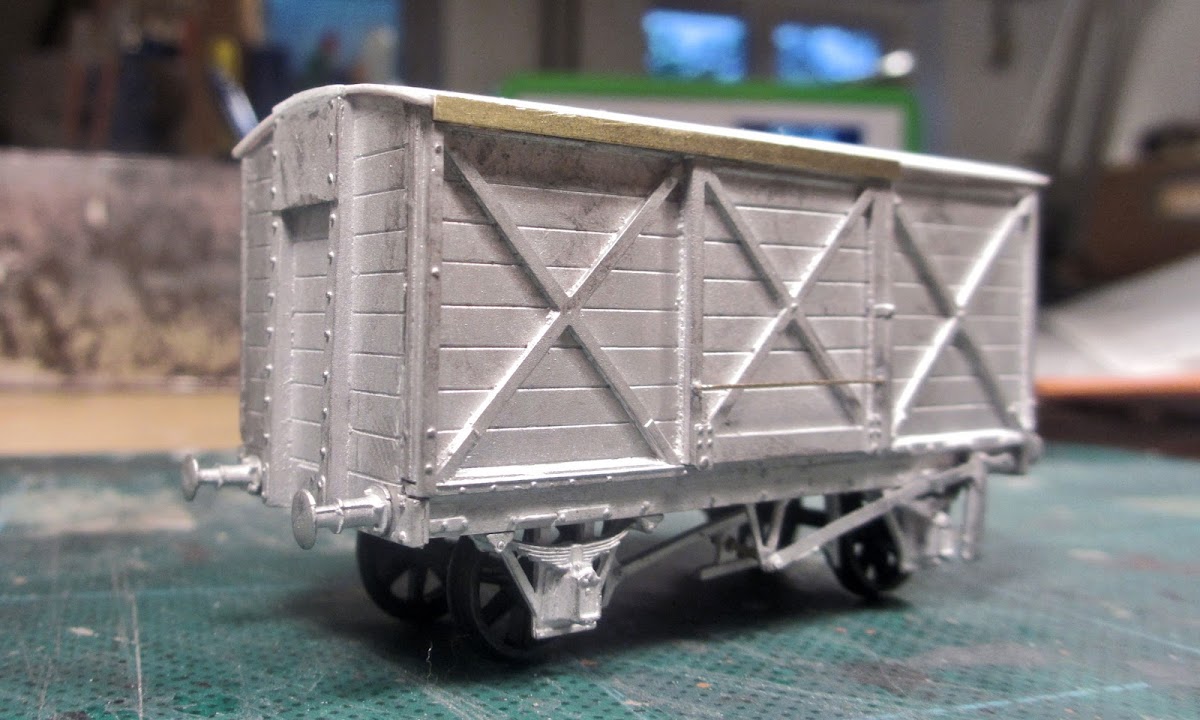
Except for the primer, I prefer to brush paint my models. I like the flexibility of it. For this van I decided to experiment a bit. I first added a basecoat that was deliberately a little darker than the ideal colour.


IMG_3204b.jpg


On top of this, I semi-dry brushed a lighter shade. By “semi” I mean that the brush was more loaded than you would normally do in dry-brushing. I like the resulting “depth” of the colour.


IMG_3226.jpg


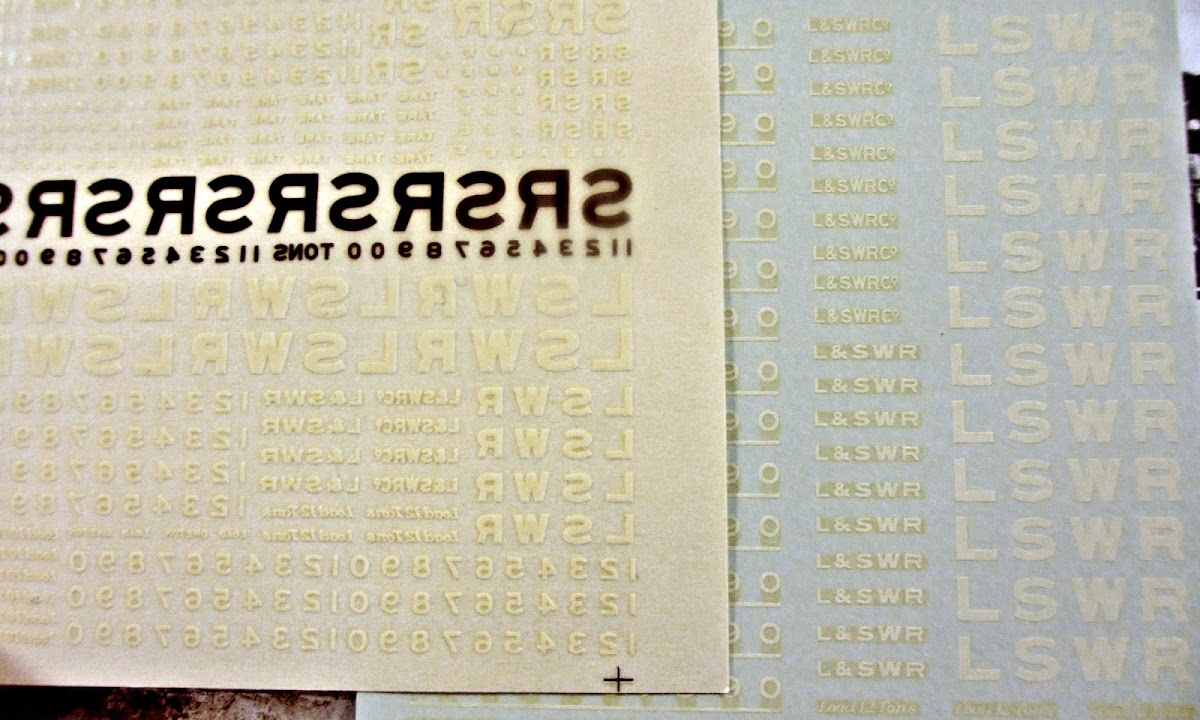
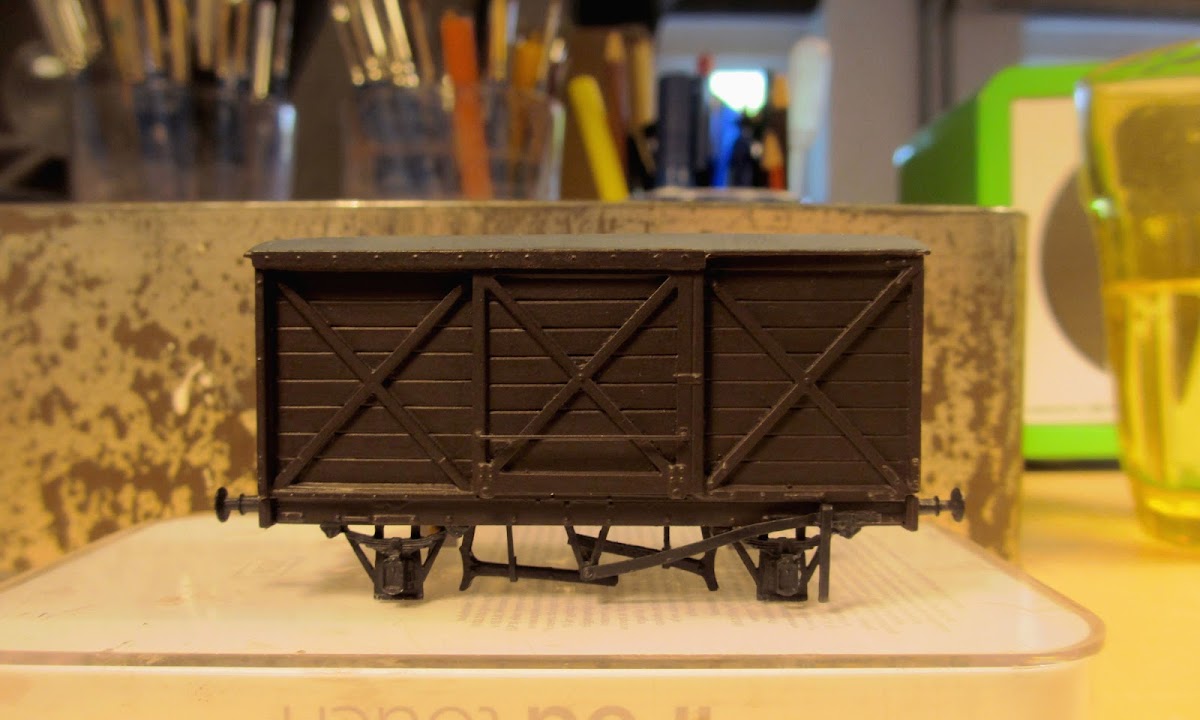
Due to a mix-up with my mail orders, I found myself with not one but two LSWR lettering sheets: One from HMRS (left) and one from Fox (right). This allowed for a bit of comparison. The two sheets are almost identical when it comes to the actual wording/styles provided. The HMRS sheet has lettering for all the main SR constituents, and a little more variety in the LSWR lettering styles. I personally like the HMRS Pressfix method which I have gotten used to over the years. The Fox transfers only have LSWR lettering, and water-slide transfers are not my favourite - but significantly, the smaller letters and numbers are a good deal finer than the HMRS ones.


IMG_3263.jpg


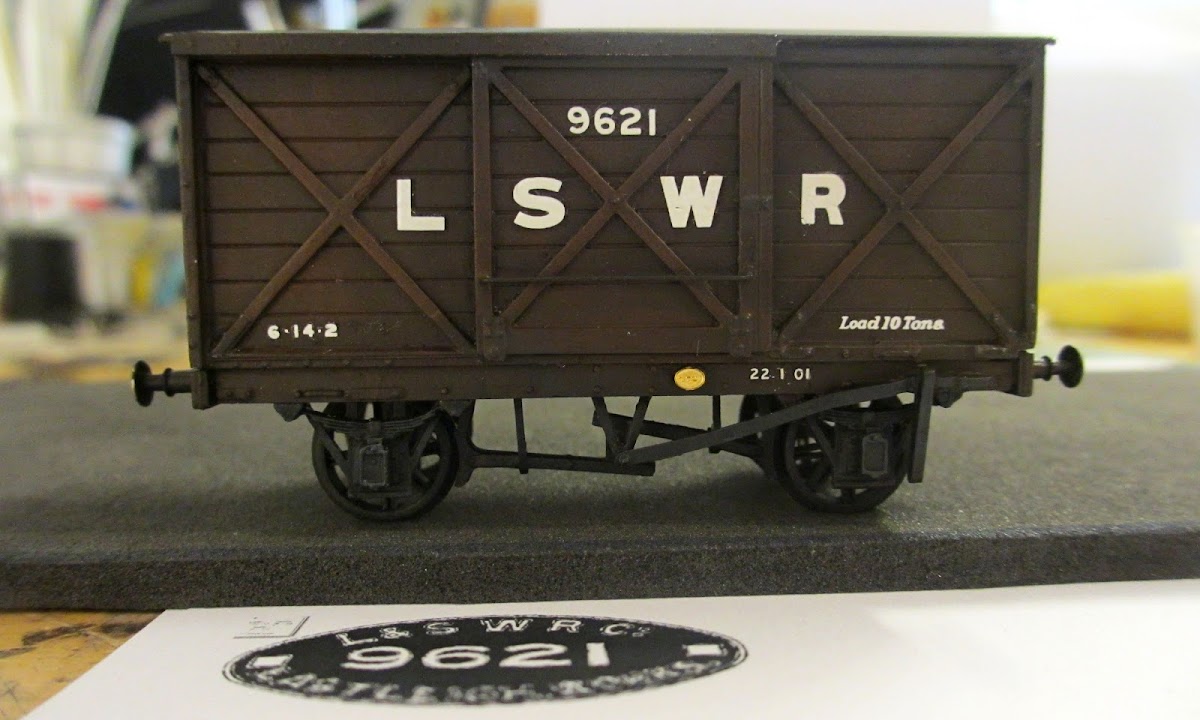
I ended up using a bit of both. By using the HMRS tare numbers for the tare, I could use the finer Fox tare numbers for the paint date on the solebar. The latter is a little overscale I think, but I thought it would be fun to include. Incidentally, January 22 1901 was the day Queen Victoria died, and thus the beginning of the Edwardian era. It does date the van, so I'll be in trouble if I decide to model a later period! For the number/builders plate I initially fashioned one in photoshop (bottom of picture), and printed it to the correct scale. But when fitted to the wagon it looked like… a paper printout! So I used a non-descript builders plate from a Mainly Trains etch instead.


IMG_3331largeb.jpg


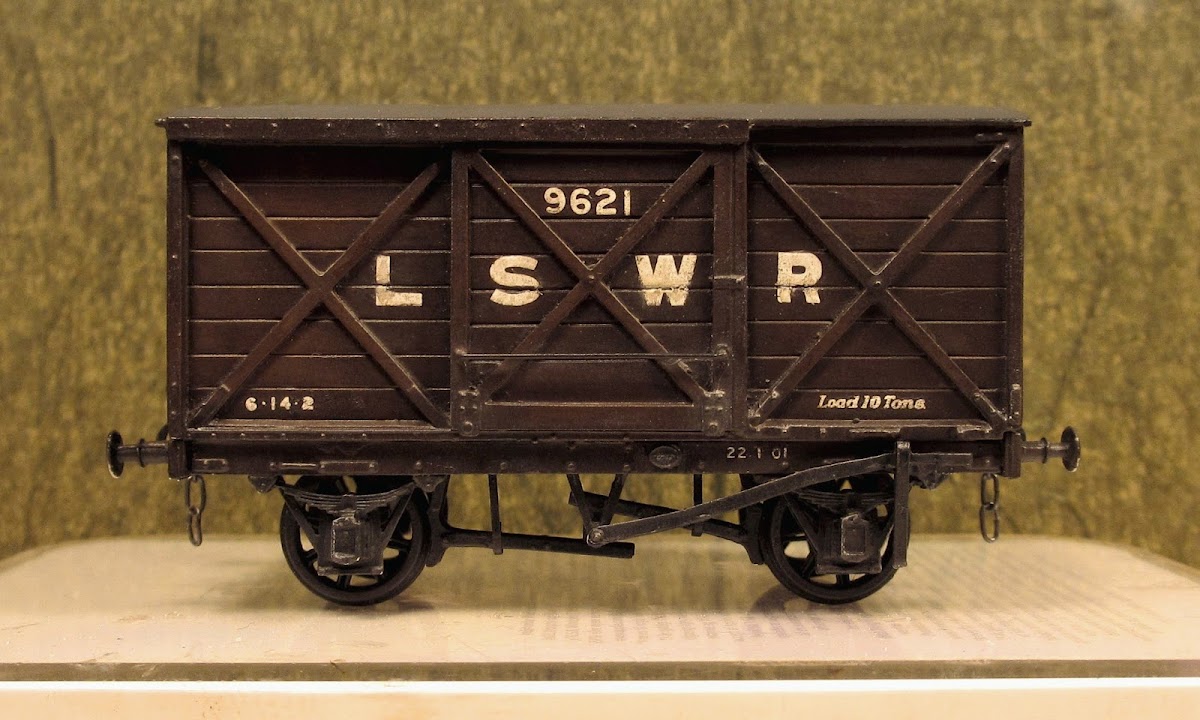
I went for a lightly weathered look, but not too much. I find it hard to get that faded look to the lettering that I have seen on some models. Any advice would be much appreciated.


DSC_2359b.jpg


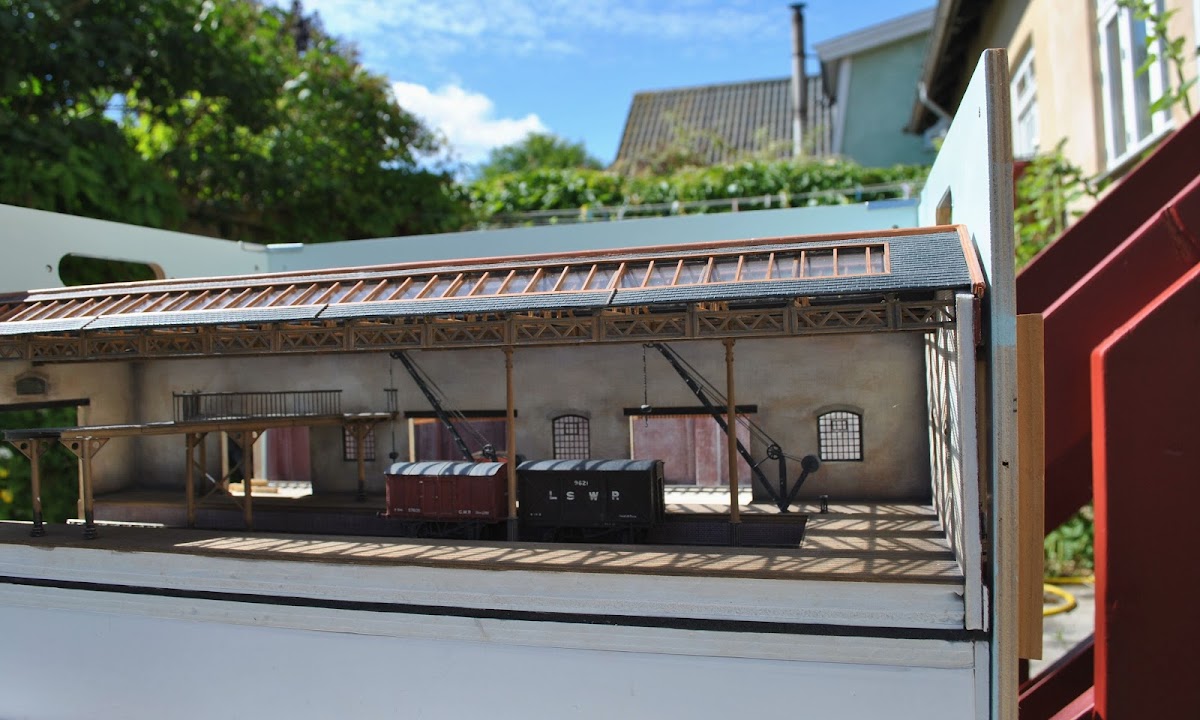
Today was a nice day here in Denmark, so I took the goods depot outside to get a few photos of the new van and assess general progress. I recently managed to crush the mezzanine floor, and am slowly rebuilding it. That's the second disaster I've had with this little layout, the other was when the roof structure got smashed. No wonder my son calls me Homer Simpson!


IMG_3290.jpg


Views like this make me happy though. Comparison between the LSWR van and the contemporary GWR iron mink shows two different approaches to the standard goods van of the late 19th century. The LSWR van was introduced in 1885, and seems fairly large for the time with its 18ft over headstocks. The GWR Iron minks were introduced the year after in 1886. With a 16 ft (later 16’6) length it stuck to a more modest size but experimented instead with iron for body construction. I wonder which of the two designs was more economical in the long run?


DSC_2360b.jpg


One day I'd like to try building a lightbox, but for the time being I'm content with that big old lightbox in the sky.

  • Like 33

30 Comments


Recommended Comments


Once again nicely modelled Mikel, I do so like the goods depot, it does you proud.


Grahame

Link to comment

Very nice Mikkel.


You got the brakes correct. It looks like the instructions are wrong. Morton brakes always has the reversing cam on the side with the brakes.


You will get the LSWR bug soon, with their colourful green loco liveries, and bright carriages.

Link to comment
  • RMweb Gold

Very nice Mikkel, I really like the shading around the framing that you've achieved. A technique that I've found works well for faded lettering is to apply transfers, varnish them and then abrade the surface with a fibre glass brush. If you keep the bristles fairly long when you use the brush you can get a pretty subtle effect. Once you're happy with the amount of fading, then a quick coat of matt varnish blends everything in. Probably worth experimenting on a bit of scrap painted plasticard rather than one of your lovely wagons though!


Looks like Northen Europe had a good day of it today, It was even sunny in Wales! :-)


Dave

Link to comment
  • RMweb Gold

Once again nicely modelled Mikel, I do so like the goods depot, it does you proud. Grahame


Thanks Grahame, I've got my traverser wired up now, so shortly I can finally begin operating the goods depot, and doing the final details.


Very nice Mikkel.


You got the brakes correct. It looks like the instructions are wrong. Morton brakes always has the reversing cam on the side with the brakes.


You will get the LSWR bug soon, with their colourful green loco liveries, and bright carriages.


Thanks Pete, what a relief! It seemed so odd for the instructions to carefully state the exact opposite of what is correct, and since I'm not very familiar with the LSWR I thought maybe I had misunderstood something. I do like LSWR locos, but especially their goods stock. Got a few more wagons in the drawer, I have to restrain myself so I don't end up with more foreign than GWR wagons :-)


Exquisite, atmospheric, inspirational - what more needs to be said?


Thanks very much Al. I like the fishbone pattern that the shadows make, although it's perhaps a little over the top in strong sunlight like this. I expect most goods depots would have been somewhat darker inside. One problem is that because there is no side to the depot, light will sometimes come in from the viewing side, which looks nice but isn't really prototypical! 


Very nice Mikkel, I really like the shading around the framing that you've achieved. A technique that I've found works well for faded lettering is to apply transfers, varnish them and then abrade the surface with a fibre glass brush. If you keep the bristles fairly long when you use the brush you can get a pretty subtle effect. Once you're happy with the amount of fading, then a quick coat of matt varnish blends everything in. Probably worth experimenting on a bit of scrap painted plasticard rather than one of your lovely wagons though!


Looks like Northen Europe had a good day of it today, It was even sunny in Wales! :-)


Dave


Thanks for this Dave, that is very useful. Your superb stock was actually some of the examples I had in mind of worn/faded lettering. I haven't tried using a fibreglass brush, will do that. I think I might add some Microsol before the varnish, in order to get the letters bedded "into" the surface. I find that the HMRS lettering is sometimes a little thick, which isn't noticeable until I start weathering it.

Link to comment

I like the light and shade effects produced by taking the model outdoors in sunshine - another advantage of 'micro layouts'!  It's nice to get a glimpse of sunny Denmark in the background, as well :)


Mike

Link to comment
  • RMweb Gold

Lovely stuff Mikkel - The photos are fab - you can't beat natural light... :sungum:

Link to comment
  • RMweb Premium

Another masterclass in wagon building.  Lovely little kit that's been enhanced with careful consideration.


But oh WOW regarding your Goods Depot.  Now that is how to build an internal space.  Those pictures are beautiful and the shadows on the walls from pure sunlight are breathtaking.  Just makes the scene totally realistic.


Brilliant stuff as per usual Mikkel.

Link to comment
  • RMweb Gold

I like the light and shade effects produced by taking the model outdoors in sunshine - another advantage of 'micro layouts'!  It's nice to get a glimpse of sunny Denmark in the background, as well :)


Mike


Hi Mike, even sunnier today. In fact, this morning I've been toying with the idea of a garden line. Nothing very elaborate - not a very big garden anyway - but maybe just a single line to run a proper length Edwardian goods train or two. I remember seeing an OO garden railway in RM many years ago, so it must be possible in that scale.... Hmmm, amazing what a bit of sun can do to your head!


Lovely stuff Mikkel - The photos are fab - you can't beat natural light... :sungum:


Hi Pete, I agree, and so much easier to get proper depth of focus too. There's also a downside though - a major panic arose among the good people of Farthing when this monster invaded the goods depot. Of course, a conspiracy theory immediately developed that the beast had arrived on the new LSWR van, as part of yet another attempt by that villainous company to disrupt GWR services.


IMG_3295.jpg


Another masterclass in wagon building.  Lovely little kit that's been enhanced with careful consideration.


But oh WOW regarding your Goods Depot.  Now that is how to build an internal space.  Those pictures are beautiful and the shadows on the walls from pure sunlight are breathtaking.  Just makes the scene totally realistic.


Brilliant stuff as per usual Mikkel.


Hi Mike, thanks for that - can't quite compete with your fantastic roundhouse effects, but I do enjoy the shadow effects, and how they keep changing according to circumstances.  E.g. I've just noticed how the shadows curve on the van roofs. 

Link to comment
  • RMweb Gold

Many thanks westerham - or are you referring to the spider? :-)


I'm experimenting a bit with the pillars. There are in principle two whole rows of them, as a sort of visual experiment to add depth and viewblocks. But I sometimes think they make it all a bit too cluttered. As someone said on here recently, layout design is a lot like theater stage design.

Link to comment

Mikkel,

Another well explained "how I did it" (but from you I wouldn't expect anything less!) :-).  The depot looks absolutely fantastic with the shadows being cast from natural sunlight.  It's a good job the Finching sisters didn't see the wee timorous beasty, they'd be still having palpitations as I type this!

Link to comment

Hi Mikkel,


I love the two last pictures of your entry. Can't wait to see your next goods wagon model.


Can't wait to see that Farthing is the subject of the next lines of Charles Dickens:

"Crowds of people and mountains of goods, departing and arriving scores upon scores of times in every four-and-twenty hours, produced a fermentation in the place that was always in action."

Link to comment

I warned before of the dangers of corruption.  Now that you have strayed, strange beasts from the pit itself are rising up!  I predict that, ere long, Farthing itself will disappear into a lake of sulphur and be expunged from the map of England. 


Just don't tell Blanche about the spider or she'll want it, to put in her elder sister's room.


Mike

Link to comment
  • RMweb Gold

I really love the photos taken with natural light the shadows bring out the details so much. Nice build of the wagon.

Someone got really confused on the brakes.

One sided brakes were as you have modelled. There are wagons (especially with bottom doors) where there are brakes both sides but the two sides are not connected and both would be as you modelled. With an arrangement where the brakes on both sides are linked if was usual that the cross shaft operated both sides hence one side the brakes were reversed i.e. one side would be left over right. There was then a need for reversing cams lost motion links and things like that so the levers would both cause the operating rod to turn the same way.

Don

Link to comment

Hi Mikkel,


Great to see you doing some L&SWR modelling!


Your eye for detail is as always appreciated.


Mr Geen has made some great kits and is much appreciated by me, but if you are looking for the definitive diagram 1410 kit, then you should consider Mr Martin Finney:


http://website.lineone.net/~cbwesson/4mm%20LSWR%20Van%20Kits.htm


http://website.lineone.net/~cbwesson/ (home page if above link faulty)


All the best, and looking forward to the next instalment as ever.


Kind regards,


Matthew

Link to comment
  • RMweb Gold

Mikkel,

Another well explained "how I did it" (but from you I wouldn't expect anything less!) :-).  The depot looks absolutely fantastic with the shadows being cast from natural sunlight.  It's a good job the Finching sisters didn't see the wee timorous beasty, they'd be still having palpitations as I type this!


Hi Ian, thanks :-) Yes, probably good that the Finching sisters weren't around when the spider visited - although they seem to get around a lot so maybe a giant spider is no match for them. But who knows, I could never quite work out their personality, it seems to change from timid elderly ladies to warm-blooded amazons all the time! :-)  


Hi Mikkel,


I love the two last pictures of your entry. Can't wait to see your next goods wagon model.


Can't wait to see that Farthing is the subject of the next lines of Charles Dickens:

"Crowds of people and mountains of goods, departing and arriving scores upon scores of times in every four-and-twenty hours, produced a fermentation in the place that was always in action."


Hi Job, what a great quote! Yes I do need to get working on the "mountains of goods". I've been looking forward to that - although now that it's time it seems like a rather bigger task than I had anticipated. Especially if I have to fold every single box as neatly as you do...


I warned before of the dangers of corruption.  Now that you have strayed, strange beasts from the pit itself are rising up!  I predict that, ere long, Farthing itself will disappear into a lake of sulphur and be expunged from the map of England. 


Just don't tell Blanche about the spider or she'll want it, to put in her elder sister's room.


Mike


Argh Mike, I fear you are right. Serves me right for betraying Paddington. It is that cursed lure of Nine Elms! Beware yourself, I sense you are being dragged ever closer to the land of Mordor, where the shadows lie.


I really love the photos taken with natural light the shadows bring out the details so much. Nice build of the wagon.

Someone got really confused on the brakes.

One sided brakes were as you have modelled. There are wagons (especially with bottom doors) where there are brakes both sides but the two sides are not connected and both would be as you modelled. With an arrangement where the brakes on both sides are linked if was usual that the cross shaft operated both sides hence one side the brakes were reversed i.e. one side would be left over right. There was then a need for reversing cams lost motion links and things like that so the levers would both cause the operating rod to turn the same way.

Don


Thankyou Don for this. For some reason I have never truly understood what parts move how on wagon brakes - perhaps because I have never seen them in operation up close. I get the theory of it, but not the practice. I think I'll have to go and see whether our local preservation railway here in Denmark has something similar enough so that I can have a go!


Hi Mikkel,


Great to see you doing some L&SWR modelling!


Your eye for detail is as always appreciated.


Mr Geen has made some great kits and is much appreciated by me, but if you are looking for the definitive diagram 1410 kit, then you should consider Mr Martin Finney:


http://website.lineone.net/~cbwesson/4mm%20LSWR%20Van%20Kits.htm


http://website.lineone.net/~cbwesson/ (home page if above link faulty)


All the best, and looking forward to the next instalment as ever.


Kind regards,


Matthew


Many thanks Matthew. I have admired the Finney 1410 photos, the kit looks superb.  I hope he'll do more ordinary goods stock like that, I feel more comfortable with whitemetal and plastic but for something like that I'd certainly be willing to tackle brass. BTW; I've just started a kit for one of the ABS LSWR round-ended opens today. Another attractive LSWR prototype!

Link to comment

Just catching up...


The LSW van is lovely, and I like the pre-shading effect of the darker base coat; detail can get lost in deep browns and this has brought them out nicely. Dave's technique of long bristles in the fibreglass pen to fade lettering works well, and then of course (if you have one) there's always the option of an airbrush and well-thinned mist coats of the base colour and/or traffic grime.


As others have said, the outdoor photos with the summer sun casting the network of shadows is incredibly atmospheric.


Shelob looks like a nasty beastie.  Are you sure Farthing isn't located in Mordor?

Link to comment
  • RMweb Gold

Thanks Adrian for some more advice on faded lettering. I don't own an airbrush, but I'll see what can be done with a fibre glass pen on the SDJR van - the next rolling stock project on the list.


Ah yes, Shelob! It's all coming together now. The dark forces have teamed up.


And to make matters worse you are diverting attention with your fantastic accounts of those wonderful GER engines. There is so much distraction for us pregrouping modellers! Here, for example: https://www.flickr.com/photos/whatsthatpicture/sets/72157624218631585/

Link to comment

In lieu of an airbrush, the haze can be produced by several very patient dry-brushing sessions, but it's a bit of a mental battle to persevere.


That's a lovely collection of photos, from some of the comments it looks like I found the album a few years ago but had forgotten about it. Further divergence may be had by perusing this Flickr album, and the clarity of some of these shots is astonishing:


https://www.flickr.com/photos/hisgett/sets/72157626617067470/


I mean...what's there not to like about the pre-Grouping period?

Link to comment
  • RMweb Premium

Beautifully made and painted model, thanks for the clarification on the brakegear!  (must remember that when I get round to building mine).

Link to comment
  • RMweb Gold

Hello Tim, many thanks, I enjoyed building this one and have been unable to resist getting some more LSWR wagon kits. More than are needed, but we all know that feeling I think :-)  Good luck with your own build.

Link to comment
Guest Jack Benson

Posted

Oh dear, Mikkel, what have you done?


It seems that I must do better and return to building stuff, thanks for the mental kick up the backside.


Soon, somewhere in a shed in Dorset, I will be doing my best.


Cheers


Link to comment
  • RMweb Gold

Hi Jack,


Modelling in a Dorset shed sounds nice from where I'm sitting (town flat)! Hope we get to see the fruits of your work. I agree that it's so easy to get distracted. "Researching" something is such an easy way to procrastinate, happens to most of us, I think :)

  • Like 2
Link to comment

Create an account or sign in to comment

You need to be a member in order to leave a comment

Create an account

Sign up for a new account in our community. It's easy!

Register a new account

Sign in

Already have an account? Sign in here.

Sign In Now

×
×
  • Create New...