Jump to content
 

GWR 1854 Class Saddle Tank (1)


Mikkel

6,891 views

IMG_2861b.jpg


I’m building a GWR 1854 class saddle tank in 1900s condition, using a modified and detailed South Eastern Finecast body kit on a Bachmann 8750 chassis. The build is also in my workbench thread, but that tends to be a rather meandering discussion, so this is a summary of the main steps without the diversions.


IMG_2274.jpg


I bought the kit part-assembled, but a bath in hot water dissolved the glue and allowed me to break it down into its main components.


IMG_2467.jpg


The Bachmann chassis I'm using is the version for the 8750 model, seen here on the right (my loco ref was 32-200, I think the recent 57xx model also uses this chassis). Note that older versions of this chassis (seen on the left, my loco ref was 31-900) are higher and the chassis block is longer, so is less ideal for conversions.


IMG_2418.jpg


I wanted to avoid modifying the chassis more than strictly necessary, so that it could be replaced easily in case of a failure. The only chassis modification was therefore to remove a section off the front to allow the kit to fit over it.


IMG_2437.jpg


The body castings require more work. The locating lugs on the side frames and buffer beams were removed, and about 1 mm was filed off the central section of the footplate and splashers each side to clear the motor. Plastikard was used front and rear to get the correct ride height.


IMG_2428.jpg


The body and chassis assembled. The two front splashers are 0.5 mm too far out. However with careful positioning of the body it is barely discernable, so after mulling it over I decided to accept it.


IMG_2458.jpg


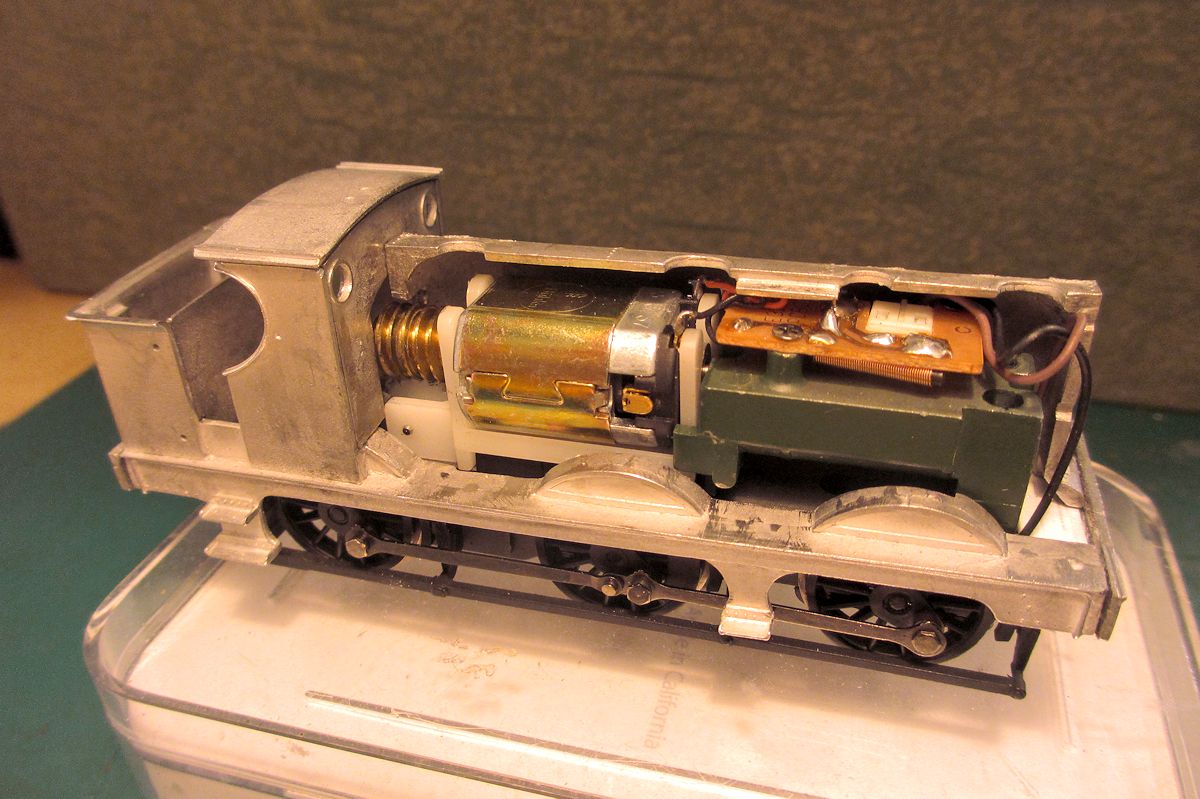
The tank sides fit neatly over the motor.


IMG_2450.jpg


The two tank halves were the most work intensive parts of the kit. The “skirts” need to be cut away…


IMG_2459.jpg


...allowing daylight under the boiler…


IMG_2529.jpg


…followed by much filing and filling to get the two halves to fit together.


IMG_2520.jpg


The motor intrudes slightly into the cab, so the backhead was moved 1 mm forward and a center section of the floor raised slightly.


IMG_2543.jpg


I replaced the main SEF white metal boiler fittings with parts from Alan Gibson.


IMG_2739.jpg


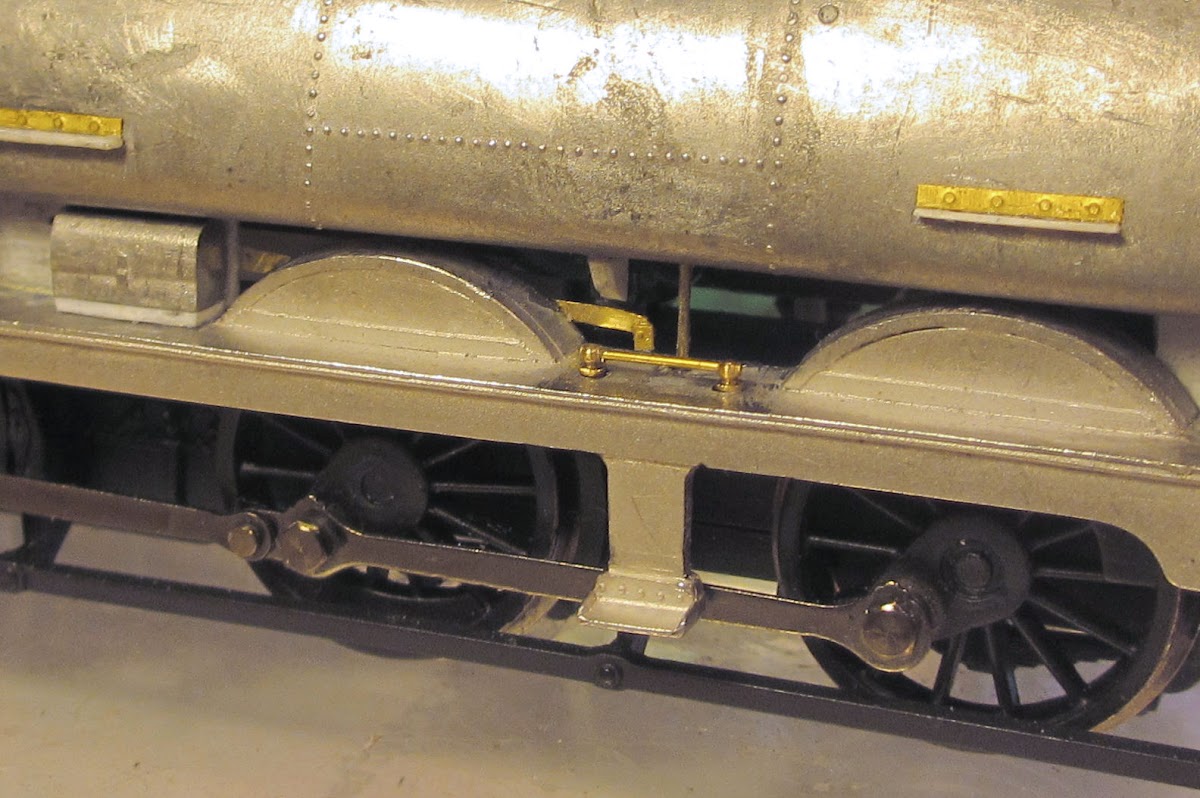
Other details were scratchbuilt from bits and bobs. The tank steps were later redone enitrely in brass with tabs to secure them. The footplate steps need filing to the correct straight shape as seen here.


IMG_2637.jpg


Liftings rings, made from soft wire wrapped around a brush handle and squeezed to shape with pliers.


IMG_2823.jpg


Coal rails made from wire, and fire iron hooks bent to shape from flat brass strip. The early lamp brackets are from the Broad Gauge Society, and the buffers are Alan Gibson.


IMG_2856.jpg


While the main build was fairly quick, the detailing has been time consuming.


IMG_2854.jpg


So here she is, almost ready for a good scrub and then some primer.

  • Like 23
  • Craftsmanship/clever 1
  • Friendly/supportive 1

24 Comments


Recommended Comments

  • RMweb Gold

Lovely work once more Mikkel ;)


I've been following this on your workbench thread and it does look brilliant. Out of interest how is it held together?


Looking forwards to seeing this build finished and appearing in one of your excellent photo montage's.


Cheers,


Mark

Link to comment

Absolutely beautiful Mikkel! I have always loved that era of gwr saddle tanks, it makes me want to concoct a mini-me version for a similar n gauge pannier chassis!


Modelling relatively obscure prototypes can be a frustrating business, but it is always fun and a refreshing change when a new body/ off the shelf chassis concoction just 'works' so well.


Link to comment

A fabulous piece of modelling Mikkel.  You have taken a model that must originally have been produced over 40 years ago and made it into something that would not look out of place against modern highly detailed and relatively accurate models.  In my opinion she looks just right.  As Mark has already said I too look forward to seeing her posed in some of your evocative photo montages.


Ian

Link to comment
  • RMweb Gold

Wow looking brilliant, you should start building N gauge locomotives for me :)


Thanks Paul, but you're far better off doing them yourself, I'm having trouble enough as it is with the fiddly bits in OO!


I love these small loco's.

Can not wait to see the finished loco.

What was the use of this loco by the GWR in Farthing?


Hi Job, yes I'm a tank loco man myself too, especially the saddle tanks! The plan is that this loco will serve as one of the two locos I'll need for shunting my next layout (the sidings). Strictly speaking it's probably a little too large to be shunting wagons and vans, but I liked the idea of using a Bachmann chassis. 


Lovely work once more Mikkel ;) I've been following this on your workbench thread and it does look brilliant. Out of interest how is it held together? Looking forwards to seeing this build finished and appearing in one of your excellent photo montage's. Cheers, Mark


Thanks Mark. It's all glued together. Not as good as soldering, but I feel more confident with glueing. Not sure which technique is more healthy, probably neither of them!

Link to comment
  • RMweb Gold

Looks like what is says on the tin, not easy to get this model to sit just so.


Thanks, I'm glad you say that as I've put some effort into getting the ride height as close as possible. It's a great advantage of the Bachmann chassis that it allows this. Having said that, I think I may have ended up with the tank sides a bit too low - compared to the splashers at least. 


Absolutely beautiful Mikkel! I have always loved that era of gwr saddle tanks, it makes me want to concoct a mini-me version for a similar n gauge pannier chassis! Modelling relatively obscure prototypes can be a frustrating business, but it is always fun and a refreshing change when a new body/ off the shelf chassis concoction just 'works' so well.


Thanks Will, it would be great to see an 1854ST trundling over Victoria Bridge. I think Ian's 2mm version can give some ideas for the body? See: http://www.rmweb.co.uk/community/index.php?/gallery/album/2548-1854-saddle-tank/


A fabulous piece of modelling Mikkel.  You have taken a model that must originally have been produced over 40 years ago and made it into something that would not look out of place against modern highly detailed and relatively accurate models.  In my opinion she looks just right.  As Mark has already said I too look forward to seeing her posed in some of your evocative photo montages.


Ian


Thanks Ian, I like these old whitemetal kits, although I must admit I'm a bit impatient to get this one finished after all the filing and detailing!


nice job Mikkel....will look a cracker on the farthing layout... :)


Thanks Dave. A few more details have been added since the photos, and she is now in primer and looking OK (the loco, not my wife!).

Link to comment

It's good to see a blog post from you again - it's been quite a while.  Whereas the forum posts throw up lots of (sometimes) interesting side-topics, I find it very helpful to read a direct account of a single item of modelling.


As you know, I built one of these kits a long time ago, so I can appreciate the difficulties in getting the halves of the tanks to mate together accurately, as well as the reluctance of the whole thing to assemble squarely.  Congratulations on achieving such a good result. 


I do like the compact, workmanlike appearance of these tough-looking saddle tanks :)

Link to comment
  • RMweb Gold

Nice job Mikkel.

I don't know why you say this is too large for shunting it is much the same as a 57xx which I used to see doing a lot of shunting at Reading. True there were a lot of the 850s but these could well have shunted ready for a trip run or between trips.

Don

Link to comment
  • RMweb Gold

It's good to see a blog post from you again - it's been quite a while.  Whereas the forum posts throw up lots of (sometimes) interesting side-topics, I find it very helpful to read a direct account of a single item of modelling.


As you know, I built one of these kits a long time ago, so I can appreciate the difficulties in getting the halves of the tanks to mate together accurately, as well as the reluctance of the whole thing to assemble squarely.  Congratulations on achieving such a good result. 


I do like the compact, workmanlike appearance of these tough-looking saddle tanks :)


Hi Mike, yes those tanks caused some swearing. I remember seeing somewhere that the tank profile (when seen from the front) isn't quite accurate either, which I think might be right when looking at it. Still, as long as the overall look is OK that doesn't bother me too much. Would be nice to see your 1854ST treated to a new chassis at some point - although I know how it is: So many locos, so little time  :)


Nice job Mikkel.

I don't know why you say this is too large for shunting it is much the same as a 57xx which I used to see doing a lot of shunting at Reading. True there were a lot of the 850s but these could well have shunted ready for a trip run or between trips.

Don


Hi Don, I think you're right on them taking a turn when preparing for a trip. I'm just not sure they were used as actual "pilots" around 1900. On the other hand, in latter years the sidings at Gloucester Old Yard - which my sidings are based on - were in fact worked by 57xxs.

Link to comment
  • RMweb Premium

Lovely work to produce a great model. one thing crossed my mind looking at it, I remember you soaking the original kit in a bucket of carlsberg to make fall to bits. And after a lot of painstaking fitting of the bits it's now back together, but I missed the part about how the white metal bits joined, sorry if I wasn't paying attention. what did you use?? I couldn't spot it on the workbench blog either, another great way to enjoy an evening at the fireside.

Link to comment

Hi Mikkel


I have one of these too, though mine will need a lot updating to match this, I also glued mine together back around 1980 and it is still holding together perfectly fine.


As for shunting I see no problem with that as I seem to remember that a saddle tank was based at Tiverton Junction along with a 517, I'm assuming for my needs that the saddle did most of the shunting with the odd goods run up to the Exe Valley, so use it it as you see fit.


I shall be referring back to this when the need arises so thanks for posting.


Jim

Link to comment
  • RMweb Gold

Lovely work to produce a great model. one thing crossed my mind looking at it, I remember you soaking the original kit in a bucket of carlsberg to make fall to bits. And after a lot of painstaking fitting of the bits it's now back together, but I missed the part about how the white metal bits joined, sorry if I wasn't paying attention. what did you use?? I couldn't spot it on the workbench blog either, another great way to enjoy an evening at the fireside.


Great idea about the Carlsberg, must try that next time! :-) It's glued together with Loctite Powerflex Gel. I seem to use a lot of that these days, the thick "gel" consistency is what makes all the difference to ordinary superglue for this kind of project, I find.


The small bits (eg lamp brackets etc) are secured by anchoring them in drilled holes before glueing. I've scrubbed everything down with a toothbrush twice now and no bits have come off, so far so good.


Hi Mikkel


I have one of these too, though mine will need a lot updating to match this, I also glued mine together back around 1980 and it is still holding together perfectly fine.


As for shunting I see no problem with that as I seem to remember that a saddle tank was based at Tiverton Junction along with a 517, I'm assuming for my needs that the saddle did most of the shunting with the odd goods run up to the Exe Valley, so use it it as you see fit.


I shall be referring back to this when the need arises so thanks for posting.


Jim


Hi Jim, so your 1854 has held together for 35 years then, that sounds promising! I assume you used Araldite? I'm crossing my fingers that the Powerflex I used doesn't turn out to become brittle over time.


My comment on the 1854 possibly being a bit too powerful was just a reflection that the smaller 850 class might have been a more appropriate choice for everyday shunting duties in my time period. But I'm not going to worry about it at this point.


Here is a photo of no. 1874 in action, ca. 1900: https://www.flickr.com/photos/brizzlebornandbred/7168557119/in/photolist-494cBw-bAojRC-bVsJhp-qbn1cM

Link to comment

No, not Araldite. It was a fast setting superglue called 'Hot stuff' if my memory is as good as I hope it is and it was also used on the 1804, Saint and County as well as a selection of coaches and wagons, all still firmly held together.


Mind you there could well have been that special ingredient 'substance X' in there 35 years ago that is banned today!


Jim

Link to comment
  • RMweb Premium

Thanks for the info. I'm not one of these gifted people who can get white metal parts to come together by waving a soldering iron at them, the times I've tried its ended in tears. Nor yet superglue, usually I get everything but the parts I'm joining to stick, including fingers! Gel is a new one to me.... Maybe? I usually go for 24 hour Araldite held in place with Blutack and rubber bands until it sets, which I've found the safest way for me.

Link to comment
  • RMweb Gold

Lovely stuff Mikkel!:-) That's turned out very nicely, as others have said it "sits" very nicely on the chassis. I'm very much looking forward to seeing it painted, as I'm sure you are!


P.S. Congratulations on 100 blog entries:-), here's to the next hundred!


Best wishes


Dave

Link to comment
  • RMweb Gold

No, not Araldite. It was a fast setting superglue called 'Hot stuff' if my memory is as good as I hope it is and it was also used on the 1804, Saint and County as well as a selection of coaches and wagons, all still firmly held together.


Mind you there could well have been that special ingredient 'substance X' in there 35 years ago that is banned today!


Jim


Thanks for the info Jim. "Hot stuff"... I was a bit nervous about Googling that!  :) But I did just for the fun of it, and there is a glue by that name on the market, although probably not the same: http://www.amazon.com/Stuff-Thin-Instant-Glue-HS-4/dp/B0006O3TLW


According to the Bristol Post that photo dates from 1905.  It looks as though it might have been a special event, with people sitting on the bank, watching.  It's good to see one of thes tanks on a train of clerestories, since such trains were frequently seen at North Leigh

blogentry-19820-0-98601200-1409419543.jpg


Thanks for that link Mike, how on earth did you find that. 1905 looks about right. Your photo from North Leigh is a good match! The 4-wheelers look very good too. I was studying the other details in the photo - I'm curious about the sand box next to the bench?


Thanks for the info. I'm not one of these gifted people who can get white metal parts to come together by waving a soldering iron at them, the times I've tried its ended in tears. Nor yet superglue, usually I get everything but the parts I'm joining to stick, including fingers! Gel is a new one to me.... Maybe? I usually go for 24 hour Araldite held in place with Blutack and rubber bands until it sets, which I've found the safest way for me.


I know what you mean about glueing things to yourself! I use fine wire or tooth picks to apply the glue, which helps a bit. As for the gel don't take my word for it, I have only been using it for a couple of years so I can't vouch for its long-term properties yet.


Lovely stuff Mikkel!:-) That's turned out very nicely, as others have said it "sits" very nicely on the chassis. I'm very much looking forward to seeing it painted, as I'm sure you are! P.S. Congratulations on 100 blog entries:-), here's to the next hundred! Best wishes Dave


Thanks Dave, and yes it's 100 entries - I dare not think of all the time that has taken up. All those lawns un-mowed!

Link to comment

Mikkel


I googled it myself later and yes it is the same company, different packaging now of course and three types to choose from, instant, 10-15 secs and around 60 secs.


I know a lot of people prefer solder but when I come to build my last whitemetal kits I will still stick to what I know as I'm happy with it.

Link to comment
.....  I was studying the other details in the photo - I'm curious about the sand box next to the bench?


Please don't study too closely - it's an old photo.  The 'sand box' is the station's prize-winning flower bed - it's just that I've not got round to planting it yet :)


Some other things have changed - the pneumatic-tyred van has gone, for example.

Link to comment
  • RMweb Gold

Mikkel


I googled it myself later and yes it is the same company, different packaging now of course and three types to choose from, instant, 10-15 secs and around 60 secs.


I know a lot of people prefer solder but when I come to build my last whitemetal kits I will still stick to what I know as I'm happy with it.


Me too Jim. Although I worry a bit about prolonged exposure to the fumes. Just haven't found a non-solvent glue yet that is good enough for whitemetal!


Please don't study too closely - it's an old photo.  The 'sand box' is the station's prize-winning flower bed - it's just that I've not got round to planting it yet :)


Some other things have changed - the pneumatic-tyred van has gone, for example.


I can't help studying your photos in detail Mike, always something interesting going on! 

Link to comment

It's a pretty little engine, and the brass castings make a big difference.


But wait - you have a workbench thread too? Noooooo! More catching up!

Link to comment

Create an account or sign in to comment

You need to be a member in order to leave a comment

Create an account

Sign up for a new account in our community. It's easy!

Register a new account

Sign in

Already have an account? Sign in here.

Sign In Now

×
×
  • Create New...