Jump to content
 

Painting coach panels


Mikkel

8,304 views

My coaches are brush-painted, and I have sometimes been asked how I paint the panels. This video shows it. Be warned though that this is one of those bodged (hopefully not botched!) techniques I seem to often end up using - there are definitely more "correct" ways of doing it!


Edit: A bit more info as a supplement to the video:


In my experience, there are four key factors that effect results of this technique:


(1) Using the right paint. The Vallejo paint is very richly pigmented and dries quickly and evenly. It can therefore take the dilution while still needing only one application. Having said that, it is possible to repeat the process with a second layer if necessary, though I rarely do it. But everything must be completely dry first!


2) Getting the mix right. It has to be just "runny" enough to flow easily to the edges, but not so much that it dries up thinly. As mentioned in the video, something close to a milky substance - although perhaps a little thicker than that.


3) Good sharp edges on the moulds of the coach, which will hold and "guide" the flow of the paint. Etched brass is particularly good, but plastic like the Ratio sides has also worked well for me.


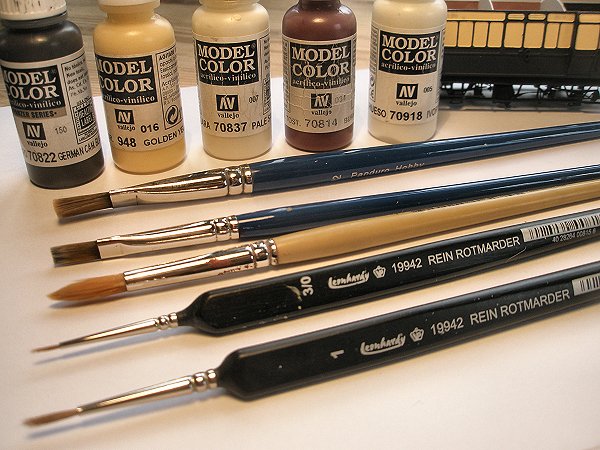
4) Good brushes - as always. The two black ones below (3/0 and 1) are the type I use in applying the paint in the video. The yellow one in the middle is a cheapo thing used for mixing the paint and water thoroughly. The blue ones are quality broad brushes (8 and 12), used for brushpainting the brown sides in several thin layers, to get smooth sides with no visible brush strokes.


Pc306288.jpg

  • Like 12

14 Comments


Recommended Comments

Excellent video Mikkel, just need to get those 3D printed N gauge 'Toplights' sorted out and I can have a go!

Link to comment

Mikkel -

Thanks for posting this. I have some 4-wheel coaches in 2mm that I hope to build and paint fairly soon, but haven't decided yet whether to try this method or the "lots of tiny bits of masking tape" alternative. Either way, it looks a bit challenging to handle the mixture of chocolate/cream/mahogany on the uprights (see http://www.rmweb.co....e/33684-t49-01/ for a 305mm scale example).


Will J -

No doubt there are examples to disprove me, but I thought that most toplights were a bit too late for the elaborate Dean-era fully lined out livery - they would generally have started life in the Churchward maroon lake livery, and later have acquired the much simpler Collett chocolate and cream style.


David

Link to comment
  • RMweb Gold

Rob: The Vallejo shades I use for coaches are:


* Coach brown: 70822 German Cam. Black Brown

* Cream: 3 parts 70948 Golden Yellow + 1 part 70837 Pale Sand

* Venetian red (droplights and bolections): 70814 Burnt Cad. Red (with a dash of 70822)

* White (rooves): 70918 Ivory


I have a feeling that my cream is a little too yellow. A 2:2 mix of the Golden Yellow and Pale Sand might be more appropriate - but since I have a number of coaches painted by now I hesitate to change my formula :-)


Will / David: I don't know if this would work in N/2mm. Factor no. 3 above might be an issue for smaller scales, because the depth of the panels might not be sufficient to retain the flowing paint? Wouold be very interested to see your results though, if you try it out.


David, you're right that the some of the finer details of the GWR pre-grouping livery is tricky (must be even worse in 2mm!). I have chickened out and use a simplified version. There are examples of this (and the end result of the panelling technique) in the second and fourth photos in this entry: http://www.rmweb.co....grouping-stock/

  • Like 3
Link to comment

Hi Mikkel -


Nice video, and I use the same system myself - except I do the framing first. That way, if there's a little 'over-run' onto the panelling the 'flooding technique' for the panelling masks it.


Will/Dave - it does work in 'N' Guage - or it did many years ago on the 'Farish' four-wheelers!


Happy modelling 2012 everyone


Ian

Link to comment
  • RMweb Gold

Hi Ian, interesting that you use it too. Doing the framing first would make sense, must try that.


Happy 2012 modelling to you too!

Link to comment

Thanks for posting this, Mikkel, you certainly make it look easy! I had some limited success doing something like this with enamels a very long time ago, though looking at my old Ratio coaches, they could do with an overhaul and repainting.


Since watching your video, I've had a go at doing this with Railmatch GWR cream acrylic on my W1 which hasn't changed since it appeared on my blog in November 2009. I'd sprayed the upper half in Halfords satin black intending to do what Ian has described. I've now tried flooding the panels with the Railmatch paint at different levels of dilution with de-ionised water, and also tried adding IPA and Klear to the mix. No matter what I try, I can't get the paint to flow like yours as there is always too much surface tension. I assume the surface of the black paint is too rough. I then tried the acrylic over the old enamel on one of my old Ratio coaches. The results were better, but it still didn't flow like yours.


I think I'll have to try the Vallejo paints that you recommend. I have some, but not the right colours and, as you say, they are densely pigmented and can take more dilution that most other acrylics.


Either that, or there's something special in that Danish water...


Nick


ps. if the lists I consulted are correct, Golden Yellow is 70948 (not 984).


pps. what's the origin of the V2?


ppps. Happy 2012 modelling to all!

Link to comment
  • RMweb Gold

Hi Nick. Sorry to hear it didn't work out so far. I've never tried this technique with anything other than Vallejo, so I can't speak for the Railmatch ones.


Off-hand I would say it must be the type of paint that makes the difference. My base colour is matt (brush-painted Vallejo brown), but that's never given any problems. Will be interested to hear how it turns out with the Vallejo paint.


Another theory could be that the surface of sprayed paint is somehow not conducive to this method? Perhaps you could try and see if your mix can flow on other surfaces that are not painted with the Halfords primer?


Sorry about the typo for Golden Yellow - now corrected in the post above.


The V2 was one of a batch of coaches that I took over from Colin Edge some years ago, more or less scratchbuilt by him as far as I know. They have been sitting in my drawer for a long time awaiting restoration (new rooves, stepboards, various underframe detail, wheels, windows etc) and a repaint. I'm modifying a U16 compo right now that is giving headaches because it seems to have been built using a Russell drawing that has since been proved faulty - those Russell books have a lot to owe for both good and bad!

Link to comment
  • RMweb Gold

Hello Ray,


I'm glad if it was of any use. It is a technique that takes a little getting use to, and thinning the paint right is key. But when it works it can be satisfying, I think.

Link to comment

I am about to try the Vallejo paints on my panelled stock. It looks like you painted the upper beading brown as for the lower panels when in fact the GWR painted its upper beading black. Try using a black 1mm marker pen to colour the beading before painting the panels.


Steve

Link to comment
  • RMweb Gold

Hello Steve, yes my coaches don't have the upper black beading. When I began painting coaches I omitted it, and since then I have been reluctant to add it as the coaches then won't match. But maybe it's time to get past that, the marker method sound like a useful idea, thanks.


Good luck with the Vallejo paints and the panels, when it works it's an almost therapeutic exercise.

Link to comment

Hello Mikkel,


I have received some Vallejo Air colours for Christmas and I'm going to try to match the standard GWR colours using those, I generally spray paint most models but have used your panel flooding technique where a full pannelled livery is needed. However I find that I use enamels so little that they usually go hard in the pot before I use most of it. Also the solvents aren't too pleaseant when spraying so I was keen to give the Vallejo acrylics a try.


I'll try to post on RMWeb somewhere if I manage to get a reasonable matches from mixes from the basic colours set.


Adrian.

  • Like 1
Link to comment
  • RMweb Gold
Mikkel

Posted (edited)

Sorry Adrian, looks like I missed your post back in 2016!  I hope you managed to get a good result with the Vallejos. 


PS: Video has now been updated with new annotations, as Youtube had decided to remove the existing ones. 

Edited by Mikkel
Link to comment

Create an account or sign in to comment

You need to be a member in order to leave a comment

Create an account

Sign up for a new account in our community. It's easy!

Register a new account

Sign in

Already have an account? Sign in here.

Sign In Now

×
×
  • Create New...