Jump to content
 

Laying track on "The depot"


Mikkel

4,304 views

P2176307d.jpg


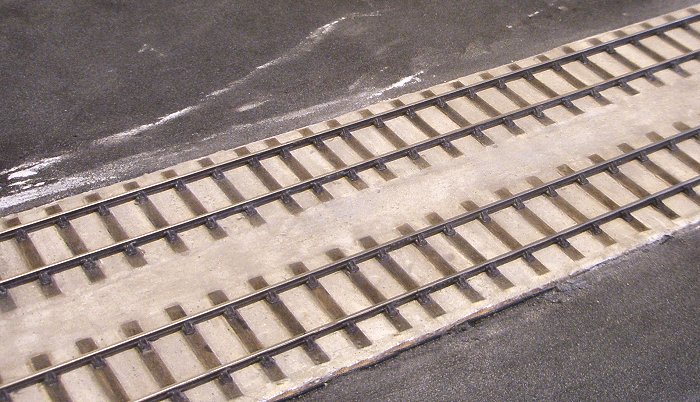
All those close-ups of Code 100 track in my past couple of entries made me want to push ahead with the C+L track for "The depot". So here's a little interlude to the "All in a day's work" story, showing what I've been up to with the track inside the depot.


P1216391.jpg


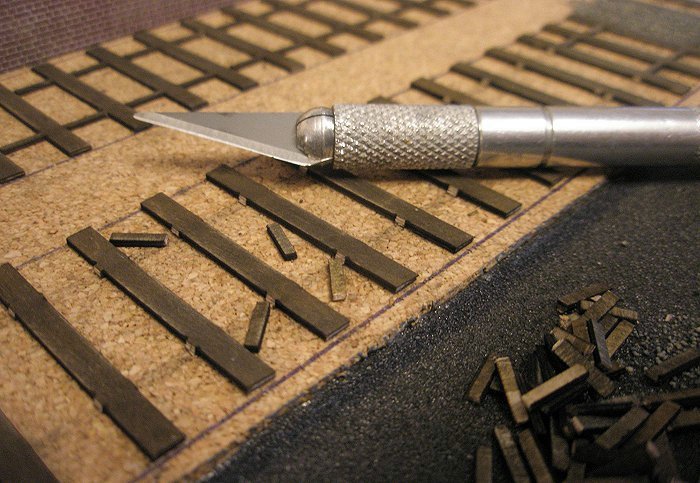
Timbertracks panels stuck down, sleepers shortened to appropriate length, and webbing removed (see the earlier dicussion in this entry). Next time I'll just lay some individual timbers!


P1226398.jpg


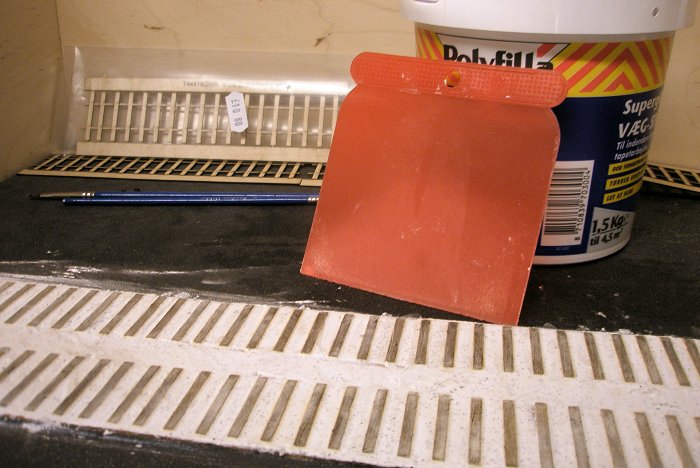
The track is inside a goods depot, so I wanted that look where the timbers are almost embedded in the ground. Using the plastic filling knife in the photo, I "dragged" Polyfilla at a 45 degree angle across the timbers, until it was level with the timber tops.


P1226402.jpg


When the Polyfilla dries up it contracts a little, leaving the timbers just proud of the ground. A slight "shoulder" is left on some timbers, which I scraped away with a scalpel.


P1296297.jpg


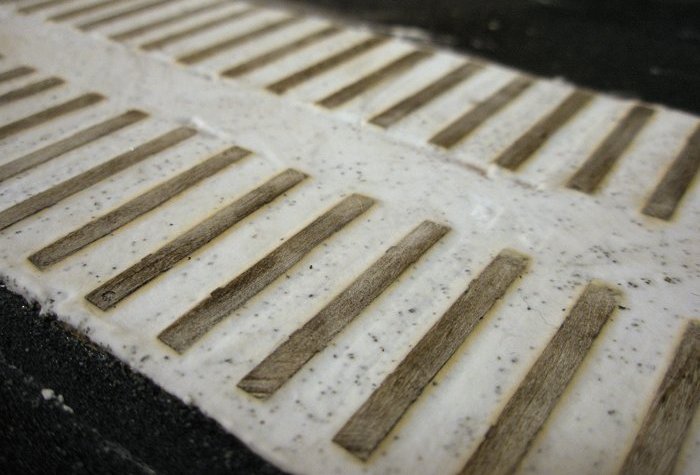
The result was more or less what I was after: Timbers slightly proud of the ground. But they are looking a bit thirsty!


P1016287.jpg


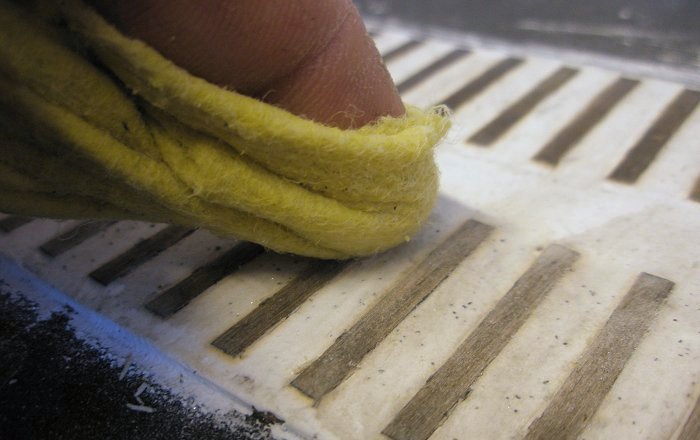
The Polyfilla residue on the timbers was cleaned off with a wet cloth (you'll notice the high-tech approaches here!) ...


P1316283.jpg


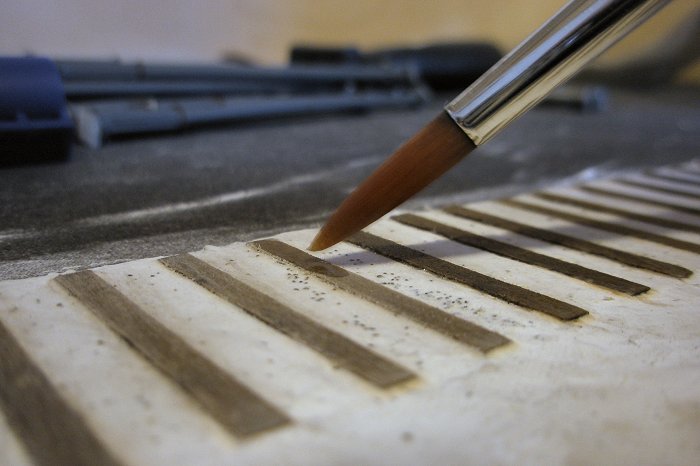
...and the timbers were given a bit of thinned matt varnish to restore some of their colour. I should've done this before laying the timbers, which would also have prevented the original wood stain from seeping into the Polyfilla. I managed to cover this by rubbing dry Polyfilla powder into it.


P2166287b.jpg


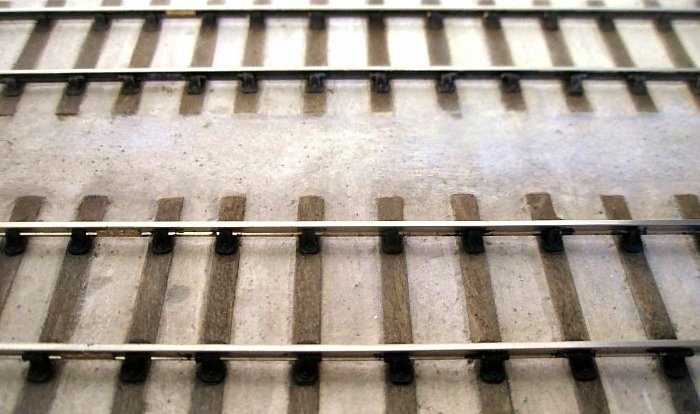
After giving the ground a light wash of grey and cork, I laid the track. The chairs were threaded on to the rail first, and then stuck down with Butanone. I was worried if the latter would give a strong bond, since the timbers had been exposed to quite a lot at this point! So far I am satisifed, but time will tell. It seems there are as many experiences with Butanone as there are modellers!


P2176313.bjpg.jpg


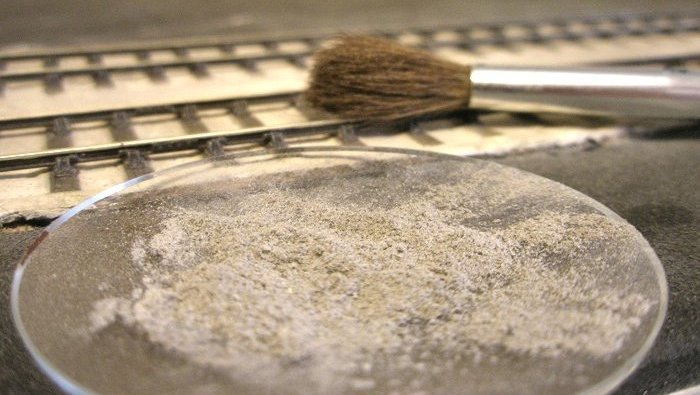
Hey dude, want some good dust? A heady mix of white baby talc (sic) and Carr's light grey weathering powder. Rock and roll! This was brushed across the track to blend things together and tone down colours.


P2176298.jpg


C+L etched fishplates, shortened to simulate the GWR type. I bet you can't see the gap in the rails. See how good a joiner I am? ;-)


That's it then. I do wonder if the timbers are a bit too light, but things will look darker once the depot is placed around them.

  • Like 25

21 Comments


Recommended Comments

I do wonder if the timbers are a bit too light


Nope - sleepers and timbers ranged from very dark brown when new and freshly creosoted under pressure, to light silvery grey when old. Old in pre-Grouping terms being 16 - 20 years on running lines, depending on the company, though sidings could have sleepers a lot older. Your best point of reference are telegraph poles which are also pressure-treated and disply a wide range of colours as they age.


What a big difference between these tracks and those in The Bay! Perhaps once the builders have the goods shed up and running the Superintendent of the Line will send a PW train to the station?

Link to comment

Nice expose Mikkel


Dont worry about the shad of the sleepers - I'll PM you an image from Moreton-inMarsh - the bay platform track has been there since GWR days (note the chairs & stop-block) and how faded the sleepers are. I like the pile of 'offcuts' - just right for positioning by the watercrane brazier?? (Waste not, want not!)


Regs


Ian

Link to comment

Thank you for posting that Mikkel.


A very well explained and photographed explaination on how you achieved a quite realistic effect. There is definately an amaount of truth in using real wood for something that was wood! I will remember this method for the future...


Missy :)

Link to comment
  • RMweb Gold

Superb result Mikkel. Ballasting before laying the rails can also work well.

Don

Link to comment
  • RMweb Gold

Lovely stuff Mikkel.


A great step by step and a rewarding finish.


Loving those fish plates too...

Link to comment

Looks good, Mikkel. The sleeper colour looks fine to me and, as others have said, older ones can weather to a much paler silvery grey.


I've never understood why some people report problems with fixing ABS chairs to wooden sleepers with butanone as it always works well for me. Provided your dilute varnish soaked into the timbers rather than filling the grain you shouldn't have any problems with it. I use plenty of butanone on a brush and do about four chairs at a time, applying firm downward pressure on the rail for about ten to fifteen seconds. Sometimes I find one or two chairs that haven't stuck, probably because I missed them when applying the butanone, but that's easy to fix.


It looks like you've painted the rails and chairs before applying your magic dust. How did you do this? What did you use?


Nick

Link to comment
  • RMweb Gold

Thanks everyone for these comments, and especially the verdict that the colour of the timbers is OK. There is the question of whether sleepers inside a depot - ie protected from the weather - would look less weathered. Very hard to tell from looking at photos from inside depots at that time, as the trackbed is rarely well lighted in such shots.


Perhaps once the builders have the goods shed up and running the Superintendent of the Line will send a PW train to the station?

Already happened :-) Dropper wires are buried in the ground and locos have been moving back and forth as if it was Paddington at rush hour!


I'll PM you an image from Moreton-inMarsh

Well received, many thanks Ian!


There is definately an amaount of truth in using real wood for something that was wood!

Yes, it's very satisfying to work with, isn't it. Only problem is, it's also very sensitive I find - ie one drop of the wrong colour and the whole thing changes appearance.


Do you find that the Butanone dries shiny?

That was my worry, but in general the timbers seems to have soaked it up and left no visible trace. I think perhas the capillary action also helps draw it in under the chairs. In one or two spots I applied too much and it did turn shiny, but a bit of weathering concealed this.


Ballasting before laying the rails can also work well.Don

Yes that's one of the nice features about laying the sleepers separately, I think. I don't intend to add much in the way of ballast here. Studying prototype photos from the period suggests there was little of that to be seen.


Loving those fish plates too...

I like them too. I was laughing at myself though: trying to get the length of fishplates just right while the gauge is totally wrong :-)


I've never understood why some people report problems with fixing ABS chairs to wooden sleepers with butanone as it always works well for me.

I wonder if it has something to do with the method of applying it. Like you say, it has to be liberally applied, which is a bit counter-intuitive. And I found that it doesn't "kick in" at once - it needs a few seconds under pressure. And then probably it is also a question of religion, we all swear by different approaches.


It looks like you've painted the rails and chairs before applying your magic dust. How did you do this? What did you use?Nick

I used my trusty Vallejo acrylics and handpainted everything. I know that acrylics on rail sounds odd, but their primer provides an OK base and if left to dry well, the top coats will harden up nicely I find. I painted the chairs after sliding them on the rail, but before laying the track. The rail itself was painted after fixing the track in place. This might be tricky in other situations, but here it was easy because there is no ballast in the way, plus I can easily stand my foamboard baseboard on its side to get to the tricky parts. Painting the rail while still loose didn't work, because sliding on the chairs would then peel/scratch the paint in places (the use of acrylic paint might have added to that, although I did try with Humbrol paint and found more or less the same problem).

Link to comment

This will give me something to work to when I start buildong my layout. The colours and textures are great.

Link to comment

...I was laughing at myself though: trying to get the length of fishplates just right while the gauge is totally wrong :-)


But on the other hand, when viewed side on the fishplates will be quite noticable whilst the incorrect gauge won't be...


Paul.

Link to comment
  • RMweb Premium

Nice work Mikkel. So glad you've given up on the code 100, your modelling deserves it. This track looks excellent. I'll be keeping your method with the polyfilla in mind for the future. I've recently been laying track in 2mm Finescale with ply sleepers and plastic chairs and haven't found any problem with adhesion so far either with Plastic Weld or Plastic Magic.


David

Link to comment

Paul's comment about the fishplates made me go back and look at the photos again and I've noticed on little problem in this area. You have the correct narrower sleeper gap for the final sleeper in each panel, but the gap between the end sleepers of each panel is too wide. The fishplate should almost fill the gap between the chairs.


Assuming these are 18 sleeper 44'6" track panels, the normal centre-to-centre measurement for the sleepers is 2' 6 1/2". For the first and second (17th & 18th) sleepers it is 2' 1 7/8", and between the end sleepers of adjacent panels it is 2' 1 1/32".


Nick

Link to comment
  • RMweb Gold

Thanks all, I'm glad it's of some use - although I should stress it is all done in an experimental mode. I do like the lighter look of the track, and the way it looks less OO than the Peco track I've been used to.


Nick's observation about sleeper spacing at the end of the panels made me go and check - and yes, there is a problem in a couple of places! It seems to be a combination of me not paying attention and some oddities in the spacing on the C+L panels. I'll post some photos with detail measurements tomorrow.

Link to comment
  • RMweb Gold

Right then. I was confused by Nick’s observation above, because I thought I had checked the spacing between two panels at some earlier point. And looking at my finished track now I can see that the spacing between the end timbers seems right in some places, and wrong in others.


A closer inspection reveals where I have gone wrong. I don’t want to seem as if I'm just passing the blame on to C+L, but I’m documenting the issue here in case it can help anyone else avoid the same mistake (note I am measuring in mm here, and am using distances between timbers rather than center to center):


Here is one end of a C+L panel, let’s call it “A”:


P2206303.jpg


...and here is the other end of the same panel, let’s call it “B”:


P2206304okb.jpg


And here are the measurements summarized:


P2206302.jpg


So: The measurements differ between the two ends of the same panel! This means that the distance between panels is dependent on the way you happen to turn them:


A+A end = 7.0 mm between the first sleeper on each panel

A+B end = 6.0 mm between the first sleeper on each panel

B+B end = 5.0 mm between the frst sleeper on each panel


This is compounded further by the different spacing between the two first sleepers at the “A” and “B” ends respectively: If you happen to combine two “B” ends, the sleeper spacing is 5.5 mm between the two first sleepers of each panel, and the sleeper spacing between the two panels is 5.0 mm. This looks OK because the distance beetween the two panels should be a bit less. This is probably the combination I happened to use when I originally checked if the spacing between panels needed modification. And it is also how it worked out when I laid some of the panels, like this one where the spacing looks - well - reasonable:


P2206285.jpg


But any other combination of ends will give you a wider distance between the panels than between the two first sleepers in each panel, which is what has happened here:


P2206284.jpg


Lessons learnt? Never assume anything, always measure twice, and lay your timbers one by one!

  • Like 1
Link to comment

Glad to see you've got to the bottom of that problem Mikkel. As you say, lay them one by one. After seeing you cutting out the webbing and now the need to check the end gaps, I'm even less convinced of the value of these pre-cut panels. Individual ply timbers (e.g. from Exactoscale) are so much simpler. It is even easier if you use Templot to generate your templates because you can define the exact measurements for specific prototype track panels, then everything comes out with the right gaps each time.


Nick

Link to comment
  • RMweb Gold

Hi Nick, yes that has become very clear here. It does serve me right though for not checking out each gap myself. Thanks for pointing it out, it would've been annoying to continue with these mistakes.


Fortunately, much of this track won't be visible anyway, down there beneath the decks of the depot - which is why it was a good opportunity to experiment.

Link to comment

Mikkel, lovely looking track. Using wood for the sleepers is very effective.

What paint did you use for the rail sides? It is really realistic.

Cheers

Chris

Link to comment
  • RMweb Gold

Hi Chris, I used handpainted Vallejo acrylics for the rail. I know that sounds a bit odd, but these are my standard colours now and I prefer using them for as many purposes as possible. Their primer provides an OK base and if left to dry well, and the top coat will harden up nicely I find. For the record, the colour is 70.822 German Cam. Black Brown. This is then weathered with a bit of light weathering powder.


I sometimes think too much rust looks wrong on layout rails, when I view real track from a distance they seem dark brown to me on all but the most abandoned sections of track - even if rusty at close hand.


I have a problem getting the top part of the bullhead rail painted - as you can see in the photos. When I wipe of the top of the rail, the top part of the sides tend to get wiped too. Must try with greater care.


I look forward to seeing your new points painted!

Link to comment

Thanks Mikkel - I have ordered one or two of those to try out, plus some thinners and white and black primers.

Chris

  • Like 1
Link to comment

Mikkle


Just stumbled across your blog (looking up LNWR chairs) and found it very interesting reading.


Just about to start a B6.5 turnoutusing stained Brooke Smith turnout sleepers (4mm wide) which are sold in 50' packets (P4 Society?)and just cut to length.


I dont know if they sell plain sleeper width (3.3mm wide) you can bet both 8' 6" & 9' pre cut sleepers, 8'6" will be fine in 00 gauge for 9' sleepers.


I could be wrong but the Exactoscale ply sleepers are 1.6mm thick where as C&L I think my be a bit thinner. The Brooke Smith come in at about 0.8mm and the Timbertrack Slip I have (Building a single with C&L and Exactoscale special 4 bolt chairs next)is about 1mm.


On track pannels, some companies used 12" sleepers at both ends of the pannels and also reduced the spacings between the last 2 sleepers. No idea what GWR practice was


My view is that Ply sleepers do look better when stained and weathered than painted plastic, as they seem to absorb whatever is used to both ballast and paint/stain them.


Butanone seems the best solvent to use as it allows the plastic to seep into the grain of the ply before drying, other types of solvent either dry too quickly and or do not melt the ABS. I have also heard that the MEK sold today differs from what was available in the past and Butanone is much nearer what was available.


I have tried the ply and rivet method (have 2 different presses)and have built turnouts and track. I look at those who still use the method demonstrating at shows. But cannot see why they still use the method. OK on the odd occasion using chairs I have had to use the odd copperclad sleeper (double slips). But with the advent of Exactoscale small, bridge and special chairs for both the obtuse (K) and common crossings the copperclad sleepers may now be redundant.


I look forward to seeing the progress both on this and the next section with turnouts on

Link to comment
  • RMweb Gold

Hi Hayfield, a belated thanks for this input. Yes the C+L timbers are a bit on the thin side in my opinion, but worked out OK in the end. I haven't tried the Exactoscale products yet, but it's good to hear you seem to be satisfied with them. I'd like to try out a direct comparison at some point.

Link to comment

Create an account or sign in to comment

You need to be a member in order to leave a comment

Create an account

Sign up for a new account in our community. It's easy!

Register a new account

Sign in

Already have an account? Sign in here.

Sign In Now

×
×
  • Create New...