Jump to content
 

5726 - Experiments with 3D Printed detailing parts


alanbuttler

675 views

Other B9 Creator users have had some impressive results using Spot-HT resin, in particular for small highly detailed components (see Rab's creations!). The main difference with this resin to the proprietary B9 resins is that you cannot use it for casting, it is also much less viscous which should mean that it settles quicker. I'd just about enough life left in the layer of PDMS for another print, so today I tested printing some detailing components using Spot-HT. The test parts I've roughly drawn up in Sketchup, some will need a little more work depending on the results of the print. The test pieces were:


4x Pannier tank rear steps

1x Top feed for 74xx

12x GWR Whistles pairs and mounting bracket

14x Steam heating hose cocks


16160860186_45038e2e86_z.jpg


First up, the steps have come out really well, with a thickness of 0.5mm they look just right. The rivet detail has come out nicely but I will probably increase the size next time round. There is some flash to remove from the edges of the steps, due to the positioning on the build table. Another thing for next time is printing these small components on a sprue. They were a devil to get off the build table without damaging! That said, this material is pretty tough even before curing under UV light.


15564839434_a7638f4001_z.jpg


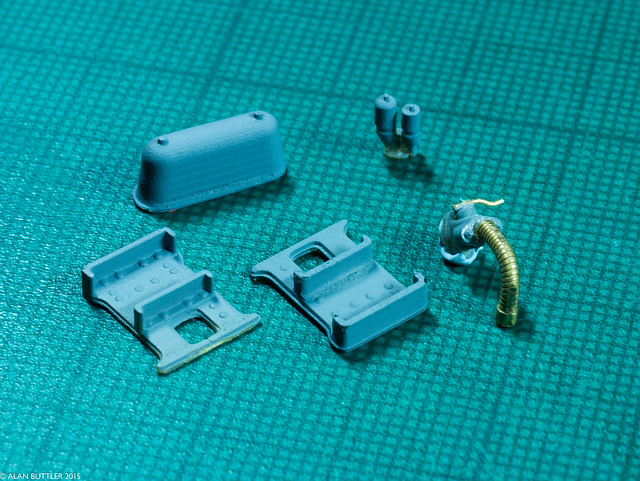
The whistles have lost quite a lot of their detail but I think this is down to the clouding of the PDMS. However, the small nut on top of the whistles has printed really well, considering its 0.25mm wide its pretty amazing! The steam heating hose cocks also look pretty good, with the addition of a turned brass pipe and handle made from 0.4mm handrail wire. However both these items are slightly overscale, I'll have to get the micrometer out next time and make them more accurate!


16185330331_62936e7cf5_z.jpg


15567405973_3b3fce907d_z.jpg


For now that's it for printing. I'm waiting on my spare vat to return from the USA as its being fitted with a replacement for PDMS called Nuvat, developed by Evert on the B9 Creator forum (details here). This new material should last a lot longer than PDMS.

Edited by alanbuttler

  • Like 6

3 Comments


Recommended Comments

Alan, I am most impressed, as usual. I need to delve into all this a lot more, before diving into the deep end myself.


One question regarding SketchUp. Do you construct the parts in real dimensions and then scale down to 4mm:1ft? It would seem that this technique would lend itself to multiple scales as well as getting things like rivets right first time? This does presuppose that good drawings and/or the real thing is available to measure.

Link to comment

Alan, I am most impressed, as usual. I need to delve into all this a lot more, before diving into the deep end myself. One question regarding SketchUp. Do you construct the parts in real dimensions and then scale down to 4mm:1ft? It would seem that this technique would lend itself to multiple scales as well as getting things like rivets right first time? This does presuppose that good drawings and/or the real thing is available to measure.


I've found it best to draw in real dimensions and then scale down as you say, Sketchup struggles at very small dimensions so drawing at 4mm:1ft you will find certain functions like follow me, or offset don't work properly as there is not enough resolution in the dimensions to create the wireframes (something I found on the Missenden Abbey 3D course).  Good drawings make everything a lot easier as you can import the drawing directly into sketchup and use it as a guide - if you have 4 hours to spare watch this rather intense video of a chap creating a 'working' Flying Scotsman in Sketchup from the works drawings:


It's impressive to see his mastery of the product, I'm far from that level and just creating these test parts posed some head scratching, especially the top feed.  


Also now the excitement of something actually printing out in Spot HT, I can look at the results a little more critically this morning! They are not to the standard I'd expect (based on the W&LLR print), there is some banding, I'm sure the finer detail should come out better and there is some flashing on the steps.  All solvable I'm sure but it will need some more tinkering :)

Link to comment

Thanks, Alan, most helpful.  Since last night's post I have been mostly awake with an ongoing Christmas virus but determined to forge ahead.  I have downloaded the b9c software and the .stl export extension.  I scaled down my simple turntable electric control panel in SketchUp to 4mm scale and, as you say, discovered that some of the detail was either lost or displaced.  So I then scaled in b9c software and was able to load the vat (virtually) with a number of control panels.


I have also been working on a SketchUp drawing of Stratford Old Town station, using a floor plan as a guide.  It will be too big to print on a b9c but is a useful learning exercise.


Well, I probably have 4 hours available at the moment.  I'm not going anywhere!

Link to comment

Create an account or sign in to comment

You need to be a member in order to leave a comment

Create an account

Sign up for a new account in our community. It's easy!

Register a new account

Sign in

Already have an account? Sign in here.

Sign In Now
×
×
  • Create New...