

A new 'Old Engine' - GWR 184 - part 9

I've read that some people like blog posts to be fairly substantial, so I'll include a resumé, in this post, of the story so far, before showing photos of my model of GWR No. 184. There are more details in the earlier posts in this series.
Background
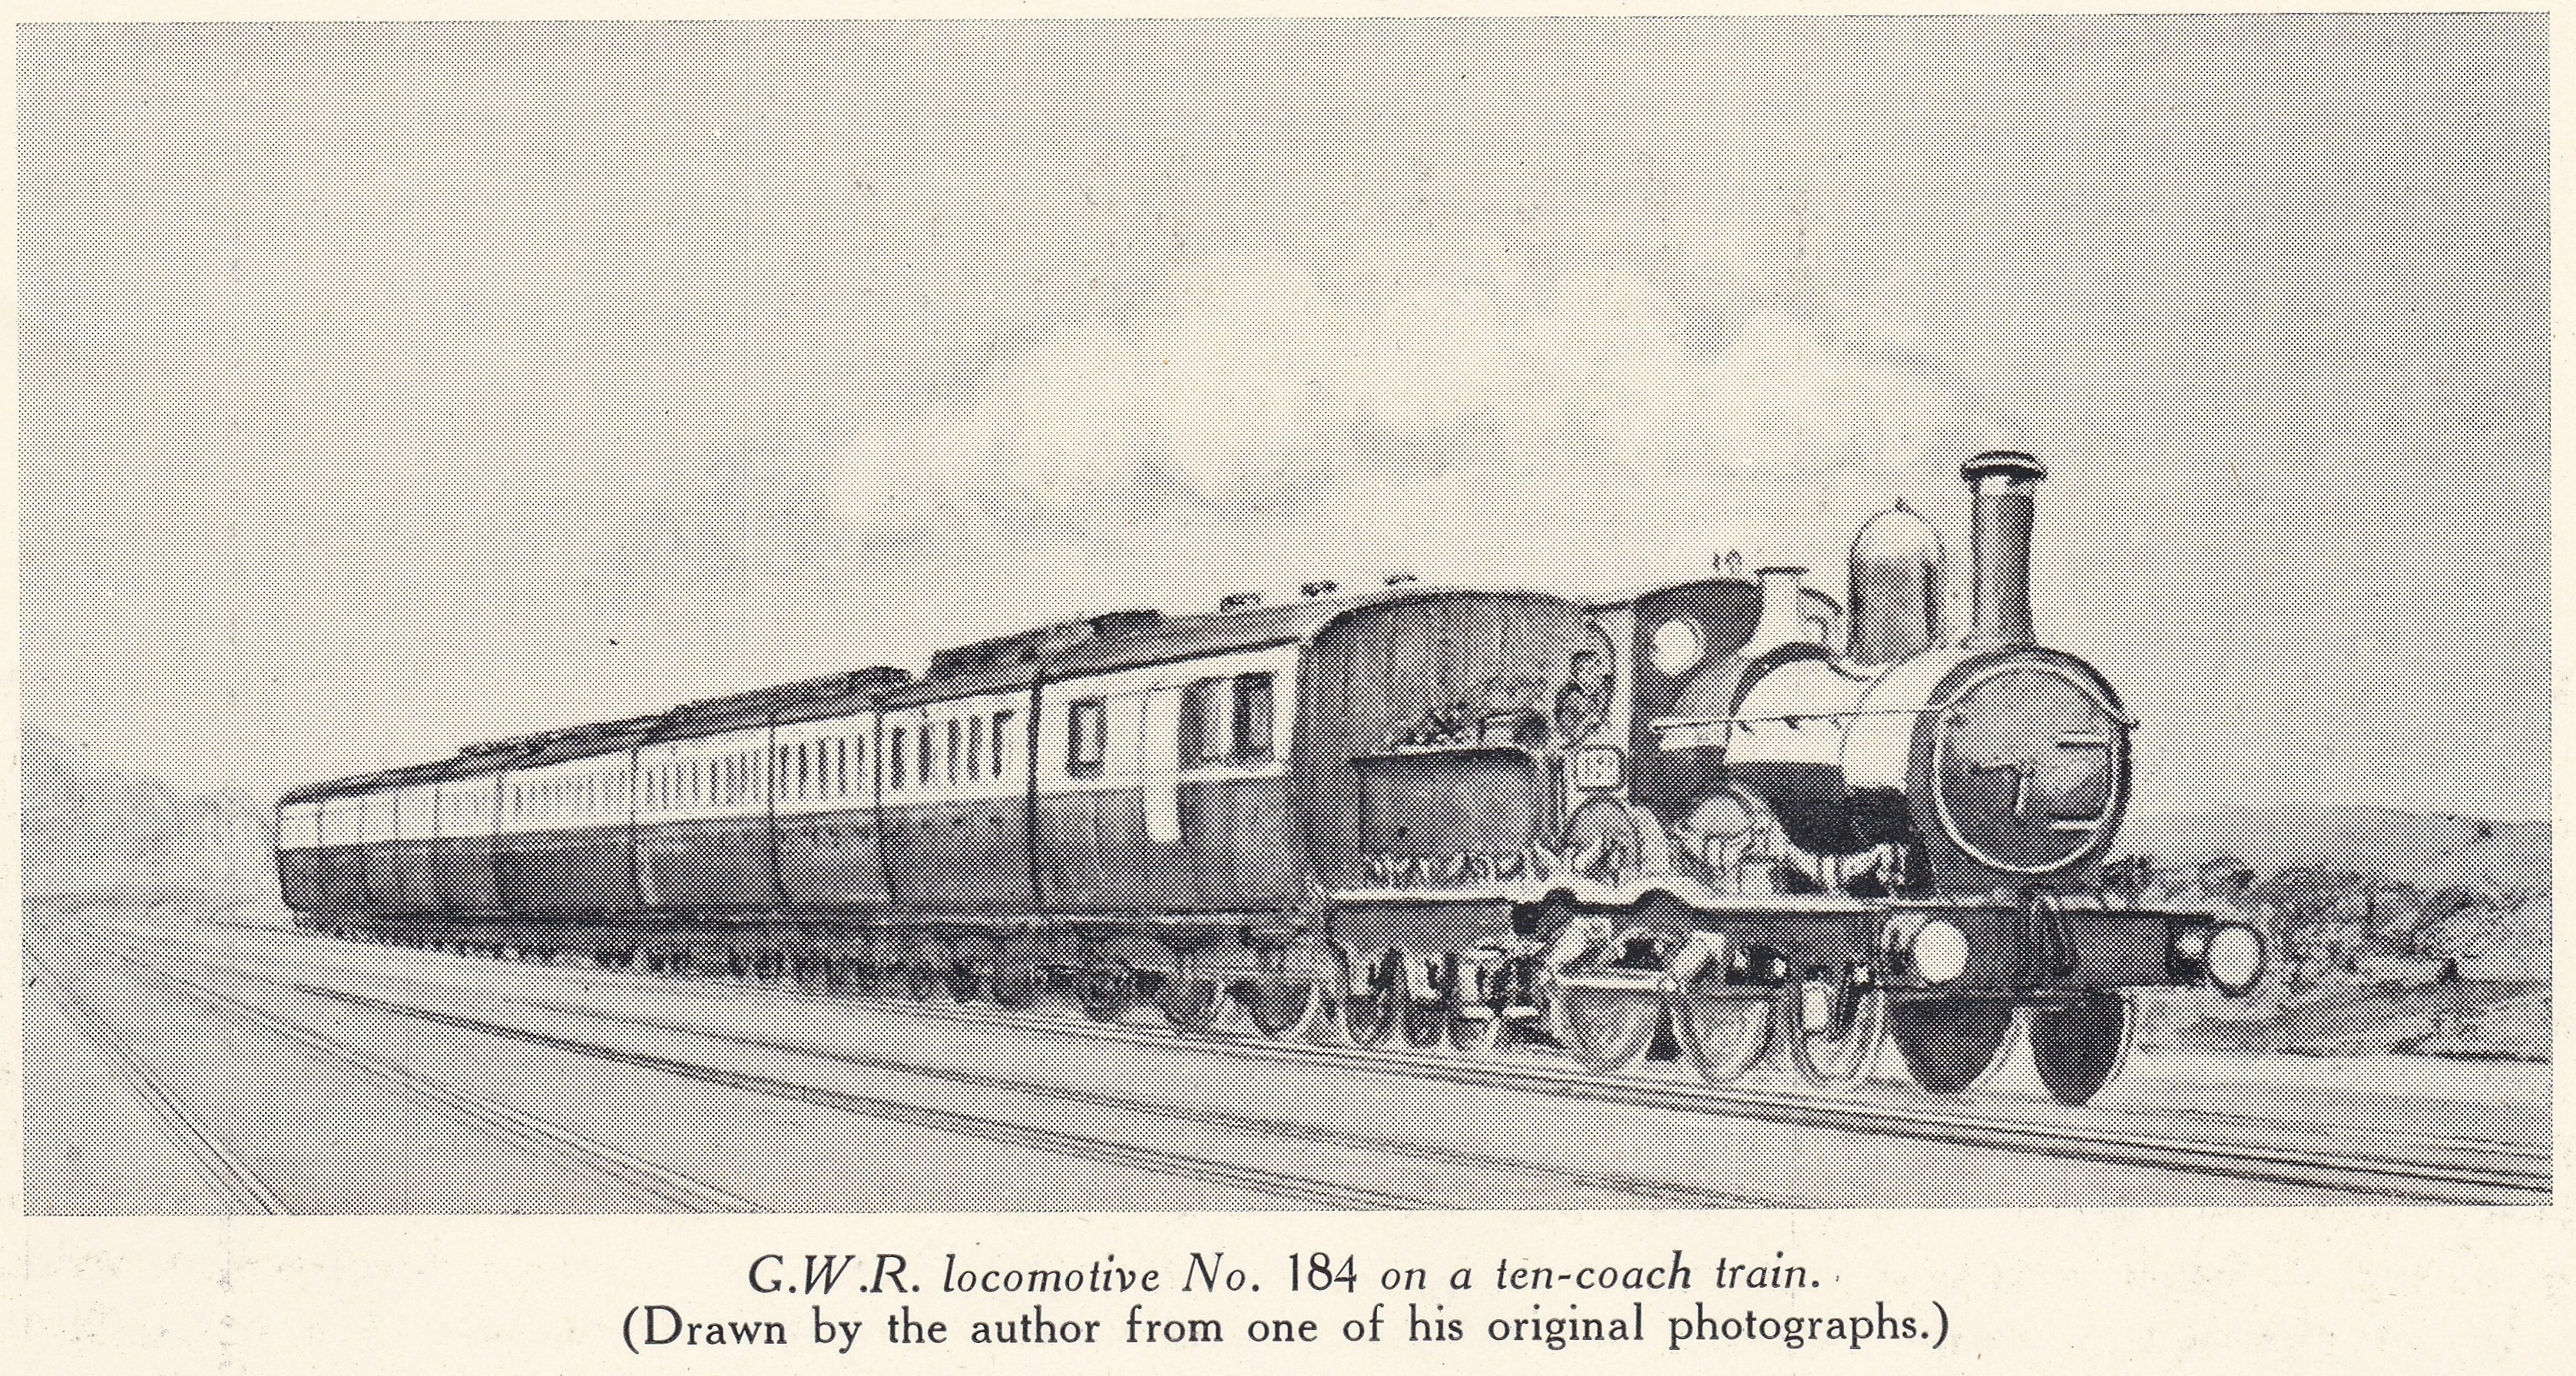
I chose this prototype since it was one of the first standard-gauge engines to run on the GWR, following the absorption of the Oxford, Worcester, and Wolverhampton Railway (otherwise known as the 'Old Worse and Worse'). No.184 was one of six engines built by E.B.Wilson in 1853 and this particular engine survived almost until the end of the 19th century, appearing in several photographs that document its re-builds at Wolverhampton Works in 1871 and 1893 It is also the subject of a sketch by C M Doncaster, which shows it at the head of a train of 6-wheelers approaching Reading Station. I decided that I would like to emulate this scene on my model railway.
Method of Construction
The first step was to create some drawings of the engine from a mixture of both photographs and drawings of similar engine types. I used these drawings to construct paper templates, so that I could check clearances, etc. for an 00-gauge model. I then cut out the major components from brass sheet and rolled the boiler by hand. The following photographs illustrate the major stages in the construction, together with dates at which each stage was achieved.

Because I was working mainly from paper templates, I made very few dimensioned drawings and fitted together the various parts by 'trial and error'. I often cut out a part from paper, initially, and then, after trimming the paper to provide a close fit, I replicated the component in brass. The major components of the engine body fitted together as shown below. Although I was concerned, in the early stages, that the structure felt rather weak, it all became pretty rigid, once the various sheets were soldered together. I was pleased to find that very little filler was needed, since the boiler and firebox fitted closely around the wheel arches. I used some book-binders' glue (which appears to be a tough form of PVA), to fill any remaining gaps. This proved very effective in providing a resilient seal, rather like bath caulk.

Chassis
I built the chassis from a pair of brass strips, soldered together while drilling the holes for the axles and frame spacers. For more details,see part 6 of this series. Initially, the model will be powered by its tender but I have made sure that there is sufficient space for a motor to be fitted inside the boiler.
To achieve this space, I cut away the lower half of the boiler, where it is hidden behind the splashers and the firebox. Top and underside views of the body are shown below:

Detailing
I made boiler bands from 5 thou brass sheet, cut into strips and stuck onto the boiler barrel using super glue. I also added rivet detail to the outside frames by using the brass detailing strips supplied by 'Mainly Trains'. These were also fixed with super glue.
I made sandboxes from small wooden blocks, wrapped in 2 thou brass foil, with a separate brass 'lid'. The springs are white metal, mounted above the footplate on nickel-silver wire uprights. Handrails are, similarly, nickel-silver wire (0.5mm). Outside cranks and coupling rods are from 'Alan Gibson'.
Since the main dimensions and appearance of the prototype changed very little throughout its re-builds, I keep in mind the possibility of back-dating my model to an earlier time period. I found that 'RT models' supply 4mm scale brass dome and safety valve cover in the E.B.Wilson style but, for the present, I have installed an 'Alan Gibson' '517-type' brass dome.

Painting
I decided to paint my model in a representation of GWR 'Wolverhampton 'livery, which I understand to have been based on the former OW&W livery. The Wolverhampton style of painting differed from Swindon, in that all items above the footplate, including splasher fronts and sand-boxes, were the same colour as the boiler, while the frames below the footplate and the wheels were brown.
My first step in painting, after a thorough clean-up of all the brass-work, was to apply an overall spray of grey primer. Then, for the boiler colour, I chose to use 'Rustoleum Painter's Touch' dark green enamel, which looked a reasonable match to descriptions of the 'blue-green' colour used at Wolverhampton This is a water-soluble paint,with a rather 'plastic' feel that dries to a 'wet look' finish. I found that it brushed more smoothly when thinned with a little water I am fortunate to have inherited some 'Winsor & Newton' series 3A sable brushes, which have superb paint-holding capacity and super-fine tips. They really make hand painting a pleasure! I think the finish will need some matt varnish in due course, since even 19th-century cleaners would find it had to maintain such a gloss!
For the brown frames and wheels, I used 'Winsor & Newton' Burnt Sienna artists' acrylic colour. Again, I thinned the paint from the tube, to produce a smooth brushing consistency with excellent covering power. If any of the 'painting gurus' on this site happen to read this, I should be interested to know why artists' acrylic is rarely mentioned for model painting, since I found it very pleasant to use.
For the black areas (footplate, smokebox, etc.), I used Humbrol black acrylic, which I find dries to a good-looking 'oily' sheen.
Lining and Lettering
.
I prepared artwork for the lining and number plate by the methods I have described previously in this blog.
Wolverhampton lining was black and white, so I used white inkjet transfer paper. My copy of 'Great Western Way' (1st.ed.) gives few details, except to state that the white edges of the lining were broader than the equivalent orange edging used at Swindon. Another factor to take into account is that the printed black centre lines tend to spread slightly into the unpainted white edges. I made a few test prints to determine appropriate widths that seemed to match the visual impression seen in old photographs.
I scanned one side of the model to provide 'actual size' templates of the cab sides and sand boxes, on which I 'drew' the lining on the computer screen, as shown below:

For the brass fillet between the boiler and smokebox, I cut a sliver of 1 thou brass shim and attached it to the boiler with PVA glue. Cutting this very thin material produced a natural curl, which I exploited to help hold it firmly against the boiler.
The 'Current' Model
I cannot describe the model as 'finished', since there are still many additions and improvements that I wish to make, but it has reached the stage where photographs can give a reasonable impression of what I have been trying to achieve.

My model of GWR No.184 attached to 2500 gal Dean tender (powered)
As I mentioned above, the model is not yet 'self-powered' but can be 'driven' by means of the 2500 gal Dean tender that I described in a previous post.
When seen in isolation, it's not easy to appreciate its small size and rather 'antique' feel, so I have taken a couple of photos to set it in context.
One of my aims, at the outset of this project, was to represent the scene drawn by C M Doncaster. Here is my interpretation, built around some of the models I have built of GWR 6-wheel coaches:

and here it is alongside Armstrong's 'Queen' class express 2-2-2, the first of which was designed 20 years after No.184 was built:

GWR No.184 alongside 'Queen' class at North Leigh
Conclusion
This was the third model that I have completely 'scratch-built' from brass sheet; the others were the 'Queen'-class 2-2-2 and my interpretation of Dean's 4-2-4T, No.9.
It proved a trickier build than the others, mainly because of the 4-coupled chassis but, also, the raised firebox and the need to leave space inside the structure to add a motor at a later date. My 'Queen' was only ever intended to be tender-powered, while the 4-2-4T is powered by a 'Tenshodo' SPUD in the rear bogie.
Construction took longer than I expected because of many non modelling-related interruptions and I was beginning to get a little impatient towards the end. There are quite a few mistakes that could be corrected in a re-build, especially the shape of the top of the firebox. I've decided, however, to set engine building on one side, for a while, so that I can concentrate on some scenic work, which is badly needed on my layout, if it is ever to represent the sort of 19th-century scene that I have in mind.
If anyone else feels moved to have a go at scratch-building a 19th-century type of locomotive, I would recommend starting with a 2-2-2, since these are very straightforward, with none of the alignment problems associated with coupled engines. I feel that, if you can build a wagon, then a 2-2-2 engine is not that different! Also, I have found that brass sheet is an easy material to use – in some ways easier than plastic card, because it can be folded and rolled into curved shapes. Once you've cut your teeth on a simple prototype, you can follow whatever course catches your imagination.
I also realise how much I have learned, and absorbed, from various books, and should mention, in particular, Iain Rice's “Etched Loco Construction”, which helped me over many hurdles.
Mike
Edited by MikeOxon
Restore images
-
 10
10
-
 2
2


15 Comments
Recommended Comments
Create an account or sign in to comment
You need to be a member in order to leave a comment
Create an account
Sign up for a new account in our community. It's easy!
Register a new accountSign in
Already have an account? Sign in here.
Sign In Now