

Kustom TRAXX Loko: Renfe Mercancías Series 253 electric locomotive by Electrotren

Entry posted by NGT6 1315
700 views
Afternoon all!
As connoisseurs of the Continental railway scene will long be aware of, there's much truth in the statement that even though there has been a lot of standardisation going on with the advent of "one size fits all" locomotive platforms such as the Bombardier TRAXX, Siemens Eurosprinter and its evolution called Vectron, as well as the Alstom PRIMA, there is, in fact, a lot more variety to even these highly standardised types than meets the eye. I but will concede that for part of that variety, one has to look fairly closely!
That being said, before we go on with having a look at a decidedly non-standard TRAXX locomotive, I would first like to point you to "The Basics of TRAXXology" if you want to refresh your knowledge of the history and general characteristics of this product line.
Even while standardised designs can cover many requirements of the modern railway scene outright, there may yet be specific customer requirements which will have to result in appropriate modifications. In my view, the Series 253 freight locomotives ordered by Spanish national operator Renfe for their logistics sector are an excellent example.
In 2006, Renfe contracted Bombardier for 100 of these locomotives, which were to be a derivative of the basic TRAXX F140 DC type from the 3rd generation of Bombardier's universal product family, called TRAXX 2E. These locomotives had to be outfitted with 1,668 mm broad gauge bogies as the most obvious characteristic, but aside from this fundamental requirement, Renfe specified a number of other modifications.
Not requiring the option of having their locomotives converted to diesel-electric operation, the body sides were specified to be smooth, deleting the usual three independent panels present on normal TRAXX 2E locomotives where the second of these three panels would be removed to accommodate engine room ventilation grilles on diesel-electric locomotives. Likewise, the provision for fuel tank filler tubes, otherwise present in the solebars halfway down the locomotive's length, was deleted.
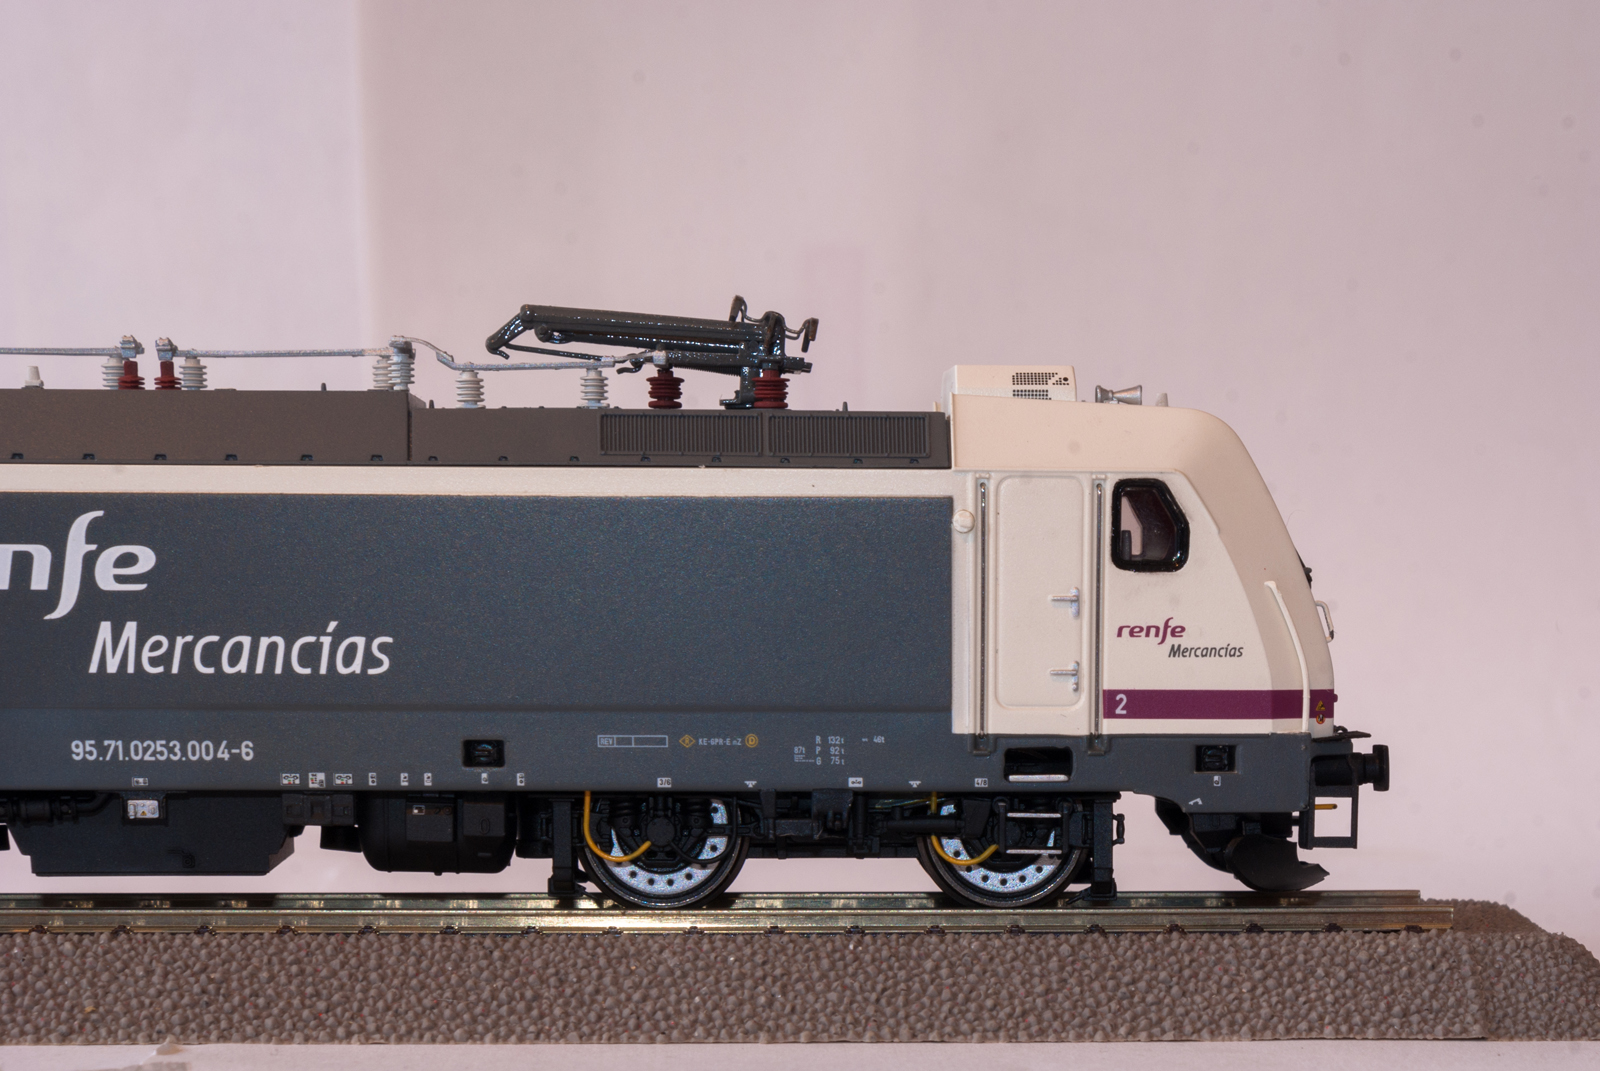
One other modification easily recognisable even at a cursory glance was the provision for uprated air conditioning packages. Normally located behind swing-up panels in the cab faces on regular TRAXX 2 and 2E locomotives, the devices requested by Renfe were too large to be fitted there, and were thus relocated to the cab roof panels, housed in prominent fairings.
The headlights were the last item to be modified for the Spanish TRAXX 2E variant. Traditionally, Spanish motive power has been fitted with large, high intensity central headlights, which are considered so important that even today, according to Section 258, paragraph 3, any locomotive is to be considered unfit for service both in day and night conditions if this central headlight fails, provided that tunnels exceeding 300 metres in length occur on the locomotive's planned route. In this event, the locomotive may proceed to the next station where it may be taken out of circulation, under the condition that its maximum speed be reduced according to visibility and not exceed 20 kph across level crossings.
Effectively, the headlight arrangement on the 253 was modified such that the central headlight was changed from a single reflector, regular intensity light to a double reflector, high intensity light, and relocated from below to atop the windscreen. Correspondingly, the high intensity reflectors normally installed on the inside of the lower headlights were deleted. However, the first couple of 253s were initially fitted with the standard lower headlights and had the customised lighting units fitted prior to entering revenue service.
Finally, the 253 was configured without ETS capability as the locomotives were not intended for any kind of passenger work, and with a newly designed, fully integrated auxiliary inverter complex.
The contract made by Renfe and Bombardier specified that 55 of the 100 locomotives be assembled at the Vado Ligure locomotive works in Italy, which Bombardier have assigned responsibility for DC only TRAXX locomotives. The remaining 45 locomotives were to be assembled at the Villaverde Bajo workshops in the far south of Madrid, but delivered as CKD kits from Vado Ligure.
253-001 was outfitted with standard gauge bogies for initial trials, which, interestingly, were conducted at the Siemens-owned Wegberg-Wildenrath test circuit in late 2007. By May 2008, 253-001 and 002 were conducting route trials in Spain – naturally set on broad gauge bogies by that time – in order to allow for the first 253s to enter revenue service by the end of the year. Mass production had commenced in March 2008, and 253-001 through 005 were accepted by Renfe on 20 January, 2009. Those locomotives assembled in Italy were transferred on standard gauge bogies and converted to broad gauge bogies at the Spanish-French border.
All Renfe 253s had been delivered by the summer of 2010. Private freight operator COMSA had also ordered a small batch of three 253s in April 2008, and took delivery of them in September 2009.
The H0 scale model of the Series 253 locomotive in Renfe livery is marketed by Hornby under the traditional Electrotren brand. However, close inspection reveals that this is actually the ACME TRAXX model, which is also evidenced by the circuit board actually being labelled for ACME. Though I do find it remarkable that Hornby did go the extra length of having a customised body shell with the external air conditioning pods, smooth body sides and deleted fuel filler recess and double reflector upper headlight furnished. I am sure there are producers who would just take a standard TRAXX body shell and slap Renfe colours on it!
At present, Electrotren marketed two different Renfe 253s, both of them in conventional DC, DCC and digital AC versions:
-
253-001: E3700/E3700D/E3701
-
253-004: E3698/E3698D/E3699
Elsewhere, I mentioned that the ACME TRAXX model is finely detailed and provides a fairly delicate representation of these now-ubiquitous locomotives. But, as always, I soon found items to be addressed on my workbench.
So, first of all, a general view of the model after having been modded:
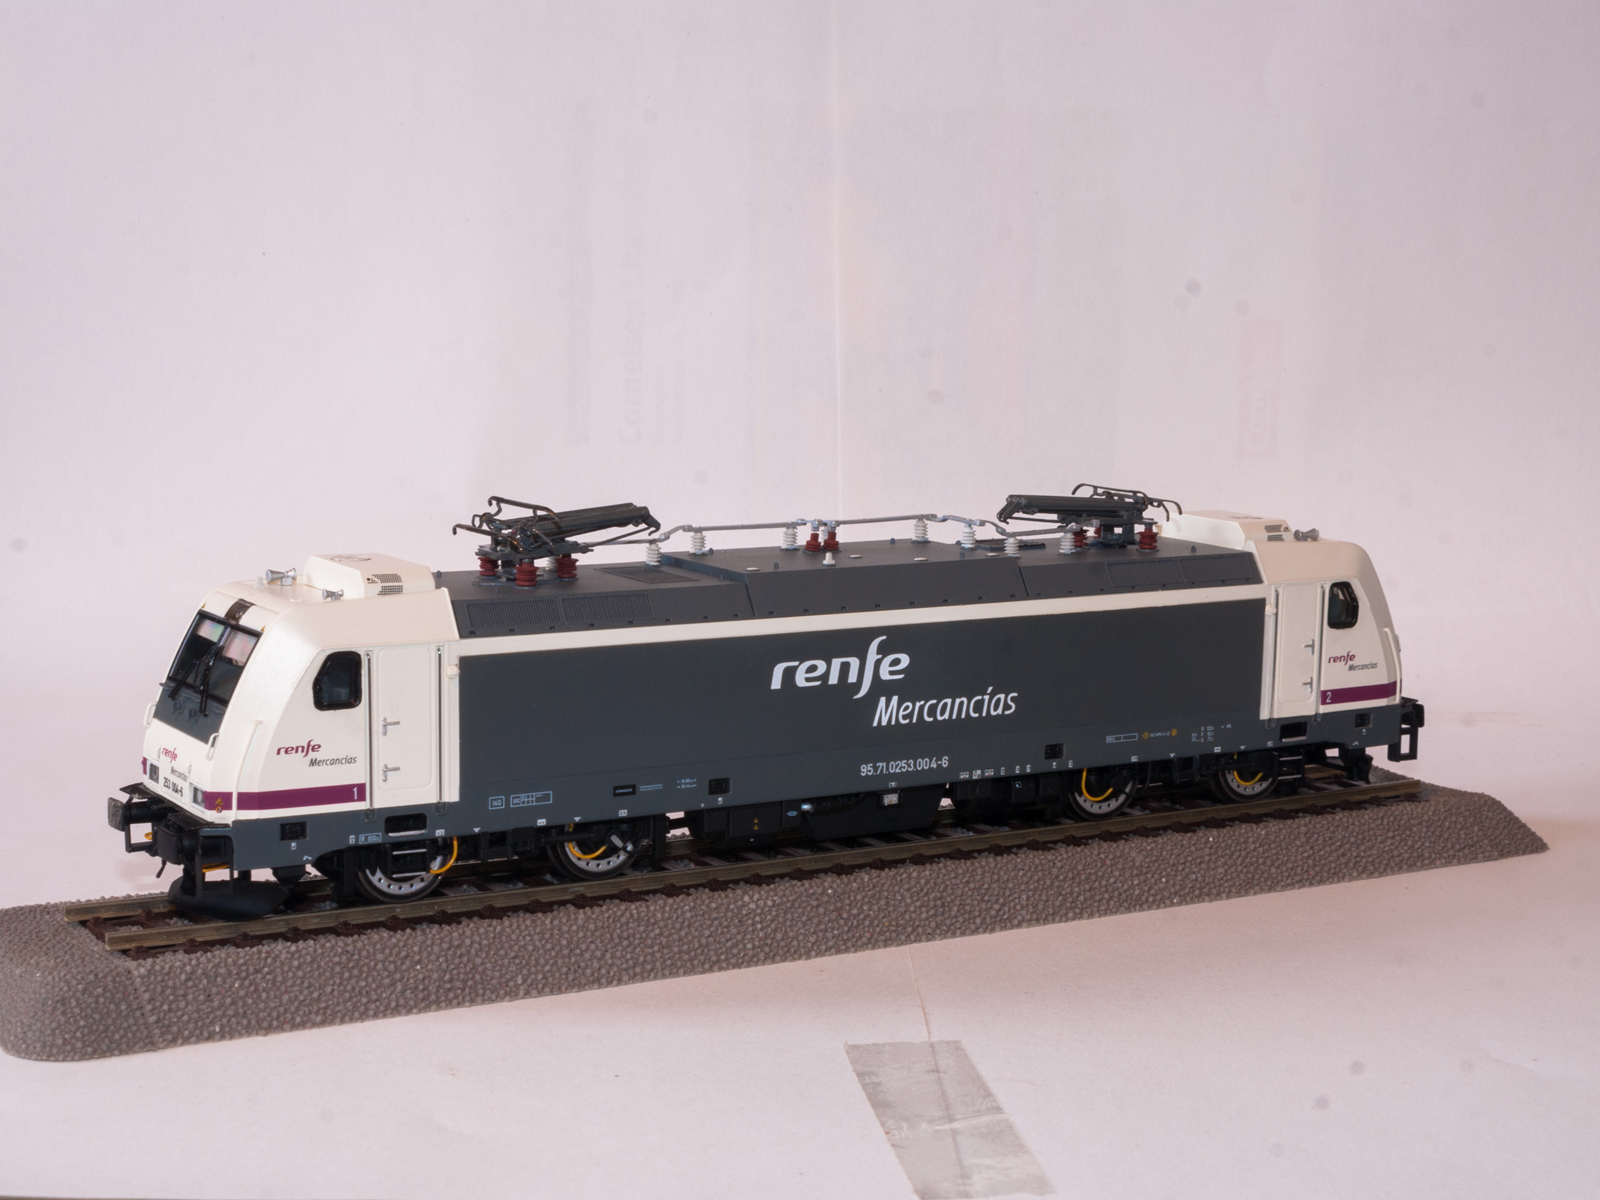
253-004 was one of the very first 253s to be accepted by Renfe, and put in service on 20 January, 2009, with works number 7983. It's worth noting that initially, the 253's livery was to have the white colour on the cab sections extend downwards right over the solebar.
The current Renfe "corporate identity" livery is alternately referred to as the "Operadora" or "Pantone" livery. The "Mercancías" sector uses a slightly modified variant of that livery with the body sides in the engine room area on all locomotive types being painted grey, while locomotives used in passenger service have white body sides.
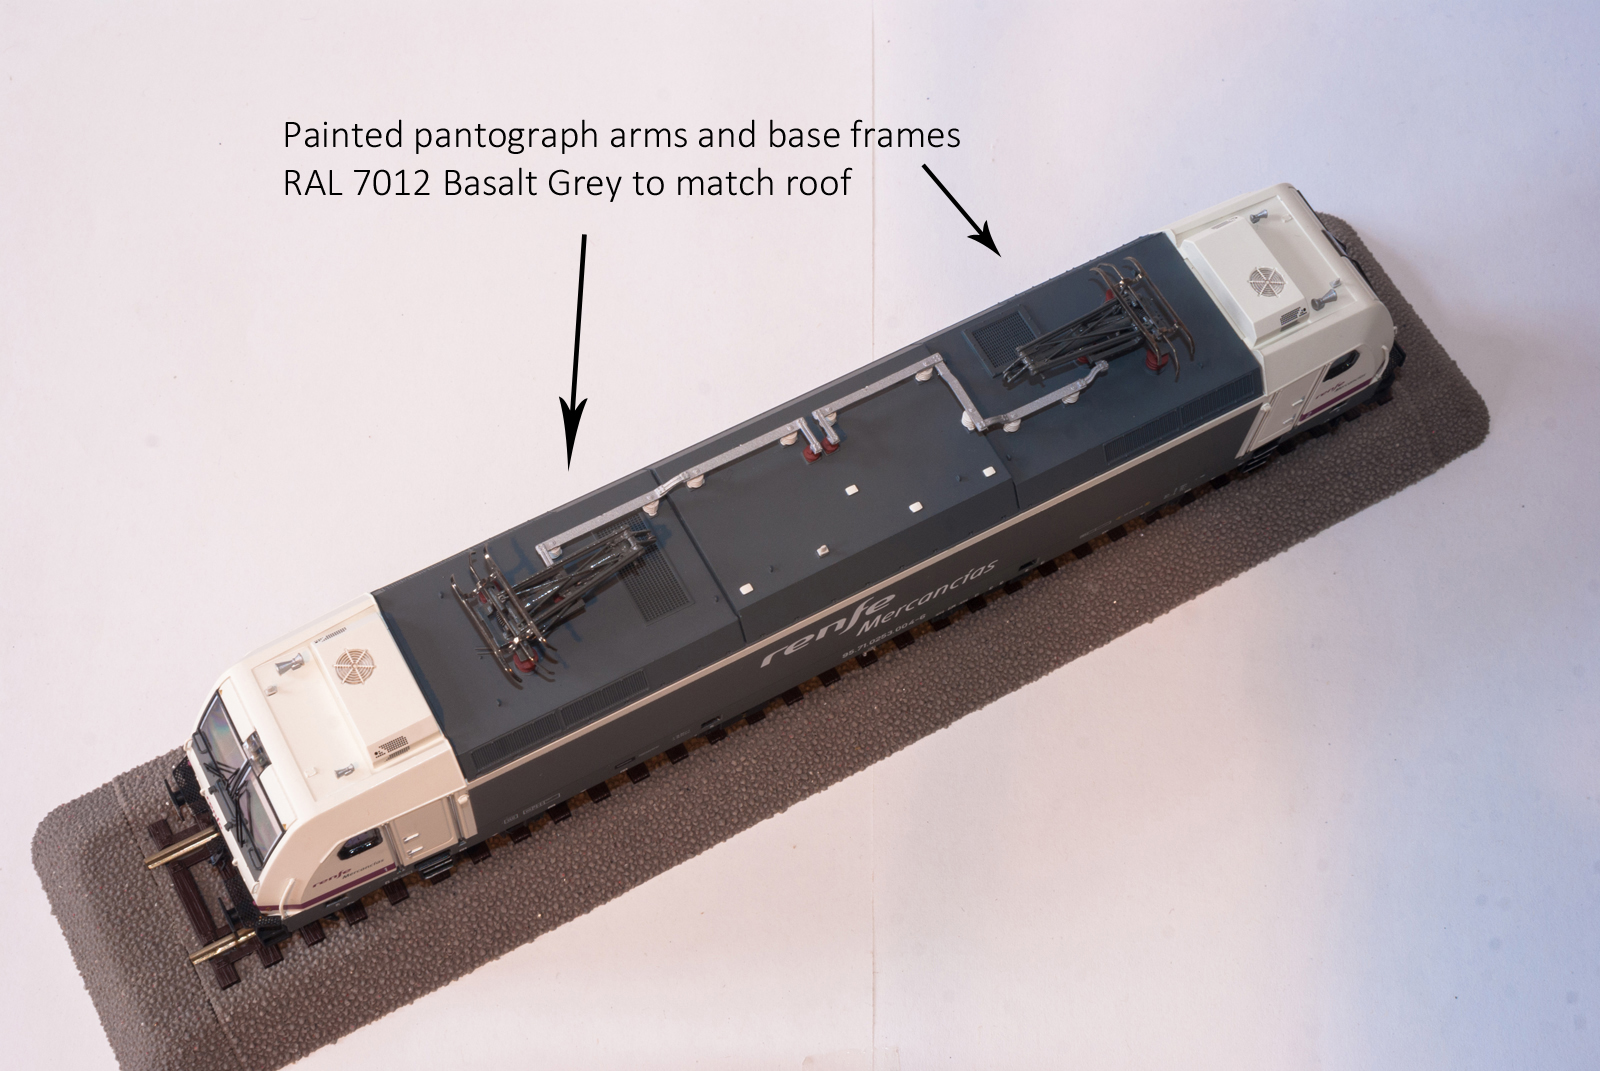
Fo better understanding and illustrative purposes, I edited the following set of photos to call out the modifications I carried out on the model.

In my first ACME TRAXX modding jobs, I had elected to completely replace the pantographs with corresponding Roco items, as ACME had chosen fairly bulky off-the-shelf pans from Sommerfeldt on their earliest production batches. By about 2010 or 2011, they began using noticeably better-looking custom parts, though the heads did remain bulky for a while longer.
The Electrotren 253 is one of those models with the "intermediate" pantographs, so that only the heads really warranted replacement. This also had the bonus of my not having to modify the supporting insulators or the attachment points in any way. I did have a couple of Roco pantograph heads matching the 1,950 mm wide version in my spares stash and knew that with a very slight widening of the pivot holes in the retaining latches, they could be slid onto the ACME pan arms with ease.
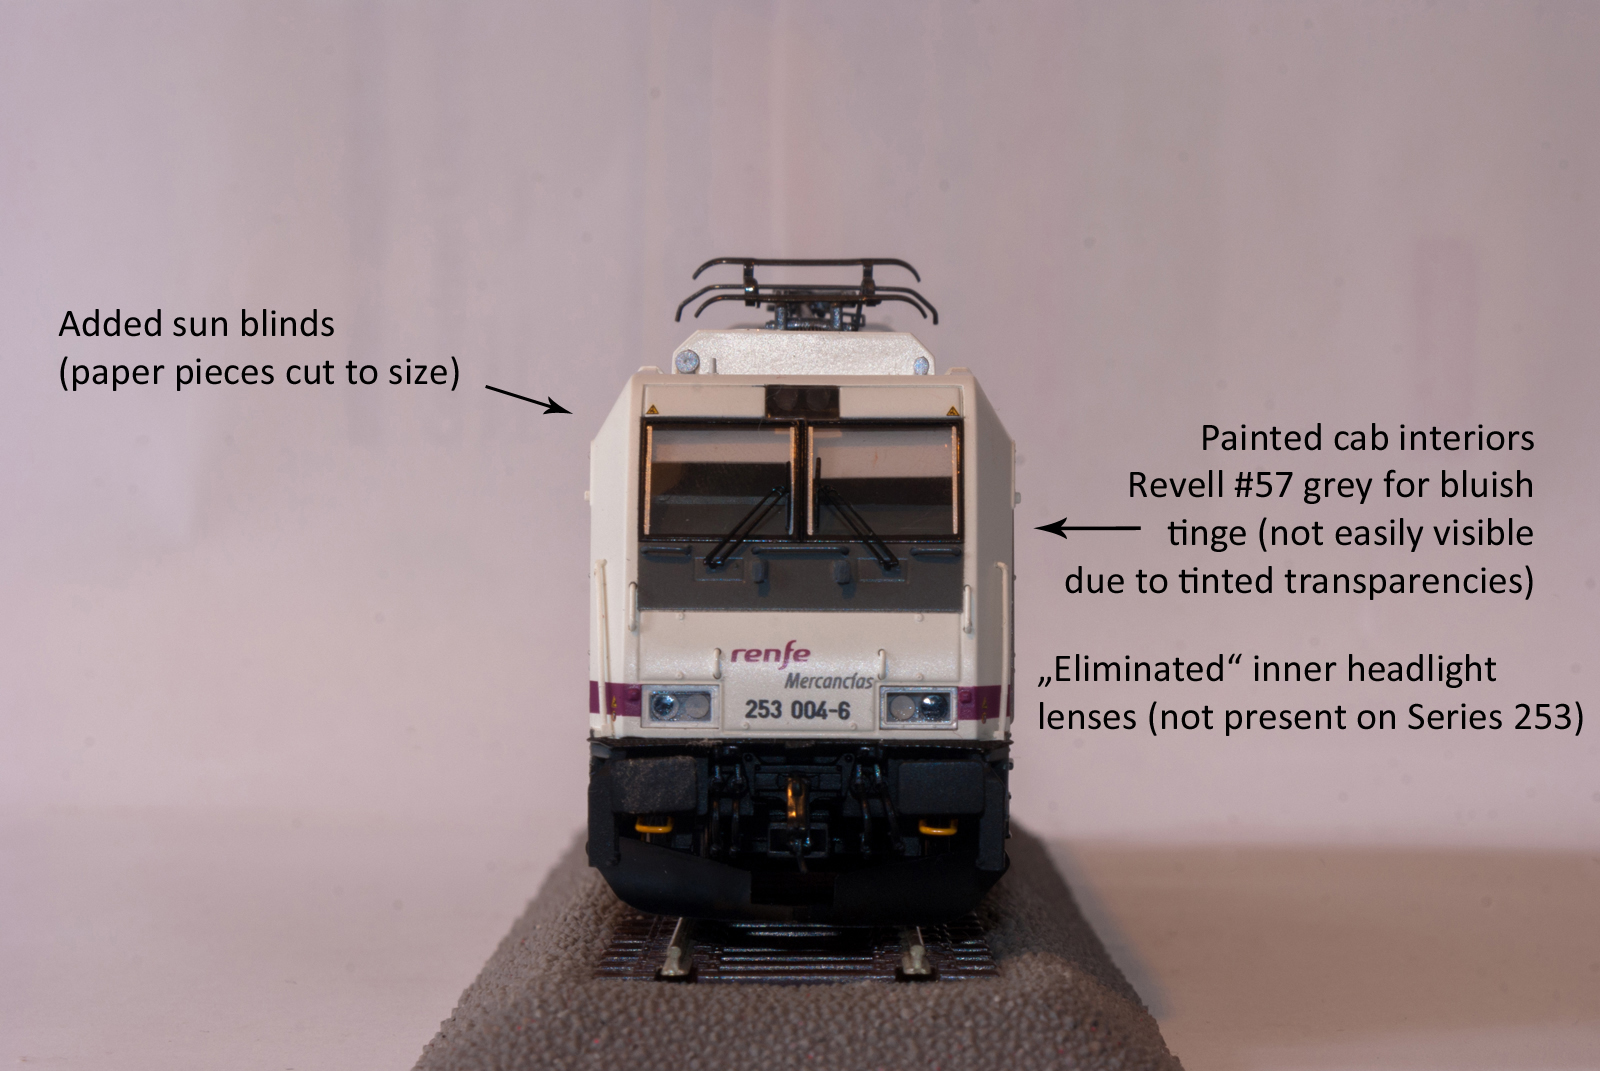
I also needed to address the cab faces in such a way that I needed to eliminate, or at least conceal, the inner reflectors on the lower headlights as these parts had not been changed for the 253 model. The transparent parts used here have small, cylindrical bores for the lighting conductors to slide into, so the conductors leading to the inner reflectors had to go first.
As the rear faces of these headlight units should be painted the same colour as the cab section but – as on all ACME TRAXX locos I have had my hands on so far – were not, I tried just filling in the former inner reflectors with some white paint.
I'm not entirely sure this is the best way of doing this when looking at the result, so I'd certainly welcome any suggestions as to which material I could use for filling the inner lenses in such a way as to make them essentially disappear!
On earlier TRAXX models (both by ACME and Roco), I had also attempted some cab interior detailing, but found that since the transparent parts used for the windscreens usually are tinted to varying degrees, little of that detailing was actually visible. I thus decided to limit myself to my usual routine of just installing sun blinds partially pulled down (and in different positions on all four windscreen halves!), and painting the interior element with a bluish grey to suggest the colour typically found in cabs both on contemporary Bombardier and Siemens locomotives.
Anyone wanting to disassemble an ACME TRAXX model and access the cab elements should be cautioned – these components contain the head and tail light LEDs and are connected to the circuit board by way of cables plugging into flat-mounted sockets atop the CB. It's easy to break off the relevant cables from the LED leads on the lighting fixtures, requiring re-soldering.
To visualise:
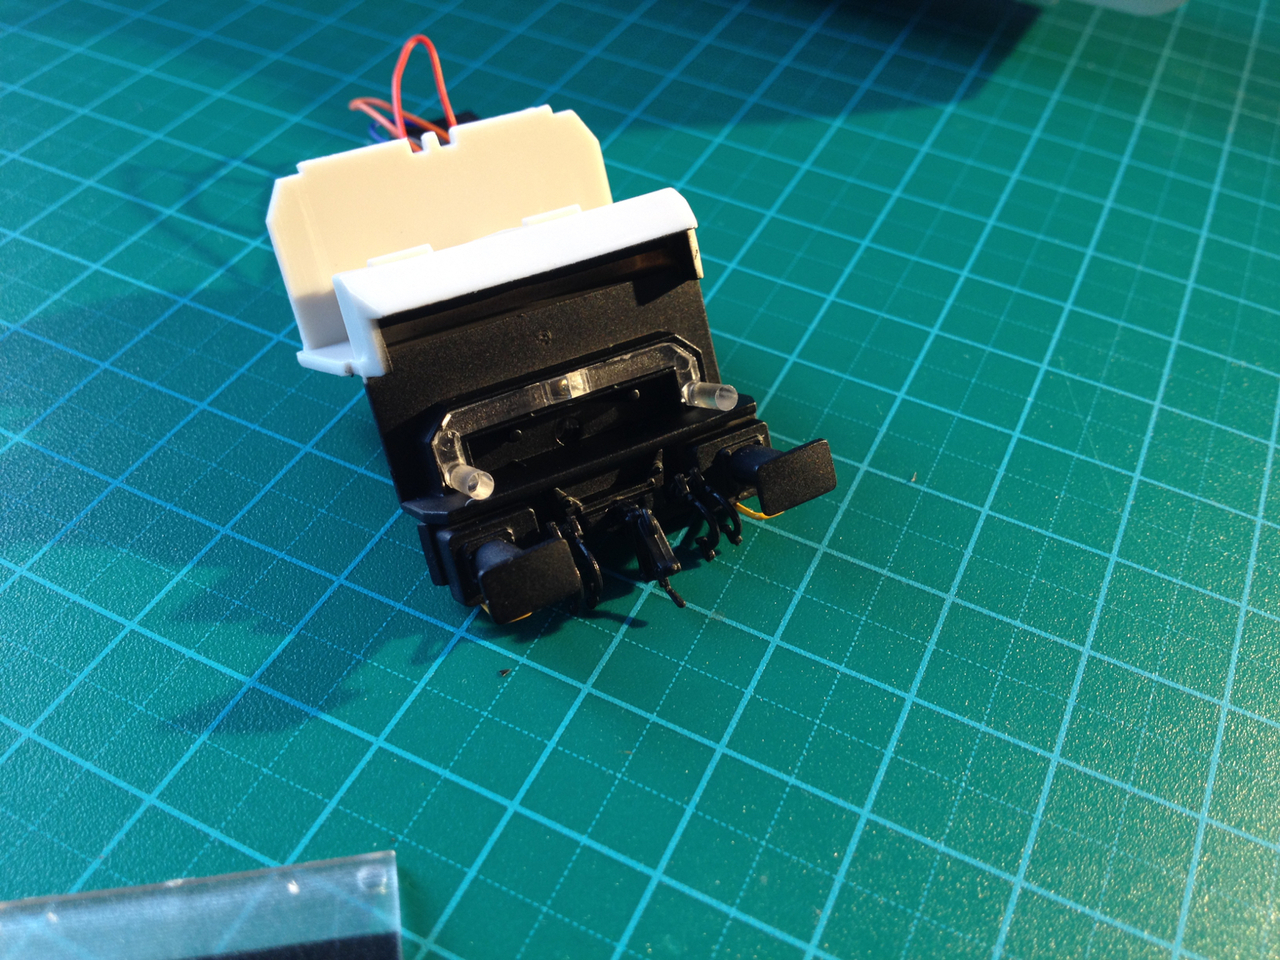
This photo shows one of the cab interiors prior to painting but with the lighting conductors to the former inner headlight reflectors removed. These are – incorrectly – configured to display the tail lights anyway.
And an overview of the chassis sans body shell:
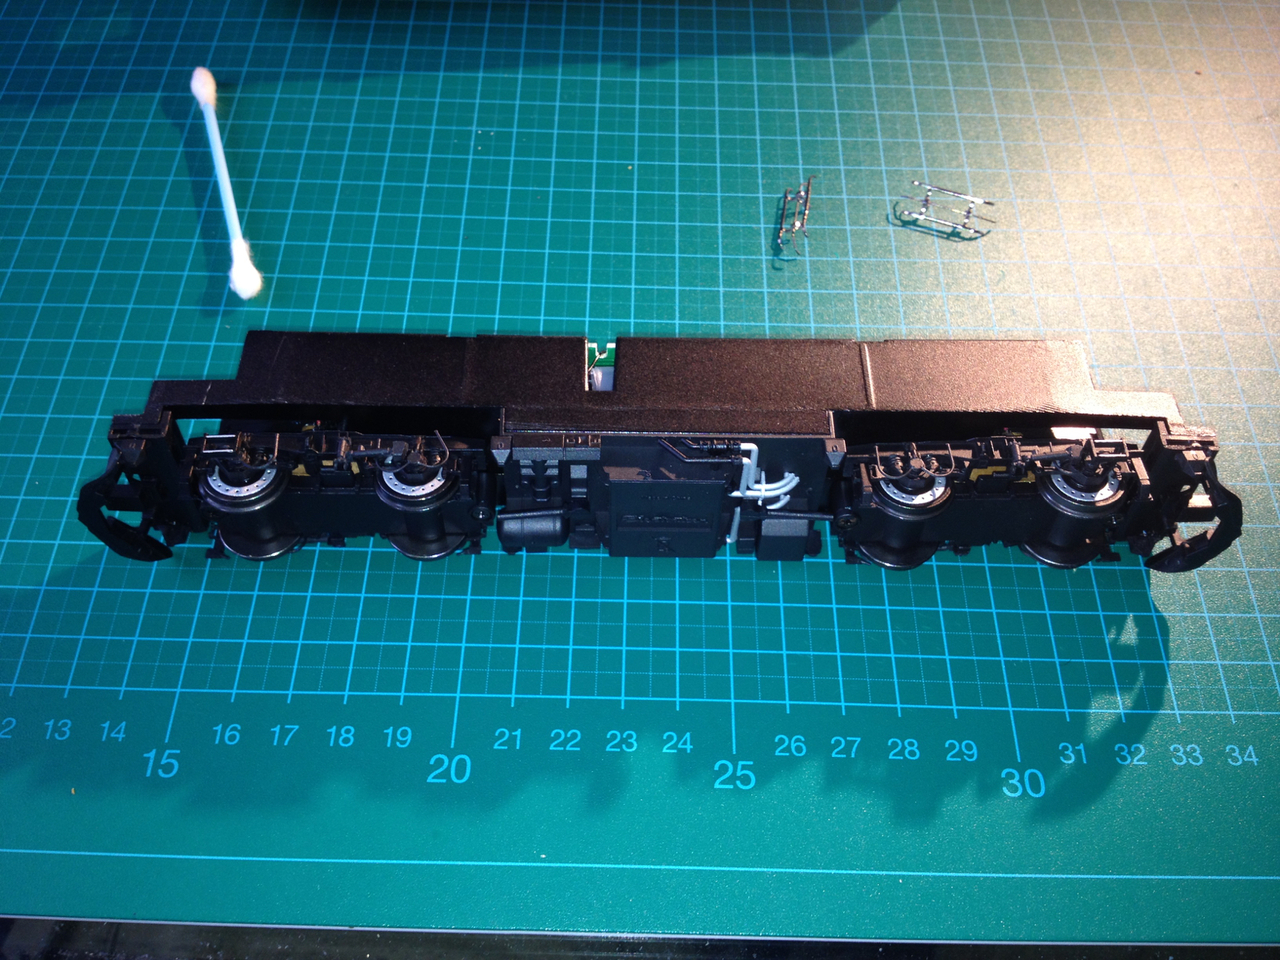

One other thing ACME keep omitting is colouring the side window seals black, so that, too, was addressed. Likewise, using some prototype photos from my archive as references, I coloured the most prominent bits of bogie cabling, though one could argue that after extended use, these colours are no longer visible due to dirt.
For TRAXX locomotives configured for Germany and Switzerland, the parts bag would contain the PZB (Indusi) and Integra-Signum transceivers respectively. As I mentioned in earlier blog posts, attaching these borders on being a nightmare as there is very little area for glue to adhere to.
If you have the tools, I would definitely recommend drilling very fine holes into the retaining arms and the bottom of the bogie frame in the proper locations and furnish retaining pins from suitably thin wire for a stronger hold – because I'd fear for these transceivers to fall off during operation sooner or later.
The braking weights are called out near Cab 2 on the loco's left side and near Cab 1 on the right-hand side:
R 132 tonnes
P 92 tonnes
G 75 tonnes
yielding a braking force of 152, 106 and 86% respectively.
There was one more item to be addressed on the rooftops. –
While the newer ACME pantographs are suitably fine scale items, they are inappropriately painted aluminium, though on TRAXX locomotives, both Stemmann and Schunk pantographs are commonly painted dark grey. Prior to fitting the Roco heads, I therefore took off the pantographs entirely and airbrushed them with RAL 7012 "Basalt Grey."
And as (almost) always, I should like to finish this entry with a few video links showing Series 253 locomotives. Thanks for reading!
-
 2
2

0 Comments
Recommended Comments
There are no comments to display.
Create an account or sign in to comment
You need to be a member in order to leave a comment
Create an account
Sign up for a new account in our community. It's easy!
Register a new accountSign in
Already have an account? Sign in here.
Sign In Now