
Chimney and Replacement Wheelhouse
Entry posted by Ian Morgan
381 views
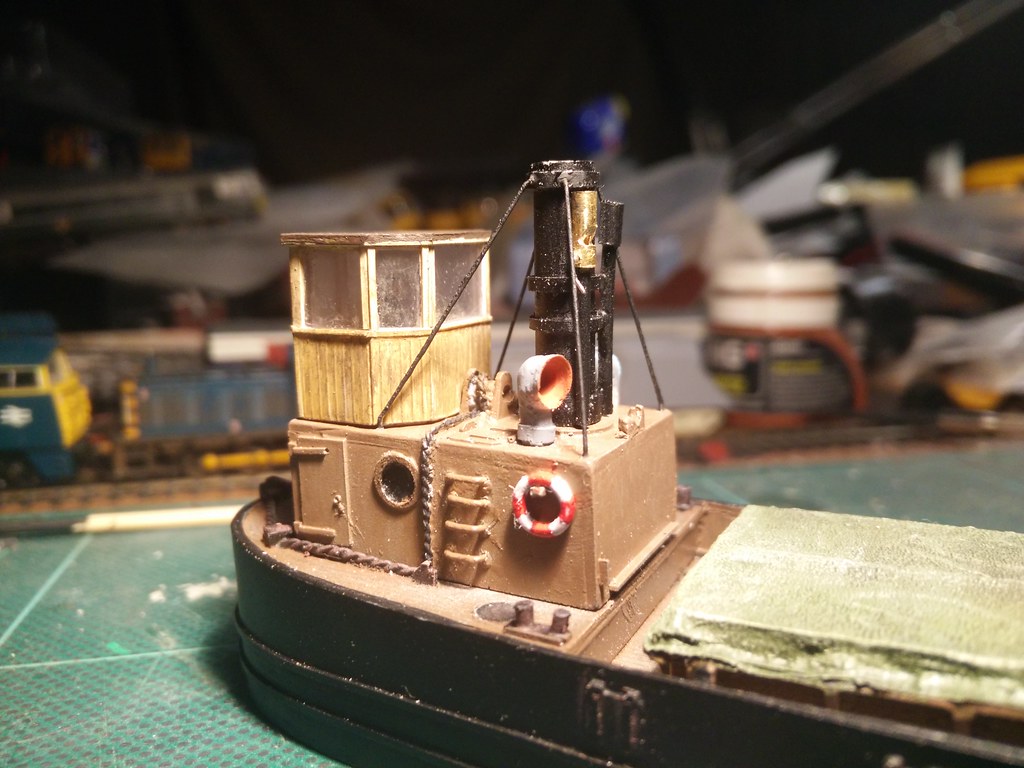
As I said previously, I wanted to replace the wheelhouse supplied in the kit, which is a solid resin block, with a new structure with interior detail. I started with some transparent plastic sheet to form the walls, and a piece of plasticard for the roof.

Some thin, scribed plasticard was then glued on to finish the lower walling, and strips of plastic framed the windows (and hid the ugly joints in the clear plastic.

A piece of plasticard, shaped to form the floor, was glued to the top of the engine room for the new wheelhouse to locate onto. It is a nice tight fit, so the wheelhouse is not currently glued down, but can be easily removed.
Some interior detail was then added. A brass wagon brake wheel fitted to some plastic offcuts forms the ship's wheel. A piece of brass tube, filed to round off the end and with some canopy glue in the hole to form a window, represents the ship's compass. Finally, a small table for the charts was fabricated from more plastic sheet. The captain is a ModelU bus conductor, suitably painted with Arun jumper and turned down wellies.

It was at this time I noticed the ladder rungs on the boiler room walls in various photos. It would have been easier to add them before gluing it to the hull, but I managed to drill the holes and insert 0.5mm brass rod for them.
The chimney/funnel/smoke stack moulding included the pipework for the whistle, and what I presume is the safety valve. The top of the chimney is quite shallow, so I deepened the hole using a succession of drill sizes carefully twisting them with my fingers. I went down as far as I dared, and the end result seems OK. The whistle was some brass tube, with the bore increased by drilling, and the aperture created with a triangular file. A piece of wire formed the operating arm. If I glue the wheelhouse in place, I may add a human hair to link them.
Chimney stays are 0.3mm nickel-silver rod. Again, I had hoped to find some replacement ventilator snorkels, but could not find any small enough. I set about improving the supplied resin ones using successively larger drills twisted in my fingers, and eventually achieved an acceptable result.
Next will be the mast, derrick and knitting rigging.
-
 4
4

1 Comment
Recommended Comments
Create an account or sign in to comment
You need to be a member in order to leave a comment
Create an account
Sign up for a new account in our community. It's easy!
Register a new accountSign in
Already have an account? Sign in here.
Sign In Now