
Entry posted by SouthernRegionSteam
387 views
6th JAN 2020 - NOW UPDATED WITH CUTTING LIST AND DRAWINGS
If you’re anything like me, you’ll have spent a long time over the years causing mischief and annoyance by commandeering any available workspace, so that you can carry on modelmaking (or making a mess, according to those less-versed in the intricacies of… OK, yeah, it’s usually a mess!). Anyway, the point is, now that I've started doing the odd commissions for a magazine, it was about time I had a dedicated work surface which I could use. Apart from getting in the way of everyone, it was also difficult to photograph models without a load of background clutter (or a garish tablecloth!).
There was only one snag; I have very little space to work with. Equally though, my modelmaking only really occurs during a few months of the year, so some sort of collapsible workstation would kill two birds with one stone. Happily, I love to spend time on Sketchup designing stuff; be it tiny houses, furniture, or anything else that I think I might one day build. As a result, I felt pretty well-equipped to tackle this challenge, and with a retired carpenter in the house, it meant I had plenty of tools and knowledge at my disposal!
The Brief
As always with a project like this, the first place to start is to come up with a working brief; setting a brief list of what you need out of it. As such, I decided that this desk had to:
A) Be under a metre wide
B) Somehow fold; to reduce its bulk, and thus not waste precious space when not in use
C) Have a small amount of storage space for easy access to paints, brushes, and small tools
D) Be designed in a way that didn't make it too heavy or cumbersome to move
E) Be quick, and almost effortless to set up and take down.
F) Be relatively cheap to build
G) Be ergonomic to use (i.e. the height of the worktop must best suit the user and activity)
The Design
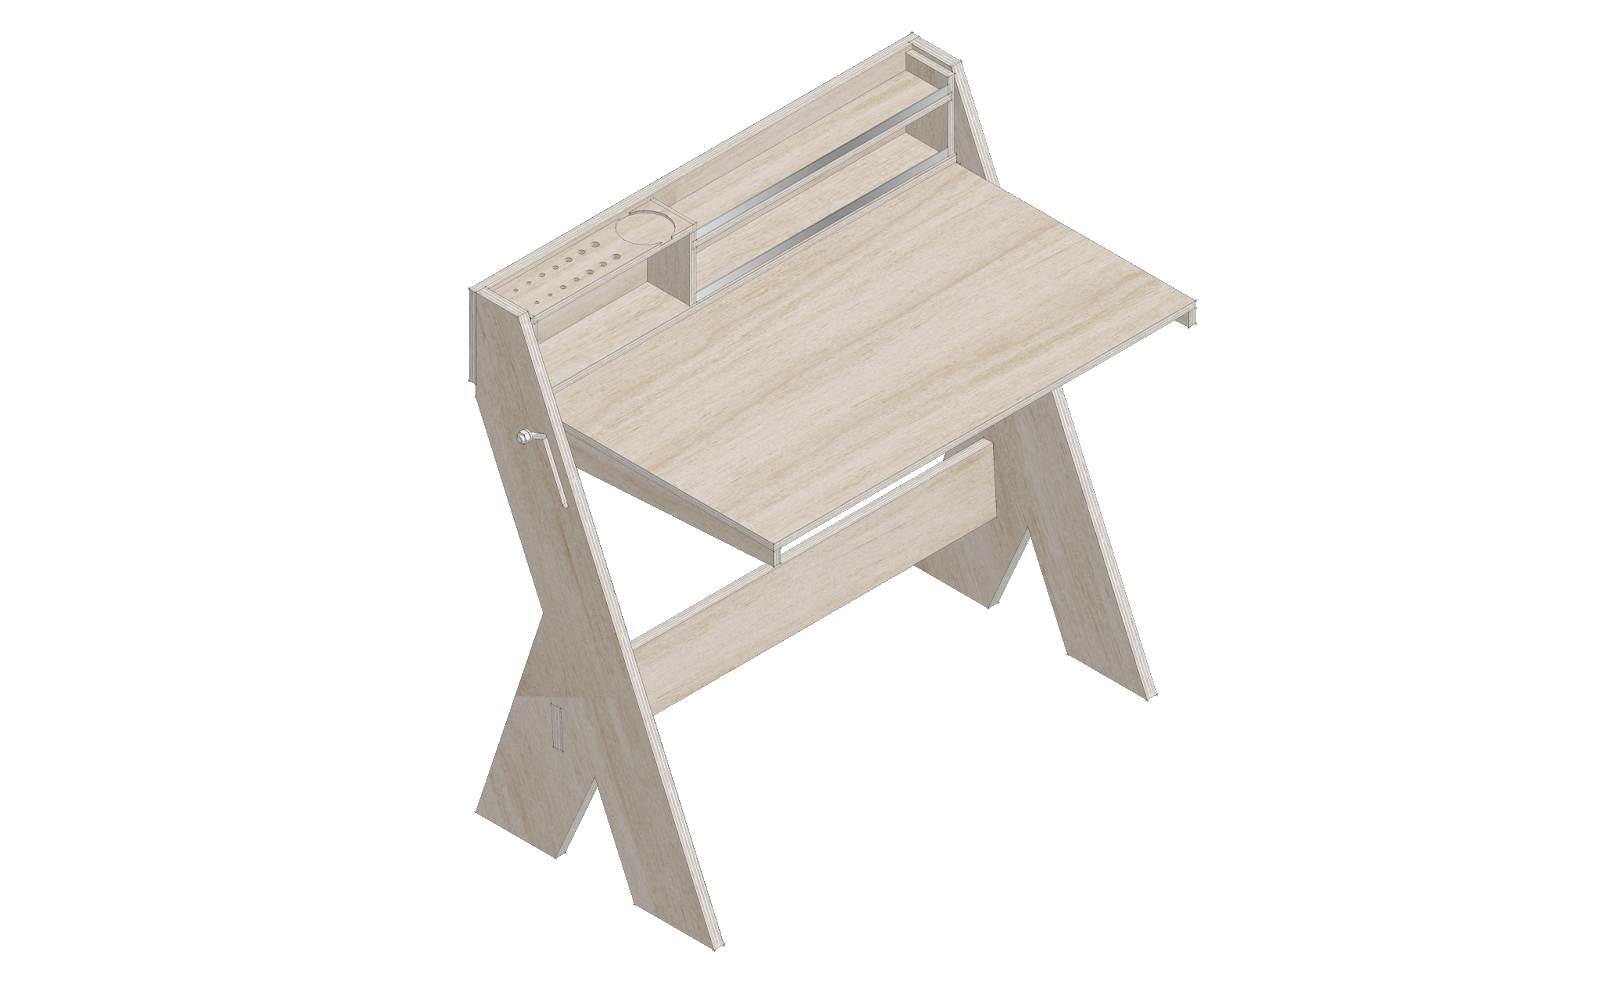
Above: The premise was simple; two upside-down Y shaped legs, a fold-down worktop, and a small storage shelf at the back. Work began on drawing up my idea in the free version of Sketchup; something I could easily do in an evening. As it happens, I was also working on a design to convert half of the garage into an office/workshop for myself; so I knew the space limitations of where it would eventually be sited, as well as how I could get it to aesthetically match other furniture that'll be in the room.
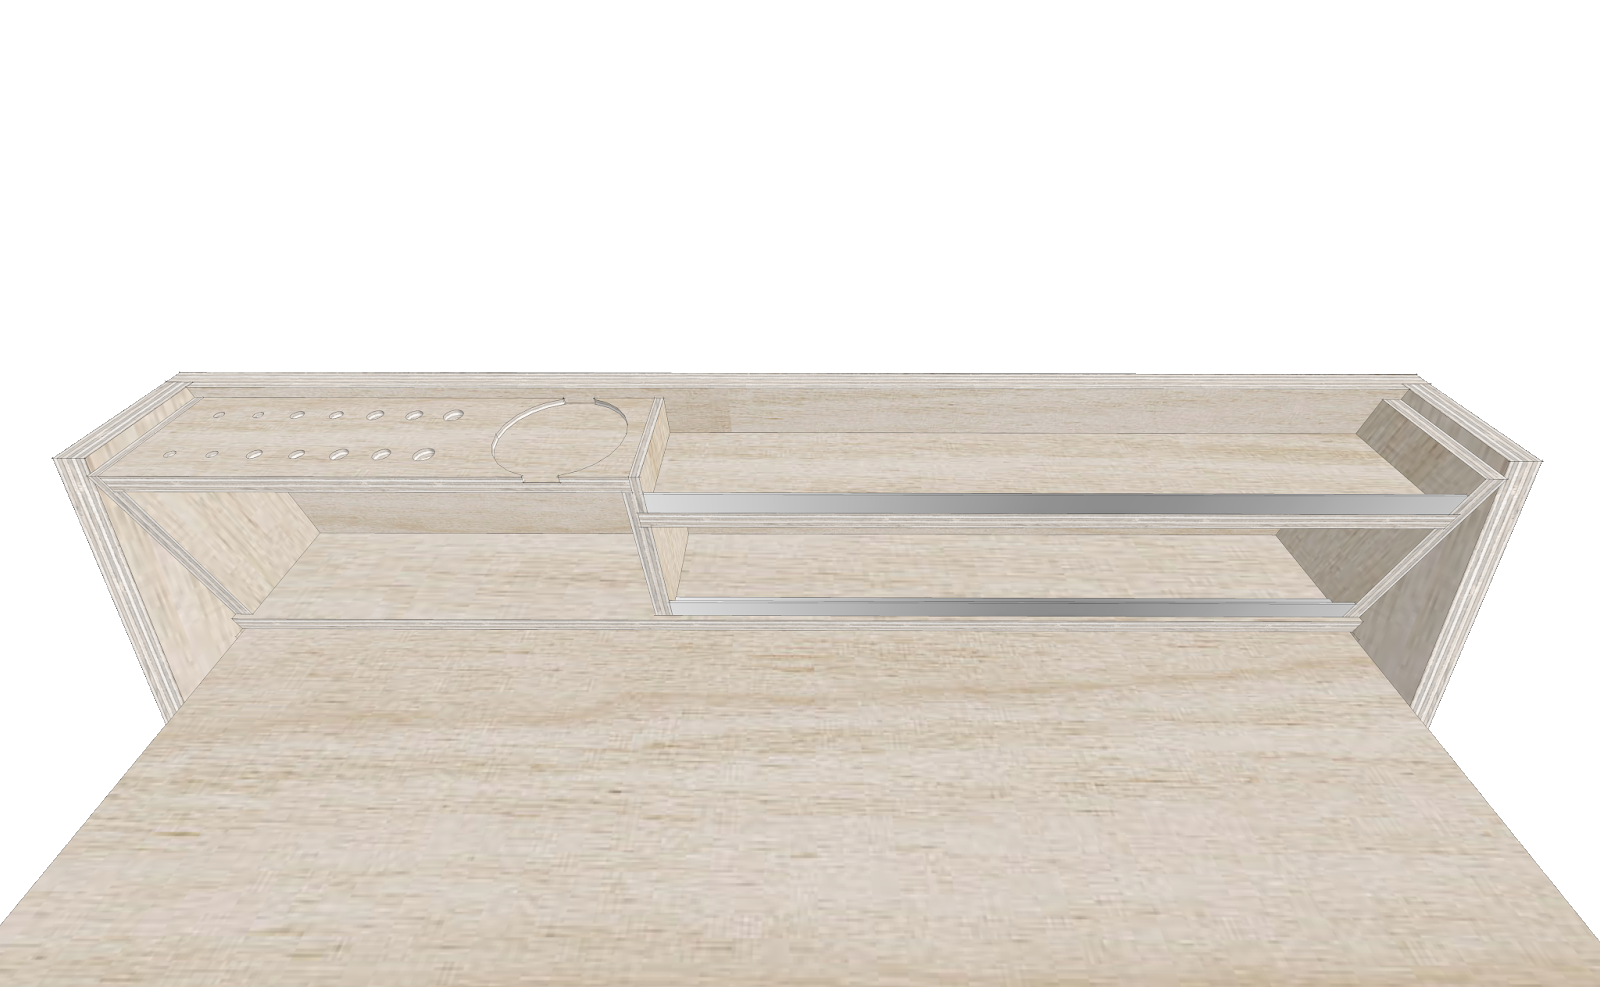
Above: The shelving area actually also doubles up as a travel limiter for the work surface. When the desk is ready to use, the offset position of the pivot means that the shelving keeps the work surface level. The elongated hole in the rear of the shelving area is big enough to fit a standard UK plug through; as I often use a Dremel, the lower shelf can be used to store it, with the cable being passed through the hole. The aluminium angle was a late addition to the design, and prevents anything rolling off of the shelves when the desk is being moved. You'll also note the variety of holes (in different sizes) to hold paintbrushes/pens/pencils, as well as a circular rebate that'll secure a water pot in place.
How It Works
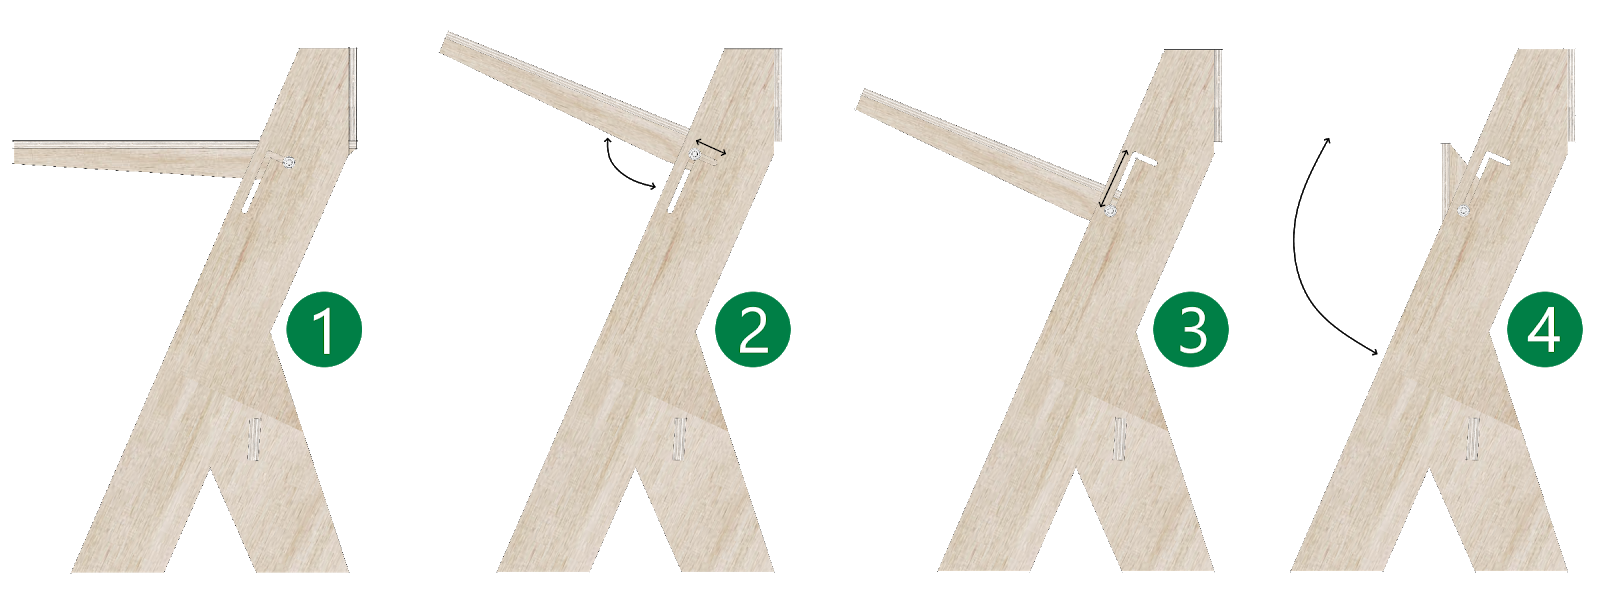
Above: The method of folding is relatively simple as the sequence above shows. In its “in-use” position (1), the worktop is held level by the shelf; which limits its travel. The desk can then be lifted up perpendicular to the sloped leg, and pulled forward (2). Grabbing both ends of the worktop, it then slides down (3), where it can then be slowly dropped down (4), folding against the cross-brace between the legs.
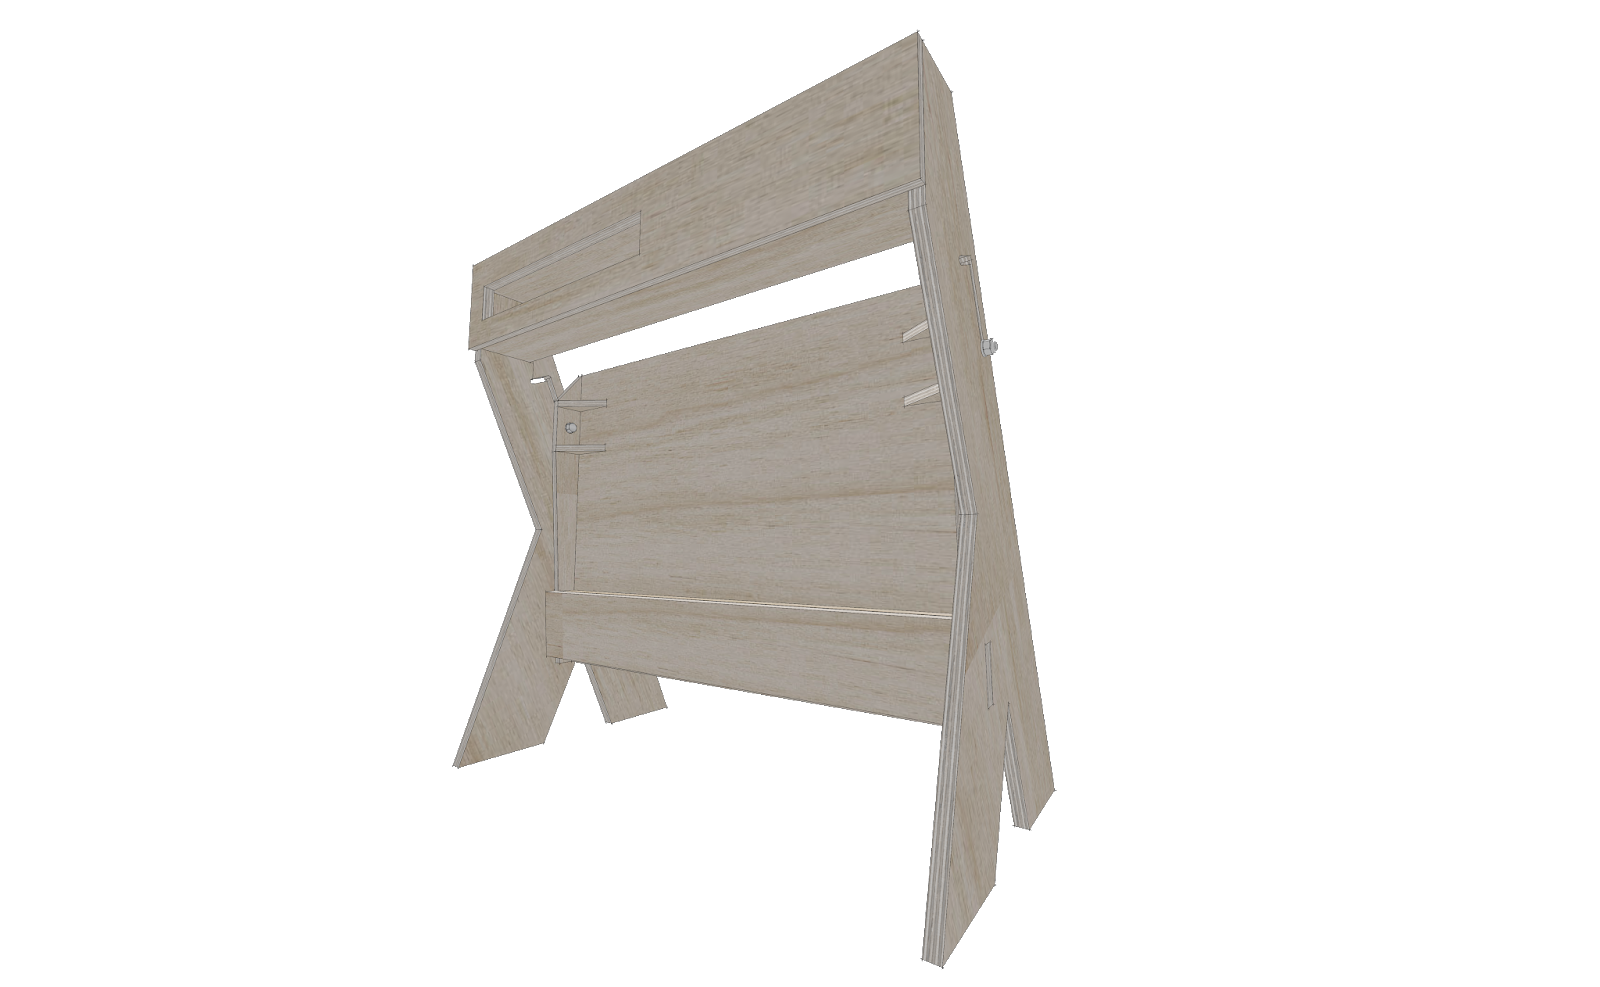
Above: The crossbar (that doubles up as a limit of travel for the worktop when in its folded position) can be seen in this shot of the rear of the desk. Note the various braces underneath the worktop that support it, and keep things square.
It probably goes without saying, but the critical aspects of the design are the clearances needed for pivoting the work surface, and the position of its running slot. To keep the desk stable, the pivot point is quite far back, so that there is sufficient leg support underneath to support the desk surface. This will prevent the whole thing tipping forward. The downside of this is that the legs jut out, which, depending on its intended location, may cause a trip hazard when in its folded position. Ideally, such a desk would have a permanent home, and would be wall mounted; which would mean the "legs" could simply be vertical planks, rather than the Y shapes they are here.
Materials & Costing
Plywood may sound like a strange choice for building furniture with, but it is relatively strong, fairly lightweight, usually has good availability, and will not produce fine dust in the same way that MDF will. However, it is hard to secure fixings into its end grain, so rebates (in conjunction with wood glue) are used to join many components together instead. This may sound like a hassle, but they are actually easy to do with a router, and a cheap set of router bits. The result is a strong joint, despite a complete lack of fixings. Don't worry; I'll show you how to use a router in a future post.
If you're not a fan of the "raw" aesthetic, you can always sand, prime, and then paint the plywood in a colour of your choice. Either way, you would be wise to give the whole thing some sort of protection; even though it'll only be used inside, some varnish will help protect surfaces, and seal them to prevent moisture ingress.
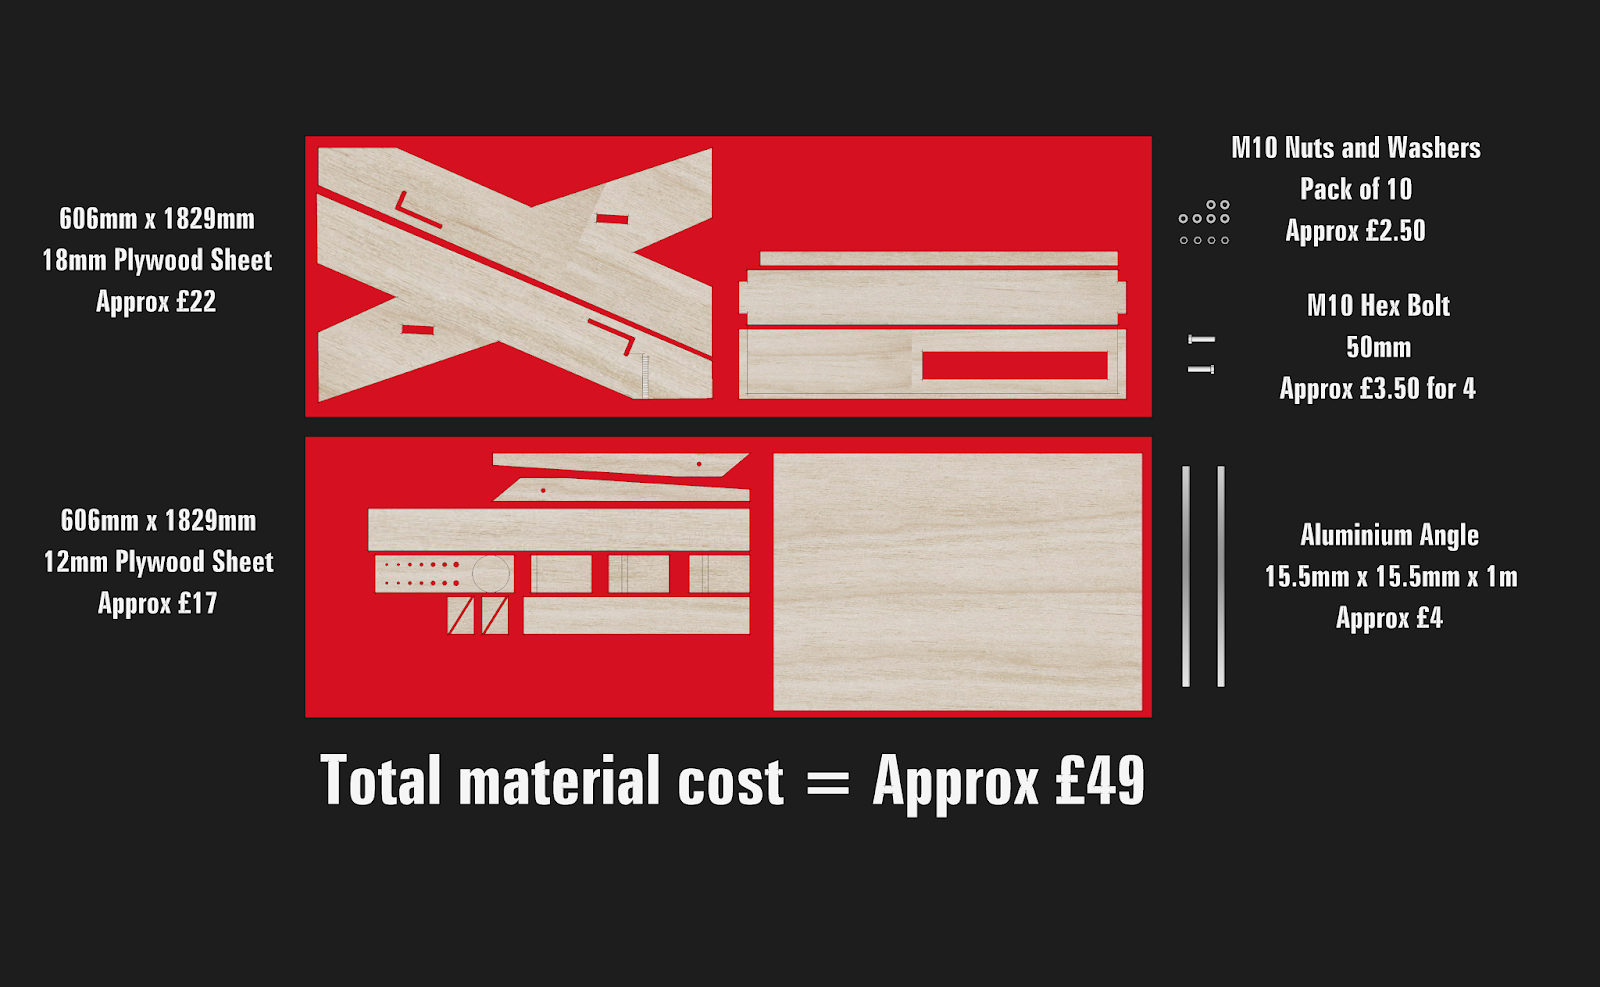
Above: In order to minimise wastage, and determine how much material I needed (and what the desk would cost to build), I actually “disassembled” the desk within Sketchup, and layed the pieces flat onto rectangles sized to the standard dimensions of various plywood sheets. By rotating the pieces, and allowing for a generous 10mm wastage from saw blades, I could manipulate the components until they fit in the most efficient position possible. Admittedly, as I was also going to be using some of the sheets for the music desk, I had more leeway with different sheet thicknesses. If you were to build something similar, you may prefer to fit everything solely onto a large 12mm sheet, or similar.
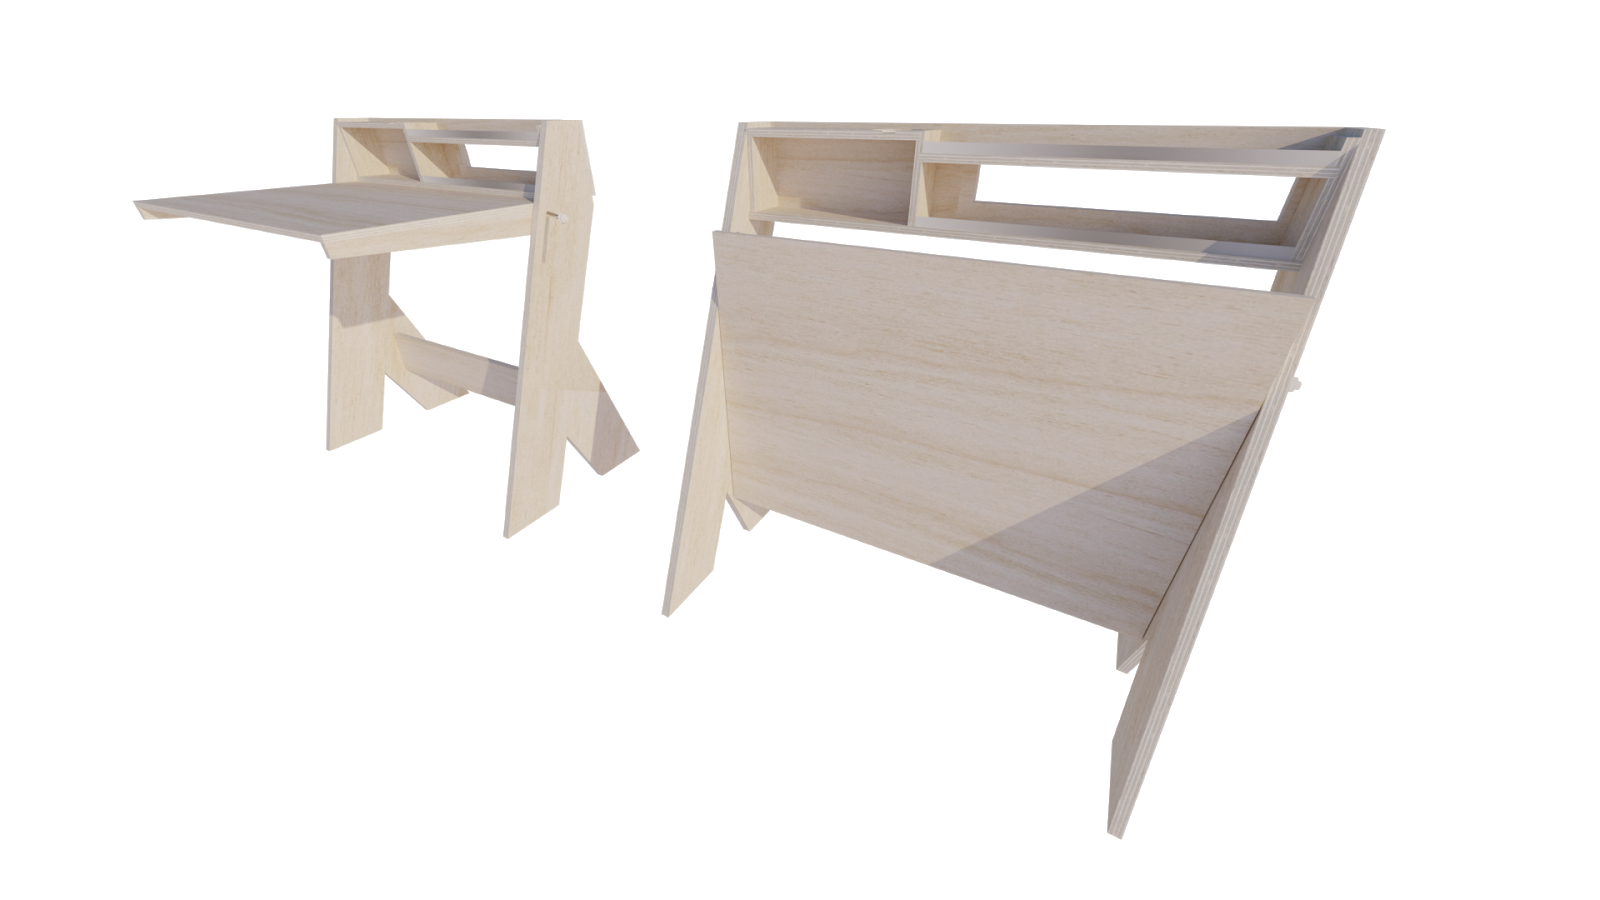
Below: And there we have it; the final design as shown in Sketchup. Note that the only fixings are the two M10 bolts that hold up the worktop; the rest is rebated and glued together, and is as strong as it would be with any fixings. In actual fact, if the rebates are tight enough, you could get away with not gluing the shelving or crossbar in place, and thus being able to disassemble it into 5 pieces. I actually managed to do this during a dry-run, but decided to glue it anyway as the desk doesn't take up too much room, and won't need to be relocated very often.
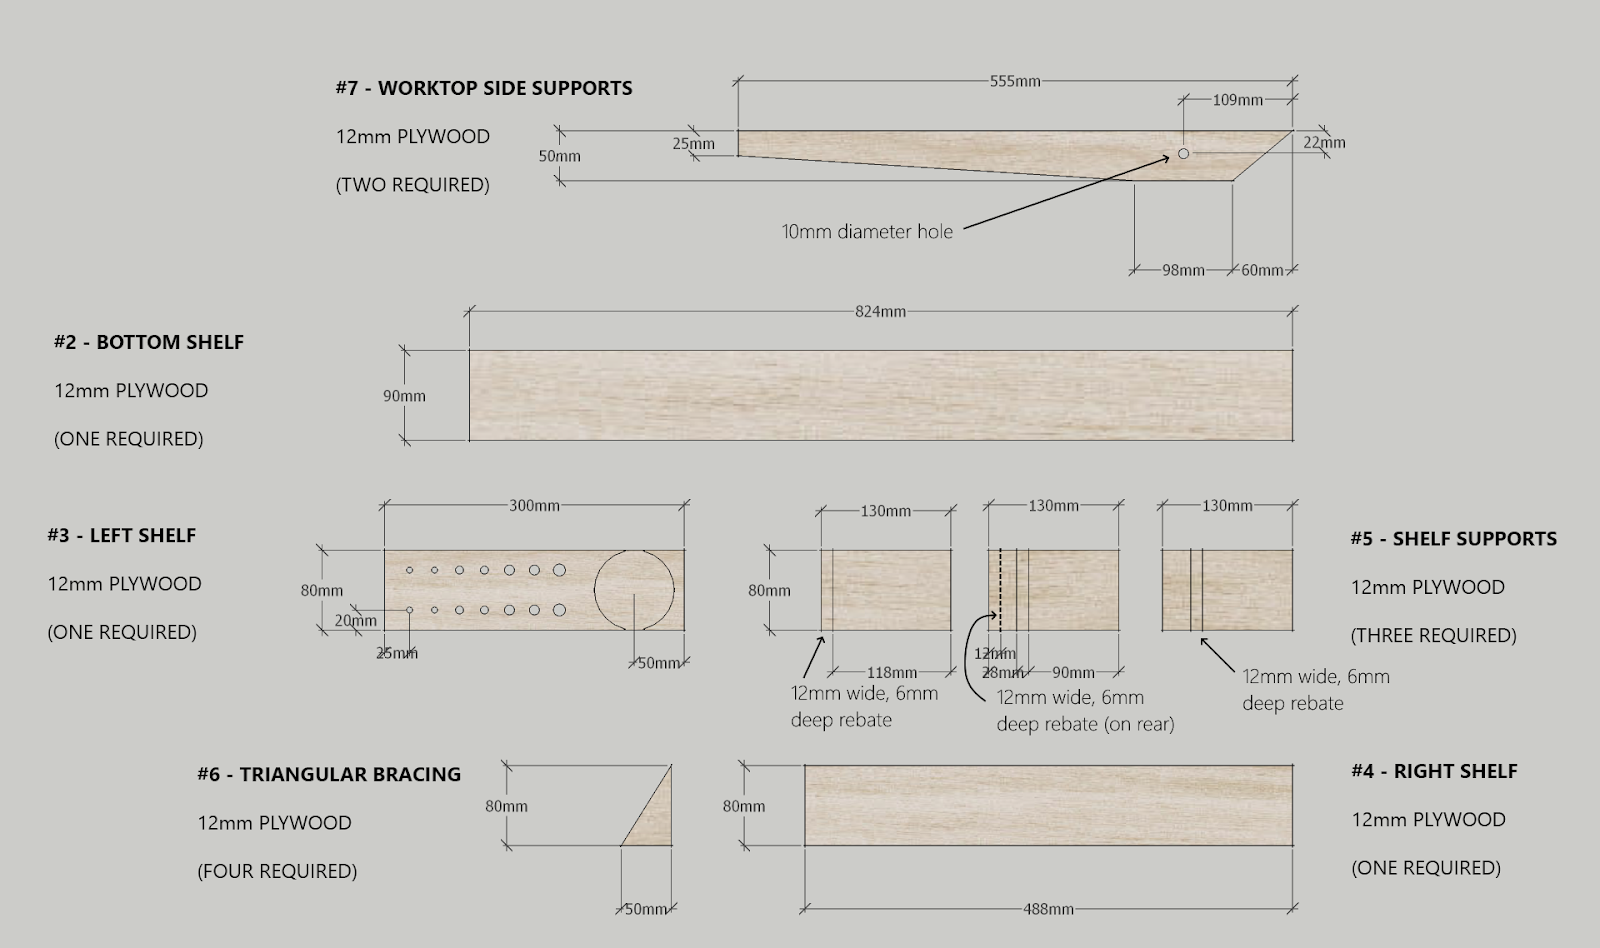
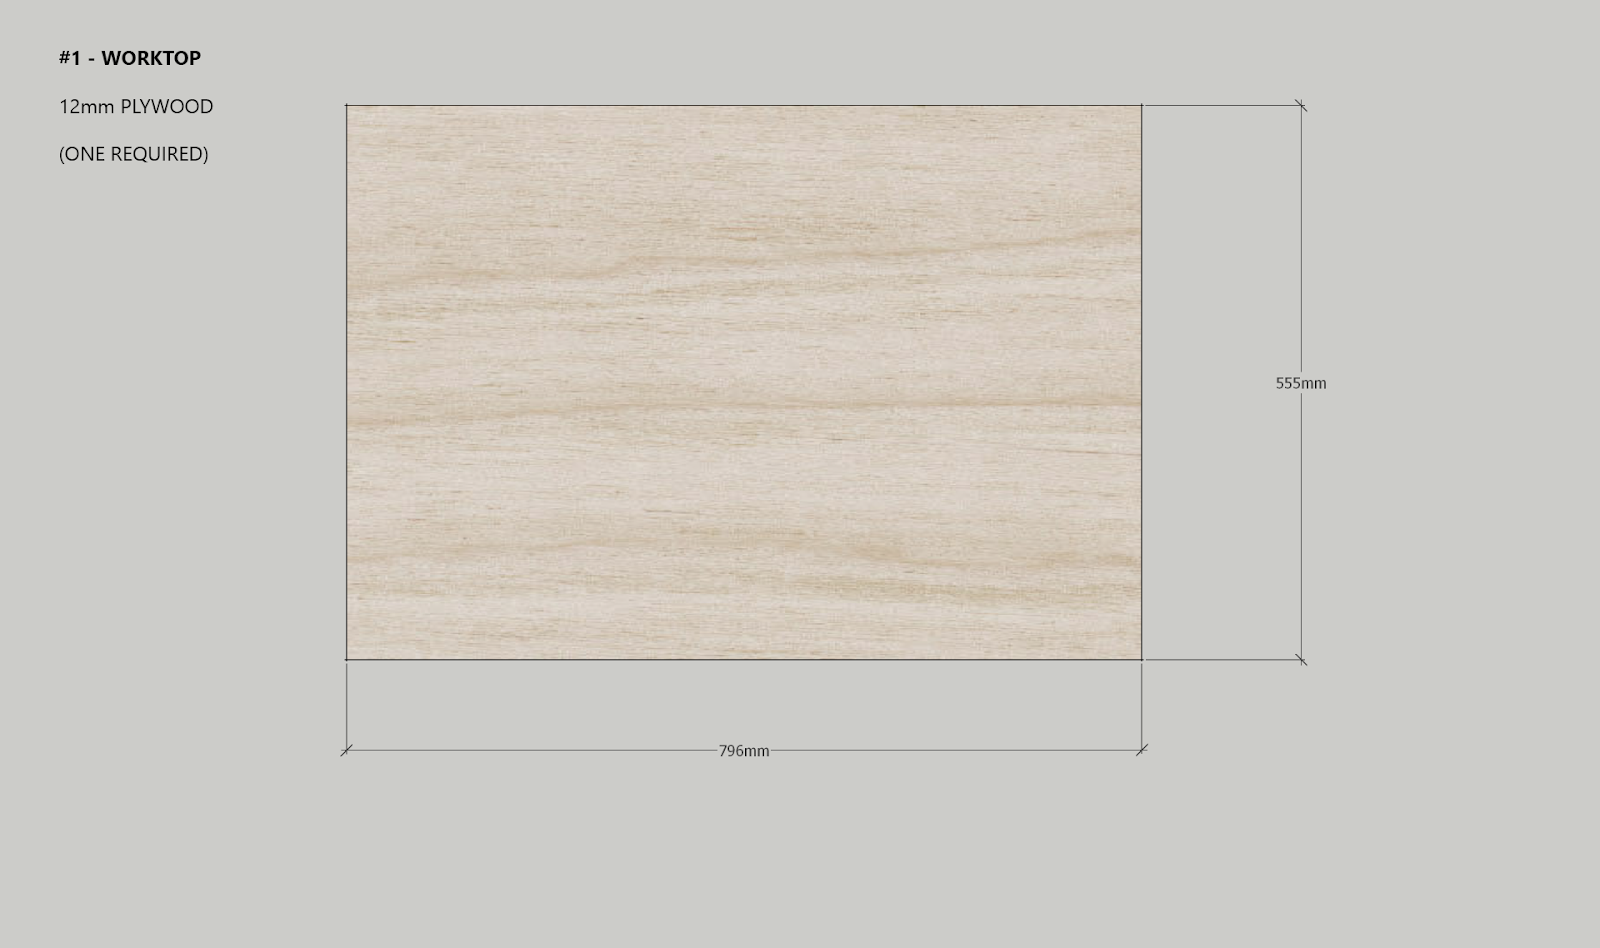
Cutting List & Annotated Drawings
REF MATERIAL QTY SIZE (mm) COMPONENT
#1 12mm plywood 1x 796 x 555 Worktop
#2 12mm plywood 1x 824 x 90 Bottom Shelf
#3 12mm plywood 1x 300 x 80 Left Shelf
#4 12mm plywood 1x 488 x 80 Right Shelf
#5 12mm plywood 3x 130 x 80 Shelf Supports
#6 12mm plywood 4x 80 x 50 Worktop Triangular Bracing
#7 12mm plywood 2x 555 x 50 Worktop Side Supports
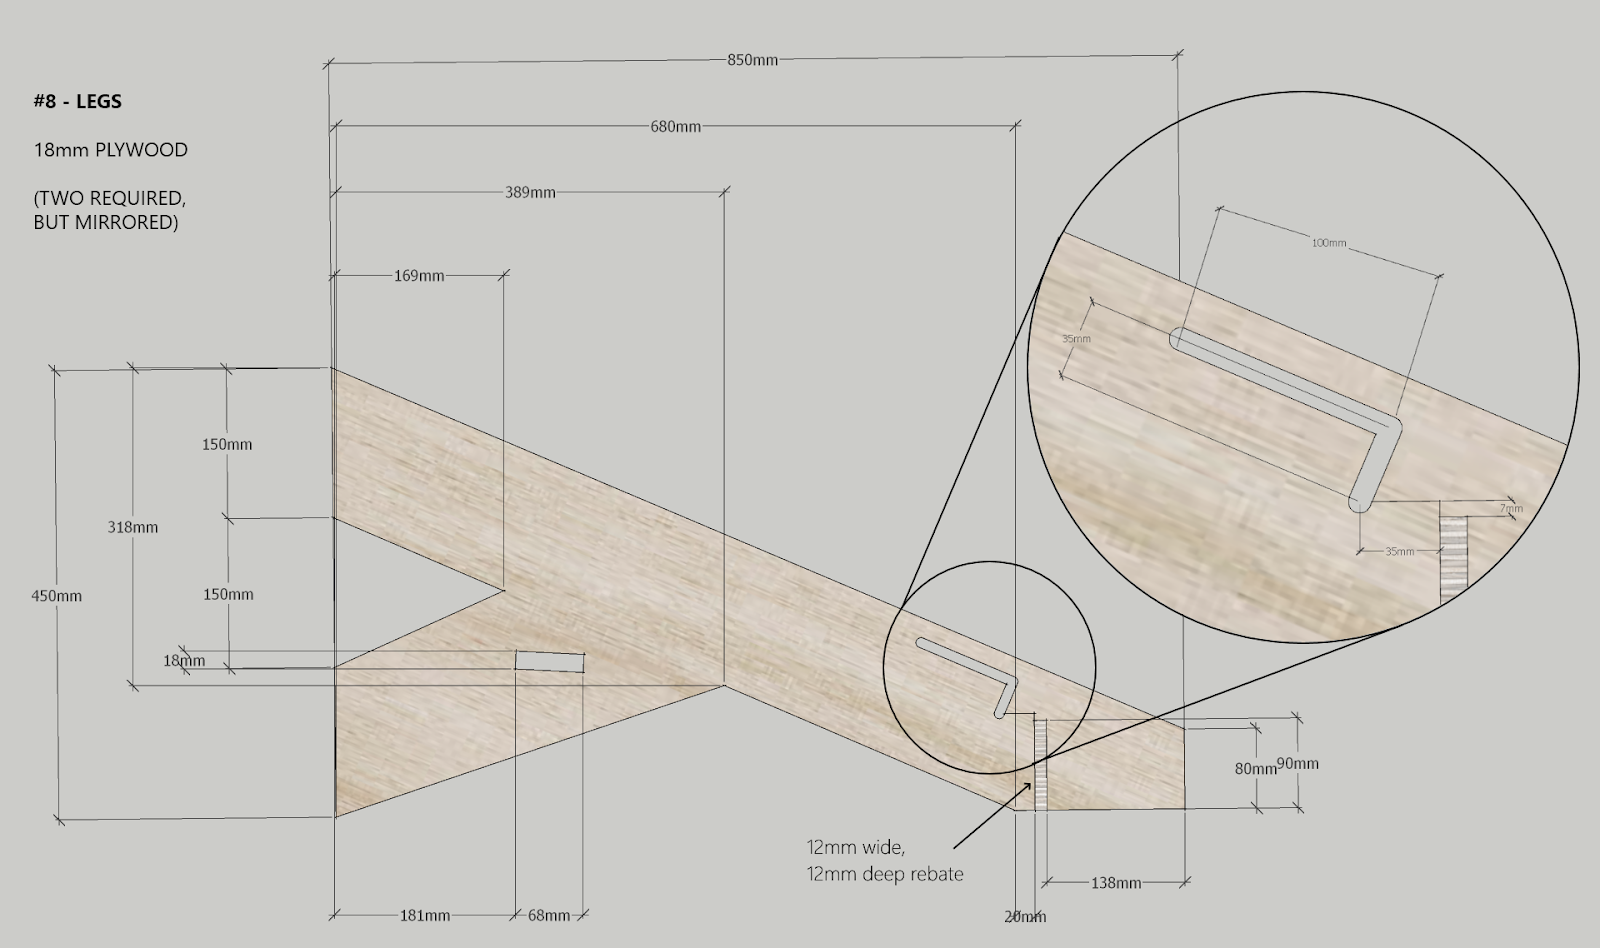
#8 18mm plywood 2x 850 x 450 Legs
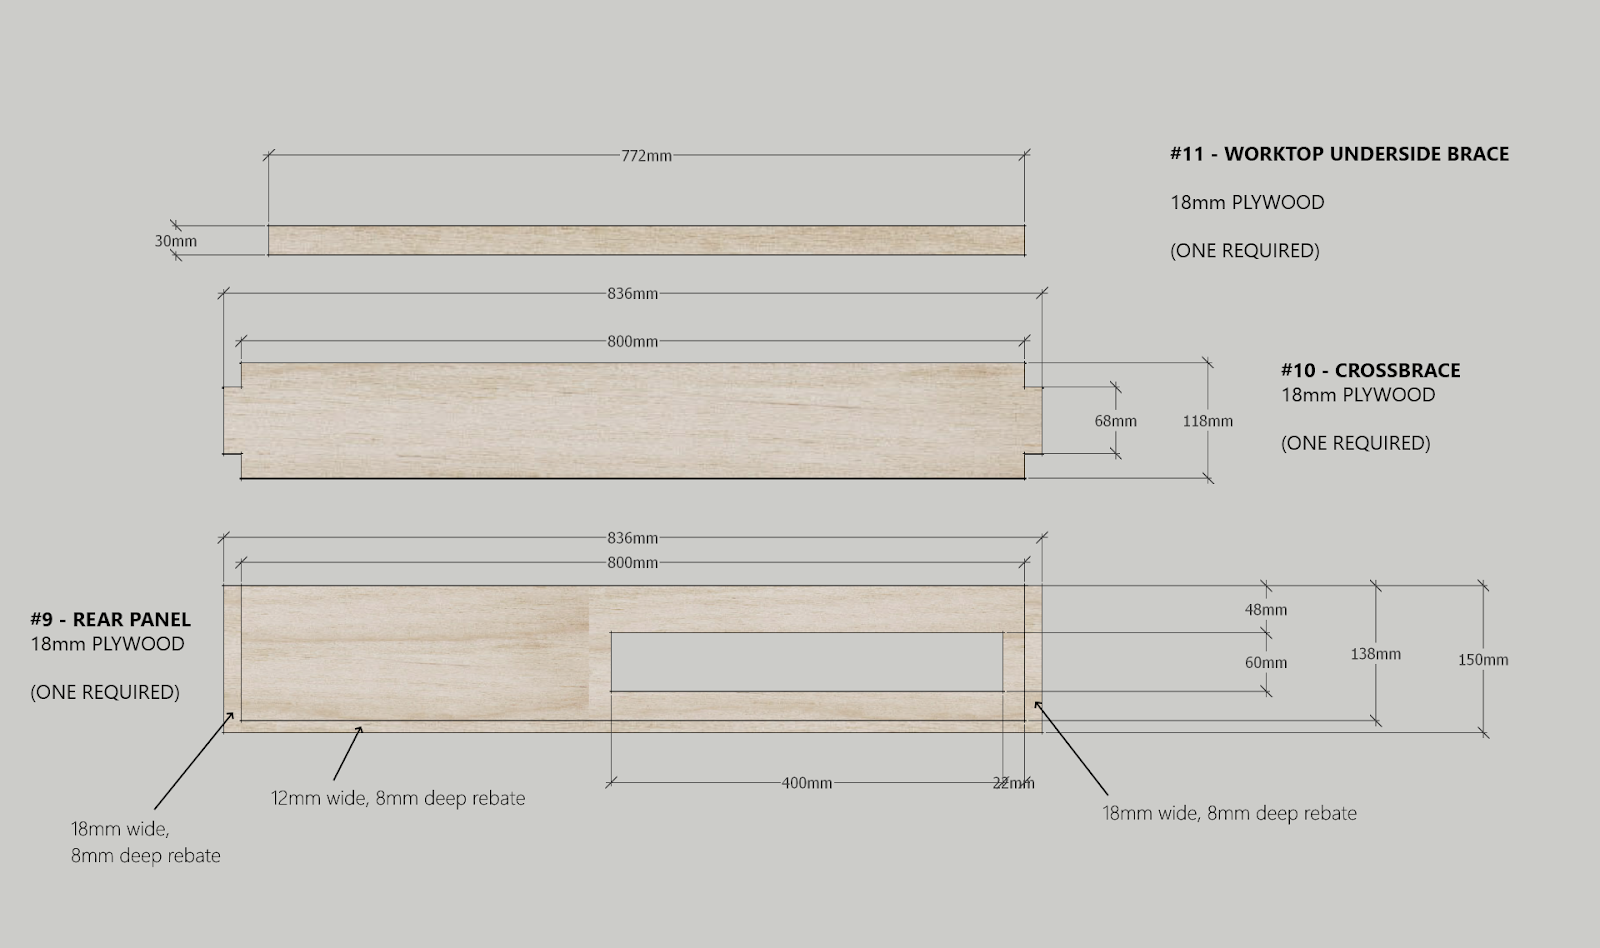
#9 18mm plywood 1x 836 x 150 Rear Panel
#10 18mm plywood 1x 836 x 118 Crossbar
#11 18mm plywood 1x 772 x 30 Worktop Underside Brace
#12 15.5mm al. angle 2x 476 Edging For Right Shelves
M10 hex bolts 2x 50
M10 nuts 2x
M10 washers 4x
And I think that about sums up the design of my modelmaking desk. Next time I'll explain how to use the router and Skilsaw, and thus begin the construction of the desk!
As always, please do comment below, and feel free to ask any questions you may have, or even offer some suggestions/alternative approaches to improve this design.
See you in the next one,
Jam/Jamie Warne
-
 5
5
-
 2
2


0 Comments
Recommended Comments
There are no comments to display.
Create an account or sign in to comment
You need to be a member in order to leave a comment
Create an account
Sign up for a new account in our community. It's easy!
Register a new accountSign in
Already have an account? Sign in here.
Sign In Now