Jump to content
 
  • entries
    95
  • comments
    385
  • views
    42,633

The construction of Calshot - Part Four


SouthernRegionSteam

515 views

layoutoverview2.png


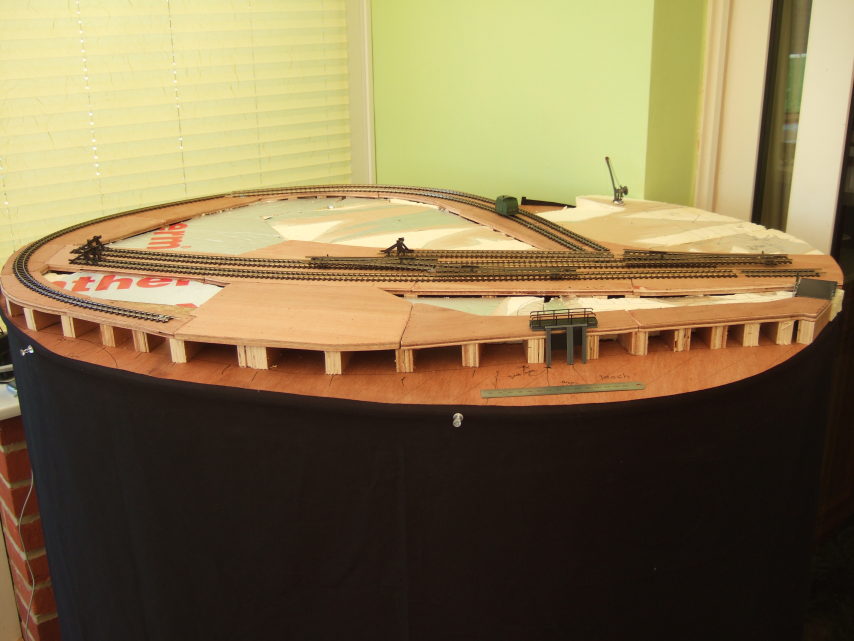
Just a small update. The layout has been moved to MkI's legs with a drape around it to win Brownie points! That way I can have it tucked in the corner and can work on it where it is out of the way. Having it like this makes me wonder if I actually need a backscene. Then again, it is not going to be very photogenic without one.

A sluice and little footbridge have been built from left over scraps in the scrap box (funnily enough!). Still needs the mechanism and a spot of weathering. If it's one thing I think will improve my modelling exponentially it is being able to weather objects. I should really buy some appropriate paints and weathering powders and experiment.

I have also started building some quay walls using DAS modelling clay. They won't be glued in place until the trackwork and electrics is done to prevent damage. I will need to score them to represent stones and also paint them at some stage. The photos below should help visualise the progress.

A long way to go, but slowly getting there! Comments welcome.

sluice1.png

7 Comments


Recommended Comments

"They won't be glued in place until the trackwork and electrics are done".


NO, they won't!


Sorry to be forceful, Jam, but if you want a working layout, get the track, then the electrics working before you even think about ballasting the track or any other scenic effects! By all means, have a plan and a view of what you want to end up with, but by getting the look right before the track is like putting a cake in the oven before you've mixed and tasted the ingredients! (Unless you really want a diorama?)


Do you have your new points and PM-1 motor yet?


Link to comment
  • RMweb Gold

Absolutely John, certainly won't be glued until it's all finished. It would make it so much harder doing the scenery before the electrics, not to mention silly as it is much more likely to be damaged, especially if wiring is not as straightforward as expected!


I wouldn't even dream of doing it any other way. The quay walls I'm only doing now as more of an experiment than anything else. Everything except the trackbed is loose for exactly this purpose. Hope this reassures you!


The new points and PM-1 motor have arrived - I think it was on Thursday smile.gif

Link to comment

Hello smile.gif


The layout is comming along nicely there. I always keep on visiting your pages to see what you have been upto. I think the concept of the layout has alot of potential for an interesting scene. Personally I wouldnt fit a backscene to it so when at exhibitions you could view it from all sides. If you wanted a backscene for taking photos how about making something floor standing with a simple sky printed on it, something like a roller banner or similar? That way you could move it around the layout to whatever position you wanted.


Missy smile.gif

  • Like 1
Link to comment

You don't need specialist paints for weathering! A good range of earthy coloured acrylics, some black, chesnut and bown inks plus some cheap brushes will do the job! If you want powders I remember seeing a suggestion that powder cosmetics were cheap and usefull. Good to see quick progress! I too don't like getting bogged down in track detail for weeks.

Link to comment

At the rate you are going you will have this very interesting little layout finished in no time at all!rolleyes.gif

Link to comment

Personally I'd put a back scene in place. As a photographer I've always tried to avoid background clutter and placed the emphasis on the subject. Without a backscene the viewers eyes will not settle on the layout for long and their concentration will wander as they stare at tangles of wire, stock boxes and all the other "interesting" items to the rear of yours and other layouts. So my pennyworth is set the scene and let them live in your make believe world.

  • Like 1
Link to comment
  • RMweb Gold

Firstly, thank you all for your contributions - it's one of these great things that make this hobby so enjoyable and worthwhile. smile.gif


Hello Missy,


Many thanks for the compliment. I have enjoyed following Highclere and your outstanding modelling in 2mm! I like your idea of a floor standing backscene - that could work really well - particularly if it is ultra portable. I hope the layout lives up to your expectations.


Devondyno,


I have had some advice from modellers at various exhibitions which I have written down somewhere. (Must dig it out!)

I'll bear in mind those colours though, I'm hoping to put together a 'weathering box' with all the paints, brushes and powders etc. Good tip about powder cosmetics too, thank you.


Killybegs,


I aim to have it complete by early August, hence why I am being careful, but trying to make it a quick build - plus that way you don't lose interest. It's a shame that so many loft layouts are abandoned due to the committments involved and a lack of sustained interest.


GWRfan,


I appreciate your comments and have taken them on board. I can't stand layouts without a decent background - but then again, from pictures I have seen of one layout in particular that has no backscene, it can be made to be quite effective. I quite like Missy's idea above - of course, the backscene doesn't have to be immediately behind the layout. This means people can walk around the layout if they wish but the backscene is there should they want to take some photos - also, if the backscene can be wheeled around, people can get their ideal photo. I have also had many favourable comments with the backscene (it is homemade).

Link to comment

Create an account or sign in to comment

You need to be a member in order to leave a comment

Create an account

Sign up for a new account in our community. It's easy!

Register a new account

Sign in

Already have an account? Sign in here.

Sign In Now
×
×
  • Create New...