Jump to content
 
  • entries
    137
  • comments
    848
  • views
    116,012

Track Laying on Brewhouse Quay


Chris Nevard

494 views

5415764792_5f46a3031e.jpg


nevard_110204_brewhouseQ_IMG_9104_web, originally uploaded by nevardmedia.


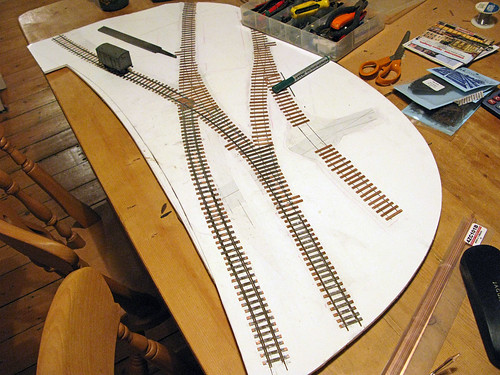
Track laying has now started in earnest on my brewery project. Because the layout will be presented diorama style with a high curved backscene on 3 sides as mentioned on previous posts, I'm laying the track 'off set' using a 5mm foamboard sub-base which will be firmly bonded to the proper plywood base once most of the fiddly stuff has been done. It's much easier to work this way because I can spin the base around to suit and really ensure that the trackwork is all properly aligned without having to resort to some kind of contortion act. Good track is something that is particularly important with a layout which will mainly be running 4 wheeled locos, though of course one should always aim for well laid track irrespective of what one is running.


Much of the trackwork on the left hand side (which is next to the canal basin) will be embedded in sets (cobbles), so armchair modellers shouldn't worry too much about the iffy sleeper spacing. Note the check rails on the nearest line in preparation for the 'sets' which will probably be scribed Humbrol Air Clay.

8 Comments


Recommended Comments

That K point will be an interesting construction to see charted Chris. Looks like the beginning of (another) wonderful diorama.

Link to comment

I can imagine that's easier to work with - but I guess the curved backscene could have been mounted afterwards? How stable is the foamboard with glues and the like? (as this is the stuff where it's a card/foam/card sandwich right?)

Link to comment

Thats comming together really well Chris. I can imagine the sunken track with scribed stones is going to look amazing once you have finished with it.

Link to comment

Catcott is all foamboard (card/foam/card) apart from the ends, fascias and sides which are ply. Almost 4 years on and it's perfect. MDF and ply is just as likely to distort if stored somewhere damp (which will never happen). I like to get all the wood work out first, this way suits me because I can borrow the dining room table and not damage it, whilst being sociable rather than hiding in the garage. :lol:

Link to comment
  • RMweb Gold

Iffy sleeper spacing? I would have thought you could have doubled the spacing if it it going to be buried in sets. Do double check the sleepers are gapped well before burying them. Otherwise its like real roadwork to get at them.

Are you actually allowed to get near the kitchen table with a soldering iron and flux? Mind you I agree with being sociable I have a small workbaord that lives in an old briefcase which I can set up on a small folding table (sold for eating whilst watching the TV).

Don

Link to comment
  • RMweb Gold

Looking good, Chris! Can I make a plea for you to make sure the inset track is at least partly ballasted under the rail & check rail? So often you can see nicely modelled inset track only to look down the gap and see raw sleepers & baseboard. Spoils the illusion.

Link to comment

Don't worry guys, no paint or ballast or clay will go near the layout until everything runs - I've done a lot of this in the past, albeit with code 75 rather than 55. For the cobbled bits I will ballast first to sleeper height - it makes a good key for the Air Clay to adhere too and avoids any looking down issues :P

Link to comment

Create an account or sign in to comment

You need to be a member in order to leave a comment

Create an account

Sign up for a new account in our community. It's easy!

Register a new account

Sign in

Already have an account? Sign in here.

Sign In Now
×
×
  • Create New...