
.jpg.068a0a7317c97928d1b69bcd13eca0a1.jpg)
Sometime in the last century.. ORBC

Entry posted by Ravenser
546 views
ORBC
by Ravenser
__________________________________________
??? posted on Fri May 04, 2007 5:24 pm
As I'm hoping that I will actually get something done over the bank holiday weekend, I thoughtt I'd better salvage the spiel about the Bratchill 150 from the old forums.
Having gone back to RMWeb2 , I was confronted by my New Years Resolutions from January last year:
Well.. most of the DCC installations are done (the Voyager still needs more work and the 31 needs sorting out)
The Athearn wheels for the 37 did turn up - but nothing else got done. The 153s are still an aspiration - though my Challenge project gives them an immediate use (once the Challenge Project is far enough advanced). The Sentinel got built
The rest didn't , though I got a fair way with the 150/2...
__________________________________________
??? posted on Fri May 04, 2007 5:30 pm
So here we go (just under 13 months ago...)
Quote:
Not a lot has happened recently but now DMUs seem to be on the agenda.
The other evening the Bratchill 150/2 kit came out for the first time. Fit of parts seems reasonably good : a little bit of filing was needed around the corridor connection on the ends. One area that will need careful attention is at the front end , around the interlock between sides and roof . There is a visible bump here and this will need filling and filing down as no such bump is visible on photos of the real thing.. It will also be critical to ensure exact alighnment of sides and roof so there is no "step effect" as you go round the rim.
I'm also agonising over whether I need to fill the join lines where the end fits into the roof. I'm a bit short of 150 photo reference especially for internal ends and have resorted to gawping at a few other Mk3 MUs . Yes there seems to be a faint seam , but not a prominent one...
One thing I didn't buy at Ally Pally was a set of Lima 156 bogie mouldings, as recommended by cloggydog
Nothing has actually been glued together yet.
Unquote
4 days later a start had been made:
Quote
Posted - 12/04/2006 : 14:19:34
--------------------------------------------------------------------------------
I've actually managed to make a start on the Bratchill 150/2.
Progress to date amounts to gluing in the ends and making a start on gluing the sides in place. I'm having a spot of bother with one side, - there's a kind of interlocking step between side and roof at the cab end and the side isn't absolutely seating properly here, meaning that there's a hairline crack between roof and side towards this end. So of course the solvent wont grab at this end, and the side is only glued for about 2/3rd of its length .
Fixing in the cab end might help. Unfortunately the instructions say that glazing should be fixed with contact adhesive - I'm not sure if this applies to the clear ends as well, and I don't think Uhu is going to give me a great bond here. I may have to slip in a sliver of microstrip or micro-rod to get a bond at the cab end and resort to a bit of filler to fill in any residual hairline cracks. (The other side's fine)
I've started to fix the sides of the second vehicle - at this stage just at the inner ends . I've still got room to work on the interlock at the cab end to make sure that this time it really does seat properly
Unquote
By the end of the month , one concern had been allayed by the Fatadder:
__________________________________________
??? posted on Fri May 04, 2007 5:36 pm
By mid June , things were far enough along for a first assessment:
Quote
Is it just me?
I took yesterday off and full of good intentions decided to do some modelling. Hoping and expecting to make Some Serious Progress on several fronts.
The net result? Er 8 small holes and a couple of bits of whitemetal stuck with Araldite . And no we're not talking big subtantial structural items like boilers and footplates . Try a few underfloor casting bits...
The 150/2 has now reached the stage of 2 bodyshells. Yes , I should have drilled out the headlights before I stuck the ends into the bodyshell . No, I didn't . (And no it didn't turn out to be mission-critical). An Express Models lighting pack for the Dapol 150 has been procured as I'm not up to doing my own LED lighting installation , and I've managed to drill the headlights out to suit (actually starting with micro drills and opening out with broaches. If I'm honest, despite my best effort trying to centre the drills on the headlight , the results are only 98% straight, but they are the same size)
After much effort with the needle files and fibreglass pencil I finished/gave up on cleaning the main engine and gearbox castings (given that the castings are ex MTK as cleaned up and sold by NNK , finishing and throwing in the towel come to much the same thing. In fairness the engines were always going to be the roughest and most awkward castings by some way).
These are now araldited in place, after much comparison of the ex MTK instruction sheet, Jim Smith-Wright's Update drawing, and drawings in Railnew Stockspot 2. All show slightly different positions for the engines and transmission relative to the windows, meaning much poring and moving of bits of whitemetal , but Update and Railnews are pretty close here
Also aradited were a pair of brass coupling hooks for the Dublo 20 (and one exhaust pipe on the 150/2 before the araldite went off). This now has main handrails one one side - the second side was going to follow the 150/2, but I didn't get that far....
I still need to sort out some ex Lima 156 bodies for the Sprinter - so no progress on running gear.
I think I'm now at the point where some intelligent comment can be offered on the Bratchill kit. Where Bratchill's own work is concerned, assembly is pretty straightforward and results good.
But I'm a bit disquieted by the amount I'm going to end up discarding - basically everything below the bodyshell - and the amount I'm having to source from elsewhere. The underframe boxes etc supplied with the kit are nothing to do with a DMU and have been put aside. The bogies are well designed , and would be easy to build and attach - but they've got damper arms so must be discarded and alternatives sourced . I do hope I can fit the Bratchill centre bolsters , otherwise I've got to devise and fabricate alternative arangements
So all I'm going to get from Mr Bratchill is two body shells - not including the seating , which is courtesy of DC Kits (and looks like Modernisation Plan benches - more work with file and paintbrush. ). Considering the kit cost me ??????‚??67, this seems a bit meagre. I'm having to source bogies, underframe detail castings , motor bogie, wheels, seating, and lighting units myself . That's quite a lot of the finished vehicle. And some of these items will require some work. The additional items will cost about ??????‚??85 -90
Ouch.
Obviously things look rather better if you're building one of his EMUS , where the bogies and underframe detail are right. But still, the 150/2's not cheap and it's not complete.
Unquote
Quote:
Speaking of MTK, I've spent the afternoon sticking a few bits of whitemetal. Here's the base of the Bratchill 150/2 kit.

Most of the bits on the side are now stuck to one of the underframes.
Working out what is what and what goes where from Jim Smith Wright's drawing, Railnews Stockspot2 and the NNK/MTK leaflet is a bit difficult. J S-W and Stockspot seem basically to agree, but the castings don't necessarily match. The two objects on the left with round fillers are the two ends of the fuel tank. They are neither the same shape , nor remotely the same length (one's about 2/3rds the length of the other) nor the same height. The circular discs appear to be meant as representations of the ends of the air tanks???
Its going to have to be strictly representional , I'm afraid , but at least it will be a represenatation of a DMU , not (like Bratchill's bits) a representation of an EMU
Gives the thing bags of weight though
Having discarded chunks of the kit to replace them with detailing bits from elsewhere, I'm now discarding detailing bits to replace them with bits from the kit...
Those curious objects looking like whitemetal archery targets seen in the piccy above which are alleged to be airtanks , or at least the ends of airtanks (one of the late Mr Massingham's less plausible fibs) to be precise. I stuck them on, found they were wonky, shakily attached , and didn't even begin to resemble the air tanks found under Mk3 derivative stock , or the drawings or anything else really. Sanity dawned, I reached into the relevant bag of Bratchill bits, retreived 4 x plastic air tanks and stuck 'em on. A plastic rod drive shaft between gearbox asnd engine went in to
Apart from that I've been adding plasticard sides to MTK/NNK's cast facades for battery boxes etc
__________________________________________
??? posted on Fri May 04, 2007 5:46 pm
By the time I reached the bogies , we were into mix and match territory...
Quote
No work done, just some shopping
I finally phoned MB Models in quest of the Lima 156 bogie frames recommended by cloggydog. Unfortunately they're now out of stock , as they've had quite a few people buying them recently . Wonder why that would be....? Perhaps I'm not the only person who's actually building a Bratchill Sprinter
So I resorted to Plan B , and ordered some Hornby Networker bogies and one or two other bits from East Kent Models . Service was exemplary - stuff ordered on Tuesday afternoon was waiting for me when I got home yesterday
The sideframes will need to be sawn off the bogie mouldings and superglued to etched H-frame units - I have a pack of A1 Models etches in stock. It looks like I will have to fill in the slight recesses around the bogie pivots , and possibly file down the mounts as well (fortunately the holes are the same size in the Bratchill floorpan and the etches)
The trailing vehicle is the easy bit . More awkward is the powered vehicle. Gluing the sideframes to the Beetle is not difficult . However I will have to provide pickups on the trailing bogie and that's a bit more problematic.
Soldering a wire across the top of the cross stretcher for wiper pickup from the top is easy enough, but means the H frame is live to one rail. Fitting a second pickup is then more awkward. Last time I tried this , on a light rail vehicle, I ended up with through wiring to 2 trailing bogies , each one live to one side, because attempts to fit a second pickup on a bogie resulted in shorts.
Through-wiring an articulated LRV is one thing, but I'm not going to do that on a 2 car DMU. And there must be a chance of simply fitting an excellent set of brakes to the trailing bogie
Seating is another problem . I took the Hornby 155 out of its box last night and a number of problems started to emerge for the 153 conversion. The moulded seats in the 155 are nothing like the seating units supplied by DC Kits - which I'm increasingly certain are 2 + 3 high density seating for a Modernisation Plan unit, and not 2+2 seating for a Sprinter. So they are completely unsuitable. I'm not sawing down 3 seat units one by one into 2 seat units (This is despite being quite explicit on the phone to DC Kits about what I wanted , and being assured they would provide a suitable pack)
Unfortunately E Kent's Hornby spares list does not include seating units for the 155. The candidates are Networker seating (almost certainly 3+2 suburban), Mk3 seating , and Eurostar seating . If anyone has any comments , I'd be glad to hear them , but present thinking is to go with the Eurostar seating units as being 2 + 2 and presumably having plenty of airline seating
I'll need more seating for the 153s anyway , as the seating needs to be extended at both ends to fill the unit, as well as installing end partitions. And I suspect I will have to replace the bogies with etched H frames when I do the conversion - the Hornby versions are the very opposite of open
There's also the complication of the wiring and installation for the decoder on the 150 . I'm making the coach with the toilet the powered vehicle with a view to hiding the decoder in the toilet compartment
It doesn't seem to be getting more straightforward
Unquote
By mid July the tale was looking still more like a corkscrew :
Quote
And things have got even less straightforward , as the person who was going to paint the unit (and any 153 conversions) can't now do it intil the New Year , if even then
The gubbins has now been installed under the second floor pan , and here is a picture for anyone else who is trying to reconcile a bag of whitemetal bits with a couple of drawings and concluding that the two things don't exactly match.....

This is the second and very slightly better underframe. You will see that the two ends of the fuel tank bear no relation to each other....
I don't guarantee this is absolutely accurate compared to the real vehicles - in fact I'm sure there are some differences (fuel tank for starters , and the exact shape of the exhaust arrangement being two). However it is a reasonable approximation of the equipment underneath a 150/2 , as opposed to the excellent model of the underneath of a 321 MS which is what you get if you s8imply use the bits in the kit
After further investigation , I've decided the best way forward for the seating is Mk4 TSO coach interiors from E.Kent Models. These have the right sort of seats in a 2+2 arrangement with a fair amount of aircraft seating in the mix . A fair amount of chopping up of the units will be necessary, but it's the only route that offers something approximately correct
It's perhaps worth adding that there are two black plastic airtanks underneath the exhaust unit, both mounted laterally , not transversely, with the smaller tank towards the centre. Black on black hasn't shown up well
Unquote
The start of August saw things working towards the rails:
Quote
I had a day off yesterday, and actually got a bit of modelling done
Thankfully the weather is now cool enough to dig out the soldering iron. 3 x A1 etched H frame bogies were folded up and soldered, and the sideframes cut from the Hornby Networker bogies stuck on with cyano. The brass of the etch does project slightly above the cosmetic side frames but I think I'll have to live with that.
I've fitted two to the trailer vehicle, using the Bratchill screws and attachment points. The recessed wells in the floor pan have been packed down to floor level to provide a bearing surface for the fold up bearing tabs
And suddenly I've got a vehicle, instead of a collection of bits and sub assemblies. All it needs is windows, interior,lights and one or two details. Photo will follow
Even better, my Boy's Bumper Bag of Kadees arrived from MG Sharp, and a little experiment showed that a dropped head Kadee should mount at the correct height via the enlarged coupler slot I filed in the front
I'm told that The Thing To Do is to use a medium shank Kadee at one end and a long shank Kadee at the other , as this will get it round a 2' radius curve. There's a packet of medium shank overset Kadees in the Starter Pack, but no long shank equivalent, and the separate packet of #49 long shanks I ordered is still on back order..
I've decided to make the DMSoL the motor car as this gives me a toilet compartment in which I can hide the decoder
I've even started to contemplate the supplementary pickups off the trailing bogie in a cheerful frame of mind .
And I've found someone else to do the paint job. It's starting to come together
Unquote
__________________________________________
??? posted on Fri May 04, 2007 6:23 pm
Quote
As promised, a photo:

I'm afraid black plastic doesn't produce the clearest results. We'll have to say its currently a Stealth Sprinter. But it rolls very freely, sits very steady and weighs quite a bit
As the Mk4 seating has arrived from E.Kent Models, I've started some desultry hacking. I was going to fit interiors after painting , but I've come to the conclusion I'm going to have to fit the interior on the powered vehicle before it goes away for painting, so that I can get all the wiring round it. (to be specific , Decoder, leading bogie pickups, Beetle pickups, and Express Models lighting)

The problem of the snowploughs seems to have a solution , and I'd better order some for the 153s as well
Unquote.
It was not long after this that we managed to break RMWeb1.5....
A hasty knot in the thread and we rejoin RMWeb2 late in September...
Some comments from bigjim, who had done some 153 conversions :
And bigjim again:
And rather embarrasingly, there the matter has rested ever since, as a couple of locos , a Challenge layout and the club project plus various bits of admin have been ahead of the 150 in the queue
With most of those disposed of, I'm hoping the 150 and the Challenge project can make some progress this weekend.
The delay hasn't entirely been a bad thing. Thanks to one or two people I now have some much better ideas about how to install the Express Models lighting kit. The circuit board will now be mounted on the roof, avoiding much awkward sawing up of the interior seating to fit round it. This will also mean that the LEDs can stay firmly inserted into the cab front, and there will be no complications in routing the wire+ plug to the slave lighting unit in the trailer via the gangway. Effectively the whole thing becomes part of the removeable top - not the underframe
This also means that the partitions can be glued in place and I just have to cut a notch in the top for the wire to pass through. And it leaves the underframe clear to install a Tony Wright style simple wire coupling between cars. This gets round the possible problem of Kadees uncoupling between the cars if standing in the wrong spot
__________________________________________
??? posted on Tue May 08, 2007 5:22 pm
I had lots of good intentions for the Bank Holiday weekend. I was going to crack on and sort out the bogies for the poweered car , pickups, motor bogie , that sort of thing.
And what happened?
Er, well I almost finished the trailer car instead.
It now has an interior, with seats concocted out of chopped up bits of Hornby Mk4 interiors. Unfortuately part way through the process I rechecked my references and realised that 150s are supposed to have 3+2 seating , not 2+2. At least nearly all of them do. I'm afraid I was led astray by too many miles on 153s and 156s . The HornbyNetworker interiors would presumably be more appropriate, and I suppose I should have written off for some and called a halt till they arrived...
In fact being a OO bodger , not a P4 modeller , I'm afraid I assembled the interiors using 2+2 seating , set in "airline seating" on the principle that it is going to be pretty difficult to see the details of the interior through the windows and so long as there are shapes , of a suitable shape , in a suitable place , of approximately the correct colour , the eye will be happy and not enquire further
Lighting has been fitted , using double sided stickytape to hold the slave unit of the Express Models lighting kit to the roof and the cab front (sticky pad behind the gangway door)
I've also added part of a Hurst Models detailing kit (for the 155). I took some effort to file the profile of the top of etch to match the moulded gangway, and on checking a photo I find that the top of the gangway seems to have less of a rounded corner - like the etch. Are the Bratchill moulded gangways not quite right?
I'm struggling with the other bits on the etch. I've identified the door opening buttons (already used A1's), the windscreen wipers (moulded on the glazing) but there are 2 square brass frames which sat inside the gangeways on the etch and some other tiny bits, and I've no idea what they are....
All that needs doing to the trailer car now is fit the etched roof aerial pod and the brass snowploughs - plus painting and fitting of the glazing
Then I've really no excuse for not sorting out the power car
__________________________________________
??? posted on Wed May 16, 2007 9:24 pm
Over the weekend I actually got the pickups installed on the power car. Two bits of brass handrail wire soldered to a piece of copperclad strip (as sold for building points - spare from a Mainly Trains sample pack) , with a connection to the inside from some strands of computer ribbon cable.
The copperclad was pared away with a craft knife before cutting off to length so that the whole lot would be low enough to fit on the cross beam of the H frame without fouling underneath the floor. I added loops to the ends of the pickups - much easier to adjust than bare ends
The worst is almost over. Can the end really be in sight now?
Thanks to several threads several new loco projects float back into view. The Airfix 31 should definitely be tarted up. I even have a spare painted body , bought as part of the Dapol factory clearance along with the body I used for the 20 (as well as a battered and crudely painted one bought for 50p) I shall probably spare the original body ton please collectors and rework the spare.
However a hasty check throws up no photos of 31 402 - and besides it seems she went from FP to the WR . Besides , the Airfix body is pre refurbishment, and couldn't easily be altered. I'm not certain of the visible differences between an unrefurbished 31/1 and original 31/4 conversion so I'd best stick to an early 31/4
Checking through a Cl31 site threw up another, better candidate loco : 31 408 . This is well recorded in photos , was at MR, BS , and CD in 1985-90
And best of all is this:
http://www.class31.co.uk/picture/31408-bk-090383_t.jpg
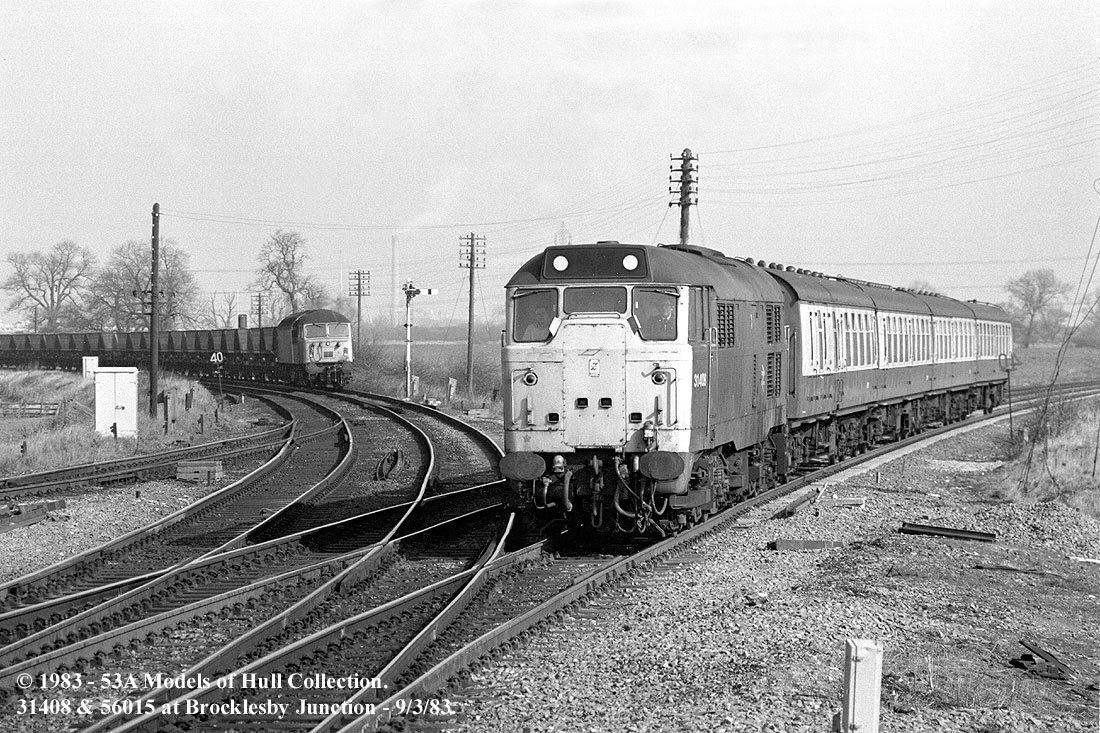
a JohnTurner shot of her at Brocklesby in March 83 with a Cleethorpes/Newark local service ( 4 x Mk1s) - allocated to IM and working in N.Lincs. Any unrefurb 31/4 is going to be slightly out of period on Artamon Square in 1988-90 (a Steve Jones shot at Stafford in 1988 shows her refurbished) but 31 408 is going to be spot on for my theoretical ultimate N.Lincs early 80s interests
And thanks to Jim S-W , the scrapbox 37 is definitely back on as Athearn PA1 chassis can be DCC'd. The second Athearn PA1 chassis is earmarked for the battered 31 body to give a green headcode box Brush 2 for the little GE BLT project I've got involved with (We'll try to keep it to the Gresley compo kit and the Dublo 20 not the ex LNWR BCK and the road van)
A further thread took me to Russell Saxton's livery site. And a photo then raised an interesting possibilty for the Ultrascaled Lima headcode box 20 lurking in a cupboard. Maybe not a mid-late 80s blue IM loco. Nor a late 60s blue loco for the cancelled Thamesside plank.Try a late 70s green TO loco?? I hadn't realised 20 177 was still in green , at Toton, in late 1976. That could easily find itself in the Scunthorpe area
Speaking of Ultrascales I must write off for repleacement wheelsdets for the Pacers to sort out the binding problem in the diverging roads of the points (what was that Capain Kernow was saying about a Jinty and an A6??) . With any luck I should have them by the start of 2008. I don't think sorting out the Pacers is going to be an early priority
__________________________________________
Comment posted by Pennine MC on Wed May 16, 2007 9:39 pm
None, bar the ETH gear (which Airfix didnt model anyway). Some (non-ER) 31/4s had the boiler exhaust plated, but so did some 31/1s - an easy mod with thin plasticard. So with another Fotopic trawl, you *might* just find a 31/1 that was still unrefurbed in the late 80s
__________________________________________
Comment posted by Phil on Thu May 17, 2007 7:03 am
Ravenser - try 20141. I think that was the last, or one of the last 20s to carry green livery - possibly even into 1980. At least, I think it was green under all the dirt !!!!
__________________________________________
Comment posted by Phil on Thu May 17, 2007 7:07 am
The ever helpful Brian Daniels fotopic site :
http://briandaniels.fotopic.net/p38615978.html
Continued thanks Bri !!!!
__________________________________________
??? posted on Sat Jun 23, 2007 7:45 pm
This is by way of a blatant bump , in order to stop the thread being locked.
The melancholy fact is that with various distractions, I haven't actually made any progress on any of these fronts in the last month. In particular no progress at all has been made on the Sprinter.
Maybe tomorrow, or possibly next weekend. At least the external distractions are clearing, and I'm hopeful some of these projects can be finalised in the next few weeks.
In the meantime I have managed a little bit of modelling , and have started a very elderly building kit, which is going to need a lot of upgrading. Yet another large cardboard box with a half built project in it is cluttering up the sitting room
__________________________________________
??? posted on Mon Oct 22, 2007 8:49 pm
Resurrecting my workbench thread from the depths , I'm shocked to see exactly how little I've done, and for how long. Building a layout does seem to preclude building any stock. There has been zero progress on the Sprinter
However the purpose of this is to record a way forward for dealing with the factory weathering on a Hornby 31. I didn't really feel comfortable with the weathering or the colour it left the blue - photos suggest the sides of 31s were fairly clean and blue , not covered in brownish gunk on their lower half - that stayed below the body
You are of course always advised to try out a new weathering technique on a piece of old junk in case it goes horribly wrong. So I tried it out on a new Hornby 31... In reality if you want to see what you can do about a particular factory effect , you don't have a lot of choice.
I took a scratchbrush , aka a fibreglass pencil , to the paintwork. At the top of the thread I mention
I now have 2 x Hornby 31s: rather than risk 31 174, which works, has a bodyside band and was allocated to IM in the 80s, I tried to minimise my risk by using poor 31 270 , which is none of these things and is still stopped. I started from the bottom , and worked up , very gently - the whole process was rather hair raising when you recall the price of these things, and the idea was that if it went horribly wrong and I went through the finish, it could be patched up and rescued as rust affected/paint stripped areas, which appear on the bottom of the body in shots of run down 31s
Thankfully it worked , and the preliminary results are seen here.

I haven't finished work - I've simply gone far enough to be sure it's working. When I do press on , the intention would be to apply a thin weathering wash of grey over all then pick out grills in black . Applying my usual matt varnish overcoat might be awkward here.
And if I'm going to put that effort into weathering, I have to get the thing to work again....
I've also started work on adapting the inevitable Pikestuff kit for a low relief building. After the long struggle with the ballast, quick results are morale boosting.

__________________________________________
Comment posted by Platform 6 on Tue Oct 23, 2007 1:29 am
Thanks for the update on your thread - especially on the Hornby 31. I have a couple but I don't admire the Hornby "weathering". I really want to do my own. Removing it is a first step I've wondered about.
I've also got a Pikestuff 3-road shed from a few years ago and again, I don't know what to do with it. I don't know of any sheds in "Pikestuff blue" - I'm thinking of a light grey to respray it. I'm modelling pre-TOPS blue.
__________________________________________
??? posted on Tue Nov 06, 2007 6:03 pm
Platform6:
I've treated the Pikestuff shed with Humbrol Metalcote, a light silver, and it seems to give a very satisfactory result (details in the Blacklade construction thread near the end). You could also try mid green : there certainly seem to be some green sheds near us
I know the Challenge is over , and I really shouldn't be working on Blacklade but... While trying to sort out the photos on Sunday I posed an unbuilt card kit for a warehouse in the right place to show the effect, and well.. I couldn't help thinking that all it needed was layering up and one thing led to another and I had yesterday off and by lunch time we were well under way to a warehouse.
The kit is one of those added to the Bilteezi range in the early 80s as a sort of postscript and drawn very nicely by Maurice Bradley - I think he was an architect as he has "letters" - ARIBA.
I've bought 2 kits , and I'm layering them using mounting board with the printed windows and cut out. This gives some genuine relief to the model. Photos to follow - the basic principles should be applicable to the Bilteezi range in general and also to Street Level Models kits
__________________________________________
Comment posted by MartinWales on Tue Nov 06, 2007 6:55 pm
Nice work on the 31-I'm just plucking up the courage to weather mine!!
__________________________________________
??? posted on Mon Dec 03, 2007 8:48 pm
I've been working on another building for Blacklade . This is one of the Bilteezi sheets - not the original Vacy-Ash sheets from he 50s but one of the low relief buildings drawn by Maurice Bradley in the 80s. He seems to have letters - ARIBA - so I assume he was a qualified architect
The original building was in Hampshire I believe but similar Victorian brick warehouses are common enough in the E.Midlands and therefore right for Blacklade.
The big issue with the Bilteezi sheets is they're flat. The printed windows can be worked round but part of the character of these buildings is they're chunky and have deep inset brickwork.
Never fear - heavy rework time ....

Here we have the bits. At ???’???‚¬????????‚??1.50 a sheet (actually 2 x A4) , buying two isn't a hardship. One front has had the recesses cut out, and been mounted to 1mm mounting board. The other has had the windows cut out and been mounted to 1mm mounting board. All brickwork has had a light rub over with a suitable pastel pencil to tone down the yellow and give it more of a Midland redbrick look - in this case, Derwent Terracotta
To minimise warping , I'm using permanent Photomount to fix the thin card to mounting board. Blacklade isn't going to be exhibited (for lack of means to move it) and I hope this will be perminent enough

Here we see some hasty masking up with freezer tape to keep Photomount off the bits that will be visible after layering up
A fair bit of the afternoon was spent cutting slivers of card from spare bits of the kit and sticking them over the exposed mounting board edges . All the windows and all the doors have been done as well as the recesses. Not quite as bad as it sounds, and the finished result can be seen here
Close flash photography is quite cruel to my felt tip and pastel pencil touching in of the edges, but there is an awful lot less edge to touch in than if I'd just left the mounting board unclad (brown seems better than red , and a rub with something called Sanguine de Medici seemed to help - this pencil is from another range , grabbed cheap in a closing down sale . Quite why the Medicis are supposed to have had a darker shade of blood I can't say....)
And here is the result. :

The imperfections are not quite so obvious in life ("honest guv!") and the result is a very chunky frontage with heavy relief . You'd not think it was a flat card kit to start with
__________________________________________
??? posted on Sun Jan 06, 2008 12:26 pm
The warehouse is now finished and awaits installation.
So last night, between sneezes, I opened one of the packets of Ultrascale wheels for the Pacers, expecting that this would be the usual 5 minute drop in job.
It isn't
There are no instructions, which is a good start.
I've removed the trailing wheels , only to find the replacements won't fit. They have a dirty great boss on the back of each wheel which fouls the plastic moulding very comprehensively. Still worse , this moulding is a bearing surface - the pin points fit into an open U where the W irons whould be , and are held down by plastic in the centre on which the axle runs . Except that on the placement wheelsets thereis a rubby great boss in the way. So somehow I've got to file the plastic down , on both sides , to get the replacement wheelset in.
I can't simply leave the original Hornby wheel set in place (it was the driven axle that caused the problems over point work). This is because the Ultrascale wheels are smaller diameter than the Hornby wheels they replace
The driving axle is more fun. It looks as if I have to knock the old axle out with a nail (and the gear wheel!) to extract the old wheels , then remount the gear wheel on the new axle - somehow - and add the wheels
I suspect a tiny drop of superglue to secure the gear wheel may be appropriate - I don't have any Loctite (And I do mean a tiny drop)
I bought a Pacer replacement chassis from Branchlines a month or so back , and compared to this it looks relatively straightforward , reliable and well engineered. Significantly easier to do , in fact. I never thought I'd ever say that about attempting a chassis kit....
__________________________________________
Comment posted by jim s-w on Sun Jan 06, 2008 12:36 pm
Hiya
Out of interest are the Ultrascales 10.5mm diameter or 12mm like the Hornby originals? Rather than Gluing the gear on a better bet is to knurl the axle by rolling it with a file a few times.
Did you get your 150 finished? Did you have any window frames off me ![]()
Cheers
Jim
__________________________________________
??? posted on Sun Jan 06, 2008 3:44 pm
Jim:
1. Hornby 13mm diameter; Ultrascale 12.25mm
2 There is roughening /knurling of the replacement axle at its mid point. However alignment may be interesting as the gear will have to be fittted in place - you can't extract the wheelset , as it slots through a metal casting with the gear sitting in a cut out in the centre.
The more I look at this, the worse it gets . I can't even fully disengage the motor unit from the chassis without unsoldering connnections
3. The 150 is still unfinished. Having got the warehouse out of the way , I was looking for a nice quick win before turning to finish off longer term projects , and I thought an Ultrascale rewheeling pack would be a doddle: 10-15 mins at most....
A final push on the 150 should be the next item on the agenda, or pretty close to it
I haven't had some of your etches, but I probably need them. How do they fit into the build sequence ? I'm having the unit painted by someone else, and they asked for it before the glazing is fitted, to simplify masking. I assume the etches must go on before painting as the paint partly covers??
__________________________________________
Comment posted by jim s-w on Sun Jan 06, 2008 4:44 pm
Thats right - etches go on before paint.
If it were me I'd use the Branchlines or High Level kits for the 142. Ultrascale sounds like a bit of a pain and will result with the wrong sized wheels anyway.
Cheers
Jim
__________________________________________
??? posted on Sun Jan 06, 2008 5:10 pm
Jim: This may be a stunningly stupid question but - can you fit the glazing after the etches - or does this require the sequence glazing/etches/paint , meaning the glazing has to be masked for painting?
I've a feeling I may be parking the Pacer in the too hard basket for the moment . Making up the girders for the bridge looks like a more productive use of a Sunday evening
__________________________________________
Comment posted by jim s-w on Sun Jan 06, 2008 5:32 pm
Hi
No, you fit the glazing after the paint. You do need to cut your own but there is a small overlap between the etch and the hole. I have asked a lazer cutting company about the costs of getting windows cut - if its viable i'll let you know
Cheers
Jim
__________________________________________
??? posted on Sun Jan 06, 2008 5:35 pm
So I'd have to throw away the window glazing in the kit?
__________________________________________
Comment posted by jim s-w on Sun Jan 06, 2008 5:44 pm
Yeah
Its means you loose that god awful prism and the over thick frames effect too ![]() You do re-use the door glazing though
You do re-use the door glazing though
Cheers
Jim
__________________________________________
??? posted on Mon Jan 07, 2008 12:22 pm
Hmm.
I'm starting to wonder just how many bits of this Bratchill kit I'm actually going to use , having already discarded virtually everything below the floor and replaced with components from other sources
I made a little progress with the Pacer. The trailing axle can be pullerd out and worked on seperately. The moulding has an open U-iron on each side - the wheelset is held in place by running through two slots in plastic lumps that project upward between the wheels (ie within the back to back). I reckon you need to file these back from the outside to get the wheels in place. It may or may not be necessary to file down the projections to the bottom of the slot . I did, over filed , and will now need to cannibalise a spare moulding off the second Pacer. As I have a Branchlines pack for the second Pacer, that's not a problem . Anyone with just the one Pacer and an Ultrascale pack would now be tearing out his hair.
________________________________________
0 Comments
Recommended Comments
There are no comments to display.
Create an account or sign in to comment
You need to be a member in order to leave a comment
Create an account
Sign up for a new account in our community. It's easy!
Register a new accountSign in
Already have an account? Sign in here.
Sign In Now