


Andy 53B
-
Posts
99 -
Joined
-
Last visited
About Andy 53B

- Currently Viewing Topic: Early Risers.


Andy 53B's Achievements
81
Reputation
Bookmarks
-
Detailling - Handrails
Advice on how to replace handrails on locos pleaseHi
I am currently detailing 25190 and 47076
I require cab handrails for both. Preferably nickel but could be brass.
My understanding is 0.45mm is the right width. I am not sure how I would bend this accurately to 90degrees at each end.
So can anyone help. Does anyone know of a supplier that can provide ready made cab hand rails for a 25 and a 47?
Thanks
(The 25 is Bachmann - The 47 in Heljan)
-
Airbrushing indoors
Airbrushing indoors3 hours ago, ianLMS said:Its probably too late to save me, but would definately benefit others reading this if a link to a suitable mask, and/or suitable filters for use with enamels/airbrushes would be very beneficial. I can also delete the link or edit my post above to reflect your guidance to esnure I do not misguide anyone.
Unfortunately for me, I had smoked for 30+ years before giving up last year (now vape a wonderful concoction of VG/PG), worked in an asbestos infested hanger, sprayed aerosols and enamels, inhaled copious amounts of various glue vapours and spent many hours filling my lungs with solder smoke way before I even thought of buying a mask!!!!
This is the one that I use and recommend:
There must be many others, and I'm sure that somebody will be along soon with their favourite.
-
Wright writes.....
Wright writes.....1 hour ago, Tony Wright said:John,
I've not changed one yet - in three years.
I'll check occasionally, just to make sure that they're not contaminated, but they're still doing the job.
As I've said before, running a layout regularly keeps it clean. LB is run at least once a week, so track cleaning is not really necessary.
I have heard the use of a graphite pencil advocated, though I've never used one. They're used on the vast Carlisle, with success. Perhaps Mike Edge will comment.
Regards,
Tony.
Here's a link to the pads.
http://www.gaugemaster.com/item_details.asp?code=GM37&style=main&strType=&Mcode=Gaugemaster+GM37
HTH
Brian
-
Weathering
Phil Mc's workbenchPicked a few of the NPCCS that didn't need renumbering to work on, and this is the result.
Cheers,
Phil.


-
Weathering
Eastwood Town - A tribute to Gordon's modelling.Thanks for your note, John. It wasn’t until late last night did I spot the link to the video featuring Alan showing how he does his stonework. That really was invaluable and was the first time I have seen so much detail in the process. As you say it starts from 4 minutes in and is well worth watching. Alan makes it look effortless turning a Will’s plastic sheet into wonderful stonework.
Hopefully you can still get the wood dye....
")
I hope you don’t mind, but I have embedded it into my thread so it doesn’t get missed by others. I’m so glad for Shane to see video footage of his father. He really was one of life’s characters.
-
Coupling
Wright writes.....1 hour ago, Jesse Sim said:Speaking of the C2 how’s it coming along? No rush of course, just asking.
It's with Geoff for painting.
It's in the queue.
Regards,
Tony.
-
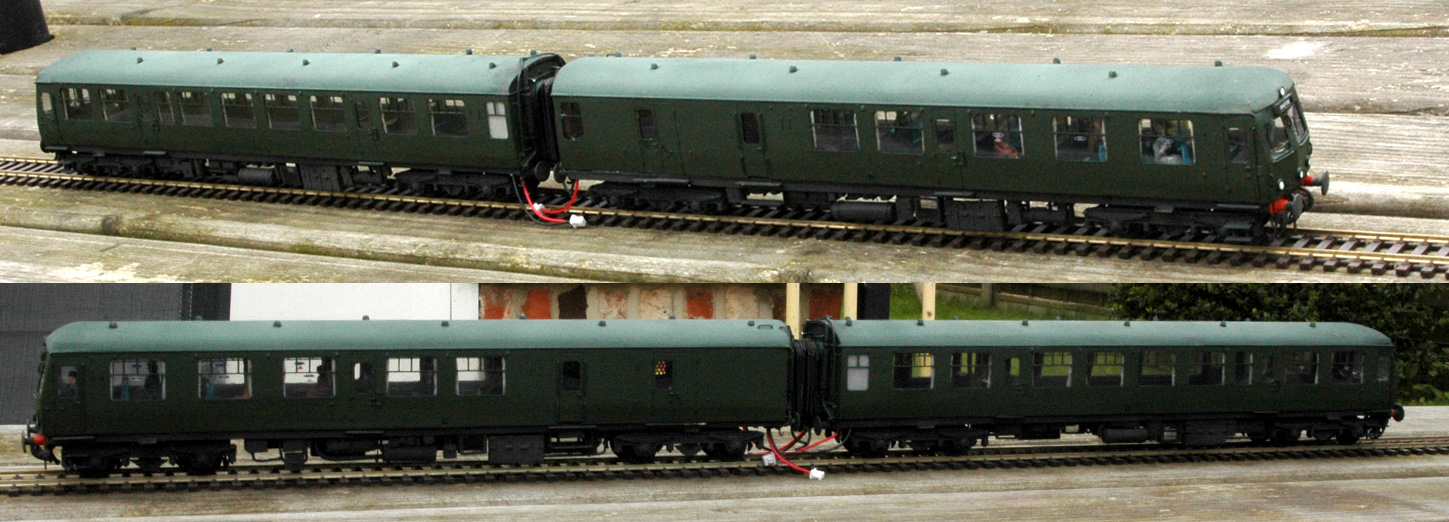
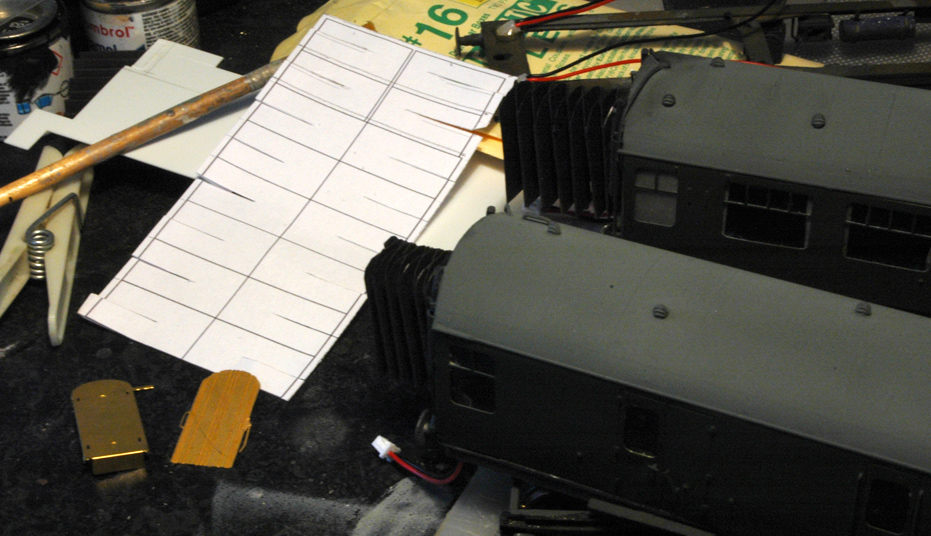
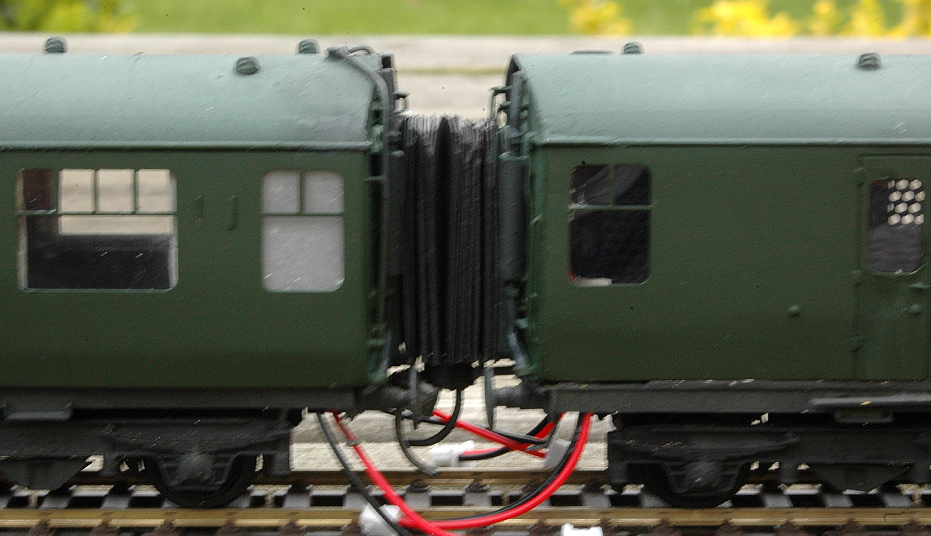
Corridor Connection
Wright writes.....My apologies for the quality of the photos, it is darker outside than I expected. I need to get my tripod out and use a bigger F-stop.
Working on a Class 120 DMU, 3 car, but only showing the two driving units at the moment. Mostly from the Craftsman conversion kits, but Comet underframes, MTK bogies and a wealth of other sources. To be powered by a Replica Railways motorised frame and controlled by DCC.
The units are roughly assembled, but not fully screwed together yet, hence the body sitting up a bit on one of them.
Some advice sought.
What do people think about using the metal end pieces for the bellows on what will be a permanently coupled set of coaches?
I have read elsewhere, the bellows need to be cut down a bit. Roughly connected with a couple of Kadees at the moment.
It will be interesting to see how effective the cables for the lights masquerading as brake pipes are. Will they be flexible enough to take corners or will they derail the model? They will fit into the centre car which is still being glazed at the moment.
The other question is what would people advise for glazing the destination boxes. I do have some Glue’n’Glaze, but it seems to remain tacky. Would varnish be good, or would cutting very small pieces of clear plastic and fixing them in, presumably with Glue’n’ Glaze?
Thanks to Tony and all on the thread for the constant inspiration.
Jamie
-
Painting - Tamiya
Wright writes.....On 09/05/2020 at 20:20, 45568 said:To Doug & St. Enodoc, with apologies to Mr Wright for hijacking his thread...I will have a look at my spray can paint palette in the next couple of days and put in my suggestions. I have tried many car sprays, with mixed results, I do envy the b*ggers in UK with 'damask red' etc.
The Mr Hobby 'russet' was worth a go I thought, and overall I am very pleased with the result. It is also compatible with Tamiya varnishes..that opens another can of worms!
Cheers from Fortress West,
Peter C.
Wow, four pages gone since I said I would reply, however, Mother's Day has been and gone and it was good to spend it with family in a legal gathering!
Tamiya spray colour chart below.
https://www.tamiya.com/english/products/list/tamiya_spray/kit85001.htm
Regarding Tamiya spray colours, I use the following regularly:
TS-1 is good for interior of steel mineral wagons prior to further weathering.
TS-4 & 48 are excellent for coach and van roofs.
TS-9 A good 'Brunswick' green.
TS-11 BR Maroon coaches.
TS-6 & 29 are excellent black paint for BR locos.
TS-32 good for 'early' (darker) BR wagon grey.
TS-62 & 69 are good track/underframe weathering colours. Also may be good for GWR brown vehicles and SR brown stock.
TS-68 good for 'unpainted' wooden wagons.
TS-81 is good for later (lighter) BR wagon grey.
TS13,79,80. Excellent varnishes which are fully compatible with the above paints. CCT transfers do not like them however, unless you have put a coat of Klear/pledge to protect the decals!
Fine surface finisher/primer makes an excellent BR fitted wagon Bauxite.
I am looking at using TS-46 and TS-8 to represent faded 'Carmine/cream' on coaches.
MR. Color spray 81, Russet, as mentioned above is good for faded carmine as shown, I have not tried any others yet.
Humbrol offer #20 Crimson as a spray, I have used the colour from a tin for as-new crimson stock, but the spray was out of stock so I have not tried it.
Car sprays: I have used Ford?? Venus Red & Hermitage as crimson for coaches, also Milano Red for faded 'blood', I can't remember what I used for cream!, but I haven't looked in a car part shop for a while now so I'm not sure what is available.
The big gap is anything suitable for DMU or SR coaching stock green. I have used TS-43 which matches the later Bachmann BR/SR green, but is not close to the current Hornby colour.
Illustrating the difference between the two Tamiya wagon greys, in very bright sunlight, the light grey isn't that white!
Tamiya finisher/primer red as BR Bauxite below.
Hope our Antipodean modellers find this useful, (also modellers elsewhere as Tamiya seems to be available worldwide). Any further suggestions welcome..except you pommie blokes don't make us jealous with your endless list of Halfords exact matches!
Cheers from slightly-relaxing Fortress WestOz,
Peter C.

-
Weathering - Wood
Weathered Wood - A Worked ExampleOn another thread (http://www.rmweb.co.uk/community/index.php?/topic/99615-transfers-for-airfix-lowmac/) , where I was asking about getting replacement transfers for an Airfix Lowmac EK, I was asked if I could give an overview of how I got the wood effect on the Lowmac deck. So here’s a worked example - it’s the floor of a Parkside Plate wagon.
The equipment used is:
- Lifecolor acrylic weathered wood paint set
- Lifecolor acrylic BR unfitted freight grey (UA 818)
- MIG Black smoke weathering powder
- No. 2 round paintbrush – good condition
- No. 0 Filbert paintbrush – poor condition
Start by giving the whole floor two coats of “Wood Cold Base Color” (sic) (UA717) from the weathered wood set with a decent quality brush, and leave to dry for 24 hours to harden off. This is important as the subsequent dry-brushing can be quite vigorous, and can remove the base layer. Guess how I know this…

Then, when that’s fully dry, things do speed up a bit. Take the “Wood Warm Base Color” (UA714) from the weathered wood set, and using the grotty filbert brush, start drybrushing along the grain of the planks. Note that this is really, really, really drybrushing – if you think there’s no paint at all on the brush, there’s probably too much. . The picture below shows the effect we are looking for on part of the floor.

When it’s done we should have something that looks a bit like this:

There’s no need to wait before moving on to the next step – the drybrushing means the paint is dry pretty much as soon as it has been applied. So next take the “Wood Warm Light Color” (UA 715) from the weathered wood set and repeat the drybrushing, to give something that looks like this.

The next step is important and takes a new colour not from the weathered wood set. I use “Lifecolor Unfitted Freight Grey” (UA818) because I’ve got some handy, but any medium grey will be OK. Generally, the older wood gets, the greyer it becomes, so this is an important step in defining how old our wood will look. So repeat the drybrushing process, but adding a bit more grey if we want older wood. I’ve gone for a not-too-old look here:

As well as going grey, older wood take on silvery highlights, and these are then added by guess what? More drybrushing - this time with “Wood Cold Light Shade” (UA718) from the weathered wood set.

The final drybrushing stage is then to add the darker highlights (if that makes sense) using the “Wood Warm Dark Shade” (UA713) from the weathered wood set, to give us something like this:

Because this is going to be the floor of a plate wagon, I felt that a bit of pre-weathering would be appropriate, and so I’ve just worked in some MIG Black Smoke weathering powder to darken the effect, using the grotty filbert brush.

And that’s it really. All the drybrushing and powder work on this floor took me about 35 mins, so it’s not too time consuming.
Just remember - the most important things are to make sure that the drybrushing is really, really dry, and remember that if you make a mistake, just rub it off (I use my finger) and have another go.
Any questions?
-
Ballast Weathering
Waverley West, Princes St Gardens and Haymarket MPDOn 07/06/2020 at 07:50, young37215 said:Hi Dave
You clearly paint/weather your track bed area post ballasting as can be seen in the above picture. I am struggling to get something like this, please be so good as to tell us what it is you do.
Thanks Rob
Hi Rob,
The method for tracklaying and weathering I use is as follows:
1. First, lay the track and test run your trains to make sure everything is working OK and derailment-free.
2. Using Railmatch aerosols, I then spray the track in-situ with a mixture of Railmatch Frame Dirt/Sleeper Grime/Roof Dirt/Weathered Black according to the finish I want to achieve.
3. I then ballast the track. I mainly use Greenscene ballast, although I also use Woodland Scenics too. Always use the finest grade of ballast. (i.e. basically N gauge ballast. The supposed 00 gauge ballast types generally look far too coarse for me).
4. Finally, I spray the track using the same mixture with loose sheets of paper (newspaper or kitchen roll) placed on either side of the track covering areas which I don't want to be sprayed. I only place the sheets loosely by the track and often a few mm's or more above the track level. This produces a slightly feathered effect to the edge of the track weathering, which I think is much more realistic.
Studying photos of track suggests that the edge of the sleepers is normally as far as most track grime extends laterally, although there are plenty of exceptions of course.
5. If desired, finish with a slight dusting of the whole track and adjacent ballasted areas to tone everything down and blend it all together.
That's basically it. I'm not yet entirely happy with the look of the reballasted station throat, so a bit more titivation is required I think before I can consider the refreshed trackwork finished.
Hope that helps!
Dave
-
Weathering - Wood
Wright writes.....23 hours ago, Erichill16 said:Thanks Andrew,
As I said in your own time. I’m suffering from a different type of fatigue, I’m refurbishing an old loco and at every step there appears to be something in the way. I’m ready to put transfers on it and having three sheets of transfers I thought there should be plenty of what I need. Wrong, no number 5s. Damm I wish I’d checked earlier.
Regards Robert
Good evening Robert,
I hope you get your bunch of fives, if you see what I mean.
On 19/06/2020 at 21:09, Erichill16 said:I like the finish on your wagons and I’m particularly interested in the wooden effects and wondered if you could tell us what you used. Enamels acrylics powders paint numbers etc. In your own time of course. I never seem to get the wood look and think it’s probably that I don’t use enough gray.
thanks in anticipation,
Robert
I don't use acrylics, I'm mostly a wet painter, acrylics dry too quickly for me. I've seen some nice powder work, but sometimes I think it looks a little overscale and you can always tell it's powder work. In the grand scheme of things, I don't see myself as an expert at wagon weathering, It's too time consuming on a forty wagon train. Keep it simple, you can always do a bit more, However, it you can't tell if it is acrylic, enamel or powders, then that is quite pleasing to me because you are seeing the finish and not the materials. I've currently got twenty wagons on the go, most with bair wood visible, so I wanted a technique that gave relatively fast and predictable results. So this is what I did.
1, find a base coat that is both light but warm, perhaps like freshly sawn timber. I seem to consistently use lighter base coats than many. Humbrol 121, was airbrushed on to the areas I wanted to be bair wood. To be honest any warm cream colour will probably do. You can of course brush the paint on, it takes forever. I allow 48 hrs to dry.
2, pick out a few individual planks, a mix of Humbrol 121, Railmatch frame dirt, Humbrol 79 or and Humbrol 32 in different mixes to produce warmer or cooler, darker or lighter planks. Many years ago Humbrol 32 was an awesome carriage roof colour, it's changed so much, it is now a very acceptable pre war LNER wagon grey. Again, any substitutes will do, a weathered or subdued brown and mid to dark greys. You will be mixing your own colour and tonal applications anyway. The mix is more of a wash but still paintable, so that you are using the colour of the basecoat, not obliterating it. leave it 24 hrs to dry.
3, application of the first wash. You have a number of choices, Frame dirt will give you a warmer brown finish, Humbrol 32 a cooler look, or you can mix the too or use a lighter grey. The most important thing is that your brush is clean, your white spirit is clean and you paint mix and the surface that you intend to apply the mix too is also clean, no bits, bits will kill it. A generous wash of thinned paint is applied from side to side, in the direction of the floor planks, Working down the length of the wagon from one end to another. Paint out the mix until you are happy with the consistency of the effect and don't let the paint start to bite. If you need to add more white spirit or paint mix, do so .The crucial thing is that the the wash is kept wet on the area of application, so you are painting all the planks at the same time. Thus, they are allowed to dry at the same time. This will produce a consistent finish without tell tail brush strokes or other grot that looks like slap dash workmanship. If happy, paint the wagon sides and ends in the same fashion and leave the lot to dry for 24 hours.
4, repeat with second wash, you can vary the tone or colour of the individual washes, a second wash may be pure dark grey for example, to pick out the groves in the planks. If you are not happy with the look of the washes, remove with damp cotton buds, this in itself can produce some nice effects. You can keep adding washes if you so wish, there was no one wood finish, though modelers worship the grey fashion at the moment. One of the grey worshipers posted a photo of wood recently and declared it grey. It was alive with subtle yellows and browns ............. pinks ........... blues ...................... creams ............ greens .............funny how some can look an not see a darn thing. The important thing is to build up a subtle effect, don't go to dark too soon and obliterate the base coat, let it to do its job.
5 Finally, I finish up with the airbrush, I can work wet on wet with this in a way you can't with a traditional brush. I set up a higher pressure to get a nice dusty dry effect that gives more cohesion to the whole thing. Adjusting the pressure down, I will touch in darker areas, were dirt will collect around strapping and door edges. Then leave to dry, an important note here, the rest of the wagon is still in undercoat. I will not touch the rest of it until I'm finished with the bair wood areas that I am working on.
Lots of drying time, but the time spent actually painting the wagon is reasonably brief. most of the time goes on picking out the planks, don't go mad on that, keep it understated like the colour palette. Remember that tone and contrasting tones will do a lot of the heavy lifting, rather than colour and brushstrokes. If I chose to go back and add more detail, you can at any time. I hope that has all been of help.
-
Track - Peco Points
Peco Bullhead Points: in the flesh17 minutes ago, dasatcopthorne said:Has anyone with shorting locos discovered exactly what two pieces of rail are shorting?
Dave
Hi Dave, Gilbert,
The photo below (of an unmodified turnout) shows exactly where shorts can occur. Different Loco's or stock seem to short out at different places... Certainly the first thing to do is check your back-to-backs. Then look for where the wheels might be being pushed against the nearby rail with the opposite polarity, it could be any one of the three places indicated below, where rails of opposite polarity are close to each other. Problems mostly occur when stock is taking the curved route. As mentioned before, loco's with a short double-pivot front pony truck such as Hornby's L1 or P2 are particularly prone, also Hornby Pacifics with the flangeless trailing pony truck wheels that swing out of gauge on curves, and some Loco's with long wheelbases. For some reason I still haven't fathomed, I have one Bachmann Deltic that does it too, but not others.
The modifications I make are shown on page 46 of this thread. RFS above has kindly provided a link above. Essentially, I convert the turnout to an electrofrog format.
The Unifrog can short out in any one of the three places ringed red: usually it is caused by the back face of a wheel flange touching the opposite polarity rail. Hornby's flangeless training pony wheels on their Pacific locomotives can also swing outwards on the curved rails, bridging the gap and creating a short.
With the unifrog, it is the frog nose, and the two check rails aside of it that change polarity when the frog is thrown. The modification makes all the adjacent rails the same polarity as the frog, and moves the electrical breaks further away from the frog.
-
Peco Bullhead
Peco Bullhead Points: in the fleshA thin smear of epoxy (not paint, it will rub off) on the sides of the rail here:
is all that is needed to cure the shorting problem. It is caused by the backs of the wheels, so there is no need for anything on top of the rail.
It will have minimal effect on the running quality, and easily done after laying, or at any time.
Martin.
-
Painiting
Signaller69's projects18 minutes ago, Signaller69 said:Hi James,
Thanks, I was pleased with the colour I have to say. Holts do fractionally lighter and darker shades too. The green of the older Bachmann Peak I am working on has slightly more brown in it giving a slightly different shade, but then the real locos were not all the same shade so it doesn't bother me unduly. Conversely, I have now sprayed the 25 roof with Holts HGREY03, which is a perfect match for the roof on the Peak, but the grey roof of the 27 has slightly more brown in it by comparison!
My local Holts supplier also mix paint, I should perhaps look up the RAL code for BR blue, Warning Panel Yellow and BR Green for starters!
Martyn.
Hi Martyn,
Here you go:
Rail Blue:
Rail Grey:
Various BR colours:
https://www.e-paint.co.uk/uk_organisations.asp?cOrg=BR
Gibbo.
-
Lamps
Wright writes.....7 minutes ago, Major Clanger said:Lamps - pins are not required. Use tiny neodymium magnets instead. The hand of God will be involved though.
Yes, with staples for the irons. 1.5mm x 1.5mm cylindrical magnets do the job nicely (as they do for headlamps too, of course).
-
Coupling
Wright writes.....Martin Brent used to sell AJ manufacturing jigs. A colleague borrowed mine.. and it hasn't returned. Fine in EM, S4 and O but OO has abit too much side pay for them to work well.
We in Leeds have used DGs for a long time *30+ years possibly). They are easily made, can be fitted easily and can take real battering. We have a height gauge so a quick check when taking stock out of the stock boxes means they work well on our exhibition layouts. You can easily fit them to coach bogies, wagons, vans, Bogie goods stock, locomotives etc. Electromagnets can be used to give a delayed uncoupling action and they are much smaller than Sprat and Winkle (and you don't need to chop holes in buffer beams as some people do fitting S&Ws
Both DGs and S &W are part of Andrew Hartshorne range (Major Clanger on RMWeb).
To use 3 links .. try seeing them with varifocals..
Baz
-
Coupling
Cemflo, by AccurascaleOn 28/03/2019 at 21:30, Enterprisingwestern said:Just as aside, has anyone managed to solve the coupling conundrum and get the tommy bar to obey rather than defy gravity when connected to an adjacent wagon?
Crack out your favourite 0.5mm drill bit and grab one of the finest Irish lace making pins money can buy (0.5 mm diameter of course) and to a man of your consummate skills: Bob's your Uncle.
'Serious head back on'.
Coupling hook is plastic with integral spigots that are melted over to retain the flat top links. I had hoped that I could have "pinged" the links off leaving enough plastic to refit and melt over again. Alas no joy, hence the 0.5 drill and fine lacemaking pin.
Top Right.

P
-
Painting - Tamiya
Cheesysmiths OMWB quick DMU update
A quick update. The 116 has had paint added, and the destination box modified with a piece of 10 thou added to bring it forward and down to the gutter at the front, which looks better to me.
Needs a quick touch up, then this bit is done.
As for the other DMUs, the 105 is drying as I type, but the 127 parcels unit is due a visit to the DOT paint stripper after the masking failed whilst spraying.
As for the paints used, the yellow is vauxhall mustard yellow and the roof is plastic bumper grey from halfords, but the blue is from autopaints huddersfield
-
Painting
What is on the bench was previously in my head !Hi Folks,
Here are three photographs of 25 317 wearing RAL 5020 and 25 064 wearing Railmatch 207:
Out door diffuse sunlight.
Indoor diffuse sunlight with the positions swapped for comparative purposes.
I'm really pleased with my painting experiment as it has gone very well unlike other paint jobs where the varnish ruins the whole job at the last moment. The satin lacquer has an effect that has altered the shade to make it appear more like the Railmatch shade in that it seems to have both lightened and made the colour a slight more green, a definite bonus.
Below listed are the paints used and the order in which they were applied:
- Halfords grey primer.
- Two coats of APS RAL 5020 (gloss finish).
- Masking for yellow ends.
- Halfords white primer.
- Two coats Humbrol RC 407 acrylic.
- Apply transfers.
- Seal transfers with B&Q acrylic clear wood varnish.
- Halfords satin lacquer.
The APS car paint and the Humbrol and B&Q acrylics are not affected by the Halfords satin lacquer which gives an excellent finish with no fuss at all. The B&Q varnish is only applied over the transfers and brushes out without leaving any discernable marks ready for the lacquer. The reason for using the Humbrol RC 407 is that it is a yellow paint that actually has the ability to give solid colour in only two coats with the added advantage that I can spray over it with the Halfords Lacquer.
The reason I experimented with the 25 is that stripping the paint from a diesel body is much less trouble than that of an electric regarding breaking fiddly bits off the roof. Now that I have a painting system that actually works and doesn't curl up the transfers I can get on a paint lots of locomotives and coaches, trucks will get the same treatment except that I shall use Halfords matt lacquer. Once the RAL colour chart arrives I shall find all the respective colours, list them here and then get busy.
Gibbo.
-
Excel
Stock list databaseOn 19/09/2020 at 09:49, Shed Driver said:Hi Spamcan61
I have produced an Excel spread sheet with a hyperlink to a photo of each item of stock. Not ideal as the photos are stored on the C drive separate from the Excel program. How do you embed photos on an excel spread sheet? Ideally I would like a thumbnail in a cell which when clicked on opens up to a full page. I am using Excel 2003.
Thanks Norman
I've done 2 things with images in my excel spreadsheet inventory (another vote for Excel).
I have a small thumbnail of a side view of each loco placed in a cell. Easy enough as said before.
I also have a pop-up image which appears when I hover my cursor over a cell, and a larger image appears. In this example, when I hover over the class type, the large image appears.
This avoids having large images taking over the whole spreadsheet, only appearing when necessary.
Here's the steps to make this work.
1. Right-click in a cell and select 'Insert Comment'
2. A box appears with the excel user-name within, ready to add text comments. But adding an image takes a few different steps.
3. When the comment box appears, right-click in the fuzzy border (not within the cell) and a pop-up menu appears. Choose 'Format Comment'
3(a). You can also right click in the cell (not the comment box), and in the pop--up menu select 'Edit Comment....'. appears. then right-click the fuzzy border. -> Another way of reaching this step.
4. In the box that appears, choose the 'Colors and Lines' tab, In the Fill section, click the drop-down arrow beside 'Color' and at the bottom of the list choose 'Fill Effects'.
5. On the Fill Effects window, choose the 'Picture' tab and then select your picture.
6. OK out of all selections and then resize your 'comment' to suit.
-
Mitre Box
Mitre boxes and razor saws for fine cut'n'shut workThere was another similar thread recently: https://www.rmweb.co.uk/community/index.php?/topic/156761-mitre-box-help-please/
My own research led me to a Zona 500 32tpi fine kerf deep cut razor saw & T-SA37/240 thin slot mitre box. However, I didn't take it any further, so it is still on my round tuit. The two suggestions above give further food for thought.
-
Peco code 75 point
Wright writes.....
While i'm here, let me just explain about this rebuilt Peco point.
I know from bitter experience in the 1980s, that building your own points in flat-bottom from plain rail, is hard work, taking far longer to grind off those bottom angles, when making frogs and point blades, doubtless these days you can buy the parts ready made? The Peco code 75 looks quite good for general use, but the plain track sleepers and point timbers, are too closely spaced for 1960s UK track, perhaps aimed at the continental market?
All is not lost, this 5ft. "Large Radius" example is about the sharpest you can get away with on a prototypical passenger running line in 4mm, nothing has been added, it was just a case of careful filletting, the point does not need to be dismantled. To maintain integrity and strength, I retain the tie-bar unit (far left), the two timbers at the pivot points, two timbers at the isolation break, two timbers at the frog, and the two timbers with angle at the far end, all else is removed. The timbers removed are then cut into individual strips, the inner rail clips removed, and then re-introduced to the point, where appropriate.
So looking at the photo, from left the first two sleepers become one spaced out, after the tie-bar switch, 7 timbers become 6, after the pivot 6 become 5, after the isolation gap 4 become 3, after the frog 5 become 4, with some tricky half-timbers around the frog, to avoid cutting the latter. You can see I still need to add some half-clips on the insides of the re-positioned timbers. If you are careful, you can leave the outer moulded rail clips on, or replace with Peco or C&L clips cut in half. You will have spare timbers to play with.
Should take about half-an-hour. You can convert them to EM and P4 as well.
Cheers, Brian.
-
DMU Bogies
Sheffield Exchange, Toy trains, music and fun!If you are going to use the new Hornby motor bogies, the DMU/153/156 bogies are identical. This is even down to the wheels, 12mm, which is too big for the sprinters, but is perfect for the 1st gen DMU. The motor bogie frame for the 101/bubble car clip directly onto the sprinter motor bogie. I have found the 153 is the cheapest of the lot to buy as spares.
-
Silouette
A Guide to using the Silhouette Cameo CutterAnother Silhouette School post: How to Turn Off Silhouette 3mm Kraft Blade Hooks and Loops.
This seems like it might be useful - they tell how to turn off the hooks and loops (called "Smart Cuts" - perhaps an oxymoron) which helps cut thick materials without the blade getting stuck. Sound familiar?
The article also tells how to set up your own materials - and relates to a second post: How to Guestimate the Best Silhouette Cut Settings for Materials Not on the Material List.
My usual disclaimer that I don't yet own a cutter, so what would I know. I have no relation with the site - not even a customer.
-
Accurascale Deltic Years
Accurascale Class 55 Deltic - 4mm scale10 hours ago, ColinK said:I've been digging through my books to try and work out which model deltic would be perfect for my layout. With so many different models being produced, it would be helpful if there was a list saying which years each model is correct for.
This is what I worked out on time spans for each when I was ordering. Accurascale may wish to confirm or deny
")


")
.jpg.343b02956cf6fa4cb06bd92c334ca2ba.jpg)
.jpg.dc3756960e60d03f028346bf68b77747.jpg)

.jpg.8a56a735511a8215310b2c0fd1e0053d.jpg)
.jpg.a7dd1e67b9b28961a5b3002a7688da5a.jpg)


")
