


47137
-
Posts
3,035 -
Joined
-
Last visited
Content Type
Profiles
Forums
Blogs
Gallery
Events
Exhibition Layout Details
Store
Posts posted by 47137
-
-
I have removed the Dapol wagon from the mix, added my red wagon (from earlier) and arranged them all on my H0 layout because it has a backscene and a lighting rig.
The wagons are lit by the lighting rig and the camera is on its tripod. All of the light is from the lighting rig and this is of course set up for my human eyes and it doesn't match the daylight balance of the flash:

The brake van (on clothes pegs) is exactly the same colour as the steelwork on the structure far left, yet to me it looks so different. Maybe this is because I have different perceptions of what these different subjects should look like? The colour balance here is about right for the clothes pegs, tree and background; and the brake van looks fair too.
In a closer view, the lighting is unchanged but the blue in the paint is more intrusive:
To recap, the colours here are Halfords grey primer (box van), Haze Gray (brake van), and Royal Light Gray (open wagon). The two underframes are Tamiya 'Dark Iron'.
When I paint the strapping on the brake van to resemble black, I expect my perception of the body colour will change again.
I am still not quite sure about the haze grey. Partly because I last saw a BR unfitted wagon in the 1970s and they were really untidy to look at. Also I think I could have applied less paint on the brake van and let the grey primer underneath have more effect.
Any more thoughts on this would be much appreciated.
- Richard.
-
 1
1
-
-
22 minutes ago, cctransuk said:
I don't know about 40 years too early but, IMHO, it's a very good rendition of BR Wagon Grey - (60 years too early).
CJI.
I agree with you ... but I have added a Dapol 5-plank wagon wagon in "BR unfitted grey" to the mix, and this looks completely different, almost like a whitish or creamy grey:
The light source is the same and the exposure is the same too with a slight adjustment in the image editor to allow for the greater distance from camera to subjects.
I am losing whatever understanding I thought I had :-)
- Richard.
-
17 minutes ago, Compound2632 said:
I think that brake van grey could be close to the lilac grey used by the Brighton in Stroudley's time, but would defer to Brighton expertise.
It is funny you say this because I have a kit for a LB&SCR machinery wagon. The instructions for this state 'lilac grey' and I felt the Tamiya 'Haze Gray', which I have used for models of 21st century steelwork, would be just right. The machinery wagon is from the 1880s, so arguably (if a bit tentatively), Haze Gray ought to suitable for the period.
- Richard.
-
 1
1
-
-
On 07/12/2021 at 09:16, 47137 said:
I have just received a kit for an ancient brake van from the Mid Wales Railway: https://sixteenmills.yolasite.com/10mm.php (the 7mm version). I will rehome this to my fictional railway in Essex.
The instructions explain, "The correct livery is unknown, but mid grey or maybe dark red seemed appropriate for the period".
So - if a railway as well-documented as the GWR is a bit hazy I don't much fancy my chances with the MWR. I have a chance of being historially correct, also not much chance of being proved wrong; and I could invent a third scheme for my railway. My decision can be what looks most pleasing :-)
On 07/12/2021 at 09:21, Compound2632 said:The thing to bear in mind is that (as far as I have been able to determine) there were two pigments in use for wagon painting up to around the late 1920s / early 30s, both preferred both for their cheapness and hydrophobic properties - providing good waterproofing: white lead, which was usually mixed with a black pigment, often lamp black (soot) to produce a range of greys; and red lead - Forth Bridge colour, a warm but not bright red.
I have rewound a bit to let me mention my brake van, this got its top coat yesterday. I wanted this to be a "cool" (i.e. blue) shade of grey but it has ended up more like, well, blue using Tamiya 'Haze Gray'. For comparison the van on the left here is Halfords grey primer and the open wagon on the right is Tamiya Royal Light Gray.
I am pondering, do we know whether I can expect to get away with this greyish shade of blue for a 1890s setting? I actually rather like this, but if it is really 40 years too early I will have to try again.
Sorry I know this is nothing to do with the GWR or its wagons but it seems more sensible to post it here than to try to start a topic on "grey".
- Richard.
-
1
-
1
-
-
On 16/12/2021 at 11:32, Ruston said:
Looking at only the photos we have posted in this topic, it looks as though earlier locomotives like 'Trent' had cab footsteps with curved backs, and slightly later locomotives like 'Bowdon' had steps with enclosed straight sides. (My Ixion model had steps with straight edges but no sides at all).
So, our unidentified cabless locomotive might be a bit older than 'Bowdon' because it has a similar bunker and sides for the footplate, but the older design of steps. To my eye its weatherboard looks like a Manning Wardle / ex-E B Smith one.
- Richard.
-
I think this is the way to go. Begin by trying to make a new cab. If I can make something good enough to blend in with the Ixion model, then proceed to try the rivets and the sand boxes. The loco would also need new cab steps and, if I dare, taper the front of the chassis block upwards. I have read somewhere, putting the Ixion superstructure into the freezer weakens the glue and helps you snap the assemblies apart.
- Richard.
-
 1
1
-
-
2 hours ago, Mol_PMB said:
There may not have been many without cabs, consdering that the class was introduced in 1888.
Attached is a contemporary 1888 HC 0-4-0ST which is cabless, also on the MSC contract.
MY HC book also features a photo of HC 160/1875 'The Mardy' which is an outside cylinder 0-6-0ST with a similar weatherboard.
There is a better selection on leedsengine:
http://www.leedsengine.info/leeds/locolist.asp
Search for [builder] like HC and [Type} like 0-6-0, sort by date built, click the box for photo. You'll get a range of options but the only cabless one I spotted was 'Ebor'. Good luck with the wheels on that one!
It is quite frustrating how Internet searches for "Hudswell Clarke" bypassed such a useful site, many thanks.
If I do a search for "Builder=HC" and "Type=0-6-0ST" and restrict the results to entries with photographs, then the first loco with the Ixion style cab is works no. 579 or 1901 "Countess of Warwick". I've read of these locos described as the Countess Class.
So it seems to me, if I want something earlier than 1901 and for my sanity I stay with inside-cylindered designs, I need to make a new cab. I could try for "Baguley" or also "Worsley" (325/1889) which looks very similar. There is a photo of the left side of "Worsley" here:
https://imageleicestershire.org.uk/index.php?a=QuickSearch&q=L1047&WINID=1639916988819
and the tool boxes will hide the flange along the bottom of the Ixion boiler.
I will find this easier when I have my replacement model to look at.
- Richard.
-
1
-
-
44 minutes ago, Ruston said:
...
I posted a photo of one of this same type that has no cab, back one page 1 of this topic. It has a riveted smokebox and although they are not clear it does seem that the tank is also rivetted. The bunker is the same design as on Stretford and Baguley, as posted by Mol, so it has to be quite an early one. It's a fairly straightforward conversion from what you already have and it meets the criteria of having a model that is back-dated to 1888, as mentioned in your OP.
Dave, the cabless loco you illustrated has different frames and the footplate is lower; it is a different class of loco. Although important dimensions may match up well.
I could try to build this loco using the Ixion base, but in doing so I would be building a freelance loco. No harm in this, but if there is a closer prototype locomotive I would be interested to find out about it first. I am trawling through the link @Mol_PMB posted earlier today.
- Richard.
-
On 16/12/2021 at 11:32, Ruston said:
If you want to back-date it to appear generally older, rather than being a specific loco then rivets are the main thing that you need to add.
...
Lopping off the cab is also a good trick for back-dating a loco.
I was unwinding with my Minerva MW and I could not help thinking, the only thing that really jars on this model is the plastic moulded cover for thesafety valves. When the model is running I cannot count the spokes on the wheels and I can barely see the rivets. What does count to emphasis the period I want to show is the weatherboard in lieu of a cab:
I don't have a reference book on Hudsell Clarke, but from this topic and a bit of online browsing I have these options so far:
- wheels (pricey, Slaters do the earlier 12-spoke ones but I need to find about the axle sizes and crank pins)
- side rods (difficult for me)
- sand boxes (ok)
- rivets (probably ok)
- outside cylinders (hmmm, never tried this, I've only ever cut them off)
- a different cab or no cab at all
Plus smoothing out the top of the saddle tank and other fettling.
I don't suppose we have other photos of a similar HC loco without a cab? I think a cabless loco would suit my railway. It would be good to keep to a prototpye with a weight of 24 tonnes or less.
- Richard.
-
1
-
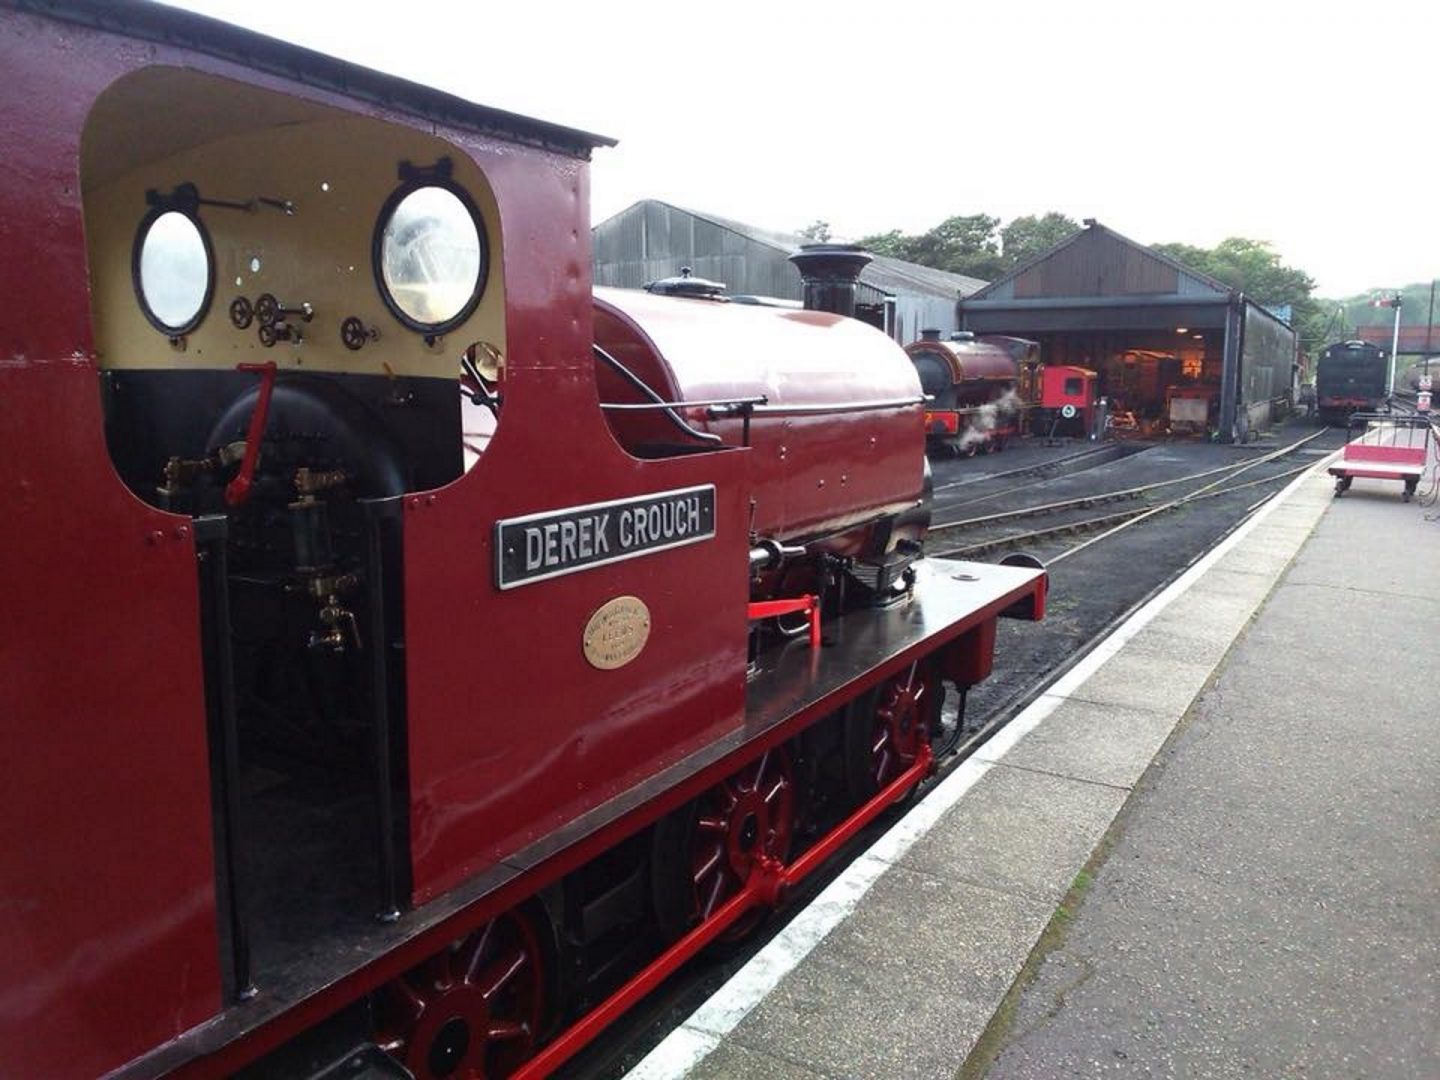
59 minutes ago, Ruston said:
'Derek Crouch' does not have the cover for the reversing lever as modelled by Ixion. So when the lever is in its forward position, it is in front of the cab. Might be something to attempt on my model when its replacement arrives.
Like this:
I have no idea how many of the locomotives had this cover.
- Richard.
-
I am looking at something of a masterclass on reworking the Ixion model here:
https://www.davidlosmith.co.uk/GCR_Humber.htm
This is clearly aimed at artisans and craftsmen rather than bodgers like me, but it is useful to see how the model comes apart and how I might improvise some new sand boxes to put above the footplate. Though mine won't be getting beautifully milled concave-edged bases.
David L O Smith has smoothed off the ridges on the tank of his own model.
- Richard.
-
4
-
-
Dave your photo is just amazing!
I was intrigued by the ridges along the top of the tank, now I know.
- Richard.
-
There is a better solution underway. Although I bought the last model with an etch of plates included, the supplier has a loco from another batch without plates. So I am swapping the loco for another one.
- Richard.
-
1
-
-
43 minutes ago, Mol_PMB said:
That’s a shame. They’re no longer in production so getting replacement parts may not be so easy.
Best bet might be someone else who has modified one and replaced the wheels for a different type?
I have written to the chap I bought it from, see how he would like to proceed. The model only arrived late Wednesday morning, it has barely run ten lengths of my test track so less than 70 feet

- Richard.
-
12 minutes ago, Barclay said:
That's a huge amount of slop in that rod - are you certain there wasn't some sort of bush that has also disappeared into the track somewhere? I ask because this could account for the poor running.
Good point but there are no bushes on the other five crankpins. I guess the slop is a characteristic of Far Eastern manufacturing techniques.
I am beginning to think, the crank pin was split at the factory during assembly. I don't think the motor in the model can produce enough force to do this.
- Richard.
-
 1
1
-
-
12 hours ago, Argos said:
Hi Richard,
The structure is lightly glued together so comes apart with some gentle pressure.
The biggest challenge to back dating is whether to change the wheels and coupling rods, these were a relatively late change and the Ixion model represents the later version.
I chose not to attack them for fear of messing up a sweet running loco.
It does mean that mine will be a hybrid of new and old but hopefully will look the part at a passing glance.
I think I should make the most of what I have got. This means, keep the cab and wheels, and limit my changes to putting front sand boxes above the footplate and adding rivet detail.
Mine threw a side rod yesterday evening, while trundling along my test plant at a low speed. The force has knocked the quartering out of true and what was a sweet-running loco is now rather lumpy. The crankpin is split and I found its hex screw beside the track. I've only had the model for a day and a half, and it was the last one in the seller's batch. I need to have a think about trying to bodge a repair on the crankpin and re-quarter, or get a new crankpin, or request new wheels or a refund.
- Richard.
Edit: I do not know whether the crankpin was already split when the loco arrived, or split by the power of the motor after the rod fell off. Photo:
-
1
-
 1
1
-
-
Okay - I will remember this for when I try a small etched kit like a wagon.
- Richard.
-
On 15/12/2021 at 17:56, NHY 581 said:
Hermes are frankly inept . I was awaiting a delivery from a purchase on ebay. I received numerous emails telling me the parcel was in a variety of places.
Then I had an email telling me delivery had been unsuccessfully attempted.
For convenience, I had opted for a click and collect address. It was a supermarket which was open at the alleged time of the unsuccessful 'delivery'. Rubbish. Having used this address before on a number of occasions with Royal Mail, all without incident and crucially without failure to deliver, I failed to see how Hermes were being anything other than dishonest.
Rob.
My parcel arrived silently this evening.
Out of curiosity I found the CCTV footage of the delivery. The courier went to my neighbour's house and rapidly retreated. A minute or so later emerged into view as though they had phoned the office. Walked to my house and stared at the front door as though it was perhaps an alien spacecraft. Read my notice describing my safe place and duly put the parcel in it.
It was pretty clear to me, the courier was told where the house was while they stood ten yards in front of it but still they could not find it. The message from Hermes two days ago claiming they could not deliver "because I was out" (I was in all of the day) seems rather distant from the honesty I would expect from a courier indeed anyone.
- Richard.
-
1
-
-
I found these rivets online but could not imagine drilling the holes. I am still guessing how you can drill so many holes so consistently :-)
- Richard.
-
1
-
-
34 minutes ago, Argos said:
I did start just such a conversion a while ago but got distracted by other projects.
No doubt it will resurface at some point.
The MRJ article mentioned above is worth getting as it delves into the history and provides a good drawing.
Your photos show the Ixion superstructure to be a number of separate parts. It is as though Ixion expected their customers to dismantle these models and modify them, and designed this into the model. This is a very welcome feature to me.
- Richard.
-
1
-
-
It sounds like the Archers rivets are a better bet.
I would not try to tackle these in 4 mm scale, but I think I have a chance in 7mm.
- Richard.
-
1
-
-
22 minutes ago, Mol_PMB said:
Not cheap but definitely worth it.
That was just a quick snap of a half-finished project I reached for that has been gathering dust on the workbench. I used two types of the rivets on that scratchbuilt tank.
You are telling me I can buy stick-on rivet heads, they go on like transfers, and they will be in a straight line and all the same distance apart?
Today is getting better. I was supposed to be going to Norwich. Made the original post and then sat at the local station engrossed in the Metro Sudoku, train arrived and left without me. Next train an hour later but cancelled. So I took myself to a local cafe and spent the afternoon with a excellent MRJ article ( @Barclay ) and now I learn can buy rivet heads ready-made.
I am going to need a lot of convincing to start overlapping bits of sheet brass, I know this is a worthy and proper approach but ...
- Richard.
-
5
-
-
-
Thanks to all of the above I now have a shortlist of characteristics:
Things to keep
- The tyres on the Ixion wheels measure 23 mm diameter, this represents 3ft 2in in 7mm scale. The tyres are 1.4 mm tall representing 2.4 inches. The MRJ article explains, the tyres would have been allowed to wear down to 1.5 inches. So for me, the first stake in the ground is to say the model can represent a prototype with 3ft 1in or 3ft 3in wheels.
- The wheelbase of the Ixion chassis represents 5 ft 9 in + 5 ft 9 in.
- The footplate is aligned with the tops of buffer beams.
Important to make the model convincing
- Rivet detail or no cab or ideally both
- A different cab
Good to have
- Front side rods on the outside (like Stretford but not Baguley)
- Wheels with ten spokes (Ixion wheels) (strictly, wheels on earlier locomotives had twelve spokes)
Options
- Sand boxes above the footplate (like Baguley)
- Dumb buffers
Serious work (I've not done this before)
- Outside cylnders
I have never added rivet detail to a model. Only filed or scraped it off. A week ago I bought a rivet press tool for a wagon project! I am imagining, the easiest way to add rivets is to make a cover for the water tank from a rectangle of styrene sheet; emboss the rivet detail onto this and then wrap it onto the model?
- Richard.
-
2


Early iron-framed open wagons, 9ft wheelbase
in GWR Rolling Stock: model and prototype
Posted
I actually bought this wagon to backdate its livery; the BR signwriting is quite minimal. I think it is far too pale, it is even lighter than the 'Royal Light Gray'. This wagon is really for a future project, perhaps another cake box challenge if we get one. It has opening doors, which is quite cool.
- Richard.