


Erichill16
-
Posts
596 -
Joined
-
Last visited
-
Days Won
2
1 Follower

Recent Profile Visitors


Erichill16's Achievements
50.2k
Reputation
Bookmarks
-
Y8
Wright writes.....I was sorting through some boxes of old stuff this weekend, and came across my first ever kit-build project, I must have been about nineteen when I built it. I wanted something small and easy to build without specialised equipment, and painted it in Great Central green with a great big GC crest on the side. Nothing like the real Y8's ever wore, but it pleased me at the time. It ran backwards because I wired the polarity the wrong way round, but it worked, pulled wagons and gave me a real sense of achievement.
I have posed it next to my current project, one of the GC A3's from 1949, because I find the contrast fascinating. This is a Hornby model, (Sorry, Tony) in the process of modification to become a reasonably accurate representation of 60049 Galtee More as in her Leicester days. Although this model is a straightforward modification of R3518 Gay Crusader I have four in total going through the works at the moment, including 111 Enterprise; 60054 Prince of Wales and 60061 Pretty Polly. Blue liveried versions of Sir Frederick Banbury and Prince Palatine will follow. All are subtly different to accurately portray the class member in 1949, including boiler dome shape, tender version, some require the donors to be modified by reducing the cab cut-out and converting to right hand drive. Still to do on Galtee More: Add coal, wiggly wires, weathering, crew and working lamps. I'm also still mulling over whether swopping the front bogie wheels to Markits ones is worthwhile.

The reason for prattling on about this is that it highlights the contrast of my modelling between then and now. In my late teens, I was very naive about details such as liveries, locations and detail accuracy in general, mostly I just made stuff as I liked. Fifty years on and I am much more concerned about accuracy, and research is at least as important as the modelling itself. Sure, my modelling is much more accurate as a result... but with that comes a much more critical eye. Rediscovering the little Y8 has reminded me that it is important to not lose sight of the simple joy of modelling, as I pursue ever increasing accuracy!
Incidentally, the recent comments about background clutter remind me of why I painted the walls of my railway room sky-blue, it has made a big difference!
Phil
-
N5
Wright writes.....C12s one of my favourite locos!
Below are photos of one I'm building at the moment which will become 4525, based at Louth in the late 30s for our new exhibition layout to be based on Spilsby. A Craftsman kit, obtained secondhand and part built (about 10%). I had to remove the w/m bunker top parts to fit them on square and in fact to remove the front part of the RHS piece and add a new piece to extend it as it was shorter than the LHS.
The key issue I think with the Craftsman kit is that the cab top doesn't have a flat enough roof and that the sides of the cab top are therefore not quite high enough. However, I wasn't sufficiently minded to try to make a new one and get it all nice and square with the cutouts.
I have added quite a bit of extra detail. It has replacement smokebox door, short chimney and dome, safety valves and whistle - all from LRM. I have added the plate wind shields to the sides of the cab cuts as well as the rain strip over the beading on the top of the cutouts. I have left off the rear steps on the bunker as a lot of photos show these not to have been fitted. I have fitted the step on the LHS side of the bunker and the small angled handrail to the rear of the cab cutout. It has sprung tapered buffers from my spares box for the front and Gibson GN parallel buffers on the rear. I have also fitted the vacuum pipe along the RHS valance and the steam heat pipe along the LHS valence. It also has injectors made from modified Mainly Trains J52 injectors (now available from Andrew H at Wizard) below the rear of the cab.
My next challenge is to teach myself to use a bow pen and a Bob Moore lining pen so I can line it in red - I have used a bow pen before some years ago but need to refine my skills. When its finished it I have another to build which first of all means stripping down a model I was given by a mate that has been glued together! That one will have tall chimney and dome and be No 4537, based at Boston. That will be the fourth Craftsman C12 I've built as I built my first one back about 1979 (4507) - my first brass kit and another (4513) about 2002 for a mate who has modelled Nottingham Victoria.
Also posted below is my Millholme N5 No 5945. This model is based on one of the last 6 built which were the only ones to have snap head rivetted tanks and bunker. If I may point out Tony - the two you have shown should have the rivetted tanks and bunkers which are quite distinctive (the SEF one appears not to have rivets in the photo?). The Millholme kit is only suited to one of the last 6 with the countersunk rivets but I understand that SE Finecast actually make brass overlays with rivets for its N5 but I think these need to be purchased separately?
The comparison between the two is quite interesting - the boiler is pitched a lot higher on the SEF model. Perusing photos and a drawing by Reddy in Sept 1970 RM indicate the pitch of the Millholme boiler is close to the mark. However, it does appear to be a few mm short at the front end ahead of the smokebox.
Andrew


-
N5
Wright writes.....I have certain information about Essendine South box, which might not be what is wanted. I have no photos and nothing about the structure of the box.
What, then, is it that the inquirer wants to know?
It's a request via a third party for photographs of Essendine South Signal Box. The request is for a retired signalman, now in his '80s, who used to work in the 'box.
Oddly enough, when Ian Wilson and I were contemplating building a prototype ECML model in these parts, Essendine was our first choice. However, with a footprint of 'only' 32' x 12' (absolute maximum) to work with, no matter how hard Ian tried, we were up against the 'barrier' which neither of us could accept - namely far-too-sharp curves in the scenic section. Fitting in the two south-facing branches was not a problem (we were going to cheat history and assume the Bourne branch closed at the same time as the Stamford branch, along with the station, in 1959), but tight scenic radii are something that the ECML in this part of the world doesn't have. The Bourne-Stamford road overbridge would have made a half-decent scenic break at the north end (though Ian included the further-north occupation bridge as well in one scheme), but going on/off-scene at the south end proved hopelessly unrealistic. A pity, because the station at Essendine was more interesting than at LB, with much greater operational potential and with more sidings. Not only that, there were two 'boxes and watering facilities (which LB doesn't have).
And, as well, we could have legitimately run these pieces of loco antiquity................

This is an old Wills C12, started by Ian Wilson. I made the chassis, completed the body and painted it.

This is the Craftsman equivalent, built and painted by me. The transfer lining on both these locos is not in the same class as Mr Rathbone's work, nor that of Mr. Haynes. However, Tom Foster has weathered them to perfection, and I must take further photos.

The nearer N5 is a Millholme kit, started by Ian Wilson. I completed the body and built the chassis, painted and weathered it. The further N5 is a SE Finecast kit, built/painted/weathered by me.
All these locos are Ian's property, acquired through barter. I'm still puzzled when I see model locos of these classes still with 12-spoke bogie and pony wheels. A bit too NE I think.
Both types worked the Stamford-Essendine branch (the older N5s lasting until the end), and were serviced at New England on a weekly basis. Is it beyond the realms of possibility, that, for a time, New England was a bit busy, and they were serviced at Grantham? It's just about equidistant. Thus, a light engine C12 or N5 bowling through LB? Surely it happened - once? Or twice?
-
04/8
Wright writes.....51 minutes ago, davidw said:That looks a beaut. What's the parentage.
Thanks for the interest, it's a bit of a potpourriThe cab and tender are from a little engines kit, the cab side sheets were extended for and aft. New roof required as a result. Firebox shortened, I filed up my own dome and a Bradwell B1 chimney was used, cut in two and extended to the right height. An old style Hornby B17 smoke box door is mounted up front. The cab and boiler are white metal so were soldered up and made so that they can be screwed on and off the footplate.
The footplate is Bachmann with the following modifications. The large block between the left and right footplates and stretching their length, was cut out and dummy frames made so that you can look down and see between the boiler and the footplate. The step out over the cylinders was corrected by filing off the valance and the re-profiling the platform to the correct shape and then re inserting a new valance.
The Bachmann chassis was altered as follows. The cylinders were rearranged so that the piston rod lines up with the centre of the crank axle, the cylinders were also moved slightly further forwards to their correct position. The front truck was rebuilt to more reassemble the prototype, it was also shortened as Bachmann have mounted it much further forwards than the real engine, presumably to negotiate tiny curves. Rear sandbox fillers and injectors were added to the back of the chassis and frame extensions above the bogie wheels. Lots and lots of little archers rivets all over the place and my own hand made rivets on the front frame extensions above the platform, also a scratch built reverser.
A new chassis is under construction that will replace the Bachmann one. However, I will keep the modified pony truck and running board and possibly the cylinders.
-
O4/8
Wright writes.....34 minutes ago, micklner said:O4/8 using a modified Bachmann B1 body and a Bachmann LNER version of the O4 , this was built before the ROD version was available.
How do you enter text and photos on the same post ?? Every time it keeps putting text to the right of left side of the photo!!.
Evening Mick,
great to see your work as usual, I especially like the tender mods. I didn't go the B1 cab route, partly because I wanted the weight, the loco is on a forty wagon freight, also because the B1 spectacle plate windows are mounted to high for the lower pitch of the O4/8 boiler. A lot of the mods I've seen using the Bachmann B1 components either have the boiler pitched too high or a gap between the boiler and the spectacle plate windows, as the latter are up under the cab roof. Contrary to popular belief, the O4/8 cab was not identical to the B1, the spectacle plate windows were mounted much lower.
One small criticism but one for the rivet counters. You have done the rivet arrangement on the cab side as per the O1, a left hand drive engine. The O4/8 was right hand drive and had a different style of riveting to accommodate the reverser on that side. The loco was handed, so the style of riveting on the left hand cab side sheet was a mirror image and correct for that on the right hand side of the O1 cab and vise versa.
-
Container shackle
Wright writes.....6 hours ago, Jack P said:Excuse me for asking Clem, but what do you use for your chains and shackles please?
Hi Jack - I gave a description in an answer to Headstock on the last page. I'll save you the tedium of searching for it.... :-)
"For the AF container shackles , the screw shackle is a Roxy Mouldings brass fret. Above that, there is a short section of chain from Eileen's (just 3 links I think) fastened at both ends (to the screw and to the container at the top) with links made from 0.31N/S. Below the screw shackle, I've used 0.8mm tube (0.4mm inner diameter) about 2.5mm long to represent the spring link, threaded with 0.31mm N/S wire fashioned into hooks at each end. The top hooking into the shackle and the bottom into the container flat end side ring which is itself fabricated from 0.31 N/S wire. I'm not sure it would survive closer scrutiny but from a reasonable distance it looks pretty convincing. "
What I didn't mention was that each link was progressively soldered up taught as I went along as per Geoff Kent's method. The distance between the tab for ring on the container and the ring on flat (i.e the length of the link) was approximately 18mm.
I hope that helps.
-
Brass boiler
Wright writes.....On 26/09/2019 at 09:01, Lecorbusier said:I have a basic question relating to my Craftsman 1F build, which hopefully someone can give a little guidance with.
What is the best/most simple method to solder up the seam on the rolled brass boiler? To date I have only used brass tube or white metal so this will be a first. Specifically is there a simple way to ensure the seam lies flat (rather than slightly ridged) whilst the boiler remains round ..... also is there a simple way to hold it in place whilst working? Finally, does one strengthen the seam as a matter of course or will the solder joint be fine as is?
Thanks
There are two ways that I know of holding a tube for soldering. The first is jubilee clips and the other is florists wire twisted round. The last one I did I put a length of brass strip inside the joint, soldered it to one side then found some half inch dowel that can be put in a vice. Then covered the strip in solder and flux, tightened everything up then put the boiler over the dowel and soldered it up using somehing to press the seam down as I went along.
Hope it works out.
Jamie
-
Weathered valve grear
Wright writes.....2 minutes ago, CCGWR said:These photos look fantastic Tony as others have commented. I particularly like the oily look of the valve gear on 'Hale O' The Wynd' and 'Cock of the North,' looks like a real locomotive. How was this achieved?
Regards Connor
Thanks Connor,
After I've thoroughly-tested a new locomotive when it's completed, I put it to one side prior to painting for a little time (whoever is painting it; me, Ian Rathbone or Geoff Haynes). I make sure all the valve gear/motion works smoothly, without oil to start with. It's then oiled, and, as already mentioned, thoroughly-tested and then put to one side.
Before painting the loco body, after a little time, I then paint the valve gear/motion. By now, any oil will have spread a little, and not be in any quantity. Using a thin sable (not the best!), I then paint all the valve gear/motion with a mixture of enamel matt black, dark brown/leather, a variety of greys and, in some cases, white. I just mix the paint on a bit of scrap plastic and apply it evenly. Obviously, it then dries (in the main) matt. Now, here's the trick (if it is a trick); I then apply plenty of oil, letting it creep along all the rods and motion, particularly in the area of the slidebars/crossheads.
What looks more like oily valve gear than oily valve gear?
Regards,
Tony.
-
Helian o2
Wright writes.....Heljan certainly found a "different" way to put a model loco together in the case of the O2. Once you've understood the odd way it goes together you can tame it to suit your own requirements. The coupled wheel flanges seem unusually fine for RTR OO so may be a good test of your quality of track laying. I tried to alter mine to get as close as conveniently possible to O2/1, although the main section of the running plate is actually about 1mm too high for that version. What I did is covered briefly here:
https://www.lner.info/forums/viewtopic.php?f=3&t=2443&start=4170
With a little more on the following page.
Since that time I've tinkered again with the valve gear to put better expansion links in place of the originals, making even more certain that they don't fall off and putting the joints between the expansion links and the eccentric rods are in the right places rather than the original wrong places. Even if you don't do that, I think that providing you've decided that you don't want the loco to go round unreasonably tight curves then it does improve the appearance greatly if you at least do what's necessary to restrict the sideplay on the leading coupled wheels and to bring the slidebars parallel with the centre-line of the loco and within a believable loading gauge. With their rear ends splayed out, as received, my loco looked like some poor afflicted person running with elbows sticking out!
I'm not sure that the prospect of the official RTR version is completely dead, but I'm not having exciting thoughts of imminent release.......
-
Br numbers
Wright writes.....On 09/11/2019 at 08:52, Chamby said:Morning, Headstock. I must admit to scratching my head about the colour of lettering on some early BR liveried loco’s. In this instance I was led by the fact that whilst Fox Transfers produce BRITISH RAILWAYS lettering in white, off-white and yellow, the requisite curly six is issued on a separate sheet only in the ‘off white’. I will give the lettering a wash of yellow-tinted varnish, and then when toned down with weathering, it should look more as you describe. There is a lot of ‘toning down’ and weathering still to do on this layout... but scratch building platform structures and a canopy will hopefully be my big priority this winter.
With thanks,
Phil
Good afternoon Phil,
apologies for the late reply, the situation is rather complicated but one of the things that makes your modelling period so much more interesting. Model Masters do full sets of different size British Railways and the numbers, with the curly six, in cream, white and Yellow.
On plain black locomotives 12'' is definitely yellow and with a combination of sizes of lettering, ie 6'' British Railways and 12'' numbers it would be yellow. 12'' was the LNER standard for Gill sans numbers and lettering. The 10'' straight six in white/cream was introduced around August Sept 1948 by most works. As a result, locomotives turned out in MT lined black in July 1948 were painted cream as per the BR spec but with 12'' numbers and letters with the curly six/nine. I have only seen the white/cream12'' curly six in this condition.
Plain black locomotives also received the straight six and white/cream lettering from August, Sept 1948, in 10'' lettering or smaller. Here's the complicated bit, it is possible that a plain black locomotive may have received 10'' white/cream lettering or smaller with the curly six, if so, the size would be consistent between numbers and letters. I have yet to find a plain black loco in this condition. I say it is possible because Green locomotives did receive the White/ cream lettering with the curly six in 10'' or smaller. The B1's, mostly delivered from outside contractors at this time, seem to have been uniformly yellow. The A3's also had curly six and straight six numbers whilst in LNER/British Railways green, I haven't done enough research into them to see if there was a difference in colour associated with the straight six and curly six. The only colour photo that I have of an A3, is of an example with a curly six that is yellow.
The photo below demonstrates the complexity of the situation. The B12 is in green with white cream lettering with curly six. The British Railways tender lettering in the background is in 12'' chrome yellow originally used by the LNER.
-
O4 sub classes
Wright writes.....7 minutes ago, bbishop said:Gentlemen & Ladies,
For an LSWR and DB aficionado, could someone explain the various O4 sub classes? I think the O4/7 is the GCR locomotive with a Thompson boiler, but I could be very wrong!
Bill
Sorry Bill,
The O4/7 is a Robinson loco with a modified Gresley O2 boiler.
Briefly, they are in BR days.
O4/1. Original GC 8K 2-8-0.
O4/2. O4/3 with lowered boiler fittings and cab.
O4/3. ROD-built locos with no vacuum brakes nor water scoop.
O4/5. Robinson 2-8-0 rebuilt with shortened Gresley O2 boiler and separate smokebox saddle.
O4/6. Rebuilt from O5 (a large boilered 2-8-0), retaining higher cab (63913-20 with side window cab).
O4/7. Robinson 2-8-0 rebuilt with shortened Gresley O2 boiler but retaining original GC smokebox.
O4/8. Robinson 2-8-0 rebuilt with Thompson B1 boiler and Thompson side window cab.
O1. Almost complete rebuild (just retaining frames and tender) of Robinson 2-8-0 with outside valve gear, new cylinders, a B1 boiler and Thompson cab.
Beware, because at certain times some rebuilds were also rebuilt into O4/8s and O1s. .
In 1955 (prior to further rebuildings) there were 58 O1s, 60 O4/1s, 8 O4/2s, 107 O4/3s, 4 O4/5s, 13 O4/6s, 40 O4/7s and 34 O4/8s.
In comparison by 1959 (when the types were still largely intact) there were 58 O1s, 52 O4/1s, 5 O4/2s, 60 O4/3s, 2 O4/5s, 11 O4/6s, 33 O4/7s and 96 O4/8s (the diminishing numbers in some sub-divisions are due to their being rebuilt into O4/8s; thus a rebuilding of a rebuild in some cases).
I hope this helps.
Regards,
Tony.
-
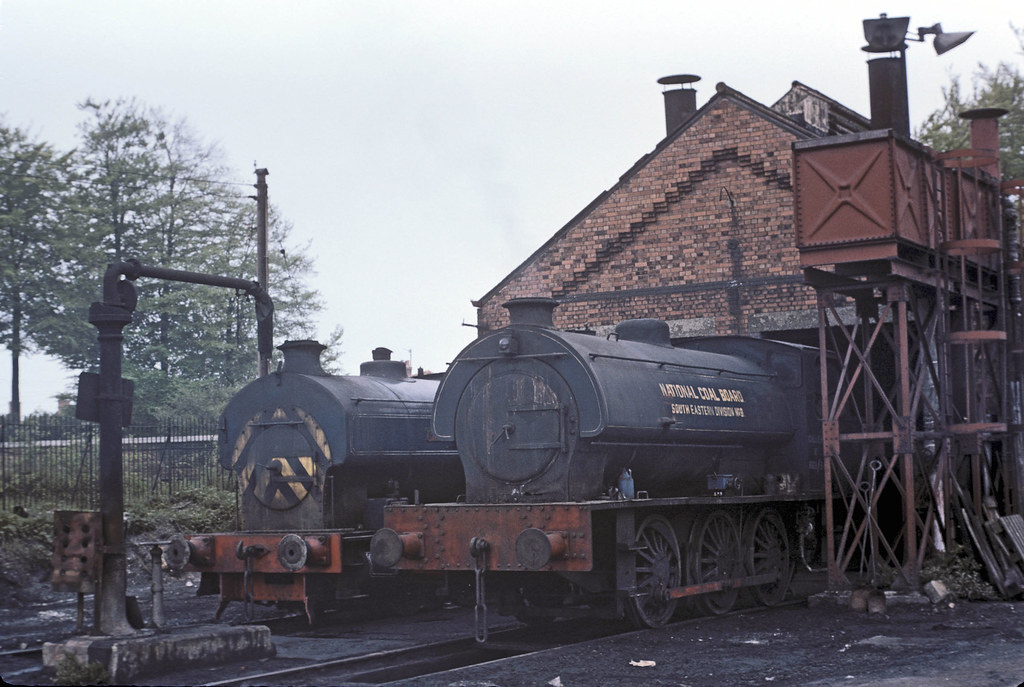
Industrial
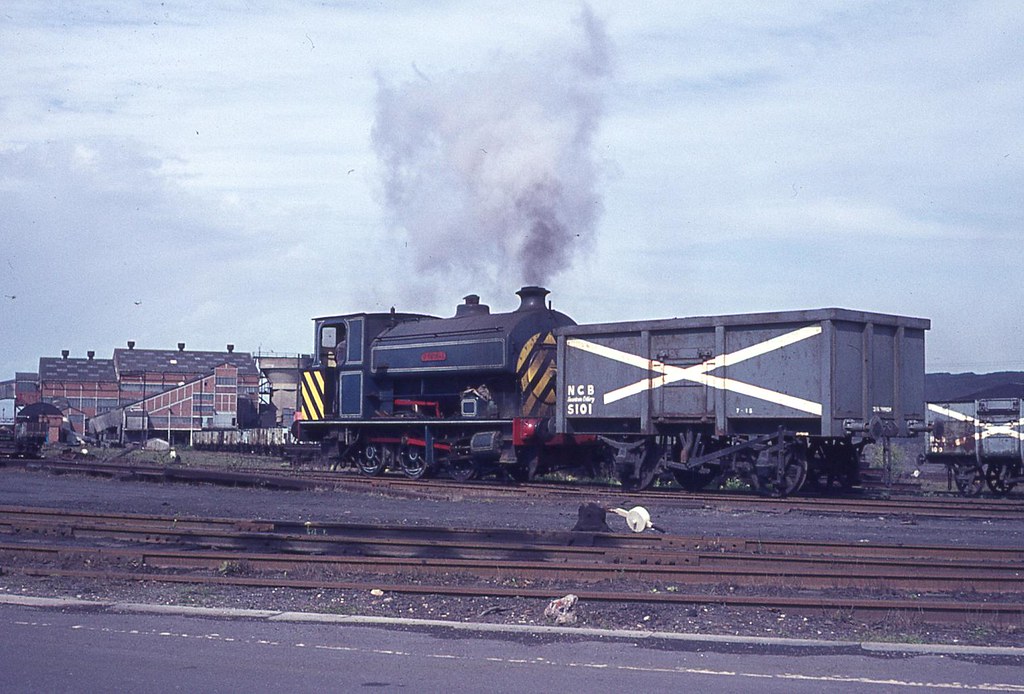
70s Industrial steamSnowdown Colliery
1974
This picture says that Snowdown station is in the background so it would make for an interesting 1970s model with an industrial steam loco shed nearby.


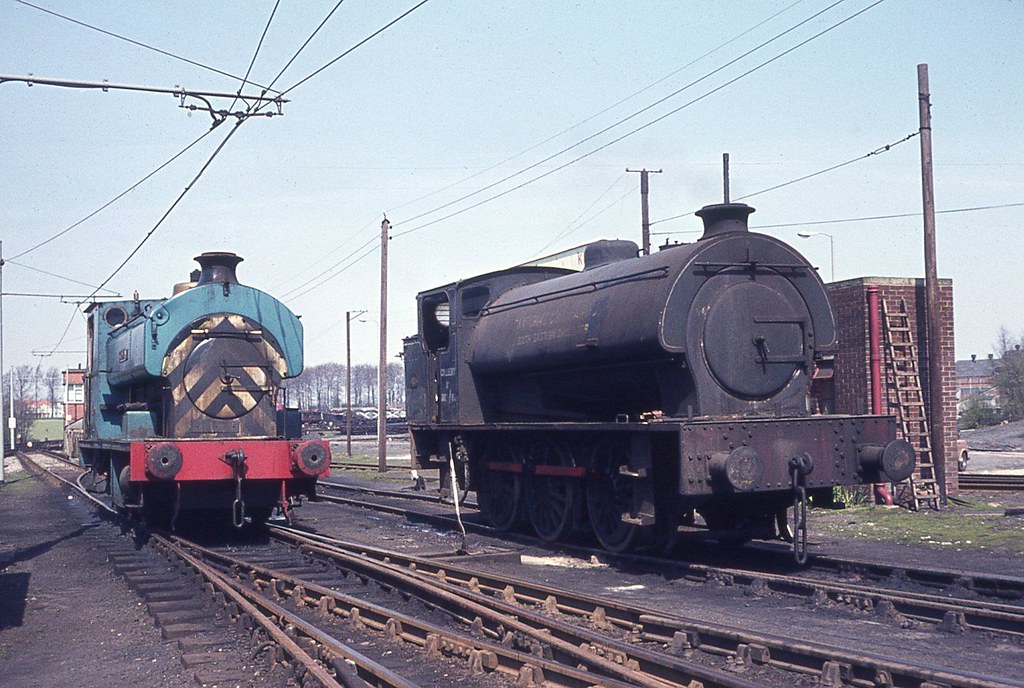
1977


Open Day 1978

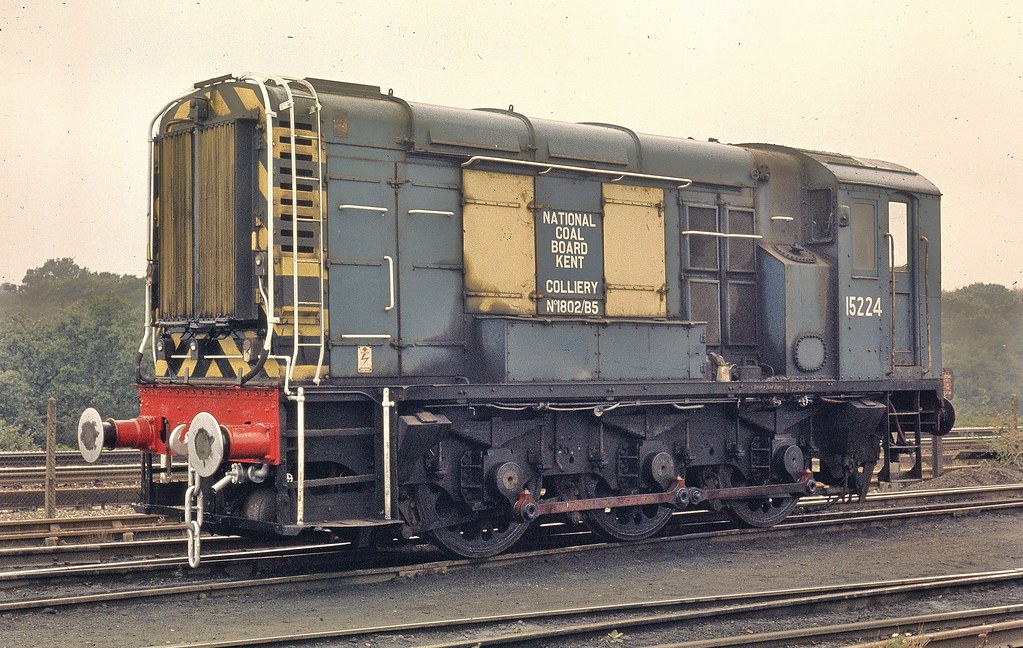
Would you like to see a 70s picture with a Bulleid Class 12 shunter, an electro diesel and a steam engine all in the same frame?
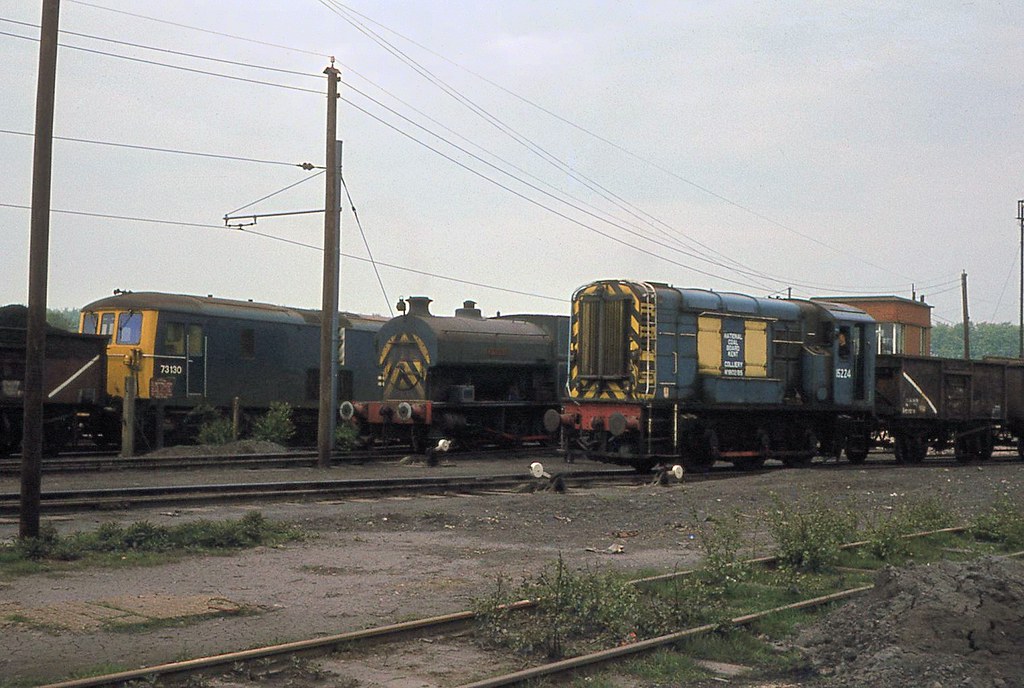
Would you like to see a 70s picture with a Class 71 using the 750v overhead and steam loco in the same frame?


A close up of the Class 12 showing the BFB wheels
-
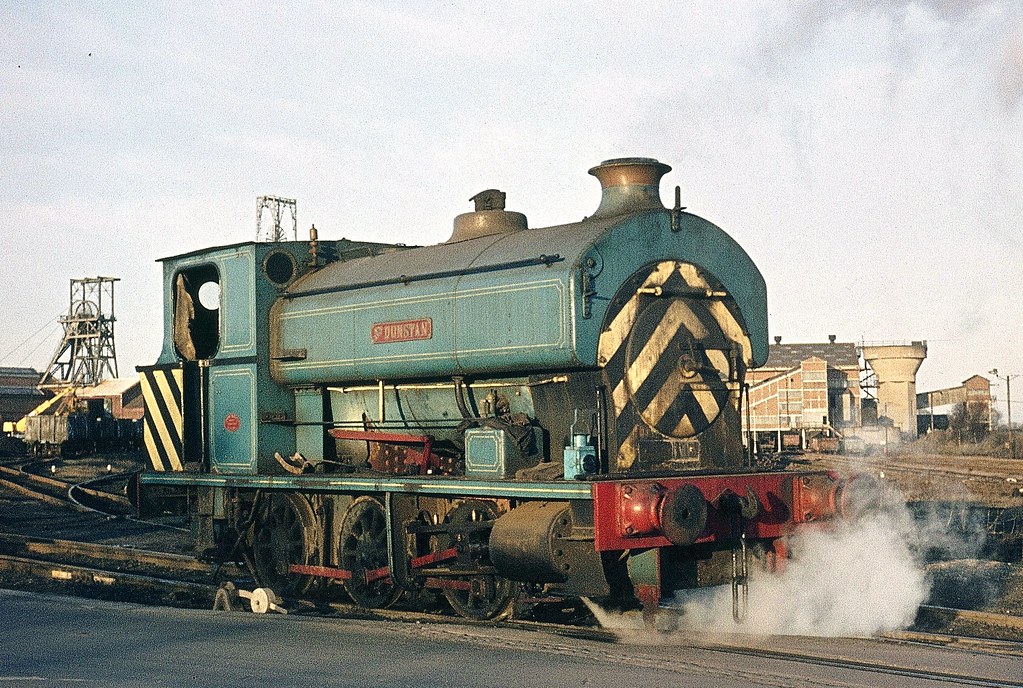
Industrial
70s Industrial steam1 hour ago, montyburns56 said:Snowdown Colliery
Open Day 1978


I love those slim line water tanks, presumably that narrow to fit in the site between the tracks and the road.
-
Lotus
For those interested in old cars.12 minutes ago, Erichill16 said:Thanks, when I got it it was refurbished before being fitted. I don’t know how long it will last so would be grateful for further information.
regards Robert
If I'm not mistaken it is a Girling Mk2A servo. The guy I know (Trevor) runs Stage 1 Motorsport in Cornwall. He does Escort RS and Lotus Cortina parts and is definitely worth talking to. He gets an awful lot of parts remanufactured as well.
Also bear in mind a guy called Richard Lee, he trades as Richard Lee Classic Spares and is in Southwell, near Nottingham. He gets all sorts of parts and also deals in Weber Carburettors.
-
O4 subclasses
Wright writes.....23 minutes ago, micklner said:Have you your own build thread on the O4's please?
I have acquired a GWR ROD Body and I also have a spare Bachmann LNER O4 . I am trying to find out what combination of parts makes the best LNER version including the Tender ( I have G Kings resin Tender parts ). The one thread I have found used the GWR Cab and Footplate and the LNER boiler combination. Yours look like they still have the LNER Cab fitted ?
Any help will be appreciatted to clear the fog !!.
Sorry - I don't have my own thread, been too lazy I think. I'm sure Tony won't mind if I give you some pointers here.
Basically the GWR footplate is the better one as it has a shorter wide section over the cylinders and the bolt heads on the front frames which most locos had - basically Bachmann got the shape of the footplate wrong on the O4 version - I don't know why they don't use the ROD footplate on their subsequent O4 models? Maybe its all too difficult with dedicated tooling for each version?
You should use the O4 boiler. However, you need to decide whether you want an O4/1 (ie original GC loco as inherited by the LNER at Grouping) or an ex ROD version which was bought by the LNER in the 1920s from surplus Govt stock.
The O4/1s were fitted with vacuum brake and therefore had the ejector pipe inside the handrail on the righthand side of the boiler as the Bachmann O4 has and also had water pickup so you need to use the King tender water pickup box arrangement for the rear deck of the tender and you need to remove the rear coal plate on the tender, and fit a ships wheel to the front of the tender for operating the water pickup gear (Judith Edge can supply these for £2). Note however that water pickup was generally removed after 1946 - so it depends on period you are modelling. You will need to fit a vacuum pipe to the front as well as the oval buffers from the O4 footplate - they pull out with a little bit of persuasion.
If you build an O4/3 you need to use the O4 boiler but use the GWR cab as the rear angle iron on the cab roof is further forward - a feature of the ex ROD locos. My two O4/3s built from Bachmann parts do use the GWR cab - but you will need to remove the two whistles and then determine whether the single whistle for the engine you are modelling was on the top of the firebox in front of the cab or still on the roof, but in the centre (earlier period). You will need to remove the vacuum ejector pipe inside the boiler handrail which will probably mean making a new handrail and fitting new handrail pillars. You will also need to use the oval buffers from the O4 footplate.
I trust this is of some help micklner and that it all makes sense.
Andrew
-
O4 subtypes
Wright writes.....Did someone mention LNER 2-8-0s! A number of these have appeared on here before.
My first O4 , an old Ks kit I bought secondhand in 1975, it was rebuilt in the early 80s with a later Ks chassis, ie not the key hole cutouts for axles and fitted with my first Portescap, it will just about pull more than anything else on the layout. The chimney is actually from a Black 5 but was the nearest I could get at the time. It needs fully flanged drivers and brakes when I find the time. Its also a bit of a hybrid neither an O4/1 or O4/3. Its numbered as an O4/1. Possibly I'll take the handrail so I can fit an ejector pipe and refit the vacuum pipes that fell off. The tender front also needs modification and water pickup if its to be an O4/1. The cab roof is not right for an O4/3 but possibly it requires less work to make it an O4/3 - its a product of its time and my lack of knowledge at that stage!

My second O4 - the first Bachmann release - its had work to make it into a better O4/1 - tender has water pickup added, cylinders lifted, front pony pulled back 1-1.5mm, longer reversing rod.
My second Bachmann O4 - utilising a Bachmann O4/1 boiler on a Bachmann WR ROD footplate and WR ROD cab, ejector pipe removed, other mods to loco chassis as above.
An O4/5 utilising a Bachamnn WR ROD with a Bill Bedford 3-D Printed boiler and cab. Water pickup added to tender, chassis mods as above.
Another Bachmann WR ROD was used to make this O4/3 with flowerpot chimney. The chimney is a cut down Bachmann J11 chimney. Chassis mods as above.
My first O2, a Nucast kit I built in 1982. Also Portescap fitted. Cab is made from tinplate to get a better curve for the LNER cab. Was upgraded in the 90s with fully flanged 14 spoke drivers, new smokebox dart and Crownline chimney. Has probably run more miles than any other loco I have!
Heljan O2/3. Has had a full makeover including new expansion links, new chimney, buffers, smokebox handles, handrails, repaint.
I agree with the comment made previously that the Hornby O1 is probably the best of the RTR LNER 2-8-0s. This has had a new chimney and smokebox front, courtesy of Graeme King. It could do with some additional less brown weathering of the chassis.
Last but not least of the current operational fleet, not that it gets much of a run as I rarely run BR period stock, my father's Bachmann WD, weathered by my friend Alan Harrison, who also visited you with us in 2017.
But that's not the end of the story!
I have another couple of Bachmann O4/RODs to work with, plus two Nucast O2/3s, one of which will form the basis for a Gresley O1. Also I have another old built Ks O4 that I was given as well as an unmade Ks O4 to use. Plus an unbuilt Little Engines O1 I paid less than 15GBP for at a BRMA Convention a few years ago!
Andrew
-
Tamiya paint
Wright writes.....On 09/05/2020 at 20:20, 45568 said:To Doug & St. Enodoc, with apologies to Mr Wright for hijacking his thread...I will have a look at my spray can paint palette in the next couple of days and put in my suggestions. I have tried many car sprays, with mixed results, I do envy the b*ggers in UK with 'damask red' etc.
The Mr Hobby 'russet' was worth a go I thought, and overall I am very pleased with the result. It is also compatible with Tamiya varnishes..that opens another can of worms!
Cheers from Fortress West,
Peter C.
Wow, four pages gone since I said I would reply, however, Mother's Day has been and gone and it was good to spend it with family in a legal gathering!
Tamiya spray colour chart below.
https://www.tamiya.com/english/products/list/tamiya_spray/kit85001.htm
Regarding Tamiya spray colours, I use the following regularly:
TS-1 is good for interior of steel mineral wagons prior to further weathering.
TS-4 & 48 are excellent for coach and van roofs.
TS-9 A good 'Brunswick' green.
TS-11 BR Maroon coaches.
TS-6 & 29 are excellent black paint for BR locos.
TS-32 good for 'early' (darker) BR wagon grey.
TS-62 & 69 are good track/underframe weathering colours. Also may be good for GWR brown vehicles and SR brown stock.
TS-68 good for 'unpainted' wooden wagons.
TS-81 is good for later (lighter) BR wagon grey.
TS13,79,80. Excellent varnishes which are fully compatible with the above paints. CCT transfers do not like them however, unless you have put a coat of Klear/pledge to protect the decals!
Fine surface finisher/primer makes an excellent BR fitted wagon Bauxite.
I am looking at using TS-46 and TS-8 to represent faded 'Carmine/cream' on coaches.
MR. Color spray 81, Russet, as mentioned above is good for faded carmine as shown, I have not tried any others yet.
Humbrol offer #20 Crimson as a spray, I have used the colour from a tin for as-new crimson stock, but the spray was out of stock so I have not tried it.
Car sprays: I have used Ford?? Venus Red & Hermitage as crimson for coaches, also Milano Red for faded 'blood', I can't remember what I used for cream!, but I haven't looked in a car part shop for a while now so I'm not sure what is available.
The big gap is anything suitable for DMU or SR coaching stock green. I have used TS-43 which matches the later Bachmann BR/SR green, but is not close to the current Hornby colour.
Illustrating the difference between the two Tamiya wagon greys, in very bright sunlight, the light grey isn't that white!
Tamiya finisher/primer red as BR Bauxite below.
Hope our Antipodean modellers find this useful, (also modellers elsewhere as Tamiya seems to be available worldwide). Any further suggestions welcome..except you pommie blokes don't make us jealous with your endless list of Halfords exact matches!
Cheers from slightly-relaxing Fortress WestOz,
Peter C.

-
A1 boilerr
Wright writes.....3 hours ago, CUTLER2579 said:Tony,
a mutual friend stated that one of his A1's was not appropriate for the 1958 period on which Peterborough North is based. He stated
"there has been a slight step back in time. 60139 Sea Eagle is coming in with a Hull express, but this can't be August 58, as 60139 by then had a different boiler fitted by then".
My question for yourself or any one who knows the answer is , Visually what are the differences pleas. I am assuming we are talking Diagram 117 & 118 boilers, so the Dome has been covered by a dummy banjo,but I am guessing to be honest.
I confess that I always assumed that the Peppercorn A1's all had the same 118 type of boiler throughout their short lives.
Regards,
Derek.
Good evening Derek,
Because all of Gilbert's A1s are Bachmann ones, they've all got Peppercorn Dia.118 boilers (I don't think Tim Easter has altered any).
Several A1s got Thompson Dia.117 boilers (ex-A2/3s), resulting in the dome being moved forward. On the A2/3s this was covered by a round dome (the 117 boilers didn't have a perforated steam collector - yet another Gresley feature disliked by Thompson). With one exception (60153), those A1s which received 117 boilers had the round dome covered by a streamlined dome (not a 'banjo' dome - can we have this myth debunked forever, please? The only LNER Pacifics to carry a banjo dome were the last-built A3s, and then only until their first boiler change - henceforth it was a streamlined dome, not 'peardrop'-shaped).
A few A2s also got 117 boilers as well, and one A2/2. Those A2s which did received a round dome (60505 had a streamlined dome).
Eric Kidd has altered at least one of his Bachmann A2s. It can be done, with care.
The difference is the dome's position - further forward on the Thompson boilers.................
My ALACAR is fitted with one.
I built this from a DJH kit, and Ian Rathbone painted it. Note the dome's position on the second boiler ring. Of course, by building a kit (rather than being RTR-reliant) one can stick the dome wherever one wishes.
For comparison......
Another DJH/Wright/Rathbone creation, this time carrying a Dia.118 boiler, with the dome on the third ring.
A further difference is that this one represents a Doncaster-built example (with snaphead rivets). ALCAZAR represents a Darlington-built example, with countersunk rivets.
And, just to illustrate a streamlined dome.................
The bodywork is now complete on my latest SEF A3.
I've started on the valve gear, so it should be finished tomorrow.
Regards,
Tony.
P.S. Just to further complicated matters, all of the A2/3s and four of the A2/2s eventually received Peppercorn Dia.118 boilers! The two types were entirely interchangeable.
-
Tornado
Early Risers.3 hours ago, J. S. Bach said:True, but not really suitable in a garage!

I recall working in the Tornado OEU Hangar at Boscombe Down in the mid-1990's when the pilot's ejection seat went off whilst having the seat cartridges taken out; the guy was standing on the seat at the time...
He survived, amazingly - he was knocked off by the canopy and fell to the hangar floor (i.e. a bl00dy long drop), mashing his arm in the process. The seat went thru' the roof and landed in the M.T. yard out the back.
The guys wrote to Martin Baker for "The Tie"; M-B were less than forthcoming, strangely.....
-
J10
Wright writes.....Correct - the tender in the picture with J10 5137 is rivetted. 5137 is a 1946 number applied 31 March 1946. According to Yeadon 5137 got tender 5869 in May 1946 and it is a Pollitt 4000 gallon tender as described by 61579 above. The DJH tender is a Pollitt tender as far as I can make out. The tender with 5137 is the first Pollitt tender I think I've seen with the curved ends to the side coal plates, most appear to have the straight ends. According to RCTS the tenders from passenger 4-4-0s when fitted with the coal guards got the curved ends and some of these were transferred to J10s, tender 5869 coming from D6s before being paired with J10s.
As Tony Gee says it's possible that some J10s had water pickup in the early years of the London extension but I don't imagine they retained this for long. RCTS makes no mention of this, neither does Yeadon and I can't see any photographic evidence in Yeadon.
I still think your best bet Jesse is to use the DJH tender and fit coal guards with curved ends rather than use the Bachmann tender- I would save that for another GC loco of some form rather than removing the water pick up gear which includes all the box arrangements on the rear deck. I like the Bachmann J11 4000 gallon tenders and have two spare bodies to use with GC locos in my 'to build' drawer as a number of the earlier whitemetal kits had in-accurate tenders.
Here's my DJH J10 built about 3 years ago and previously posted on here. It has the Pollitt 4000 gallon tender but DJH didn't include the rear curve to the valence.
Andrew
-
J10
Wright writes.....Hello Tony, somewhere around last Autumn I came across this thread in browsing and decided to start reading it from the beginning as it looked very informative and entertaining. I've read a few pages every day since then alongside other reading, and it became quite a habit! Thank you for sharing so much information and photos and in particular, for being so encouraging to less experienced modellers like myself
") .
.
As you often ask people to show pictures of their own modelling, here are some of mine - firstly, a D&S ECJS Luggage Brake:
This is another D&S kit, the Pigeon Brake:
This is an ABS Models whitemetal 6 plank wagon:
This is a D&S CLC Brake van:
And this is my first loco, a DJH J9/10:
Best regards, Chas
-
Weathered wood
Wright writes.....2 hours ago, Headstock said:Good evening Robert,
I hope you get your bunch of fives, if you see what I mean.
I don't use acrylics, I'm mostly a wet painter, acrylics dry too quickly for me. I've seen some nice powder work, but sometimes I think it looks a little overscale and you can always tell it's powder work. In the grand scheme of things, I don't see myself as an expert at wagon weathering, It's too time consuming on a forty wagon train. Keep it simple, you can always do a bit more, However, it you can't tell if it is acrylic, enamel or powders, then that is quite pleasing to me because you are seeing the finish and not the materials. I've currently got twenty wagons on the go, most with bair wood visible, so I wanted a technique that gave relatively fast and predictable results. So this is what I did.
1, find a base coat that is both light but warm, perhaps like freshly sawn timber. I seem to consistently use lighter base coats than many. Humbrol 121, was airbrushed on to the areas I wanted to be bair wood. To be honest any warm cream colour will probably do. You can of course brush the paint on, it takes forever. I allow 48 hrs to dry.
2, pick out a few individual planks, a mix of Humbrol 121, Railmatch frame dirt, Humbrol 79 or and Humbrol 32 in different mixes to produce warmer or cooler, darker or lighter planks. Many years ago Humbrol 32 was an awesome carriage roof colour, it's changed so much, it is now a very acceptable pre war LNER wagon grey. Again, any substitutes will do, a weathered or subdued brown and mid to dark greys. You will be mixing your own colour and tonal applications anyway. The mix is more of a wash but still paintable, so that you are using the colour of the basecoat, not obliterating it. leave it 24 hrs to dry.
3, application of the first wash. You have a number of choices, Frame dirt will give you a warmer brown finish, Humbrol 32 a cooler look, or you can mix the too or use a lighter grey. The most important thing is that your brush is clean, your white spirit is clean and you paint mix and the surface that you intend to apply the mix too is also clean, no bits, bits will kill it. A generous wash of thinned paint is applied from side to side, in the direction of the floor planks, Working down the length of the wagon from one end to another. Paint out the mix until you are happy with the consistency of the effect and don't let the paint start to bite. If you need to add more white spirit or paint mix, do so .The crucial thing is that the the wash is kept wet on the area of application, so you are painting all the planks at the same time. Thus, they are allowed to dry at the same time. This will produce a consistent finish without tell tail brush strokes or other grot that looks like slap dash workmanship. If happy, paint the wagon sides and ends in the same fashion and leave the lot to dry for 24 hours.
4, repeat with second wash, you can vary the tone or colour of the individual washes, a second wash may be pure dark grey for example, to pick out the groves in the planks. If you are not happy with the look of the washes, remove with damp cotton buds, this in itself can produce some nice effects. You can keep adding washes if you so wish, there was no one wood finish, though modelers worship the grey fashion at the moment. One of the grey worshipers posted a photo of wood recently and declared it grey. It was alive with subtle yellows and browns ............. pinks ........... blues ...................... creams ............ greens .............funny how some can look an not see a darn thing. The important thing is to build up a subtle effect, don't go to dark too soon and obliterate the base coat, let it to do its job.
5 Finally, I finish up with the airbrush, I can work wet on wet with this in a way you can't with a traditional brush. I set up a higher pressure to get a nice dusty dry effect that gives more cohesion to the whole thing. Adjusting the pressure down, I will touch in darker areas, were dirt will collect around strapping and door edges. Then leave to dry, an important note here, the rest of the wagon is still in undercoat. I will not touch the rest of it until I'm finished with the bair wood areas that I am working on.
Lots of drying time, but the time spent actually painting the wagon is reasonably brief. most of the time goes on picking out the planks, don't go mad on that, keep it understated like the colour palette. Remember that tone and contrasting tones will do a lot of the heavy lifting, rather than colour and brushstrokes. If I chose to go back and add more detail, you can at any time. I hope that has all been of help.
Thanks for all the information. It’s a lot more involved than when I weather my steel bodied wagons.
l’ll give it a try when I’ve got the J10 finished!Regards Robert
-
Go 460
Woolmer Green 1935-40Right I'm back again.
I built my Millholme B5 in 1987 and that hooked me on the GC 4-6-0s. Even though I've only built two more classes so far - B2 and B3, I have plenty more to build, including another Millholme B5!
I'm presuming Jesse that you don't have Yeadon Vol 22 which covers all the GC 4-6-0s? (by the way David Lord up on the Central Coast had Vol 22 for sale in that deceased estate of books I mentioned to you some while ago now).
I don't have an Isinglass drawing of a B5 but do have a drawing of the original version by Charles Reddy. According to the Reddy drawing the height from the upper footplate to the top of the smokebox on the original version was 24.8 mm. My Millholme kit, built with the higher pitched superheated boiler measures at 27.8 mm for the same measurement so that's 9 inches higher - its meant to be pitched 7 inches higher. I suggest you measure yours - from looking at the photo I would suggest it'll come out near 27mm so close enough as makes no difference for the higher pitched boiler acquired by the various members of the class between 1926 and 1936. You say the smokebox sits up too high so I presume you mean the boiler is not parallel with the footplate? which is a problem.
As indicated before it will need a shorter chimney and dome as well as Ross Pop safety valves in place of the Ramsbottom ones fitted to your model. Your model appears to be fitted incorrectly with twin smokebox door handles - it needs a 4 spoke wheel and single handle as on your Bachmann J11 and O4. The chimney needs to be 1'3" tall - I recently got 5 brass ones from PDK Models in the UK from their D11 kit (as well as 5 short domes from their D11/2 kit for large boilered 4-6-0s and an A5).
The dome you need is probably similar to the medium sized one that Graeme King has made for the G-Train B3 and B7, except those are made to fit a fatter boiler. You will also need a snifting valve behind the chimney.
Another issue is the shape of the spectacles in the cab front. On those with the higher pitched boiler the spectacles didn't wrap around the Belpaire firebox, they were vertical with rounded tops and bottoms. Also on your model the vacuum ejector pipe is wrongly placed it should be behind the handrail not above it. You could also fit an ash ejector which is a horizontal pipe above the handrail from near the front of the smokebox to the front of the boiler.
Minor details you could add include the oil lubrication pipes along the left hand side of the boiler. There is mention above of cinder guards on the cab but I don't think the B5s got these, certainly none of the photos in Yeadon show them.
The tender - on your model sits too low in comparison to the cab, the footplates don't line up. Maybe the tender only has 14 mm wheels in it? Or else the loco sits too high on its chassis. Mine line up well with 24 mm loco wheels and 16 mm wheels in the tender. The tenders whilst originally having open coal rails like your model, were either plated on the inside or had plating on the outside of the coal rails or they received tenders with solid plate coping plates (the name I use for the side plates around the coal space) with beading, I made mine from brass strip and brass wire for the beading - a good option here would be a Bachmann J11 tender, provided it is an LNER verison fitted with water pickup (if that's what you inferred).
Note that the vacuum pipe is missing from the front of yours and that GC pipes usually came out of the footplate - on the larger locos they were not fitted to the front buffer beam.
As with all modelling its important to work from some photos from the period you are modelling and preferably of the actual loco you want to model. Ideally of both sides - but of course that's not always possible.
I've added a photo taken quickly on my phone of my B5 at roughly the same angle for comparison. The dome is the shorter one that came in the kit but the chimney is one I kit-bashed from a Craftsman A5 chimney.
Trust this helps - ask if anything is not clear (if I've written it, it may not always be so!)
Andrew


.jpg.343b02956cf6fa4cb06bd92c334ca2ba.jpg)
.jpg.dc3756960e60d03f028346bf68b77747.jpg)

.jpg.8a56a735511a8215310b2c0fd1e0053d.jpg)
.jpg.a7dd1e67b9b28961a5b3002a7688da5a.jpg)


") .
.


