2996 Victor
-
Posts
678 -
Joined
-
Last visited
1 Follower

Recent Profile Visitors


2996 Victor's Achievements
896
Reputation
Bookmarks
-
GWR 4-Plank
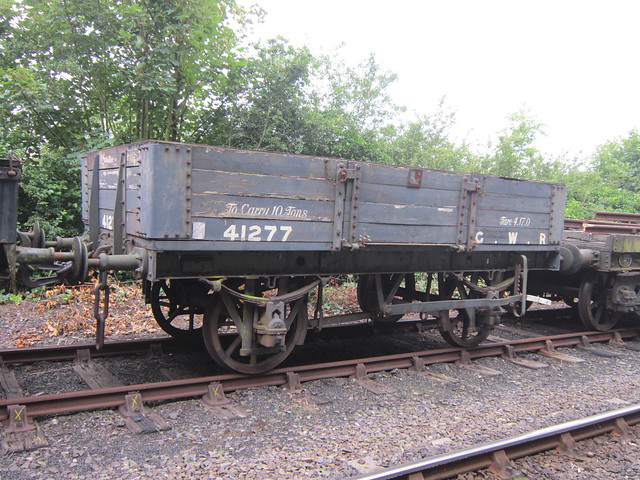
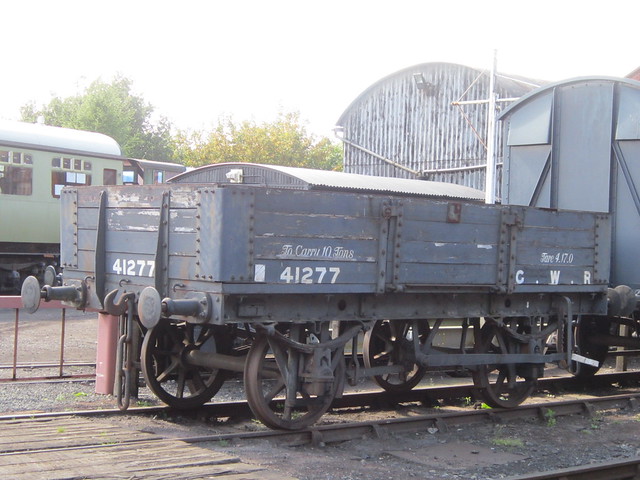
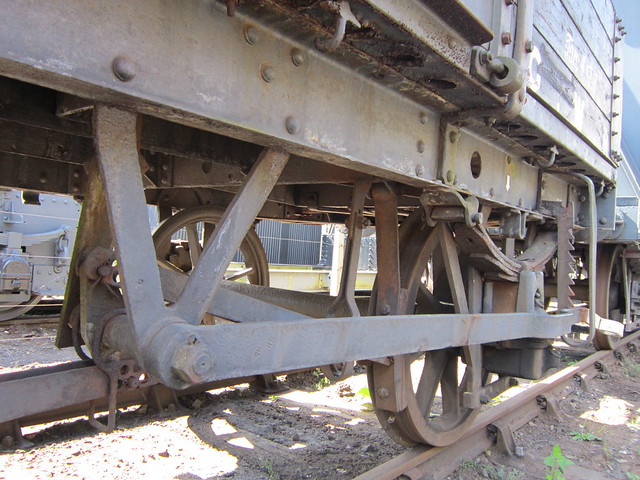
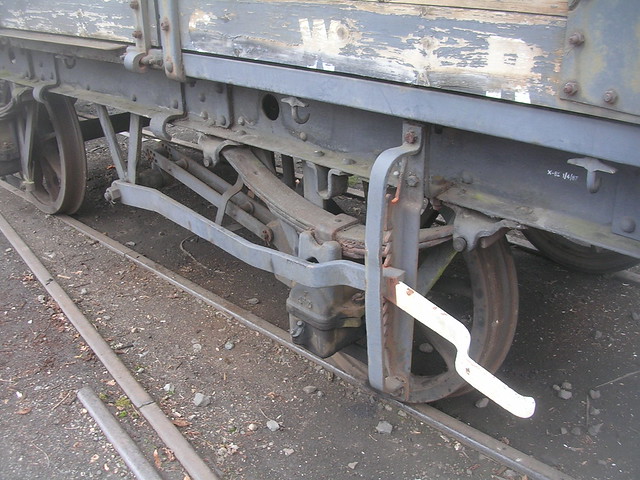
GWR four-plank wagon from Coopercraft kit + GWR one-plank wagonsI don't know if these photos I took of 41277 on the SVR may help you never know. If you need more photos let me know.
Garethp8873.
-
GWR 4-plank
GWR four-plank wagon from Coopercraft kit + GWR one-plank wagons
Here is one of my earlier efforts with the Coopercraft kit (it's compensated rather than sprung) but it probably illustrates most of the points Nick was making. Quite a few modifications: brake lever and ratchet, squared off ends to the headstocks, bolt heads inside the wagon body, top of solebar moulding sawn off to give full depth inside, support post for the V-hanger (I confess I don't know the proper name for this but it is often quite visible), metal buffers (natch), new label clip at the LH end of the solebar, and of course the MJT grease 'box castings. Underneath there is a much lead as I could cram in!
I have 4 or 5 of these in 'service' – actually mostly sitting on a shelf gathering dust – along with various 1- 2- and 3-plank wagons, one of the latter being from a Geen kit, the rest scratchbuilt. My main problem is that most of them are in earlier livery and should probably be painted red rather than grey; in this case life really is too short, though I will repaint my 7mm scale versions. Eventually.
-
GWR O4 5-plank
More Pre-Grouping Wagons in 4mm - the D299 appreciation thread.There are a great many people out there who know a great deal about Great Western wagons, so I know I’m sticking my neck out here with a couple of rather speculative models – I welcome your comments!
First, the Coopercraft O4 – another purchase at ExpoEM 2014. A lovely kit with beautifully crisp mouldings even though it goes together in a slightly odd way. No need to thin the W-irons. I’m grateful to a couple of fellow club members for letting me study both the original two-volume and later single-volume editions of Atkins et al., “A History of G W R Goods Wagons”. I learn that the O4 was moderately numerous, with 2,706 examples built in 18 lots in 1901-4 – to make a fair comparison with Midland D299, that’s around 3 a week! I have been closely reading the various discussions on pre-1904 GW wagon livery and reached the following conclusion…

… which was so shocking I covered it up with a wagon sheet!
It’s entirely possible that many/most/all of these wagons emerged from Swindon after the adoption of the 25” G W lettering, despite the lot authorisation dates. Supposing, however, that many were completed in 1902 – early 1903, they could have had the cast number and owner plates and, in balance of probability, have been painted red all over.
I’ve followed those who suggest “red” is red oxide, on the grounds that this was a standard pigment. I doubt anyone thought it worth-while to mix up a fancy shade of red for mere goods wagons. On the other hand, I’m not sure it really answers the description of “warm red” or “the only decided red trucks going” ( http://www.gwr.org.uk/liverieswagonred.html ). A really red colour would fade to pink (like my father’s old Vauxhall Vectra!) and I’m not quite brave enough to offer a pink wagon for criticism! So this is Humbrol 100 with a light wash of the grey slop in the bottom of my brush-cleaning jam-jar. For the plates, I scanned a photo in Atkins (Vol. 1 p. 70, wagon no. 73697), imported into CorelDraw, traced and printed onto photo paper at the best resolution of my HP Deskjet printer. The base colour was adjusted to hex code #BD6038 (R: 189; G: 96 B:56) but some highlight and shading was added to try for a tromp l’oeil effect for the raised numbers and edge of the plate. After cutting out I went round the white edges of the paper with a reddish-brown felt pen! I now suspect the numberplates on the ends should be on the second plank up.
Painting the brakegear red unfortunately emphasises what’s missing! Chiefly the large curved rod that actually makes the brakes work when the little hand lever is turned – I think this passes between the wheel and the axleguard? Then there should be a rod linking the brake levers on either side, so that the brakes can be released from the opposite side to that from which they were applied, much to the horror of the Board of Trade. Then there’s a little quadrant ratchet that transfers the rotation of the rod to the long curved lever… (Or is there another link between?)
I’m in doubt about the pair of straight door stops – were the wagons built with them? They look like a more modern addition.
The wagon sheet is taken from the artwork posted on here some years ago by Ian Smith. I scaled it to 84 mm x 57 mm in CorelDraw and printed it onto ordinary 80gsm printer paper. I went round the edges with black permanent marker. The ropes are grey sewing thread (of a shade matching our boys’ school trousers…) attached by dipping the end into a very small puddle of Roket Max thick non-runny cyano glue and steering into place with a sewing pin. The way the ends of the sheet are folded is inspired by the example in Wenlock's blog but I’m afraid I failed to rise to the challenge of brass eyelets in 4 mm scale! The headstocks have a couple of moulded bumps that I think represent the rope cleats, so I fixed the thread to these with dabs of cyano on the end of the pin. One rope is tied to a buffer housing, which I think is against regulations. On the sides, ropes are passed through the holes in the solebar and tied off and also, again rather naughtily, tied to the V-hanger. I suspect the real thing had rope cleats tucked under the side rail? Unfortunately in the few weeks since I did this, the thread has gone a bit slack.
I ought to have crumpled the sheet up more than I did – it looks too smooth. My excuse, based on the October 1903 date, is that it’s a brand new sheet. (According to an article in “Midland Record” No. 3, at least on the LMS in the late 30s, the white month/year mark indicating date of manufacture or last repair should be accompanied by a similar red mark indicating the date the sheet is due for inspection – unsurprisingly this doesn’t show up in photos. Does anyone know if this was standard practice?)
The sheet also hides the fact that the trapezoidal plate that should be fixed to the sheet bar is actually part of the wagon end moulding…
What are the holes in the solebar for? Did I read somewhere that they were in place of the horse hook found on wooden-solebar wagons? (Missing from my Midland wagons…) Or are they for lifting the wagon off its wheels for overhaul?
-
Quarryscapes Cambrian 10t Open
Alan's Cambrian CollectionToday's plaything, a Cambrian 10T open from another Cambrian Models C111 kit, modified as follows:
Solebars have had the makers and number plates removed from the front, axleboxes and W irons gone too and the backs thinned at the ends to accept etched replacements. Plates will be replaced with etched ones.
W Irons replaced with these and set up with straight keep plates. Buffers and axleboxes replaced with 3D printed items which are pre production Coast Line Models ones, MJT buffer heads were used but are not sprung.
Couplings are these with markits chain.
Transfers are the test version of these but heavily distressed.
Just need to finish weathering the interior and it's another wagon done.


-
Wagons
More Pre-Grouping Wagons in 4mm - the D299 appreciation thread.Speculative Great Western wagons continued…
I bought this Coopercraft kit for the 7’6” internal height V4 at the same time as the O4. To my uneducated eye, this looks like a typical Great Western van – I can see that the Ratio kit represents a later generation with more modern goings-on below the solebar and planked doors speaking of declining standards of bodywork but otherwise they’re all the same to me unless they’re made of iron. So you may imagine my dismay on reading in Atkins that this kit represents only the last 22 vehicles of Lot 479 of 1904. My supposedly generic Great Western van is in fact one of the rarest. I should have built 2,818 D299 wagons before allowing myself one of these!
I have had my revenge on Swindon:
That’s a roof hatch. Atkins says some had them, as an experiment. There’s no indication what it should look like so I’ve based this on what the L&NWR and L&YR did, on the basis that that might just have been what Swindon were thinking of. (The Midland had tried a similar experiment in 1892; it didn’t catch on either.) The door is a square of 20 thou plastikard and the runners are built up from microstrip. I’m supposing the handle is on the inside! If anyone can show me what this should really look like, I’ll be happy to peel it off and start again. Anyway, I have a hunch that hatches may only have been fitted on some of the 8’ high vans; the whole Lot looks like an experiment that was getting out of hand until someone cried “Stop!” as the 178th wagon rolled off the production line…
No ventilator bonnet on the end, as befits “as built” condition, according to my reading of Atkins.
Painting was an interesting journey. I think it’s clear these wagons came out after the move to 25” letters and hence were always grey. First the unsatisfactory Halfords white primer, followed by Precision GWR Freight Wagon Grey – grey! I’d call it black; certainly much darker than any photo of a restored wagon. After some rooting around, I tried Precision NBR Freight Wagon Grey. (I don’t know why I had this!) To my eye, it seems a much more probable shade. This didn’t brush well – after two or three well-thinned coats coverage is not very even and the white primer is showing through in places, despite the very dark grey undercoat. Tell me I’ve achieved the look of worn paint on a wagon that’s been in traffic for a while! The roof is a lighter shade of grey, given a wash of sludge grey thinners.
Transfers are the waterslide ones supplied in the kit. I cut these out as close to the lettering as I dared and was quite pleased with the result of my first use of MicroSol and MicroSet – the big letters have set well into the planking grooves. Unfortunately even after a coat of matt varnish, the transfer film is still quite reflective and prominent in the photos – less so in the flesh.
For some reason the 7’6” vans were rated for 9 tons whereas the 8’ vans were 10 tons – surely for a goods van it’s the bearings that dictate the load, not the internal volume? (Unlike the coal wagons I posted earlier – though of course the RCH wagon would have appropriately larger bearing area than the Gloucester wagon.) The transfer sheet only had 10 tons, so we have to suppose the signwriter or his foreman had an off day.
-
Sheeted O4 5-plank
Sheeted 5 plank openI'm still busy building pointwork for the proposed layout, 4 points completed so far and I'm about halfway through the double slip. The C & L timbertrack bases, preformed crossing vees and milled switch blades, really help speed construction up. I was never much of a fan of building 4mm pointwork and viewed it as a "necessary evil," drilling sleepers and tapping in rivets wasn't much fun in my opinion! I'm now a convert and find 7mm track building very satisfying and almost pleasurable! If anyone is wavering on the edge and considering making their first point, I'd say try this system and go for it!
As an aside from track making, I've built and painted this five plank open. I used the Coopercraft kit, with the usual addition of Slaters Plastikard wheels and buffers. The tarpaulin was made by Smiths as sold by Model Signal Engineering. I used slices cut from 1mm diameter tubing to represent the eyelets in the sheeting and model ship rigging thread for the rope. Sheet hooks were bent from brass wire and glued into holes drilled in the wagon ends. I found repeatedly crumpling up the paper sheet and unfolding it broke down the fibres in the paper and helped it lay on the wagon more prototypicaly.
I'm sure the GWR had a protocol on how to correctly tie down a sheet, but I can't believe it was always adhered too. Well that's my excuse if it's incorrect and I'm sticking to it!
I hope I've got the brakes right this time!
Best wishes
Dave
GWR sheeted 5 Plank Open with DC1 brakes


-
Midland 3- and 5-plank Opens
More Pre-Grouping Wagons in 4mm - the D299 appreciation thread.Having some time on my hands, I have been working my way through my stash of 4mm scale wagon kits, starting with some pre-grouping examples. As may be evident, my enthusiasm is for the Midland Railway, so first up, a couple of Midland wagons: an 8 ton high-sided wagon to D299 (left) and an 8 ton low-sided goods wagon to D305 (right).
These are both built from Slater’s kits, nice and straightforward so long as one is aware of the major pitfall with the D299: if the sides and ends are assembled to each other and the floor first, one finds that the solebars are too tall and stick out below the headstocks in a most unprotypical manner. Better to fix the solebars to the floor first; then add the ends, lining the bottom of the headstocks up with the bottom of the solebars. The sides are fixed in place last with some careful fettling of the notches in the ends of the siderails so that the corner plates line up. This does mean that the floor is too high, i.e. the inside depth of the wagon is about 0.5 mm less than it should be but for a loaded wagon that’s irrelevant. The kits for the D342 coke wagon and D357 covered goods wagon have the same issue (but the height of the floor really doesn’t matter unless you want to model a van with an open door…) but oddly, the D305 wagon didn’t seem too. Nevertheless I built it in the same sequence.
On the D299 wagon, the right-angle bend in each corner plate is rounded by a mixture of skrawking with the craft knife and gentle needle-filing. There probably ought to be a square of metal overlapping the top two planks of the door on the brake side of the wagon, to protect the woodwork when the door is dropped against the brake gear – I should have photographed the non-brake side!
On the D305 wagon, I’ve added the door stops on the ends of the drop sides, carved from 60 thou square microstrip.
The solebars have some moulded-on detail which is in the wrong place for most wagons, as far as I can tell from my treasured copy of Bob Essery’s “Midland Wagons” Vol. 1. The moulded numberplate is to the left of the V-hanger whereas photos show it consistently to the right. The builder’s plate is too near the right-hand end; it should be just to the right of the crown plate for the right-hand axleguard. Both these are scraped off; the transfers represent them adequately. (I forgot this on the side shown of the D299 wagon.) The square plate that on the prototype says “TO CARRY 8 TONS” (Essery calls this the ticket plate) is in the right place but the little rectangular spring-clip thing – which I would suppose is the label clip – is too far to the left. I’ve left it as it wouldn’t survive an attempt to relocate it; I don’t think I could make a satisfactory replacement, and something is better than nothing!
Below the solebar, things are what I venture to call pseudo-finescale. I could cut everything off and replace with brass but haven’t quite had the patience. The W-irons are a bit thick compared to some other plastic kits; skrawking the outside edges to make them thinner helps without weakening the structure – most of the material is in the spring and axlebox anyway. Axleboxes are drilled out 2 mm diameter and gently countersunk 3 mm diameter for Gibson bearings. The inner V-hanger is very carefully thinned by skrawking – and then repaired… The outer V-hanger and brake lever are a single moulding. I thin the V-hanger as much as I dare but it’s still the least satisfactory feature on the solebar: over-thick and lacking bolt-heads. On these two wagons I drilled a 0.6 mm diameter hole in the back of the outer V-hanger, through the bottom of the inner V-hanger, and through the middle of the brake gear moulding and used a piece of plastic rod to connect them all together. The final touch – actually done before fitting the brakes – is to cut away the moulded safety loops and replace with microstrip, so daylight shows through.
The 3-link couplings are Slater’s. The wheels are Gibson 00. There is a pretention that one day I’ll upgrade to P4 so the alignment of the brakes is a bit ambiguous. An advantage of modelling this period is that with brakes on one side only, I’ve lots of spare brake mouldings!
I painted the D299 wagon Humbrol matt 64 and the D305 Precision LMS goods wagon grey, on a Halfords white undercoat in both cases. In the flesh I can’t tell the difference but the photo shows the Humbrol to be bluer; I think I prefer the Precision colour but the Humbrol is easier to brush-paint. Below the solebar is Humbrol matt 33 – detail stands out better in the flesh than in the photo; some weathering would no doubt help.
These two kits came from the Coopercraft stand at ExpoEM 2014 and so unlike the old boxed Slater’s kits, didn’t include Pressfix transfers. I had long ago bought several sets of the Methfix version that Slater’s used to stock as a separate item. I’ve not used Methfix before. Whilst I’m reasonably happy with the end result, it was a bit of a trial. Things float arounf too much for too long! I started with the recommended meths/water mix, which worked well enough for the large letters though I followed up with MicroSol to get the transfers to bed into the planking grooves. The tare weights were the real nightmare; wandering off all over the place – there’s no backing film to hold the numbers in position relative to each other. I was very glad that on the Midland, painted wagon numbers didn’t come in until 1917!
I finished off (for now) with Humbrol spray-can matt varnish.
The Midland built 62,000 D299 high sided wagons between 1882 and 1900 – that works out at 12 per working day (on a five-and-a-half day working week). That’s about half the Midland’s goods stock. For an Edwardian period Midland layout, I reckon every fourth wagon I build should be one of these! (Allowing 50% Midland, 25% PO, 25% other companies – possibly too high a proportion of the latter.) There’s at least one in any early 20th-century goods yard photo – no pre-grouping modeller should be without several. I’ve read the various discussions on here about the current unavailability of these kits and have no wish to start another; the kit has been around for 40 years now and has its defects. Would that some enterprising manufacturer stepped forward to produce an up-to-date version! High-quality kits abound for many obscure pre-grouping wagons – the D299 wagon is the MOST UNOBSCURE item of pre-grouping rolling stock!
The low-sided D305 wagons were not as numerous – although still running into the thousands by my early Edwardian period, with more built right up to 1915 – and consequently surviving longer. The dimensions and construction are generic enough that the kit could be used to represent several other companies’ wagons, if I could bring myself to do so from my meagre stock…
-
BR Hybar
Adam's EM Workbench: Farewell for nowClearly there's something in the air, because here's another completed wagon, a Parkside BR hybar titivated with Rumney Models tarp' rail and sundry minor details These are lovely etchings and work rather like the prototype, even locking in place. The how is best explained in Justin's instructions and you'll be pleased to know that this isn't as fiddly as it might be; the only really tricky elements are the clips because of their tiny, tiny size. The etch provides for both variants on the standard tarp' bar and this, the earlier, is the simpler owing to the fact that the later version requires 0.7mm wire to be flattened and a hole drilled with precision. This is tricky!
The slightly bent bar is very much prototypical...
Adam
-
NBR 4-plank open at Portmadoc
Oxford Rail announces - OO gauge 4-plank wagonsWell how about that, just found photographic proof of my need for one of the NB ones, seen here at Porthmadog:
-
GWR Cattle Wagons
Cattle Trucks revisited!In response to the comments and advice I received from Buffalo regarding wagon numbering, along with suggestions from BlackRat and Ian Smith, that straw might make a nice addition to the wagons, I decided to get busy! Thanks for all your interest and advice guys, i hope you like the results.
GWR cattle wagon diag W1

GWR cattle wagon diag W5

GWR cattle wagon diag W3

-
BR Medfit
Adam's EM Workbench: Farewell for nowHi Colin
Great tips. I've used some of these myself though here, the top and bottom edges are on plank lines so didn't really think it worth the effort. When doing a bit of small scale signwriting per the Medifit below - I may yet do the same with the Shock - I have done as you suggest with the tape. It's much easier on gloss surfaces like lorry cabs (yes, I've done that too...)

Weathering does go a long, long way to hiding rough edges and will here I suspect.
Adam
-
BR Shock High and Coil H
Adam's EM Workbench: Farewell for nowAnd now, both Coil H and Shoc High are finished and pictures taken on dad's not quite complete 'photo plank' Thanks for all the comments and information:


Adam
-
BR Pipe Wagon
Adam's EM Workbench: Farewell for nowI've not had a lot of time for modelling recently, but one day when the morning remperature headed above 0 degrees Celsius the Pipe acquired a coat of primer and has sice had a couple of finishing coats; Humbrol chocolate brown on the underframe (mixed with a touch of metalcote gunmetal - I had the mix on the go for something else) and Precision Freight Brown above the solebar. The bodysides have had two or three coats of Klear prior to adding transfers. It's nearly there... The inside has had a couple of coats - a dark grey and some weathered wood colours. This isn't done yet, there's another couple of passes to go.
 Adam
Adam
-
BR Pipe Wagon 2
Adam's EM Workbench: Farewell for nowFollowing a visit to the paintshop, and having been lettered and dullcoted, the Pipe is now ready for weathering (subsequent to taking this picture, I've silvered the buffershanks - correct for OLEOs - and touched in the vac' pipe in red). I'm not sure what's more amazing; that we had the transfers in stock to do the job or that the sun shone long enough to take the picture.

I'm reasonably pleased with this one so far though it's a bit clean at present. This has been discussed recently, but, can you tell what this is yet?

Adam
-
BR Hibar
Adam's EM Workbench: Farewell for nowA couple of slightly indifferent pictures in this lovely morning light showing the BR hybar in its painted condition. Obviously it isn't actually finished; a final coat of matt lacquer and weathering, not to mention paining the insides, will follow, but a sense of what the finished vehicle will look like is clear. The painted view shows off Justin's tarp' rail etches to their best advantage I think.
More exotically, we also have - not complete because, if I have Rail Alphabet style lettering for wagons I can't lay hands on it right now - my 21 ton hopper, liveried for Charringtons. I think it's fair to suggest that the coal factors in question certainly got their monies' worth!
Adam
-
Van with leaky roof
Adam's EM Workbench: Farewell for nowOn 29/01/2017 at 20:00, 57xx said:I'm not a Mermaid expert, I've never seen a real one, but that's a nice pair of buffers
As you say, they look to match pic and look the part.
Ha! Much better - so far as I am concerned - to apply a set of stock buffers that happen to suit than build a wagon just to use up a set of buffers (I may have done this...). While we're considering the covering up of errors, here's this afternoon's quick win. I found this BR-built, LMS-designed fruit van [PC42] which has been kicking around for far too long - Parkside got the end profile and top of the sides not quite right and my efforts at repair were sub-standard. Having given the thing a new roof of 20 thou' plastic sheet, formed in a cool oven round an empty wine bottle, I proceeded to do what is often referred to as a modellers' cliché, to wit, modelling a van with a leaking roof kept in traffic by adding a wagon sheet. Such a cliché this is that I cannot for the life of me recall the last time I saw it done. So here we are, two layers of tissue from my new shoes and a bit of watered down PVA later, one van with a leaking roof:
I'm happy enough with that so once dry, it'll be time to sort out the brake levers, a missing safety loop and then, paint!
Adam
-
BR van roof sheet
Adam's EM Workbench: Farewell for nowAnd here's a bit more - the lettering on the tarp is based on the sheet shown at the centre of this picture: https://www.flickr.com/photos/31890193@N08/14550628482/in/album-72157643950295015/ from Ian Nolan's wonderful Flickr galleries. Since neither the sheet, nor wagon, will be clean then the raggedness of the lettering (white ink drawn on with a mapping pen - basically an old-fashioned dip pen - and filled in by fine brush) should be hidden.
One feature I wanted to include was having at least some of the lettering changing planes on the tarp' - I think this is fairly successful?
Adam
-
GWR Open C
Adam's EM Workbench: Farewell for nowIt's all gone quiet! Well, not quite, but here's an update before I disappear off on holiday (Italy, in case you're wondering). A couple of things on the go. First, we have the reconstruction of an ancient Ratio GWR Open C. This, part of a collection acquired from a late, fondly remembered, club member has already been reworked once, with D&S w-irons but not a lot else. I rather like long opens - later pipe wagons included - because they weren't only use for the carriage of tubes but for anything that would fit - bulky but light(ish).
The chassis is vintage Ratio and not bad, considering the circumstances. As noted the W-irons are from D&S and will be recycled at some point since they're perfectly good. The Ratio kit represents a diagram O.8, apparently (GWR 4mm Wagon and Van Kits), and this has knock on effects for the conversion. The body needed replacement doors with a barrow plank and feathered top edge - it was straight up and down - and some new strapping on the ends and sides. Meanwhile, the chassis will go from lever brake to Dean Churchward.
Here's the body with replacement doors and floor (both 40 thou') prior to the fitting or offering up of the chassis. The latter comes from the Morgan Designs range sold through the Scalefour Society e-shop. Though labelled and marketed as a conversion from an Open C to a O.18, so far as I can tell it's good for all of the Open C designs which differ mainly in the arrangements of the body to floor ironwork. Here's the etch with the basic floor cut out:
The design is quite unusual since it is basically a form of three-point compensation but instead of a rocking W iron at one end, it uses transverse springs with a built-in height adjustment using a 10BA screw acting on a captive nut. This obviously means that all W irons are static removing the need for mucking about separating springs and axlebox mouldings with the consequent visual disruption. Fair enough, but the instructions miss the key drawing/photograph which shows how the complete set up should look... This caused a certain amount of head scratching, as did the separate W irons on one side. So far as I can work out these are rendered thus so as not to flex the W irons when putting the wheels in: while this is a sound engineering solution it is perhaps a bit much in the circumstances and needs more 10BA nuts than I currently have access to. Subsequently, I soldered the fixed end in retaining the sprung end as designed to make fettling the spring units that much easier (no, the instructions didn't really help here).
I can go into all of this in more depth if anyone wants? The system does work quite well, I think, but I have had to work out where a lot of the bits go according to how they fit rather than how the overly-wordy instructions state. The headstocks have been added now (but not photographed) in plastic sheet and strip so from here on it's about detailing.
Still, we're a long way down the road to a handsome wagon which will be, I think, an O.19. Much, much easier is this, an Airfix (now 'Kitmaster') Prestwin. Lovely mouldings, little bit of flash, very straightforward.
Adam
-
GWR Open C 2
Adam's EM Workbench: Farewell for nowAnd after this morning's deluge (thunder over Kent), the now complete Open C has had a flash of primer. Since the last picture it's had capping strips and irons, bolt heads and sundry other bits and bobs. I've popped the wheels back in and it's ready for livery.

Adam
-
GWR late Mink
Adam's EM Workbench: Farewell for nowI shouldn't really be starting new projects - there's a house to decorate and too many unfinished wagons - but here we are. A freebie from the January Railway Modeller (gone to recycling after a fairly cursory glance, I'm afraid) in the form of a Ratio GW Mink which I thought should be better value than it turned out to be - my stash of spare underframes failed to yield anything suitable, so it's the princely sum of £3.50 and Parkside by PECO to the rescue! Some of these vans acquired BR-type axleguards in later life, perhaps when they were retro-fitted with vac' brakes? This one, for example:
https://paulbartlett.zenfolio.com/gwrvans/h279BBD07#h279bbd07
Unusually for such retro-fits, a reasonable number - this one for instance - acquired upright vac' brake stands: https://paulbartlett.zenfolio.com/gwrvans/h2A79DAE7#h2a79dae7 (I love the relettering and accompanying touching up on this one - the Silcock's feed poster is good, too) which I presume were second hand.

Note the platefront axleboxes (MJT) and the secondhand wheels from a mate whose current modelling has a P4 focus so it's not quite the bargain I'd hoped for, but still economical. Since this picture was taken, I've added tiebars from 0/8mm angle and - following Gerry Beale in the current MRJ - replaced the locking bar on the door in 0.3mm wire and a couple of short lengths of fine electrical wire. I've added lamp irons from flattened 0.7mm wire, too. The one issue II have is that I don't have the right sort of buffers in stock so I shan't be able to finish it this weekend...
Adam
-
Parkside BR Tube Wagon
Adam's EM Workbench: Farewell for nowBoth sides of the latest wagon, a Parkside Tube, modelled as one of the first 450 of BR's diagram 1/448 with RCH long link brakes, so about as simple as a big wagon can be. Because it's such a good kit the only additions were minor - new brake levers, those tricky little cruciform tie-down cleats (short lengths of 0.3mm wire with oblong washers of 10 thou' superglued in place) and new buffers and most of them are now invisible...


Adam
-
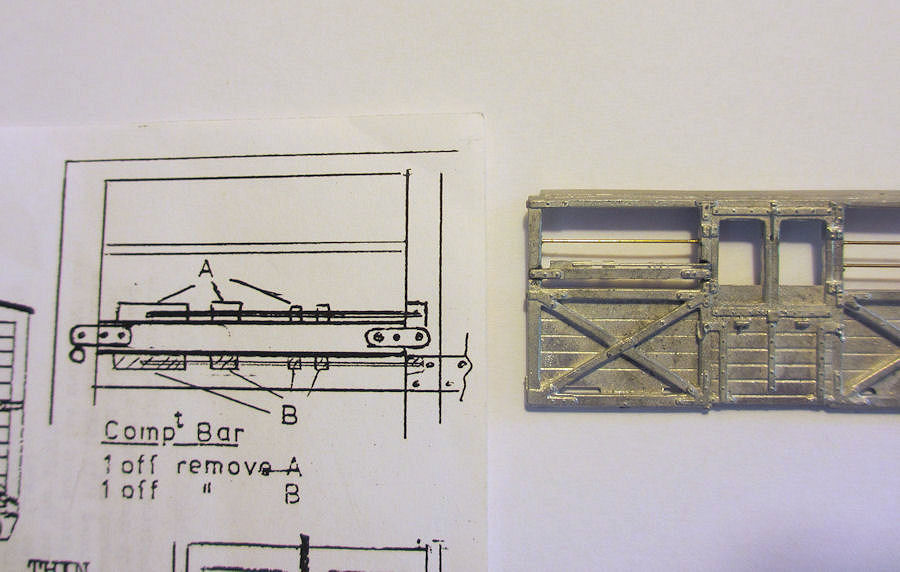
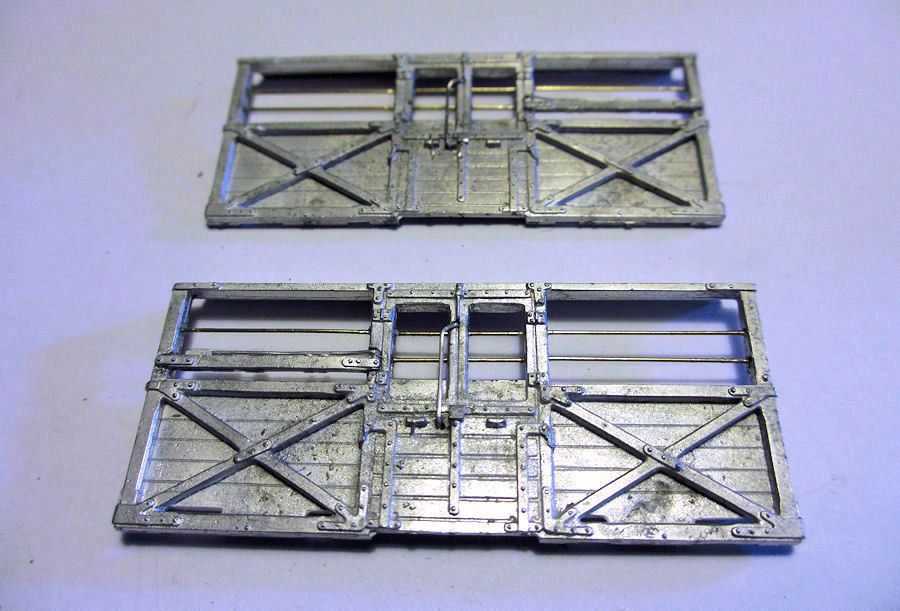
O5 4-plank Open, DCI brakes
Modified Coopercraft GWR 4 plank Open with DC1 brakesThis little project was described some time ago in my workbench thread. A couple of recent discussions suggest that the modifications involved may be of interest to others. I don't seem to have posted the usual build summary in this blog, so here it is.

The Coopercraft GWR 4 Plank Open kit (4mm scale) has an error which means that if you build it as designed you end up with 4 planks on the outside and 3 on the inside, as seen here.

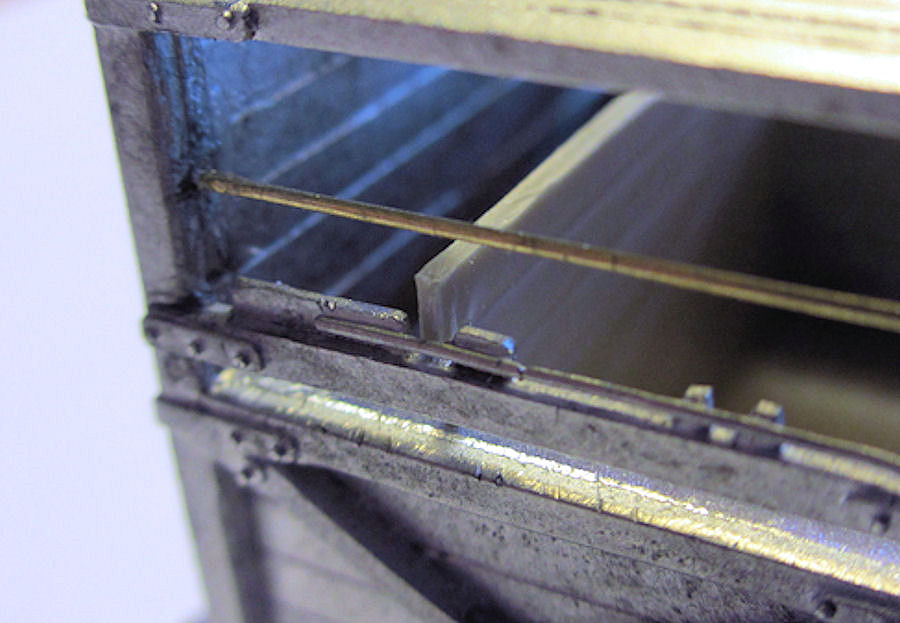
So, following good advice (thanks Nick) I cut along the red line indicated above, in order to remove most of the big fat lip on top of the solebar. This in itself lowers the floor by 1.5 mms.

The floor provided in the kit is 1mm thick, so I decided to gain another 0.5 mm of internal depth by replacing it with a 0.5mm styrene floor.

I suppose this is on the limits of how thin a floor should be, but with bracing underneath it all seems solid enough. There are two pips on the inside of each wagon end (not shown), these had to be removed to fit the new floor. The gaps at the end of the solebars were fixed with filler.

The lowered floor. Not perfect, but at least the bottom plank is now visible.

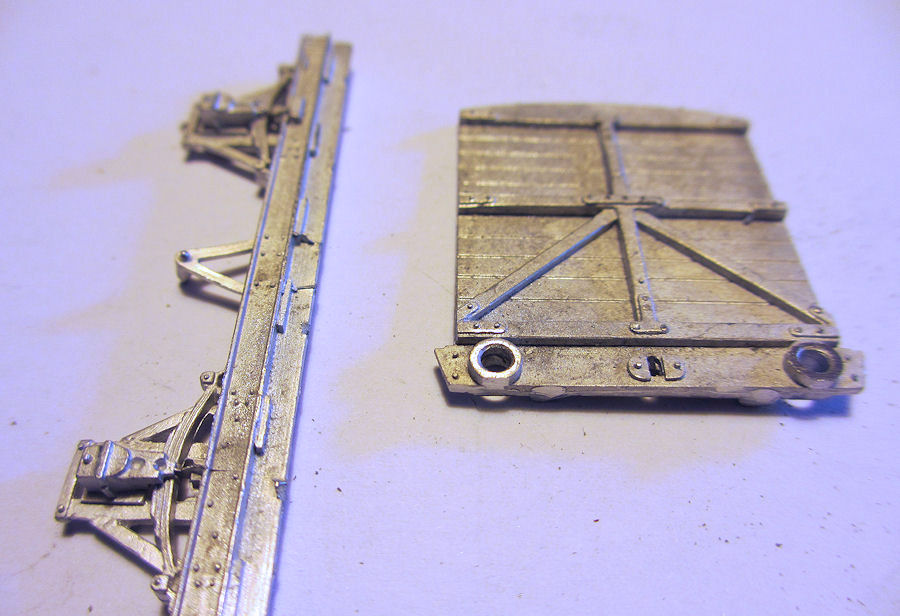
Most of my wagons have lever brakes but it's time I introduced some DC1 brakes too. So I splashed out on this Bill Bedford etch.

I worked with available drawings and pictures in the GWR wagon book by Atkins, Beard & Tourret.

I think I used the wrong link component below the swan neck lever, lesson learnt for the next one. Still, the exercise has helped me understand better how these brakes worked. Sometimes the absence of instructions can be a learning experience!

The low number belies that No. 781 was built in 1902 as part of Lot 374, thus sporting DC1 brake gear from the outset. I debated whether to add a sheet rail. Some of the 4-plankers were certainly fitted with these later on, and the O5 diagram in Atkins Beard & Tourret features a sheet rail - but I have a suspicion that the diagram stems from 1905 when the wagon index was drawn up. On page 54 of the same book is a picture of a 4-planker showing off the new DC1 brake gear in 1903. It does not feature a sheet rail, and is in the same condition as No. 781.

The wagon is in GWR wagon red (I follow the 1904 theory). I chose a slightly redder shade than normal to suggest that it is fairly recently painted.
-
GWR W2 by Mikkel
GWR W2 Cattle Van (in loving memory of the Wright-Marillier partition locking bar)Everyone knows how the “standard” GWR cattle vans looked, but I’ve always fancied the earlier W2 vans with outside frames. So I dug out an ABS 4mm kit and brought it with me on the family holiday. These were "medium" sized cattle vans, with the option of adding a partition and thereby making them "small" if the customer so required. I've always wondered why this was worth the trouble, as the difference in space seems minimal !
I decided to build the kit as supplied, which is in the post-1905 condition with oil axleboxes, an updated locking mechanism for the doors, and the Wright-Marillier partition locking bar.
And we all know what a Wright-Marillier partition locking bar is, don’t we! A regular household word it is. “Good morning dear. Wright Marillier partition locking bar?”. “Oh yes please, and two sugars”. Well, above is the 4mm version of such a mechanism, as supplied in the kit.
It seems that in the early 1900s the GWR was having problems with farmers who paid for only part of a cattle wagon, and then moved the partition to increase the space when noone was looking. So in 1903 Messieurs Wright and Marillier of the GWR’s Wagon & Carriage department invented a locking bar that would help prevent this. Not quite Nobel prize stuff, I suppose, but a good example of practical engineering for everyday railway operation.
The sides require a bit of preparation. Apart from fitting the locking bar, a door latch must be fashioned from wire and the main bars fitted.
The W2s were built with “bulb” section solebars (where the upper lip is wider than the lower one), and an early distinctive type of round buffer housing. Those lugs on the casting above the solebar caused me a lot of headscratching. They don't seem to serve a purpose and get in the way of the assembly. In the end I simply removed them. I hope I haven't missed some vital point!
Poor man's brass. I've finally realized why I get on better with whitemetal and plastic than with brass. They are much more forgiving materials, eg I can file and tweak and fill in to correct all my mistakes!
Modelling in the wilds of Denmark. A fly of the genus Wotsit inspects the roof bands. Actually it may have a point: I think the bands should have been a tad flatter and wider.
Standard grey and a bit of lime wash. I forgot to add the small "M" and "S" to the livery (now corrected, see the first photo). I know that the lime wash was often more pronounced in reality, but I find it can look a bit odd in 4mm scale. So I prefer this understated look. I haven’t finished the lettering on the ends as I am not sure how it should be. The photo in "GWR Goods Wagons" (Atkins et al) shows an experimental livery on the ends which was not carried forward. The kit instructions indicate the “GW” as seen here, but also with tonnes and tare in italics on the left hand side. But I thought that the standard end livery should be “GW” , running number and “Medium”?
When the GWR introduced the large "GW" on goods stock in 1904, they ran into problems with the outside framed vans. There simply wasn't enough room between the frames. The solution was to use smaller, non-standard letters. I did the same. Photos from the early 1900s also show that on some wagons, the cross-bar on the “G” differed from the later standard style. The HMRS transfers have the later style (bottom right), so I modified them with a lick of paint (top left).
The W2 in the bay siding. Surprisingly, the photo in Atkins et al shows it with screw-couplings, so I have added an (overscale) set of these until I work out if that was standard.
Mr Wright and Mr and Mrs Marillier inspect their invention on the W2 at Farthing. What the world does not know is that the concept for the locking bar came from a clasp on Mrs Marillier's corset. What Mr Wright and Mr Marillier do not know is that they both got the idea from the same clasp.
-
GWR red wagons
More from the wagon and carriage works.Well its been a while, but I've not been that idle - stop sniggering Gareth.
ExpoEM went well - I think. I had a good few people drop by for a chat and the lecture seemed to be well received and promoted a fair amount of questions and discussion. Suffice to say that the 3 Mink conversions I was doing didn't get finished during the course of the 2 days. The only down side about demonstrating is you don;t get to see much of the show...
Anyway after ExpoEM I got roped into demoing at the GW Study Groups members day - and no I didn't finish the Minks then either (I kit bashed a Mink D into the prototype V9 instead).
So what have I fininshed?
Well I have managed to do a few more GWR red wagons. As the Sage of Fareham noted when he saw them loafing around on Hope-Under-Dinmore one club night: "You do like red don't you." Well if it wasn't for Gareth being all so well informed....
I digress.
So we have a batch of red 4 and 3 plank wagons.

On the left we have a Cooperccraft O5 as it comes out of the box (not because I couldn't be bothered to put the correct headstocks on or lower the floor, but because I made it decades ago and have just repainted it from grey to red). Then moving right are two David Geen 3 plank white metal kits - very nice castings and went together very quickly.
Next we have a W2 Medium Mex cattle wagon.

I've left the roof off so I can admire the interior - and add some straw... This kit has had the oil axleboxes replaced with grease ones which involved a fair amount of grinding away of white metal with the dental burrs.
Last there is a J7 double bolster.

This is a D & S kit (now available through ABS). Again a very nice kit to build.
Lettering for all of them is by Pressfix or done by hand using a fine calligraphy pen and white ink. Weathering is dry brushed acrylics (Vallejo) and couplings are Alex Jacksons.
Now I just have to finish my Armstrong Goods and 1854 saddle tank in pre-1906 linery so that I have some locos to haul my growing collection of Red wagons!
drduncan
-
More GWR red wagons
The Wagon and Carriage shop - dirty wagonsIn a well ordered and just society I would be able to blame Gareth. The fact that I can't is annoying me somewhat and I think that deep down he (Gareth, whose default fault assuages so many wrongs and set backs) is avoiding any blame just to vex me. But I suppose then he is to blame for something...

On that happy note on to the dirty wagons that are 'fresh' - if that is the right word - from the paint shop.
It's worth remembering how dirty the old railway was (and the modern one is more than a little skanky too). Even the Edwardian railways couldn't keep humble fright stock clean - it very rapidly become dirty, even in the Elysium fields of the green and pleasant lands served by the GWR (Gods knows what it was like up in the dark satanic mills of the north - black and white pictures don't do the muck justice). Soot, filth and rust soon covered wagons, and that's before we deal with
1) inconsistent paint mixes and
2) weathering through oxidation and fading.
And don't forget the chalk marks that seem to adorn almost every wagon.
So if your little Disney land has immaculate wagons in ex-works conditions its probably time to get out the paints and practice your dry brushing and if you have one, use of an airbrush...
Here are the latest attempts to get the muck spread around:


This trio are all 4 plank opens (no diagram number was ever given to these examples)

This is a very faded V6 Iron Mink. It's also got the lettering in the wrong positions (deliberately on my part - can't say what the signwritter at the time thought he was doing). Don't believe me? Have a look at John Lewis' lovely little book on the Iron Minks.

And an N13 loco coal wagon.


Here are three different 'Minks'. 16280 is a V12 (non vacuum braked example) with twin end louvre ventilators, 16685 is a V12 vacuum fitted DC3 braked example with an offset V hanger together with twin end louvre ventilators, and 93182 is a V16 vacuum fitted DC3 braked wagon with twin end bonnet ventilators. They all started off as Coopercraft V4s - the main differences between all of these wagons is brake gear, wagons ends, and buffers. I think you can get 21 different diagrams (or subsets of diagrams) from the humble Coopercraft V4 7' 6" kit so watch this space.


This lot are 5 plank O4s with a solitary O2 7 plank and O15 vacuum fitted 5 plank.


 As you say, they look to match pic and look the part.