


readingtype
-
Posts
248 -
Joined
-
Last visited
Content Type
Profiles
Forums
Blogs
Gallery
Events
Exhibition Layout Details
Store
Blog Comments posted by readingtype
-
-

These photos are not only really interesting to illustrate the steps involved but also very handy if you happen to want to see some good close up details for modelling purposes. On that note, I wondered if you know the dimensions of the main front window screen glass - all four sides being seemingly different lengths, I guess the two diagonal dimensions would actually provide the answer (if the two bottom corners are 90 degrees).
-
On 30/08/2023 at 20:38, cctransuk said:
Not quite
I wrote badly, but intended to say: nothing that represents a non-British prototype in 1:76. That's what my comment was founded on, the fact that there are several recently produced non-British ones in other scales and so it's a pity the work done will not be redirected into models in 1:76.
Ben
-
 1
1
-
-
Excellent!
There are indeed 1:87 models of lots of continental UK-loading-gauge ferry wagons but nothing in 1:76, despite the hard work having been done (witness Modellbahn Union producing the same models of DB and DRG ferry vans in 1:87 and 1:160). I did write to MU and ask and (to paraphrase freely) the polite response was that I should ask the right people for the scale. Thing is to judge from what's on the packaging of the H0 models they are working together already. Hey ho. Or should that be H0...
-
1
-
-


It was a good weekend. Here's Dstg217, 17:37 off Wfn, hauled by an ex-works 50 with Cabinentender (basically guard's office surrounded by a few thousand litres of cold water). It's running late, as pretty much everything did. I have to say, when I was operating the fiddleyard that the train is about to enter, I was pretty punctilious about dispatching on time...
The red circle on a black stick will give way to a proper Einfahrsignal (entry signal) soon, according to the station's owner -- the slot for the signal base can be seen beside the second wagon and the cable run is already in place.
My phone camera hasn't magically improved since last time, so apologies for grainy impressionism.
-
 1
1
-
-
On 13/04/2022 at 19:57, snitchthebudgie said:
Is there a link to the leg design that I could access
Aha! Download PDF here. And there's another report that's public on the FREMO-Süd web site, though they've taken the design in a slightly different direction. That's FREMO 🙂
-
1
-
-
On 13/04/2022 at 19:57, snitchthebudgie said:
Neat design. Is there a link to the leg design that I could access, or is it buried within the FREMO members area? Thanks, Jon
It's buried I'm afraid. I am not sure how private it is but I doubt there would be issues sharing the basics! Of course, the dimensions all relate to the height of the rails above the floor (130 cm) and the width of FREMO H0 modules (50 cm). There's a design decision to be made about the width of the 'footprint', given that the wider it is the more stable but the more of a trip hazard. In this case that distance is 45 cm measured across the outsides of the legs, with the centres of the legs bolted 38.1 cm apart at the top. The design uses for 5 x 3 cm timber which, being metric, isn't really a thing in the UK, so mine are 5.2 x 2.7 cm. The big disc feet are not part of the original design but are a very good addition by David. The legs are 129.1 cm long.
-
1
-
-
 On 07/01/2022 at 11:00, MikeOxon said:
see this example near Oxford Station.
Now you mention it, that is an interesting fencepost. I've passed it hundreds of times without realising. There is, or at least I am sure there was, broad gauge rail in the fencing between the railway and Port Meadow and/or on the approaches to Walton Well Road bridge, just north and west of the station. Possibly on those of the next two bridges as well. But not the Barlow design.
-
Excellent! I've seen this track recreated at Didcot but it's only now that I read that the transoms and cross-ties were eight feet apart that I am amazed it all worked in real life, with spindly-wheeled broad-gauge locos rumbling over it at considerable speed. And dare I ask: have you tried curved track?
-
1
-
1
-
-
Update from Austria: 931403, which is at Heizhaus Strasshof north east of Vienna, was repainted 2019-2020. See this photo of the loco in the Heizhaus. Thanks to @Michael W on the Kleinbahnsammler forum for this news!
-
15 hours ago, Mikkel said:
Looks promising. I actually like both variants, i.e. also the one without a backscene. I feel that sometimes a pale background from the ground up can help give a sense of space on a layout - especially on small layouts - whereas a backscene can take it away.
I agree. I'm fortunate to have a white wall in the room where I am (even more fortunately) able to leave the layout up at the moment. Sour grapes: it's a bit bright and dazzles the model in the foreground...
15 hours ago, Mikkel said:But of course the background can be key to setting the scene, as in your situation here. Will you be using a photo background or modelled trees?
Now that is the thing. This thing started as a project which I thought might be my first ever exhibitable layout. But then I came across FREMO and added an adapter so that the layout is also a FREMO station module. In regular layout mode there's a front and a back, and I am pondering the possibilities of having a banner printed -- something I've read about but not seen in use. In that case the operator could stand in front of the banner, or they could stand in front of the layout both to drive and operate the turnouts (almost all the signals are fixed). This idea assumes that a banner the right size is feasible.
But in FREMO arrangements (modules bolted together for a multi-day meeting) there are no fronts and backs. Station operators (ie those regulating the services) and shunters generally stand on one side of the station and drivers accompany their trains in and out on the other side. This is for obvious practical reasons. There are no backscenes for that reason -- and because a big part of the fun is the shunting and the backscene gets in the way. Everyone's looking at the operation so the intrusion of the real world is not quite so noticeable. In the FREMO scenario, the banner concept could still work though, and if it didn't get in the way nobody would mind.
Or, I could make something more conventional. In which case a labour of love would be to create a foreshortened backscene with hundreds of trees. In fact that reminds me that inspired by your recent post @Mikkel there is some florists' wire I ordered somewhere in the post :-)
-
1
-
-
On 29/07/2021 at 06:38, Mikkel said:
Excellent modelling and attractive scenes. That shot beneath the canopy is great. I hadn't heard of joker modules before, a clever trick.
Thanks! Those who are responsible can take the credit. The canopy shot is aided by the fact that track height is 1300mm above the floor.
It's great seeing it all come together, and one of the best ways to appreciate it is to drive a train service through it... several scale kilometers of travel.
-
2
-
-
On 28/07/2021 at 14:47, Captain Kernow said:
That all looks like a lot of fun and some nice modelling there. Where did your group actually hold this meeting, please?
It was held in a school hall in Sussex. The majority of the UK FREMO group are local, for historical reasons. I brought my stuff from London, and that's the way these meetings are normally done. In normal times it's common for people to cross borders to attend a meeting -- it's a social event as well, and a chance to swap knowledge and techniques. As with a joint layout project, by coming along individuals get inspiration and encouragement for their modelling. I did much more to my modules and stock in the week leading up to the meeting than I thought possible, for example ;-)
-
1
-
-
14 minutes ago, pheaton said:
Believe it or not.....
FOX Transfers!
Life imitating art? That's brilliant. Need a large washing up bowl to float them off the backing I guess.
-
Quote
@Phaeton correcting several mistakes such as the incorrect font on the numbers....
So... what transfers do the full-size loco painters use?
A really interesting report, thanks!
Ben
-
1
-
-
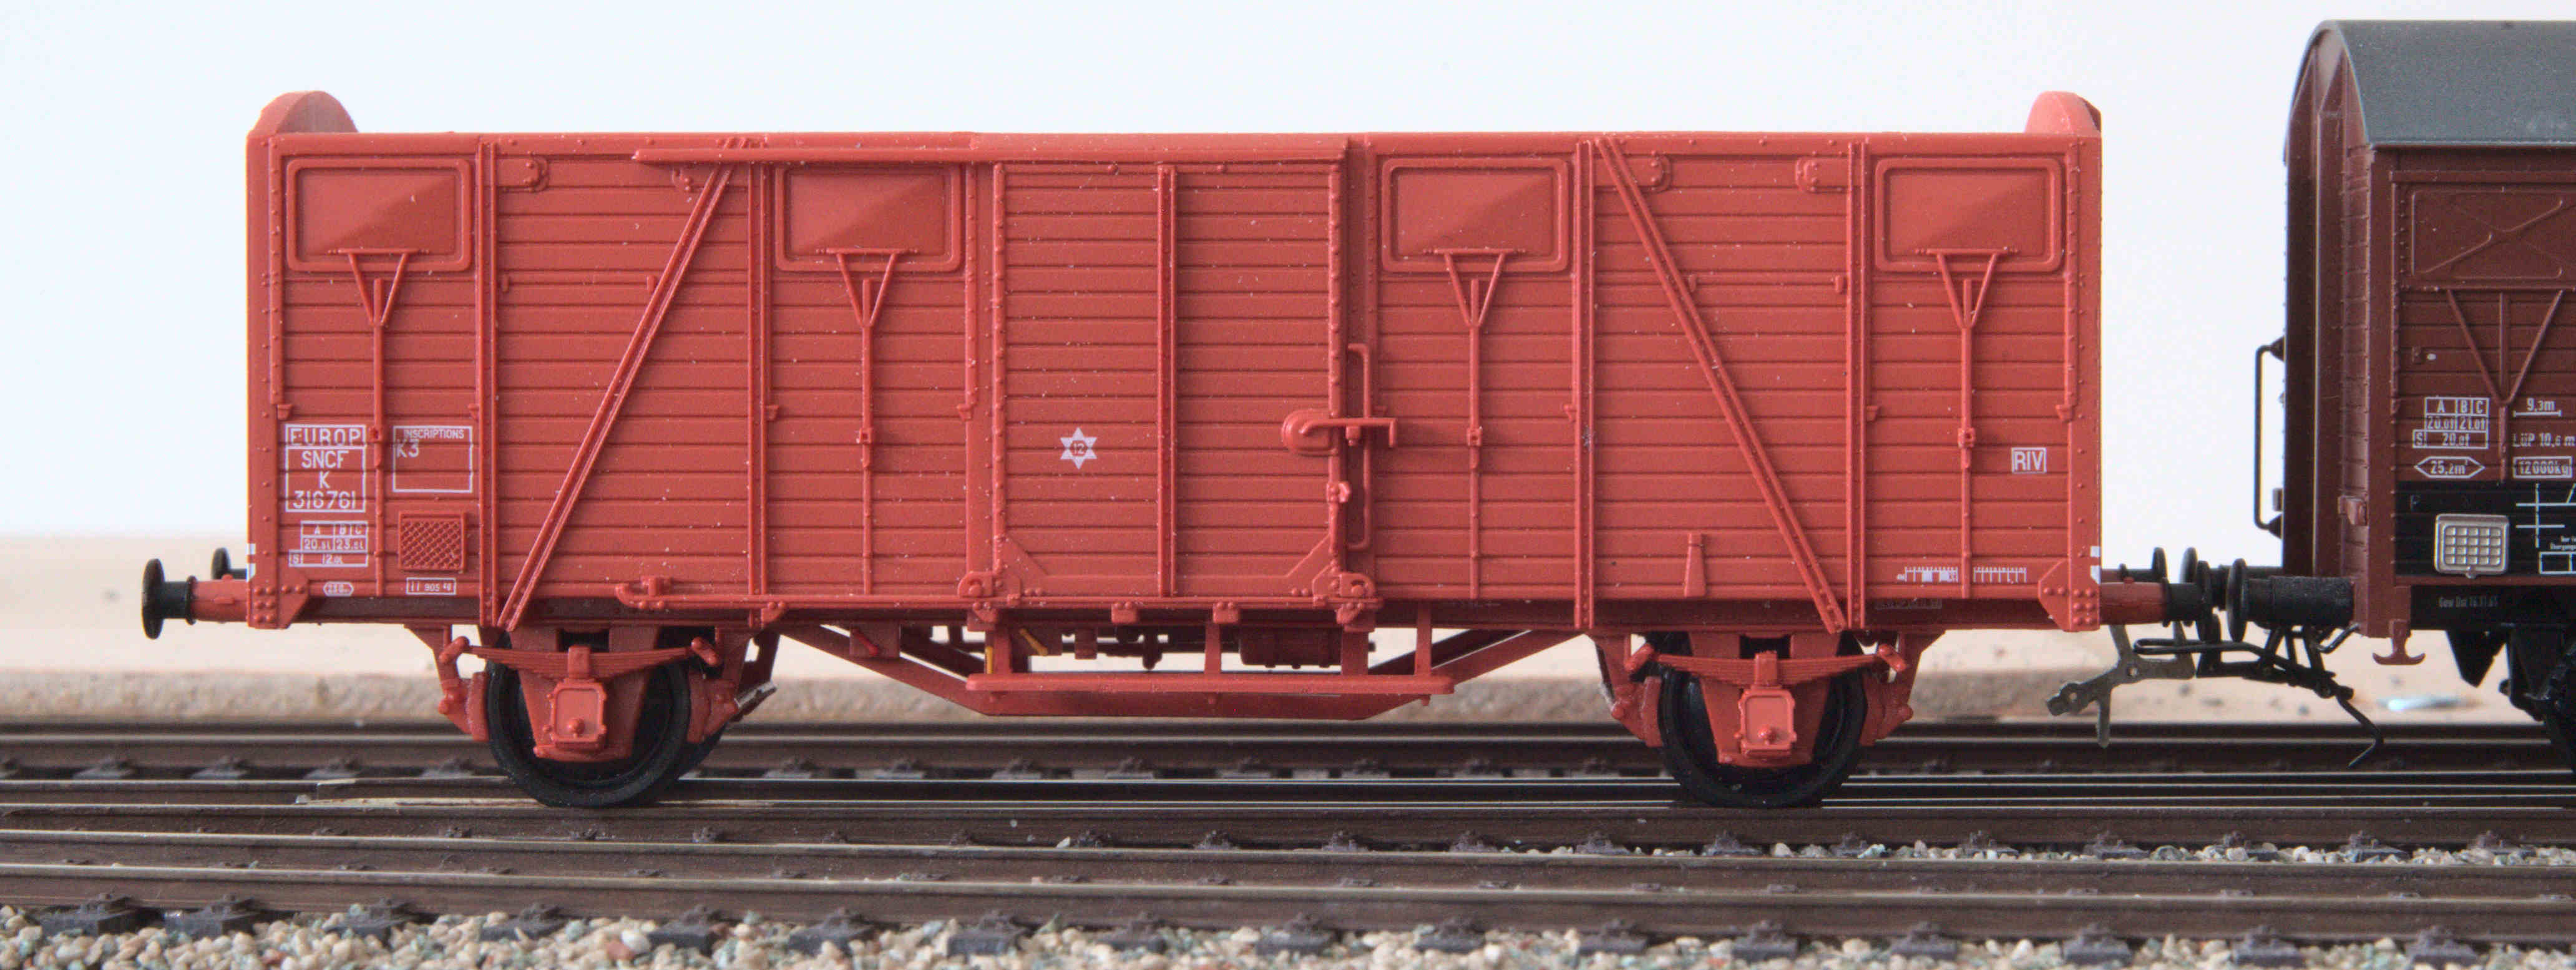
The SNCF K van now has shortened axles for its Gibson 12mm wheelsets, running in waisted bearings. The brake blocks look very tight but the faces have been very lightly filed back and everything runs smoothly. With that work done the buffers are at the right height. In view of the fact the factory fitted 11mm diameter wheels this is good news. Yes there is a roof. The wagon needs to weigh about twice as much as it currently does though, and the weight will go inside the body.
-
 1
1
-
-
A real improvement over the original W-irons.
-
2
-
-
Just need to make some space. The underside of the floor should be the right height to take the new W-irons.
-
1
-
-
Oh, what's this? @Epoche 3 W-irons under an old Roco Pwghs54? Fits nicely, looks better already. So long as I don't ruin the springs and hangers ... :-)
-
2
-
-

Qu'est-ce-que vous cherchez?
Bits and bobs for detailing: https://www.amf87.fr/prestashop/12-pièces-de-détail
Buffers: https://www.amf87.fr/prestashop/16-tampons
Health warning: do not spend too long on the AMF87 site. Also, I recommend a look at Pierre Dominique -- at the other end of the scale really, they are a big 'box-shifter', but the stuff at the back of their storeroom seems to go back 50 years ... so another health warning there. The search filters are really annoying but you may start to find things emerge after a bit.
For German stuff (say you decide to put the old nose back on the V200) then the key source of detailing bits in German H0 is Weinert Modellbau and their catalogue is here.
Modellbahnshop Lippe (another box-shifter with an astonishing range) stock a lot of their stuff and so does Weinert Bauteile.
These are obviously suppliers inside the EU. I think we're clear that there aren't tariffs on toy trains etc (are we, BoJo?) so the real game is the postage. There is not a lot you can do about this but always add it to the cost of the bits you are looking at as you go. Reckon on spending from 10 to 20 Euro on postage. The specialists are usually the most expensive for all the usual reasons. I had a brief and fruitless correspondence with one of the suppliers above on this topic ;-)
Ben-
1
-
-
Ignorant question, apologies, but has anyone in preservation contemplated re-engining a loco such as a class 26 with something else? Did the Sulzer model used in the type 2s develop further after the 1950s?
-
4 hours ago, Pacific231G said:
I'd be interested to know more about Holger Gräler. A driving wheels has just fallen off the axle of one of my Jouef (Champagnole) 141Ps
@Pacific231G Sorry to hear about that! I see from this Jouef Trains site that their model has a long and multi-part history. You will know better than I do what spare parts are available; I have forgotten the name of the French supplier who seems to have a lot of parts for older Jouef models (can't have been AMR 87?) but I did notice that Pierre Dominique seems to have swept up everything from the very back of their storeroom and put it online -- there are items there that must go back a good four decades...
I can't speak for what Holger, or someone equally competent, would choose to do but fixing issues with plastic parts, particularly stressed items like bushes, could be more difficult than for metal equivalents.
Holger's details are on the AW Lingen web site. I write to him in a gruesome parody of German and he manages to understand my requests ;-)
-
1
-
-
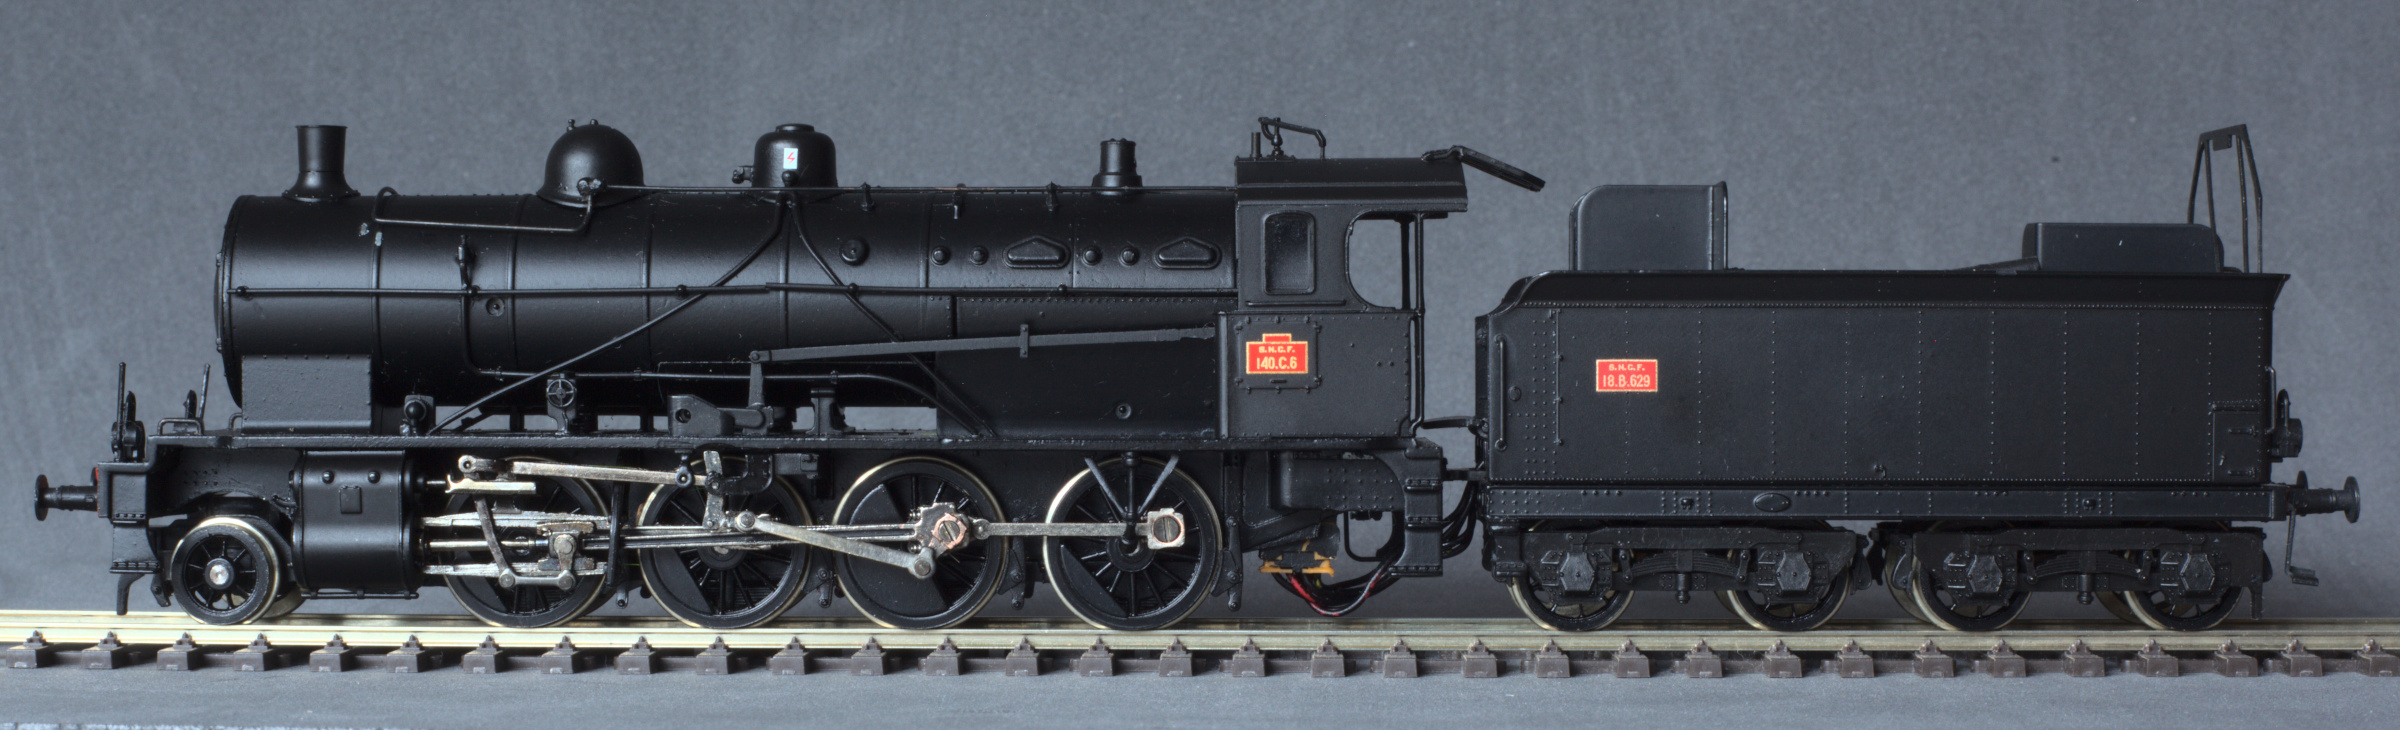
I thought I would push the wheel question further and sent 140.C.6 to Holger Gräler in Germany. Holger has previously worked wonders with the wheels on my Roco ÖBB Reihe 93, by replacing the tyres and retaining the original wheel centres and rims. The Reihe 93 has plastic wheel centres. The 140.C has cast metal wheels and these have come back looking absolutely super. The carrying wheels and tender wheels are new.
I now have no reason not to investigate what can be done to tidy the model up -- for instance, the box under the cab is a Liliput invention that holds the tender drawbar and at least one modeller has found a way to do without it. The electrical connection also needs thought. The space beneath the frames under the cab should be basically clear.
-
3
-
-

I've started one of these kits. In fact it was a while ago. It seemed to me then that, if assembled without checking and adjusting things, the axles would be parallel with each other (in plan) but not square with the solebars. AKA skew whiff. Thanks for the additional hints in your report, there are clearly other potential issues to watch out for!
-
14 hours ago, Michael Edge said:
Looks OK so far, you've done all the difficult bits, it's all downhill from here.
Now that is greatly cheering news!


Keeping 26043 alive.....British Steel
in pheaton's Blog
A blog by pheaton in RMweb Blogs
Posted
Thank you! But I have a confession: I was sticking my neck out and guessing that classes 26, 27 and 33 (excluding 33/2) have front screens with the same dimensions. The centre window obviously not. It's actually the 33 that is currently of interest to me. These dimensions are fairly difficult to measure accurately from small size general drawings because they're angled in both front and side elevations, and it's relatively difficult to measure the prototype without access...