Ethan_101
-
Posts
1 -
Joined
-
Last visited
1 Follower

Recent Profile Visitors


Ethan_101's Achievements
4
Reputation
Bookmarks
-
Early 0-4-2 banking engine
Early 0-4-2 banking engineIn the Summer 2016 edition of the Brighton Circular I posed a question regarding the identity of a loco illustrated in Samuel Brees' 'Railway Practice' 1846. His claim that the drawing was of London & Croydon Railway locomotive 'Croydon' was clearly an error and thanks to the perpetuation of this mistake by E. L. Ahrons and others, it's identity has never really been queried.
Thankfully my article sparked a bit of debate and some excellent responses were written in subsequent Circulars. Unfortunately the conclusion was that we know what this loco was not, but who built it (if it was ever actually built) and the Railway it was built for remain a complete mystery.
When I started the model, I was happily convinced it was 'Croydon' built by Rennies for the New Cross incline, and on that basis I determined to complete it. However, now it's somewhat enigmatic and I think I like it even more!

The model itself is in 4mm scale to EM standards. Power is by a slightly modified but very sweet running (thanks to the benefits of running it in long before installation) Portescap RG4. The motor is a sliding fit inside the brass tube and veneer boiler, with the gearbox hidden inside the smoke of driving the leading axle. The second axle carries flangeless wheels as per the drawing and the trailing axle and tender wheels are wagon/coach wheels since these are appropriately more dainty than loco/tender wheels: all wheels are Gibson.

The frames are cut from brass with 5thou styrene overlays to allow for rivet detailing etc. I confess I struggled a bit with the construction of the motion, the first incarnation was chopped off and started all over again as it never ran smoothly however much I swore at it! The assorted round bits were turned in the lathe, I wouldn't want to tackle a loco like this without one.

It all dismantles into sub units; the boiler with motor and gearbox which can be slid out if required. The outside frames with motion and smokebox etc. And the inside frames with the final drive gear, wheels etc.


The tender is entirely conjectural. There is no tender illustrated with the original drawings so I made one up (which was great fun by the way) based on standard practice for the period including a lever operated brake which I imagine was almost entirely useless! Sprung buffers and a bunker full of real coke complete the model.

The smokebox front is very odd indeed. I've kept to the original drawings which show a convex front bolted all the way around. Either this is a very early attempt at streamlining (unlikely) or simply another error. Surely the cleaner was not expected to undo 48 individual bolts just to brush the tubes?!

I completed the model on the last day of 2017 so 2018 is clear for the next loco. This will be a Bury Goods 0-4-0, watch this space....!
-
Show us your Pugbashes, Nellieboshes, Desmondifications, Jintysteins
Show us your Pugbashes, Nellieboshes, Desmondifications, JintysteinsHere's an electrotren-bash by ahardy of this forum. Very Hudswell Clarke-esque
http://www.rmweb.co.uk/community/index.php?/topic/67026-industrial-conversion-from-0-6-0-jouef-tank/

-
Freelance fireless (barclayish)
Freelance fireless (barclayish)I have had a project on the go for a while awaiting finishing and since I have finally got around to finishing it just the other day I thought I might share a few pictures of the project on here.
Based on the Bachmann Percy chassis and very loosely inspired by the numerous 4wheel fireless locos built by Andrew Barclay.


-
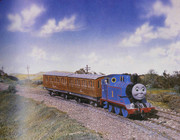
TM2001's Workbench - “Kitbashing” Thomas the Tank Engine
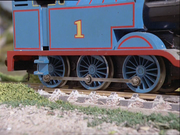
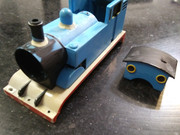
TM2001's Workbench - “Kitbashing” Thomas the Tank EngineHello everyone! I joined RMweb back in July, but until now I haven't actually shared anything about my own modelling. I got into trains through the first 3 series of Thomas & Friends, which subsequently got me into model railways... the average story of people getting into trains through their childhoods, pretty much. I am still fairly young, so up until this last June all of my products were pretty much "off the shelf" models on a ping-pong table. I decided that for my first project I would try to make my Bachmann Thomas a little more screen accurate, in a similar vein to most other people's modifications. I was just going to replace the face and paint a few details the proper color, when for some reason (I can't actually remember why) I was looking through early TV series pictures and I noticed that the standard Bachmann wheels were too large. The wheels (of all things
 ) ended up turning this into a much larger and ongoing project, though it's still very enjoyable.
For background, the original TV Thomas model had wheels from a Marklin BR 55, which, using production references, measured to a scale four feet or slightly under. Thomas retained these wheels through the first 5 series, but, when a new Thomas model was constructed for Thomas & the Magic Railroad, he gained larger wheels, which were later replaced with the original ones in the 7th series (for some reason). The wheels I used came from a dead Bachmann Duck model, and they measure to around 15.75mm, which is really close to the original model's wheel diameter.

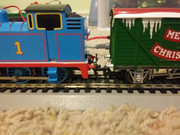
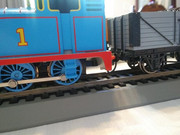
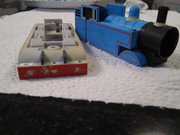
I did have to repaint the wheels from their original color (black) to blue. I found Vallejo's Deep Sky Blue to be a fairly close match to the blue of the model. This also fixed another issue with Bachmann's model of Thomas: the overall height of the model. Thomas's cab in the show is supposed to be close to the height of the vans used in the show. The Bachmann model's bunker goes to the top of the vans (I forgot to take a before picture), but it is now closer to the correct height. While it's not perfect it's something I can live with.
Moving on with height issues, the Bachmann model's running board was also higher than it was on the show when compared to Annie and Clarabel and the trucks. This is also now corrected, however highlights a few other problems with the Bachmann model (will get to that later).
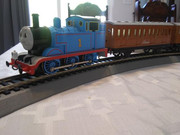
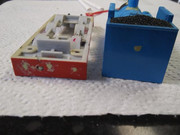
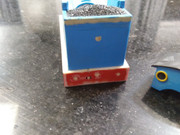
Now onto the issues brought with the change. This exaggerates how far down the front bufferbeam extends, which makes the buffers and coupling sit too low. It needs to have a couple of millimeters removed from the bottom and the buffers moved to the centerline of the modified bufferbeam. I may use one of Duck's coupling hooks instead of the oversized one currently on Thomas's bufferbeam or I will get scale ones to use once that is done. Moving on to the rear bufferbeam, it shows that the buffers are sitting too high. In the first seasons of the show, wagon (and Annie's front) bufferbeams were lowered to Thomas's buffer height. Later on, Thomas's buffers were raised instead so that wagons didn't need to be modified to be used with him.
This modification also introduced a couple of operational issues. The knuckle coupling that I put on the model is now too low to be used, so I will need to cut it out to correct it, although he won't have a rear dummy coupling anymore (I will trade operation for some accuracy). The pickups are also now in the wrong place. Although they still work, I fear that they will break with extended use. One good thing about that though, is that it will force me to use a soldering iron to fix them, which in turn will allow me to carry on with the modifications. Most of them deal with the running board, which I would prefer to remove from the model before I start cutting it up too much (the wires for the pickups fun through small holes in the board, keeping anyone without a soldering iron from easily making modifications.)
Other modifications to be made include:
-Changing the front lamp's shape
-Moving the rear lamp down
-Rear lining
-A new face
-Guard irons on the rear Windows
-Possibly opening the cab
-Adding other various painted details
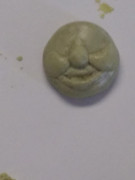
The next thing I did was an early face sculpting test, which was based on this face:
At that point, I still needed to do some things, such as drill eye holes (and give it less of a creepy color).
I also filled in the holes on Thomas' bufferbeam and rear (the lamp was too high) and began work on the tapers on Thomas' funnel and dome, though most of the refining will be the sanding process. I needed to make the face less creepy as well... It was probably the strangest part of the entire project (so far).
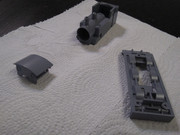
After being really busy for a few months, I finally started making progress. I put more milliput on the rest of the places that needed it and I began to sand everything down.
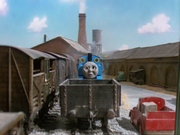
I was also able to put the model in it's first coat of primer so that it would be easier to see if there are any other areas that needed to be sanded more. The top of the boiler still needs some, from where the raised stripes used to be, and there are a couple of places that need actual filler before I finish painting the model.
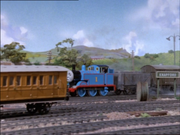
At this point, I decided that I would rather finish Thomas off as he appeared in Season 1 rather than 3, because I really liked all of the care and effort that was put into making the Series as close to The Railway Series as possible. I also decided that I would get real UK cosmetic couplings as well as brakepipes and that I would build more "fine-scale" stepladders. I hoped to do a better face as well, because the first one I tried ended up with a few problems along the way. I was really excited at this point at how well the model was turning out (for a first project), so I didn't mind the extra work that I was creating for myself. After the first coat of primer, I ended up being really busy again and didn't have much time for modelling, which catches us up to the current part of the project: The opening/rebuilding of the cab.
I have found something that eliminates the need for the eye mechanism, which should be here by the end of the month. I removed the unnecessary gears and cut out the empty part of the gearbox, which allowed me to put the remaining part of the gearbox in backwards, freeing up the space for an open cab. I have taken measurements of the original TV model's cab using the production references, and hope to begin building an open cab soon. I hope you enjoy reading about this project, even if it is a little unconventional. All TV series images came from the Thomas & Friends Wikia page.-TrainMan2001
-
Show us your Pugbashes, Nellieboshes, Desmondifications, Jintysteins
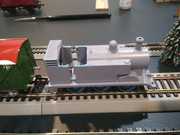
Show us your Pugbashes, Nellieboshes, Desmondifications, JintysteinsThe overhanging smokebox and prominent buffer beam are definitely characteristic, that’s where the front axle would be on a road locomotive. Road locomotives would generally have well tanks under the bunker and that seems to have been carried over to the rail versions
A coat of paint shows the prominence of the front buffer beam. I need to cut away bits of the chassis and/or the supports behind the steps before I can fit a well tank under the rear end of the chassis.

She also needs another coat of green paint and/or a fair degree of weathering
-
Show us your Pugbashes, Nellieboshes, Desmondifications, Jintysteins
Show us your Pugbashes, Nellieboshes, Desmondifications, JintysteinsFirstly Thanks to Corbs for finding and sharing my 0-6-0 build pics a few pages back, (october2017!!!)
Here are a few of mine, mainly just repaints into London Brick red of available locos, like the two fireless loco's and Hornby J94.
However the Bachmann Percy has had quite some work, new dome, funnel, smoke box door and the cab has been blanked off as al the wiring was showing through.


The reworked Percy
-
Nile's Mostly Freelance Bodging Bench - Pre-Grouping Locos
Nile's Mostly Freelance Bodging Bench - Pre-Grouping LocosWelcome to my workbench topic, where I will be mostly modifying RTR things.
This first post is now the index, the actual workbench now starts in the third post (first link in the index below).
Topic Index [35 pages so far]
LMWR 0-6-0 from Bachmann SECR C class
Busch HOf Feldbahn Gmeinder into a Plymouth loco
Back-dating a Bachmann Midland brake van (before Bachmann did)
Bachmann Midland compound for LMWR
LMWR 2-4-2T from a Bachmann LYR 2-4-2T
LMWR 4-4-0 from a Hornby T9 4-4-0
LMWR 2-8-0 from a Bachmann S&DJR 2-8-0
HOn30 2-4-0 from a Minitrains Fiddletown & Copperopolis 0-4-0 with 3d printed parts
Midland 2P from an Airfix LMS 2P with a Comet chassis
Bogie coach from two Hornby 4-wheel coaches
Midland 1F from a Bachmann LMS/BR one
Hornby 'H&B' van on Bachmann chassis
Mainline LMS coach cut'n'shut to WMR
Triang Polly + Electrotren chassis - LMWR
The 'Shepton' Mallet - Micro-Ace HOn30 conversion
Midland 3F, back-dating the Bachmann model
GWR 9700 3d printed body + Bachmann chassis
LMWR 4-4-2T from a Bachmann LYR 2-4-2T
LSWR '700' no.316 - mainly repainting a Hornby model
Converting a Beattie well tank to EM gauge
Re-motoring an Oxford Rail Adams radial
MiniTrains Porter 0-6-0T - adding a tender
MiniTrains Baldwin conversions
Triang clerestory coach conversions - 6 wheel and all third bogie
Oxford Rail LNER cattle wagon mods
Oxford Rail LNER 6 plank open wagon
Bachmann LMS cattle wagon for LMWR
Bachmann Wickham trolley to 009
Minitrains Bagnall wing-tank 009 loco
Back-dating a Hornby LSWR 700 class
Oxford's Adam's Radial - Reposition motor and add daylight under the boiler
WMR 0-6-0 from SECR C class (static model)
Repainting a Hornby SECR H class grey
Radio controlled van in 4mm scale
LMWR cattle wagons from Bachmann LMS ones
LMWR 6-wheel brake van from Oxford & Parkside parts
WMR BG from Mainline coach parts
LMWR 4-wheel full brake from Hornby clerestory parts
WMR 4-4-0 with 3-D printed body and GBL tender
LMWR small horsebox from modified Parkside kit
WMR small horseboxes from a GWR Beetle kit
Repainting and Detailing the Hornby LSWR Brakevan
A Triang TT tank wagon conversion
Hornby LSWR (and other) 3-plank wagon mods
-
Nile's Mostly Freelance Bodging Bench - Pre-Grouping Locos
Nile's Mostly Freelance Bodging Bench - Pre-Grouping LocosOnto the next project, a small loco. This is something I bought t'other week.

It's a Triang Polly/Nellie thingy.
It runs ok, but it would need new wheels as the flanges are far too deep.

The inspiration for this conversion was a picture posted by Corbs of his Polly on a 0-6-0 chassis. I happen to have an Electrotren 0-6-0 that I haven't done anything with.

It has a very nice chassis.

That is the right size to for Polly.

A trial fit shows it will fit, but the front steps are in the way.

So I removed them.

The new chassis allows the body to be lower, with the buffers at the correct height.

I reckon this will make a nice shunting loco, with a bit of detailing.
-
Roswell Mill
Roswell MillDisembowelling a General
“The General” (or a loco that may once have been The General, but has been rebuilt at least three times since) is now in a museum at Kennesaw, which was once known as Big Shanty and was famous as the starting point of the Great Locomotive Chase.
A photo of the remains of a loco, alleged to be the General, after General Sherman's visit to Atlanta in 1864.
My original intention was to buy a cheap General on e-bay and backdate it a bit, but the more I researched, the less the model seemed to resemble a civil war loco. With the 5’ gauge and with the very lightweight track of the period, simply plonking the loco onto standard HO track seemed like a poor representation. My normal modelling is to EM gauge and the idea of building track to non standard gauges is not too scary, so I began to think about building track to 17.5mm gauge (i.e. 5 x 3.5mm). An early experiment in track building is at
http://www.rmweb.co.uk/community/index.php?/topic/89233-southern-broad-gauge-track-or-ho-scale-on-175mm-gauge/&do=findComment&comment=1555920
complete with a debate about what to call the resulting gauge.
Returning to the General, I rapidly came to the conclusion that something drastic had to happen to the chassis. The motor sits in the tender and drives the loco through a thing like a telegraph pole that runs through the cab. The motor itself is massive and looks as though it has been recycled from a B52 aircraft; I am sure that it is very powerful, but it does cause the tender to assume a very bulky outline just to hide it. Finally, close inspection showed up some small cracks in the loco chassis, which suggest that it is suffering from something like mazak rot and might not stand up to much rebuilding. A new chassis was therefore a no brainer.
I have tried to reverse engineer a chassis that follows the profile of the original, but made of thin brass strip which will increase the space available between the frames – particularly with the extra millimetre on the gauge. I started by soldering four thicknesses of strip together, to provide both coupling rods and the rocking beams which will hold the driving axles. Pilot holes were drilled for each axle and the two pairs were then separated, to be fretted out with a piercing saw to achieve roughly the right outline. The rocking beams were then attached to two more pieces of strip and a further hole was drilled for the cross bar that would provide the bearing for the rocking beams. The holes were opened out as appropriate, in the case of the rocking beams, to provide for axle bearings. Frame spacers came from spares provided in a recently completed kit.
The most promising motor/gearbox combination appears to be a small Mashima motor with HighLevel Road Runner Compact +. I tried it a number of different ways, but have ended up driving the rear driving wheels, with the motor sitting over the leading drivers. The space inside the General body is really quite limited – both because it is a relatively small loco in HO scale but also because Mantua cast it out of a pretty solid lump of mazak to provide weight over the drivers. There was therefore some fairly brutal surgery to remove a little bit of the lump in order to provide the necessary space.
The need to remove metal from the body was not only to create space for the motor and gearbox, but also to make room at the sides for the new broader frames. This required much of the support for the splashers to be removed. And since the footplate also needed to be removed, the whole section up to the casting line ended up having to come out, splashers and all. In short, a classic case of getting onto a slippery slope. Since the final photos in this series, I have been fabricating a section to fill in the gap and some splashers to attach in a more realistic relationship to the wheels.
The original body and chassis compared to the replacement chassis, motor and gearbox.

The new chassis, showing the approximate position of the motor.

The rocking beams that will take the driving axles.


Keep on grinding! Removing enough metal in the boiler to get the motor and gearbox to fit.

There will need to be some backhead details.


What is left by the time that you have removed half the firebox and coned section of the boiler.
To answer David's question above, the carrying wheels have come from NWSL (superb service) but no steam driving wheels appear to be available in P87 profile, so I have used Alan Gibson P4 profile - hence my comment that standards would be "about P87". I appreciate that this concept might be theologically unsound and, if I were modelling to P4, I might be excommunicated at least or expect a visit from the inquisition. The acid test will be to construct 3 or 4 turnouts that 2 locos and 5 freight cars can negotiate - I am not worrying about interoperability with all those other HOb5 modellers! I have also looked at 3mm and 2mm scale wheels as possible options to run on code 40 track.
Before anyone gets too impressed by all this activity following on so rapidly from the original post, I have to confess that this is a catch-up posting, describing work that has been going on on the back burner for a couple of years.
Best wishes
Eric[Edited to ramble on about wheels]
-
Transforming a Bachmann Trains "Thomas" locomotive
Transforming a Bachmann Trains "Thomas" locomotiveI think the cab window and cab door issues are fairly easily rectified with a small drill and a flat needle file, the black under the tank extension is easily painted on, the coupling rods are probably not worth doing. The bunker will be a complete nightmare to reshape as will the front buffer beam. It is quite possible that 2 X Hornby Thomas 0-4-0 T bodies might be a better starting point than the Bachmann as the front footplate looks more TV like than the Bachmann. The illustrator drew the E2 front end but not the rear so either the front buffers are too low or Thomas had a huge rear buffer beam like a GW 45XX. The whistles will probably have to be made up from scrap bras
Glaring errors are the wrong shade of blue and the oversize wheels on the Bachmann look very wrong. The lack of cab fittings is very noticable as the cab is stuffed with motor. I would re wheel and remotor the chassis first so the cab fittings crew and boiler backhead can be modelled.
If a convincing Thomas is required, then the illustrations are not a reliable guide. We know Thomas lost his drooping front end when he had an accident somewhere in the first dozen or so books and Rev Awdrey himself modelled Thomas in this condition with a Stewart Reidpath 0-6-0T then an modified Triang Jinty.
I have seen 1915 as Thomas's building date so with heavy general overhauls at 10 year or less intervals there can have been little original left by the 1950s when Rev Awdrey wrote about him. I suspect he was mistaken for an E2 because of his extended tanks and stylish drooping front frames, but clearly he was a much smaller engine.
Probably an unsuccessful experimental engine as with the very limited depth above the rear axle under the firebox he may well have been built with a marine firebox. He has a very short wheelbase, and little space for cylinders and crank axle. I suspect the cylinders and cranks were not unlike Stroudley "Terrier" and Thomas relied on a high boiler pressure for his power. Those very short connecting rods would have given poor starting torque, and might well explain why Thomas hated shunting and was sent to run a branch, Lowering the boiler pressure and changing to a locomotive type boiler still with a shallow firebox would result in the Thomas of the 1950s albeit that he would have had the flat footplate not the drooping 1915 type normally modelled. Sir Topham Hatt was well known for snapping up a bargain so Thomas was probably very lucky to be bought for Sodor instead of being scrapped for the war effort.
Edward seems to have been completely rebuilt with a NER style cab on a Furness Loco, James looks like a GSWR 2-6-0 to me, probably bought from the scrap line at Carlisle Currock in the 1930s, Gordon seems to be the unsucccessful Gresley 1915 4 cyl Pacific and Henry is a real enigma. Henry is supposedly a Black 5 built in 1915. Now that can't be right. He had a bad crash and was rebuilt we know, but what was he originally. I reckon old Jock who worked at NB Loco co had an extra set of HR River bits made by his mates and sneaked them out in the basket of his bicycle after work. They had to make it look a bit different so management didn't twig so when they erected it in Jocks shed on his allotment they straightened the rear footplating and altered the cab a bit to make it look different. The cylinders and valve gear in the illustrations back this up and when he crashed Henry was probably patched up with a Stanier 8F or a tapered number 2A Royal Scot boiler that the LMS / BR were building just post war for retrofitting to the remaining parallel boiler Scots and Patriots.
I have been researching the railways of Sodor but sadly detail is sparse. I get that Henry provided cover when Gordon needed repair, like 49 did for Cardean on the CR but I still don't understand what happened when Thomas needed repair, was Daisy kept solely as cover for Thomas? If so how did the the 70 seat Bubble Car cope when Annie and Clarabel could take about 120 passengers?
-
Scaling a Triang 3F
Scaling a Triang 3FSo, how did this all come about?
I have engaged in a little eBay shopping of late:
- I decided that only having one Hornby LBSCR / Southern E2 was indecent. They have become a bit like Hornby / Triang B12s and Mainline / Bachmann parallel boiler Royal Scots - I feel guilty leaving a broken pile of bits "unrescued".
- Being tight, over the past couple of months I have bought up a few non-runners and job lots of scrap that included something E2 related as cheaply as possible. The idea being what's saleable in the rest of the job lot be cleaned up and resold to cover costs. Irrepairably damaged or warped bodies will be painting practice...sadly that's the vast majority, so I don't see much cost covering taking place..!!
- After seeing the healthy combination of fine looking wheels, generic underframe detail and running qualities of the China produced 0-6-0 SSPP chassis as found under the current Railroad 0-6-0s and Thomas the Tank engine (albeit recently even further improved in the past couple of years with a solid rear axle and no traction tyres), I decided I needed to "standardise" on that.
- I now have four E2s to detail and build up, all for a fairly reasonable outlay (about the same as a Railroad Jinty off a shop shelf). But I hope sale of the original X-03 powered chassis's can recoup some of that outlay.
Amongst the terrible disasters I've acquired were:
1. A Triang Jinty (handpainted in GWR colours) for a tenner - from the photo in the listing I could see the current Chinese wheels giving away that this was a suitable chassis. What I received was a Triang Jinty body perched backwards and very high on a mangled Hornby SSPP chassis, all held together using a very Heath Robinson concoction of bent aluminium scraps, big bolts, tons of Evostick contact adhesive and pieces of MDF..! Apologies if the builder reads this, but it looked awful.
2. A Triang 3F loco body was acquired around the same time on a whim. I was going to pair the 3F body to a Triang chassis with some 1980's wheels, clean everything up and pass it on. I think this one was about £4 (no one was silly enough to bid over my opening bid). Painted in thick gloss green and with a copper painted dome, damaged cab roof, no steps and what appears to be a huge rivet pretending to be a chimney. Nevertheless, regardless odd any dimensional inaccuracy (I haven't checked) it looks like a Midland 3F
I judged the Triang Jinty body is little more than scrap (cracked in several places and the Evostick has attacked the plastic quite badly). It will donate it's steps to a straight body with no steps that came in a job lot of scrap bodies I got recently. The Hornby (China) 0-6-0 SSPP chassis was initially a disappointment too as it's baseplate was missing all the retaining clips (very common it seems) and had been brutally drilled in several places to accept big (M4 or larger) bolts. After a clean-up, fettling of bent con-rods and removal of tons of Evostick it ran okay-ish.
I decided to combine the above late model Hornby 0-6-0 chassis with the Triang 3F body and see how good I can make it (same wheelbase as the original Triang chassis so wheels line up with splashers, but the motor will not be in the cab). If anyone is going to copy me, the use of a Hornby China-made chassis is quite important as I'm lowering the body onto the chassis to make it scale height. Older 1980-1990's type Hornby chassis will also move the motor out of the cab, but use wheels with coarser flanges - that would make life rather more difficult when it comes to lowering the body onto the chassis. Even with it's much finer flanges, I can already see I will have to do some "easing" of clearances underneath the Triang body with this chassis.
The outlay in total should be about £20-£25 (including a new motor and postage costs); much less than the beautiful Bachmann model..! I haven't worked out how to get hold of a cheap Deeley tender though (I won't be pairing it with the Fowler-esque tender Triang used to supply). And I may need to buy an aftermarket chimney (but from where?). Everything else will come from the scrap box.
Finally on to what has been done. This is all essentially "structural" engineering so far, to mate the Hornby (China) SSPP chassis with the Triang 3F loco-body.
1. Dunk the Triang body in a freezer bag and cover in Mr Muscle oven cleaner spray to strip the paint. Wear decent rubber gloves and do this in a very well ventilated room...that's nasty stuff. It took about 5 hours with a couple of rather messy scrub-ups under running water, but removed the thick green paint and an equally thick layer of red paint, even lifted the Triang printing. Mr Muscle doesn't always shift factory finishes completely (although I haven't yet tried leaving the item to be stripped for more than 10-12 hours).
2. Fettle the chassis as described above - it does really need a new motor though as the existing one runs, but the Evostick glue seems to have got inside it and so it's not "happy" despite my clean-up efforts. Sadly those motors are not serviceable like a Ringfield or X-04 - they either work beautifully or they are about to go to metal recycling...but they can be had for about £4.50 new at the moment. I also think one of the wheel-sets may need re-quartering (to be confirmed once I have fitted a motor that runs nicely).
The photo's show:
- The body after paint removal. The only bits left are a little by the dome, the smokebox door numberplate and where the buffers were; everything else is gone!! Mr Muscle oven cleaner is thoroughly recommended for ovens and paint removal on plastic models!
- The chassis after clean up, Evostick removal and attempted service. The plastic underframe was binned and a somewhat less damaged one installed in it's place. I forgot to take a photo before I cut off the extensions at the front and rear of the chassis block and what was left of the clips from the replacement (damaged, but not too badly) plastic underframe. The chassis block extensions both had had their screw holes hugely enlarged (off centre too) which is why this chassis was not destined to go under an E2 body. There's a complete one of these chassis in the background that shows what one should look like.


-
Show us your Pugbashes, Nellieboshes, Desmondifications, Jintysteins
Show us your Pugbashes, Nellieboshes, Desmondifications, JintysteinsOn 03/06/2020 at 10:57, SweenyTod1 said:I'm very impressed with the cylinders, double slide bars crosshead etc. Where did you source them from? They look so much better than my J93 offering. Are there any suppliers of such components out there as I don't want to buy a complete chassis just to get the motion parts.
Tod
Thanks Tod
I can't claim any originality here. I picked up some of the technique from others in this thread. The sliders and crosshead are Hornby spares, part of a valve gear set for a 2-8-0 Class 28xx loco. I got them here:
https://www.petersspares.com/index.jsp?searchStr=X8834W
There are probably better alternatives out there - something a bit smaller, maybe. Anyone?
The cylinders are scratch built from plasticard and sections cut from the barrel of a disposable propelling pencil - the sort you buy in packs of 10 at the supermarket.
Alan
-
Show us your Pugbashes, Nellieboshes, Desmondifications, Jintysteins
Show us your Pugbashes, Nellieboshes, Desmondifications, JintysteinsA little choppy needed on the body or chassis but this is a rough plonk, no chop
-
Show us your Pugbashes, Nellieboshes, Desmondifications, Jintysteins
Show us your Pugbashes, Nellieboshes, Desmondifications, JintysteinsThat seemed to work.
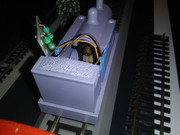
Ok, as for the budget chat, I like to do things cheaply. However, I was gifted a watchmakers lathe and some bars of brass. Very lucky indeed, so I set about making a chimney and saftey valve cover. I am a total beginner, so it was a shart learning curve, but due to lockdown, my only help was youtube vids (thought some were very good).
Those on the ngrm forum I appologise for duplication, but thought this might be of interest here:
Untitled by Ben Newland, on Flickr
Taking inspiration from home made valvegear/motion, I cut up a fosters can and some nails:
Untitled by Ben Newland, on Flickr
Untitled by Ben Newland, on Flickr
Untitled by Ben Newland, on Flickr
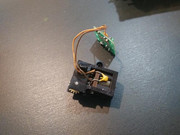
I replaced the motor with an N20 one from ebay (2000 RPM). It runs very slowly indeed so here was a test run:
Untitled by Ben Newland, on Flickr
By the way, it took lots of fettling and arranging to get the motion to run smoothly, but worked well in the end
It really is incredibly clunky really, when you compare it to RTR stuff. I very much feel on the "Hornby 4-wheel coach" end of the modelling spectrum but it has been fun to do, and still feel it looks better than without slide bars etc:
Untitled by Ben Newland, on Flickr
Keeping to the cheap theme, the smokebox door was made out of the plastic food lid (was a bit thinner than my 0.5mm styrene):
Untitled by Ben Newland, on Flickr
The front coupling was made from 0.9mm dia brass rod bashed with a hammer then with a blob of solder:
Untitled by Ben Newland, on Flickr
Following advice from a ngrm member, I used brass rod for the tension lock coupling:
Untitled by Ben Newland, on Flickr
Cab detail is basic at the moment, some sewing things for water gauges and the top of a nail for a valve - next time I might buy brass etched handwheels, but this was on a real budget:
Untitled by Ben Newland, on Flickr
Untitled by Ben Newland, on Flickr
And finally, here she is on my microlayout - I did fork out for Fox transfers for the lining. It was my first go at lining, but again, youtube proved valuble. Patience and luckily my hands don't shake:
Untitled by Ben Newland, on Flickr
Funny looking beast, but I'm happy with it.
I need to add a brake handle (which I have from a Dapol pug kit) and a reversing lever, then add some coal, and weather it.
I don't know if the blow by blow account is really suitable for this thread. I am sorry if not. However, often when I see stuff on here, I want to know how they did it.
All the best to you pugbashers out there. Have fun. I'm already taking inspiration from here for my next one!
Ben
-
Show us your Pugbashes, Nellieboshes, Desmondifications, Jintysteins
Show us your Pugbashes, Nellieboshes, Desmondifications, JintysteinsThought this would be appropriate been working on this little . Not finished yet need frame extensions, smokebox door and touch up painting. If anyone knows what paint Hornby used for this please let me know I need it.
Any suggestions/improvements would be appreciated :)
-
Show us your Pugbashes, Nellieboshes, Desmondifications, Jintysteins
Show us your Pugbashes, Nellieboshes, Desmondifications, Jintysteins
Two for the price of one pug, it always seems that the old Airfix kit 2-6-2 prairie had interesting tanks the front edges are rounded just like the old Beyer Peacock ones so there is the start of a new conversion model.
After separating the chassis from the body it leaves quit a short 0-6-0 section perhaps a small pre-grouping loco even then after some measuring and plonking this boiler on top which was meant to have been a wagon load model, inspired an even older style 0-4-2 loco emerged.
Currently, it has the colonial-style cab for an Australian engine I mocked up with cardboard. The footplate is the Airfix one, cut down once and cut done again until it looks right. This model engine was looking too small but when compared with a drawing of a Great Northern mainline 0-4-2 they were very petite engines.


 ) ended up turning this into a much larger and ongoing project, though it's still very enjoyable.