luke the train spotter
-
Posts
1,444 -
Joined
-
Last visited
9 Followers


Recent Profile Visitors


luke the train spotter's Achievements
2.6k
Reputation
Bookmarks
-
M7 to Caledonian Class 19
M7 to Caledonian Class 19For a while now I've trying to get hold of a Hornby M7 to to use as a basis for a Caledonian Railway engine. I've seen a few conversions of the older M7 into the classic class 439 (as preserved at Bo'ness) but I thought I'd try building the earlier class 19. Ten of these condensing engines were built in 1895 for newly opened Glasgow Central Railway. Originally painted in the normal blue passenger livery they were repainted black around 1900 due to the conditions in the tunnels which is the condition the model will be finished in.
I can't find any freely avalible pictures of a class 19 but it similar to a class 439 but with lower side tanks and a full width coal bunker, but still the narrow cab inbetween. The main alterations to the M7 will be a new rear bogie (shorter wheelbase and smaller wheels), rebuilt cab and coal bunker, round off the tops of the side tanks and replace/add some of the fittings. I've been able to source most of the parts needed from the ever helpfull Caley Coaches but still require a dome and a few other small parts.
I've made a start stripping the body and fitting a decoder, not as easy as it could have been! It would appear that Hornby have made a few changed to the model since its first production run. Instead of the side tank wieghts being held in by a screw under the filler cap, they are now glued in place making them rather difficult to remove to create space for the decoder. Despite this I still couldn't quite get the Hornby decoder to fit so ended up hardwiring it in instead.

I've also made a start on building a new rear bunker from an old tender top (not sure where it came from) that I found in my scrap box.

Ross
-
How small? Tiny layout with big ambitions
How small? Tiny layout with big ambitionsHello fellow rmwebers. You may have seen my current thread called Drum Lane in the micro layouts section. This is another project I've just started - they did say that micro layouts are addictive! This time I've tried to see how small a layout I can fit in the size that would be classed as hand luggage on a modern mainline train. The idea behind this was is it possible to make an oo gauge micro layout that I could actually carry onto a train as hand luggage and operate it whilst the train is moving without any special permissions or need to book an extra seat so i can take up lots of space. Now this presents many challenges particularly the size constraints, need for interesting operation, the strength of the layout and also the fact that it will need to have the potential to be battery powered as not every modern train has plug sockets available for passengers (cough cough northern pacers) . Now I've already made a start on the baseboards and track plan but I haven't taken any photos yet. Apparently I'm not allowed anymore layouts at all but I snuck away this afternoon and started another one - fortunately non of my family are on rmweb so as long as I keep my trap shut and make sure the layout is small enough to hide away in a cupboard until i get rid of one of my other layouts i should be fine. Fingers crossed! So tomorrow i shall get some pics up for you all. Any questions/comments/feed back more than welcome. Thanks for looking folks

-
Whatever happened to British Oak?
Whatever happened to British Oak?For the fourth edition of The Beginners Guide to 2mm Finescale Modelling, published in 2006, I built a small layout "British Oak" as a worked example of the techniques described in the book. Here's the description of the layout from the book:
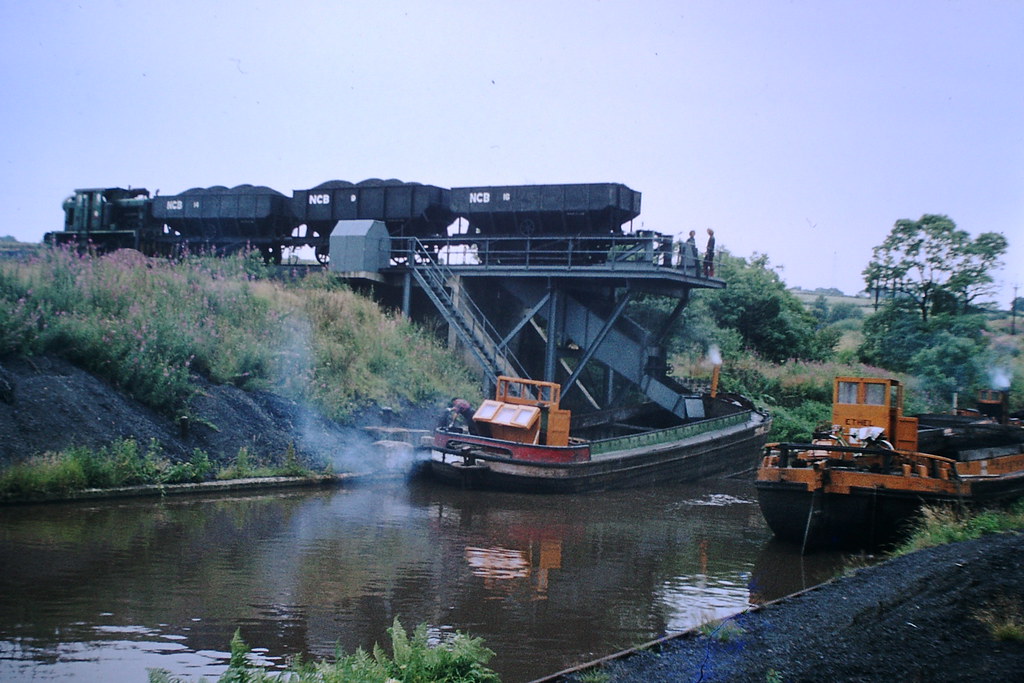
British Oak is located in West Yorkshire, alongside the Calder & Hebble Navigation canal at the Eastern end of the Denby Grange colliery line. Coal was transported from the pits to the canal, from where it was loaded into barges for onward transportation to Thornhill Power Station. It was a surprisingly long lived enterprise, lasting in service until the mid 1980s. The scene is a highly compressed version of the scene in reality, but it contains the main elements from the overbridge to the canal drop. It makes a conveniently self-contained little diorama which can be operated by a single loco and a few wagons, either hoppers or bottom door mineral wagons. All the necessary items are available in N, ready to run or in kit form. The line was home to an ex-LMS “Jinty” sold by BR into industrial service which sported an unusual black, orange, blue & red livery. Other plausible locomotives would be an Austerity (J94) saddle tank and for later years, a variety of small diesel shunters. The inspiration for this layout came from “Model Railway Planning and Design Handbook” published by Santona Publications in 2004 (ISBN 0 9538448 5 4) where it is featured in some detail, including scale drawings of the canal staithe.
The design was by Paul Lunn and I've been in correspondence with Paul, who's provided some useful additional information, including an NCB subsidence plan!
At the close of the book, the layout reached the stage below:

and was fully functional from an operating perspective.
One of the problems I had with progressing the layout beyond this was a lack of photos. I had a handful of pictures from various sources but a few more would have been welcome. As is the nature of things with the Internet, pictures have a habit of turning up and most recently these series of images turned up on the Flickr photostream of "ee20213", so whoever you are, sir or madam, you have my thanks!These images are dated 18th July 1973 and are very useful scenic references. Elsewhere in the photostream are views of the canal and surrounding landscape.
https://www.flickr.com/photos/58585785@N08/with/36173168172/
The loading staithe was rebuilt in the 1960s, replacing an earlier wooden structure. The new staithe was designed to accept bottom door wagons whereas the earlier one relied on tipping end-door wagons.Anyway, back to the layout in question. A start was made on some scenery. The staithe itself had already in constructed in a basic format as it was a necessary part of the layout. Plastic sheet and Evergreen I-beam sections were employed and the handrails came from a Peco turntable kit.
The next piece to be made was the overbridge forming the scenic break. Girders were made from some I found in my bits box, I think they may be Peco but the packaging was long gone so I cannot be sure of this. The line running across the bridge will be modelled as the disused Barnsley branch. The foundations of the trackbed are a length of brass bar. An attempt was made to represent timber baulks going across the bridge using the old style cast chairpins but as will be seen later, this wasn't terribly successful so the track was subsequently relaid. Nowadays, the Easitrac moulded chairs would be the automatic choice but British Oak predates this by some years.
The next step was to "block in" the scenic landforms using Dow Corning Floormate 25mm thick extruded polystyrene insulation. This was my first attempt at using this material. I had expected the 25mm material to be easy to work. Unfortunately that proved not to be the case. The major difficulty was persuading the blocks to adhere to each other. Previous experience with expanded polystyrene led me to believe that PVA glue would be OK. It was not, as the impervious structure of extruded polystyrene prevented the PVA from drying. I changed over to a solvent free contruction adhesive and pinned each block together with cocktail sticks. The end result was not as neat as I'd hoped it to be. The following series of photos shows the process.
The end result wasn't too bad and is certainly strong. Hindsight shows that it would be better to shape the forms from larger blocks of the material. I also tried to work too cleanly, using knifes and a hot wire cutter. Sawing and shaping with a Surform would have been a better, if messier, technique.
The polystyrene was covered with strips of heavy duty paper towel then painted with tinted Sandtex textured paint. This helped unify the whole landscape. I like using Sandtex, it provides a good base for subsequent scenery, it's strong and flexible so less susceptible to damage than filler based substrates. Unfortunately the lack of neatness in the shaping left the whole thing looking rather unsatisfactory and to be perfectly frank, was rather demotivating.Something would have to be done. For some considerable time, British Oak languished inside its storage box while other projects occupied my attention.


 One of the problems I had with progressing the layout beyond this was a lack of photos. I had a handful of pictures from various sources but a few more would have been welcome. As is the nature of things with the Internet, pictures have a habit of turning up and most recently these series of images turned up on the Flickr photostream of "ee20213", so whoever you are, sir or madam, you have my thanks!