


michl080
-
Posts
230 -
Joined
-
Last visited
Recent Profile Visitors


michl080's Achievements
273
Reputation
Bookmarks
-
Good model shops in Colorado & New Mexico
Good model shops in Colorado & New MexicoCaboose Hobbies in Lakewood(Denver). I would check with them first, as the former 'Largest Model Railroad Store in the World', is under new ownership and has moved.
BTW there is no Duty on model railway stuff, it's the VAT that gets you, plus the handling fee.
Here in the US we have the very opposite situation, where it is cheaper, and sometimes faster, to buy stuff from the likes of Hattons, rather than from mail order businesses based in the US.
Regards,
John P
-
Good model shops in Colorado & New Mexico
Good model shops in Colorado & New MexicoWhilst not as big as its former location Caboose (hobbies) is still a large shop. We visited last year using the light rail then a connecting bus thta has a bus stop very close to the shop. Plenty of parking if driving there. You cant miss the place with the full size caboose outside.
-
1951 Pullman Scratchbuild in 1/32
1951 Pullman Scratchbuild in 1/32On 26/09/2019 at 23:03, Steadfast said:Absolutely fantastic attention to detail! I love all the little touches you've gone the extra mile with, all very worthwhile.
Thanks Jo - I appreciate the comments. After what seems like a couple of years of inactivity I finally seem to be getting somewhere. It's been a long haul, but this has been on my to do list ever since I designed the 1:1 car so I am determined to get it completed... one day!!!
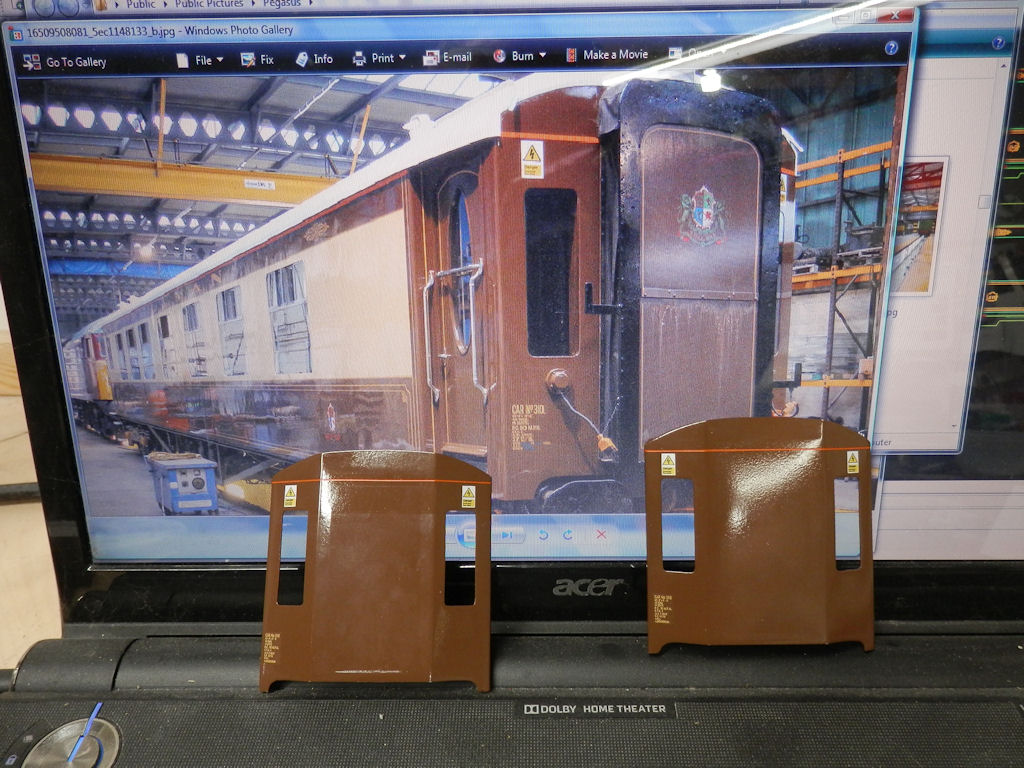
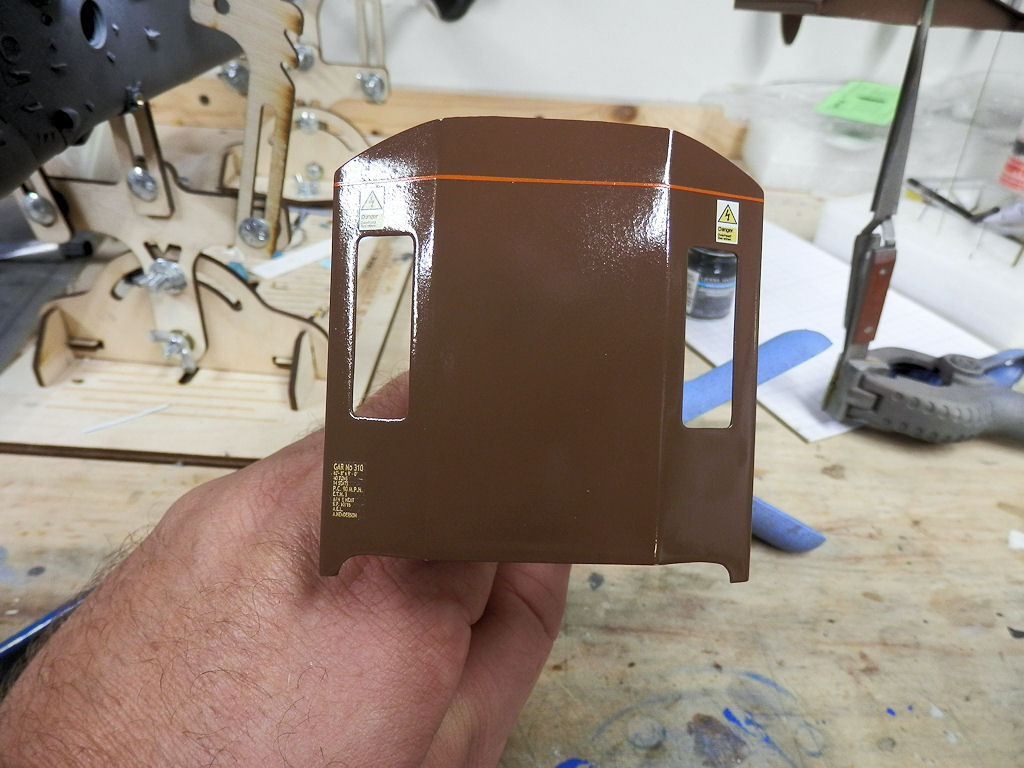
I was determined to get into some actual construction - but there were a few things that needed done first. Part of the test sheet of transfers contains a few items that I need on the end vestibule (I'm sure you've heard me harp on about that many times) - I was about to cut those out and apply them when I noticed (or rather remembered) something about Pegasus - there is an orange line around the car just below the cant rail... something to do about electrical danger. Now, if I had been bright I would have had a transfer made up for that orange strip but no, I had completely forgotten about it, and it needed done before I go sticking transfers all over the place. Nowt for it but to paint the blighter.
How do you paint a narrow very narrow orange strip along the length of a train car ? Thank heavens for Aizu tape is all I can say.
I took a roll of 1mm wide tape and applied it along the top edge of the sideframe. Not an easy task keeping that straight by any means. It was a case of stick it down at one end then slowly, carefully grabbing the tape with tweezers about every 20 - 30 mm and touching it down with the tweezers, then using a cloth to make sure it was burnished flat. I got that as straight as I could and both sides probably took me a good 30 minutes to get that first strip of tape down.
That was followed by Aizu 0.5mm tape. Again, starting off and using tweezers every inch or so to touch the tape onto the surface before burnishing the length that had just been applied. The tape was lifted and relaid many times along that length as I needed it to nest right into the previous strip.
This shot shows the 0.5mm tape being applied - minus the hand with the tweezers as cludgey old me can't operate tweezers and a camera simultaneously in the same hand
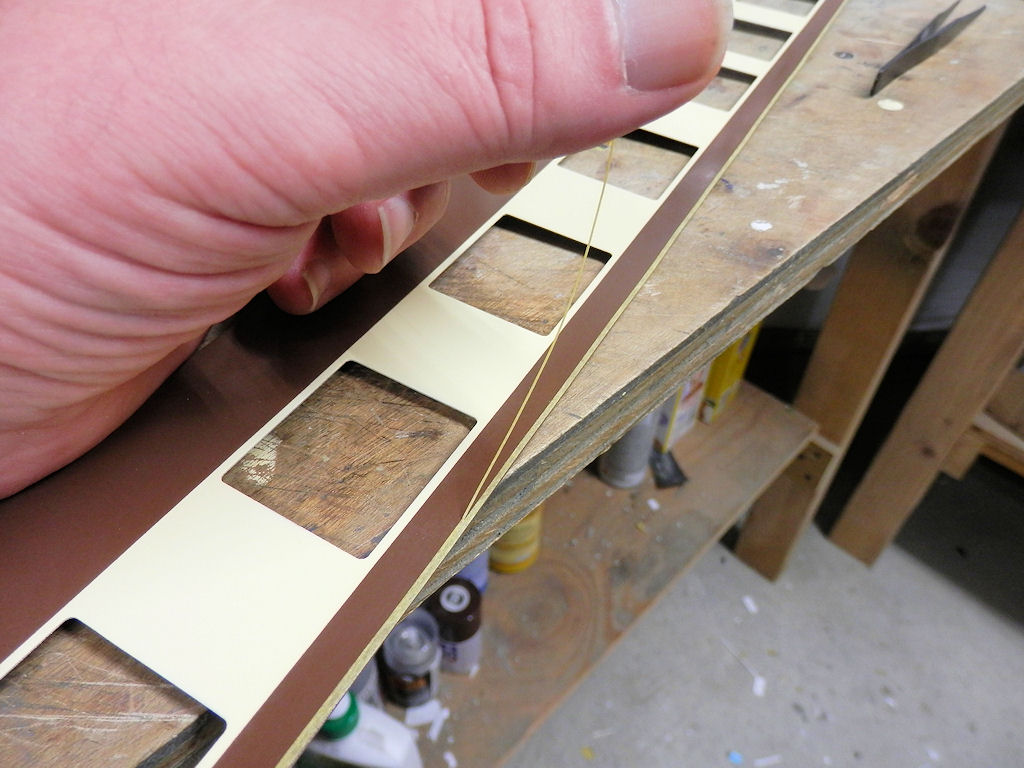
Once that effort was completed and my eyes had recovered, it was time to lay down a third strip. Again Aizu tape but this time 2mm tape (I think) - but again had to be very closely aligned with the 0.5mm I had just laid down. Once I was happy with the masking... grab one end of the 0.5mm and rip that stuff right off again. Yes really. All that time and effort to get the tape nicely in position, only to remove it again. Isn't this modeling malarkey fun ?
As you can see for yourselves here - this leaves a nice 0.5mm wide gap between the first and third strips of tape. It should be a relatively even gap as well although I did spot a couple of places where it seemed to narrow down. No! I wasn't going to do it again!

I mixed up some orange gloss with a few drops of dark grey just to take the brightness away from it. Then it was time to attack...
I was taking no chances this time - my Tamiya tape with integral blast screen was used as protection.

The same process was applied to the end vestibules.
Painting was quite frightening - it was very difficult to tell how well the orange has covered the umber, and I was very conscious of laying the paint on too tick, and also terrified it would cover well enough. Once the masking was removed I'd never be able to mask to the same lines again and it would be a strip back and start again job. Again!
I was extremely nervous when it came time to remove the masking - this paint job has been my worst nightmare and I didn't want to botch it up this late in the game. Thankfully the masking came away cleanly (another nice thing about Aizu tape) and the orange seemed to have covered sufficiently. Strong enough to be easily seen , and not too bright.
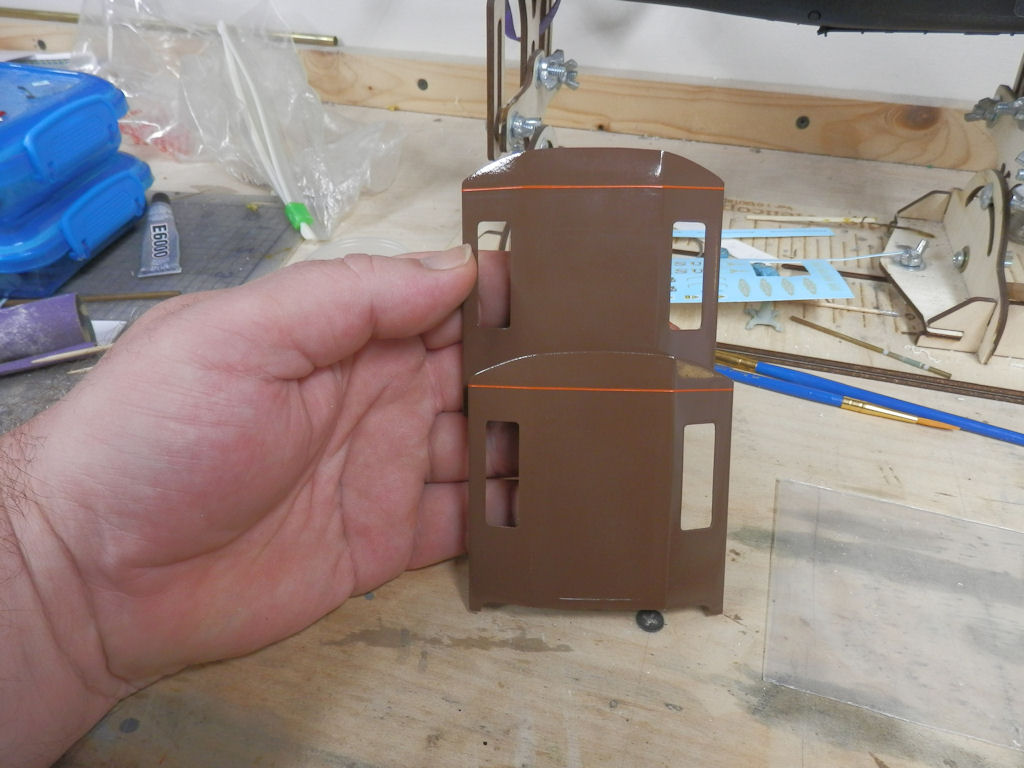
Ditto on the side frames
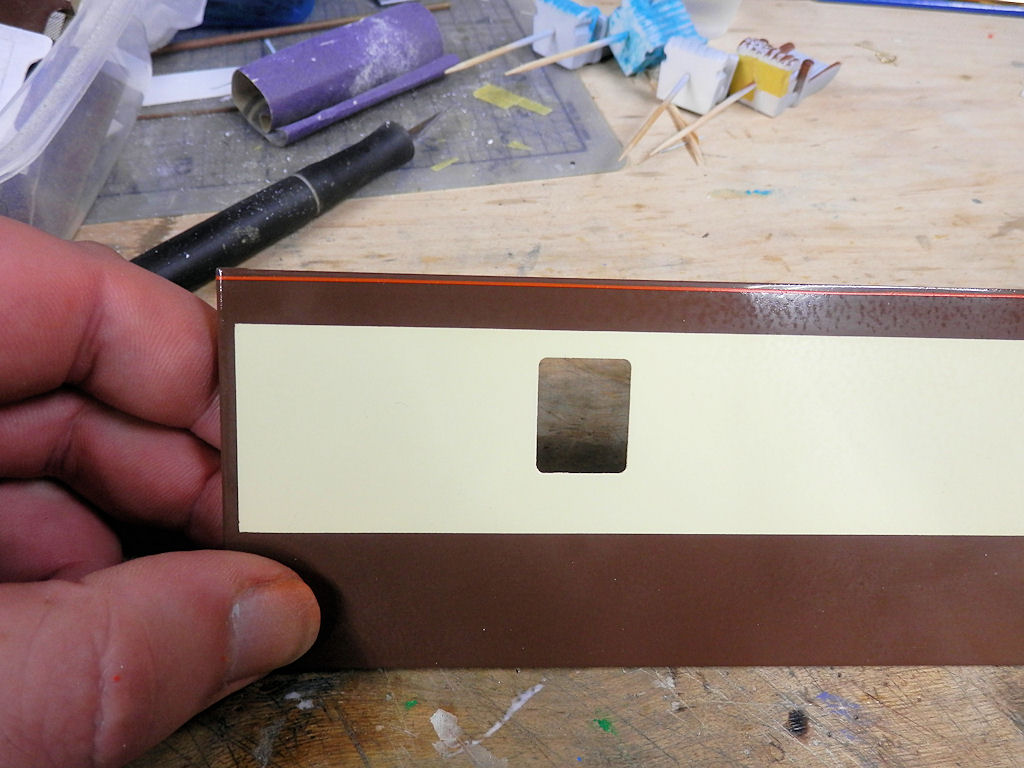
It even looks to be relatively straight.

Large sighs of relief
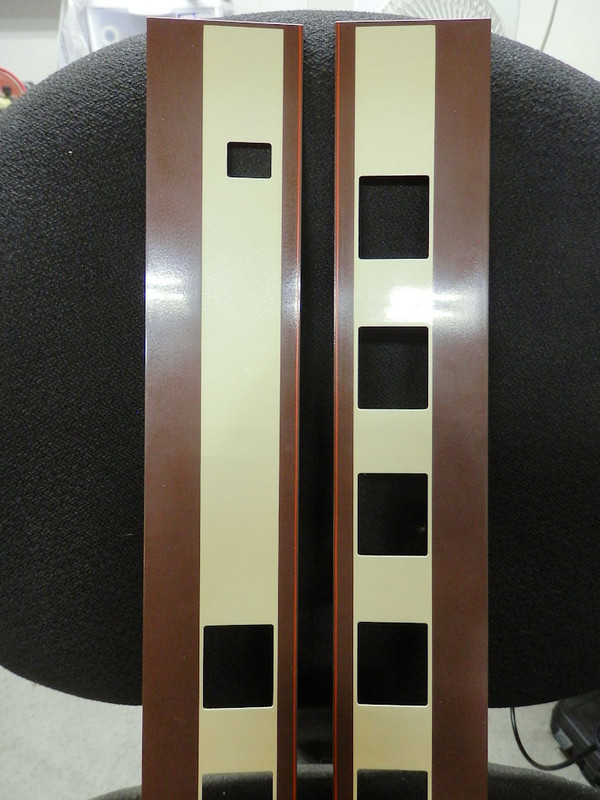
Then at long last, the transfers were applied to the vestibule ends
Another milestone reached. I can now actually begin some construction on the ends now. (well, as soon as I have clear coated these first!)
I seem to remember I had built a whole bunch of stuff made and ready to stick on... now where did I put them. Where's that safe place again?
(later that week...)
Having had a whole night to themselves, it was time to add the final coat to the transfers. First the orange line was given a quick buff with micromesh to remove the ridges left my masking. Then another pucker moment or two was had while I applied the final clear coat to the vestibule ends. I ended up with two tiny spots but so tiny even I am not going to get bothered by them.
Everything looks great but you can still catch the carrier film in the light quite easily. It seems a gloss coat will not make the carrier invisible which is a bit of a bummer, but I don't know that there's much if anything I can do about that.
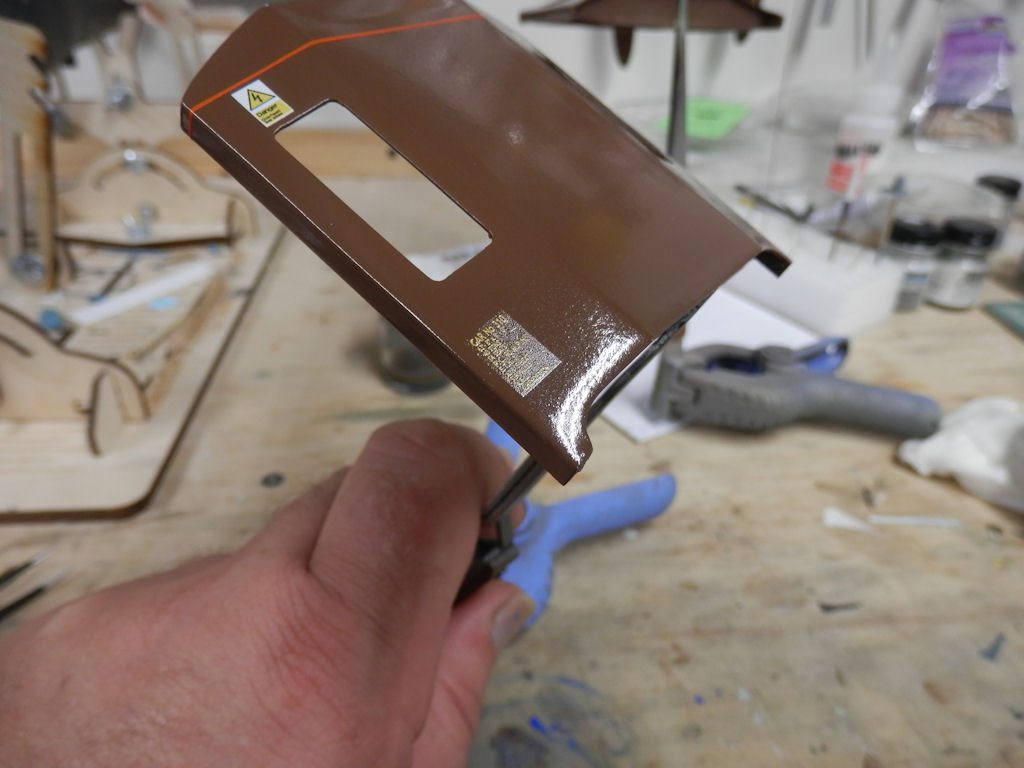
I'm guessing this is a limitation of the media. I don't suppose it matters much on most of your normal teensy weensy train scales, where it would hardly be seen. However scaling up to this size means that I do need large areas of carrier film to hold the numerous parts of the decal together - ergo, there are going to be large areas of carrier film present.
On the vestibule ends I am not too bothered by the carrier but on the side frames where there is such a large expanse of flatness.... the transfers could make or break the build. Well, maybe not that drastic, but it would be a shame if I couldn't make a decent enough job with these to make it look presentable.
Quality though, is unquestionable. These decals are astounding.

I'm leaving the clear coat for a few days to harden up properly before I start handling it (just in case).
-
Photogrametry
Photogrammetry Software - a result..Hey trensetters, is anyone using photogrammetry software, such as Agisoft Photoscan, Reality Creator, 3DF Zephyr or similar?
I'm thinking they could be a more reasnably priced alternative to buying a 3d scanner.
Leaning towards either Photoscan or Zephyr given they are a one-off cost compared to the monthiy licensce fee of Reality Creator, but RC does look fast and accurate.
So was just wondering if anyone has experience of any of the above or similar, in regards to making scans of smallish items (and maybe people and pets if they stay still....) for 3D modelling..
Not interested in cloud based uploading solutions....
-
painting modulo figures
Figure paintingHopefully, what follows is a pretty straightforward guide to my method figure painting - but going beyond the basic colouring to get something that looks fairly nice. This is how I do it, and it works for me, but obviously everyone has their own way of doing things! I thought it might be interesting or useful to some!
STEP 1
I always give my figures a black undercoat. Here we have two test subjects, from ModelU, which have simply been sprayed with a black primer.

STEP 2
I work my way outward for my painting, so I paint the skin tones first. For my figures, I use Vallejo flat flesh. For some variation, I might add a little 'basic skintone' or 'dark flesh' (both Vallejo). It's probably not obvious in the photo, but at this stage there is no need to be neat, as long as the paint goes where it needs to.
STEP 3
Again, I'm working my way out from the skin tones, so the next colour on these figures was the shirts. other than around the bits where this meets the skintone, again there is no need t be neat. Throughout the process, if you do get a bit of overlapping paint, you can always do some touch ups later on.
STEP 4
Continue working outward with the layers. I tend to leave things like ties, hats, shoes and hair until last. It's probably worth saying that as you get into the last layers, or the details such as ties, having a finer brush will help to keep the paint where it's meant to be. I tend to leave any touch ups until all the basic colours are on, as there's nothing more infuriating than having to repaint the same fiddly bit 6 or 7 times because you slip with another colour!
This is where a lot of people will say that their figures are done, and call it a day - so we're going to look at how we can go a bit further and improve how they look!
STEP 5
My next step is one that requires a steady hand, and can be missed out if you're not happy with it! I pick out the eyes and lips (only on 7mm+ scale models). You'll need a very fine brush too!
The lips are done with a mix of 'flat flesh' and a dark red colour, to something that just looks a little pinker than the skin tone. This is then applied very thinly to the mouth area.
The eyes are done with a mix of white with a touch of flat flesh - just to avoid bright white eyes! This again is applied in a thin mix to the eyes. A touch of 'black grey' is then added to represent the pupil. It's not easy to get this right, but it's easy to just go over the eye with your flesh colour and try again if you get it wrong. You can also add a little flesh colour around the edges if you think your eye looks a bit big. Practise makes perfect - and the better the quality of the moulding, the better the result will be! It's hard to get a photo of this step that really shows what's been done, so we'll go to the next step. (You can see in the image below I've also picked out the buttons on the waistcoats.)
STEP 6
This is the first shading step. I use Citadel/Games Workshop 'Nuln Oil' wash, which is the only black wash I've found that works well as a wash for figures. This is just applied directly from the bottle over all the clothing, but not the skin. It can be added to the hands if they're resting on the figure, or if your figure is holding something, or has very crisp hand mouldings! When adding this wash to white, I do tend to thin it down, as otherwise it takes the brightness off the white. It's also worth adding a spot of 'Nuln Oil' to the ear to give it some depth.
STEP 7
Next up, we need to add some shading to the skin. I do this with Games workshop 'Reikland Fleshshade' wash and 'Seraphim Sepia' wash. I apply the sepia first over all the skin areas, and then the Reikland (which is a red colour) with a fine brush to the areas that need a bit more shade, such as the fingers, and around the nose, mouth, ears and eyes.
You can subtly build up the effect, but be careful as it's very easy to go over the top! If you need some extra shade, it can be worth doing the deepest shaded areas with a very light touch of 'Nuln oil' (no photo here, but the photos below show this step to good effect)
STEP 8
Once all the shading is done and dry, I drybrush the highlights with a lighter shade of the relevant colour. So a grey for black clothes, or mix the original colour with a touch of white. This highlighting is very lightly dry brushed over the relevant areas. I'll also just give the upward facing parts of the face a very light dry brush with either 'flat flesh' or 'basic skin tone' just to bring out the highlights.
The whole model is then given a coat of AK Interactive 'Ultra Matte Varnish' which is the best matt varnish I've found so far!
And that's pretty much all there is to it! Before varnishing, things can look a bit odd, as there's a variation in the glossiness of the paints, but the varnish helps to bring everything together nicely! If the figure is wearing glasses I'll give them a bit of gloss varnish mixed with a tiny amount of light grey paint to give them a bit of a glint.
I hope this has been helpful! Feel free to ask questions. The only additional things I'd say I use other than whatever you use for painting your figures are the 3 Games Workshop/Citadel shade colours - 'Nuln Oil', 'Reikland Fleshshade' and 'Seraphim Sepia'.
Here is a cruel close up of one of the figures from above, and the rest of the cast that were painted at the same time using the same techniques - I like to paint figures in batches!
If you have any questions, feel free to ask, and I'll answer what I can!


