


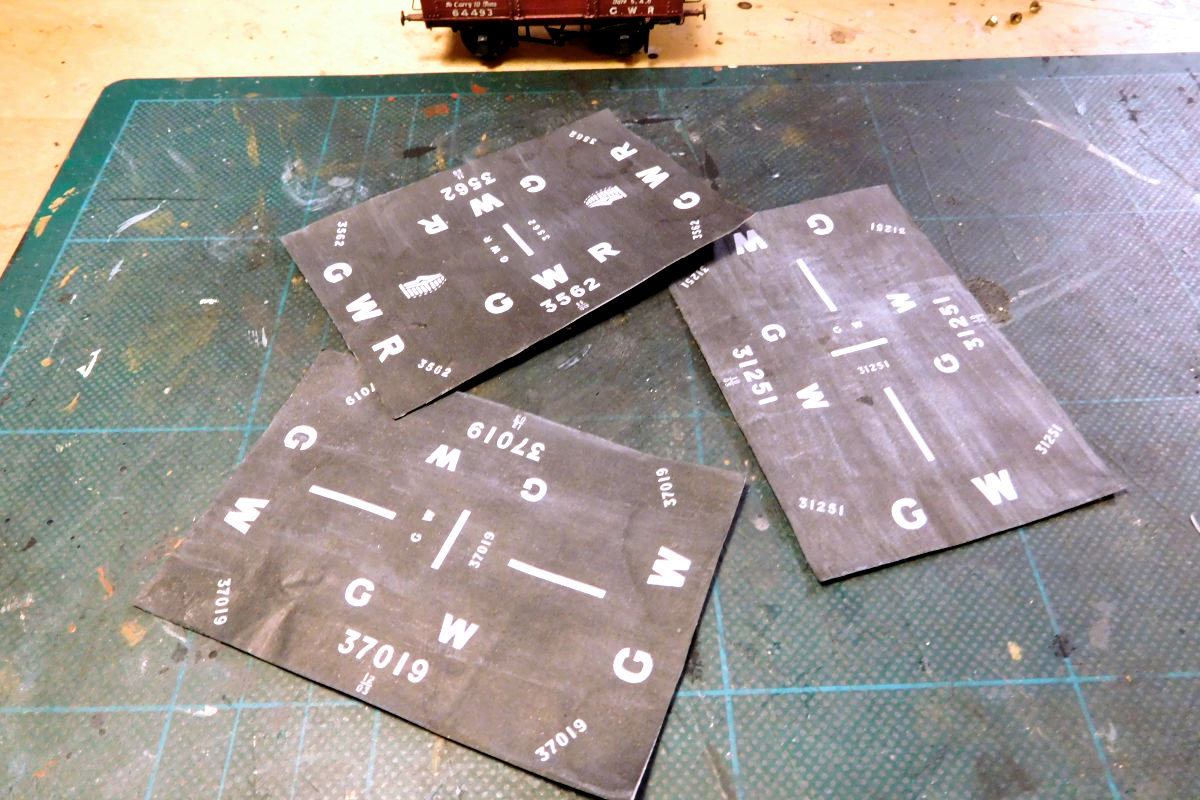
willsheldrake
-
Posts
27 -
Joined
-
Last visited
willsheldrake's Achievements
51
Reputation
Bookmarks
-
OKWB - Kato Portram evolves to a Lister
OKWB - Kato Portram evolves to a ListerKenton,
I've only just found the photo's, meant to post my efforts about a month ago.........
Firstly, curiosity got the better of me and I just had to have a look inside, this allowed me to solder to the pickups without risking meltdown. Also I wanted to feed the wires out of the end of the chassis in order to attach a resistor. After a bit of trial and error I settled on 470 ohms, this gives about the same top speed once the Kato circuit board has been removed. Said resistor is hidden inside the white heatshrink sleeving. I then had to grind a couple of slots out of the footplate underside for the wires.


Next I set about soldering up as much as was safe to do without other bits dropping off in the process. Detailing is an assortment of plasticard sections and various thicknesses of brass wire, the lifting eyes are thinned down handrail knobs. Curtains on the canopy fitted one are tissue paper painted with thinned down PVA to make them a bit more durable. The tissue is then scrunched up and flattened out again before being rolled up and superglued into place.


Finally a lick of green paint with a little oil staining around the bonnet and some mud and dust elsewhere. The driver was sustituted with a figure from Montys Models, I used their 'MSV53, Marine Worker' and adjusted one arm and leg to line up with the pedal and brake wheel.


-
Copper Wort
Copper WortAfter a lot of experimentation we have arrived at the following conclusion for the setts colouring. The original colouring idea of an enamel wash pictured on an area in the August post on page 5 was removed as the wash tended to give a mushy finish so I started again.
Ground setts were originally laid at Bass brewery using Mountsorrell setts which although light grey colour would of had a very slight pinkish tone in them. The following technique was originally tried out on a section using pink (dark tan polish) but the contrast was too severe, so I removed the finish for the second time and started again.
For the final version I painted the top surface with a mix of Humbrol enamel 64 light grey and 33 white, trying not to fill the joints, before lining all the joints with Humbrol tank grey 67 / earth 29. This gave a flat but sharply defined 2D finish. Then when dry and using a clear shoe polish and Humbrol weathering powder brushed on the polish/weathering mix. After a severe buffing-off with a soft cloth the surface will be sealed with Humbrol Satin Cote varnish. This took it up to the 3D finish as pictured below. The weathering/polish mix tended to fill in the tiny surface blemishes and dressed the edges of the setts where the painting had (purposely) missed. This was all Julie's idea.
The trackwork on the second picture has been ballasted with fine sand laid dry. Pva /water 50/50 eye dropped on, before painting on a thinned coat of Humbrol 67/29 enamel mix and dry brushing off when dry with Humbrol 110 wood / 64 light grey. The rail sides are painted in Humbrol tan 62. Ballasting in these yards would have been done using gravel and ash I believe, as proper large stone ballast was reserved for the proper railways elsewhere..


-
Show us your Pugbashes, Nellieboshes, Desmondifications, Jintysteins
Show us your Pugbashes, Nellieboshes, Desmondifications, JintysteinsCan I add to your troubles?
BR80 and Kerr Stuart Joffre or Decauville Progres. Little and Large.


-
Black Drake Wharf
Black Drake WharfI've been trying to figure out for myself your process for producing such wonderful brickwork on the factory buildings, but -
I think I'm going to have to ask you to run through this if you wouldn't mind, please!
Looks like a base coat of brick colour, followed by a light wash of Sandstone masonry paint for mortar, followed by painting a variety of ? onto each individual brick?
I've actually used a couple of different methods. First the buildings are given a coat of good quality flat matt emulsion paint from testers brought in the usually DIY outlets, the sandstone paint in the picture is used for the stonework but is a bit too coarse for mortar, For the factories I have used either Laura Ashley Powder Grey or Craig & Rose Tintern Stone, previously I have also used colours from the Farrow & Ball range. I have tried the cheaper emulsions from Crown, Dulux etc., but they seem to flake off plastic or resin surfaces during the second stage of the process.
For the Northlight style factory the brick colour was added using pencil crayons in a limited range of reds & browns. The ones I have are from the Faber Castell range, these are rubbed across the surface of the bricks holding the crayon at an angle, so the colour goes on the face of the bricks, but doesn't go into the mortar courses. Talcum powder is then 'pounced' onto the surface using an old large brush and then brushed / blown off. This has the effect of blending the colours and also matting the surface. For a more weathered finish, weathering powders could replace the talc. The 'muck' on the windows is a mix of talc & grey weathering powder.
Initially I used this process on the larger factory building, but I wasn't entirely happy with the result, so some of the bricks were then overpainted with thinned Humbrol 70 Brick Red which darkens them, but still allows some of the original colour to shown through to provide some variation. I then went over the brickwork with some more talc. The brick arches above the windows were coloured using a grey crayon and the stonework is the smooth finish Weathershield sandstone.
For a building in the centre of the back scene I am experimenting with painting the bricks with brick red paint and then rubbing the crayons over them to add variety and depth of colour, before using the talc.
Hope this helps, let me know if you need any more info,

-
The Light
The LightI have been progressing the carriage build.
I decided to paint the interior partitions and seats, and the passengers prior to assembly. I also adapted the seats for the first class with deeper cushions, wings and armrests formed from DAS.


Tonight i did a mock assembly of the body to see how the details will look once the body is assembled. Not bad I reckon.

I then traced the plan of the roof details onto the assembled roof

Next will be the carriage lighting. After that the instructions suggest assembling the body before painting and glazing, but I think I might paint and glaze the sides before I assemble the body.
-
Nile's NG Modelling
Nile's NG ModellingThanks William, in this case I used Revell Dark Green acrylic (363). I t was the closest I could find to the rest of the loco. Humbrol acrylics also get a look in at times.
-
Ladmanlow Sidings and other C&HPR locations
Ladmanlow Sidings and other C&HPR locationsI've been inspired by a number of layouts recently to attempt some overgrown trackwork.
So I decided that the siding on the latest module would be rarely used and therefore overgrown.
First thing was to mask off the rails and sleepers, as grass rarely grows on them.

Then the first layer of 1mm static grass was applied to neat PVA:
After the excess was hoovered up, hairspray was applied and some 2mm grass was added:
Then the masking was removed, and some 4mm grass was added further from the junction:
And finally some 10mm fibres were added:
Here's what it looks like with all the layers:
Gradually more overgrown, the further you get from the junction.
I decided to leave the paint on the rail head as well, so that it looks like rusty track.
I'll leave that to dry a bit, then see what some rolling stock looks like on it.
Thanks for looking,
Al.
-
Sedbergh, as a preserved railway
Sedbergh, as a preserved railwayA few more bits, some bolster wagons. There’s a BDA for the pway lads and a bobol C for the goods rake. Job is to make the decks look a bit more like wood and make them a bit more tatty.
Wood effects are humbrol enamels, first a base coat of a light tan (121), then given a coat of their grey wash. Dry brush with grey 28 and brown 29 in the direction of the grain (ie side to side on the wagon). Just needs a coat of Matt varnish because the wash decided to dry glossy for no reason. Rust effects are good ‘ol Typhus corrosion and Ryza Rust from Games workshop, steel highlights are Leadbelter (again GW).


Owain
-
The Osney Story: 0 Gauge Cameos and Dioramas
The Osney Story: 0 Gauge Cameos and Dioramas1 hour ago, Barnaby said:Hello Rob that's some fine work and becoming more and more atmospheric as each build gets added and painted.
I'm interested what your take is going to be with in-between the track areas? I'm just at the stage where my track is wired up and ready to ballast and as I want a similar look to what you have started I'm interested in where you are going next with the remaining bare cork. I have a pile of cork tiles I can use to infill my spaces and looking at your results I think I will.
I can see you have ballasted your track and painted it having first added some cork infills between the tracks, I was going to ballast every where but that would add a lot of weight to my boards, your use of cork will lessen the ballast weight. But what are you going to apply to your cork as covering I've done some test painting of bare cork without much sucess?
I'm looking for a worn, worked area so may mix some garden soil and ballast with some hard standing patches [Wills plastic plates] on top of my cork coverings, as I say what are you proposing to do.

Many thanks
Hi Barnaby,
You ask an interesting question. I keep looking at the area between the tracks, and it is a large expanse, relative to the whole layout, and thinking about the very question you have asked, how do I finish that. I am also after a well worn, unmade surface. If you look back at the first page of this saga there are some photos of Bude Quay, which has the sort of finish I am after.
I think most of my layouts have used the same approach to the ground level. I use the cork tiles to bring the surface up to sleeper level. This helps to create the allusion of older trackwork but also, as you say, reduces the amount of ballast needed and the potential weight. I have used a skim of modelling clay in some areas and various types of small ballast to portray gravel but in small quantities. I will try and differentiate between the well trafficked parts of the wharf and the little used areas using variations in the colour. I like using washes and build up the colour until I get what I think looks ok. I may also incorporate some puddles, we'll see.
I haven't really been able to answer your question, I know, but most of my modelling is based on seeing how it goes on the day, so I can only say, watch this space.
Regards Rob
-
Hard Standing, Done
Hard Standing, DoneWell, another three evening sessions have now resulted in FULLY inset trackwork
") Building 1 is also stuck down.
Building 1 is also stuck down.

I'm going to sort the electrical connections next I think. I have my standard 2 pin din socket so any controller I have can be plugged in
-
Fake news and wagon sheets
Fake news and wagon sheetsOn Twitter today:


Anyway, enough fooling around. The wagon sheets (aka tarpaulins) seen in these photos are the preliminary results of experiments with aluminum foil. My original plan was to go the whole hog with cords and ropes etc, but as I started fitting sheets to my wagons I got cold feet. My wagons are nothing special but I like to look at them, and here I was covering them up!

So as a compromise I have decided - at least for the time being - to go for removable “shells” made from 0.05 mm aluminum foil and a paper skin, as seen above. The foil is self-supporting and maintains the shape, so the sheets do not need an actual load beneath them. This means I can add and remove them as I please. They can also be exchanged across different wagons of similar dimensions.
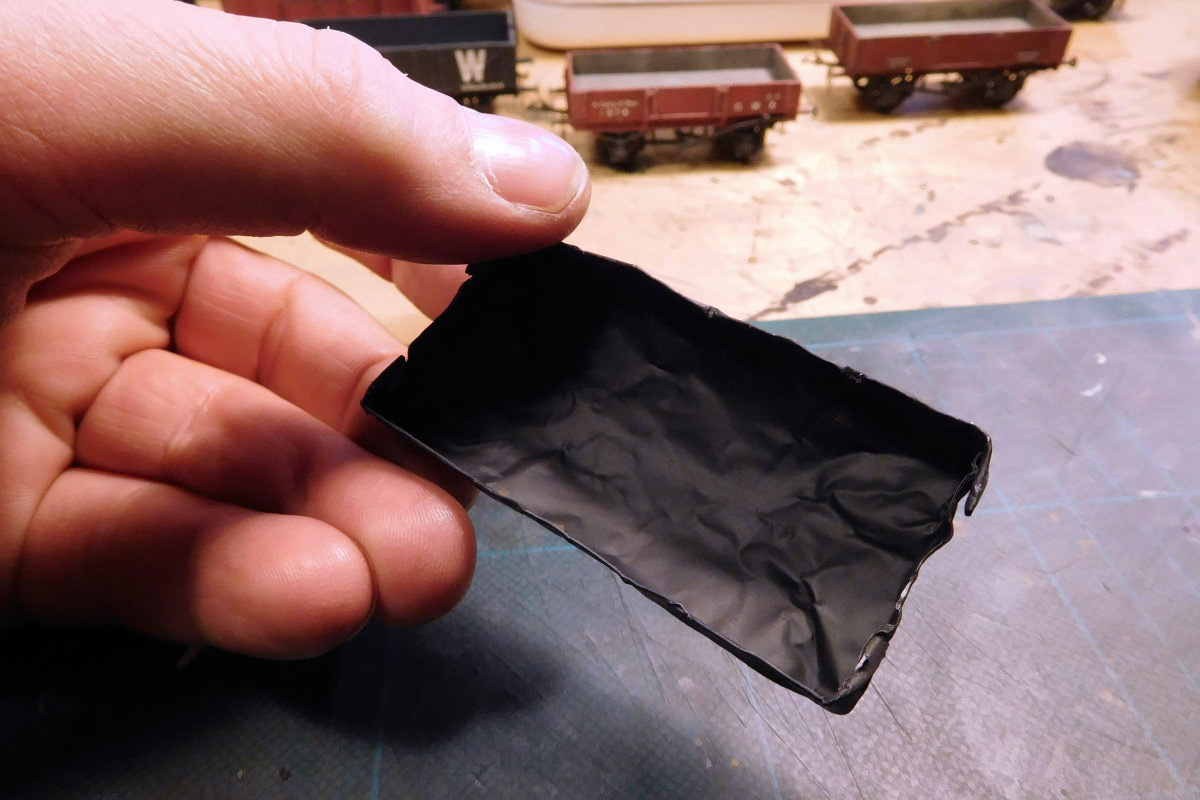
I initially used pre-primed foil for military modellers from Dio-Dump, but then found that I could buy the "raw" foil here in Denmark and prime it myself. Incidentally I also tried ordinary kitchen foil, which is thinner and therefore easier to fold, but it is also more fragile and less self-supporting than the 0,05 mm stuff.
I first tried using transfers directly on the foil as seen here (details in my workbench thread), but making the transfers was a bit time-consuming and they proved difficult to weather.
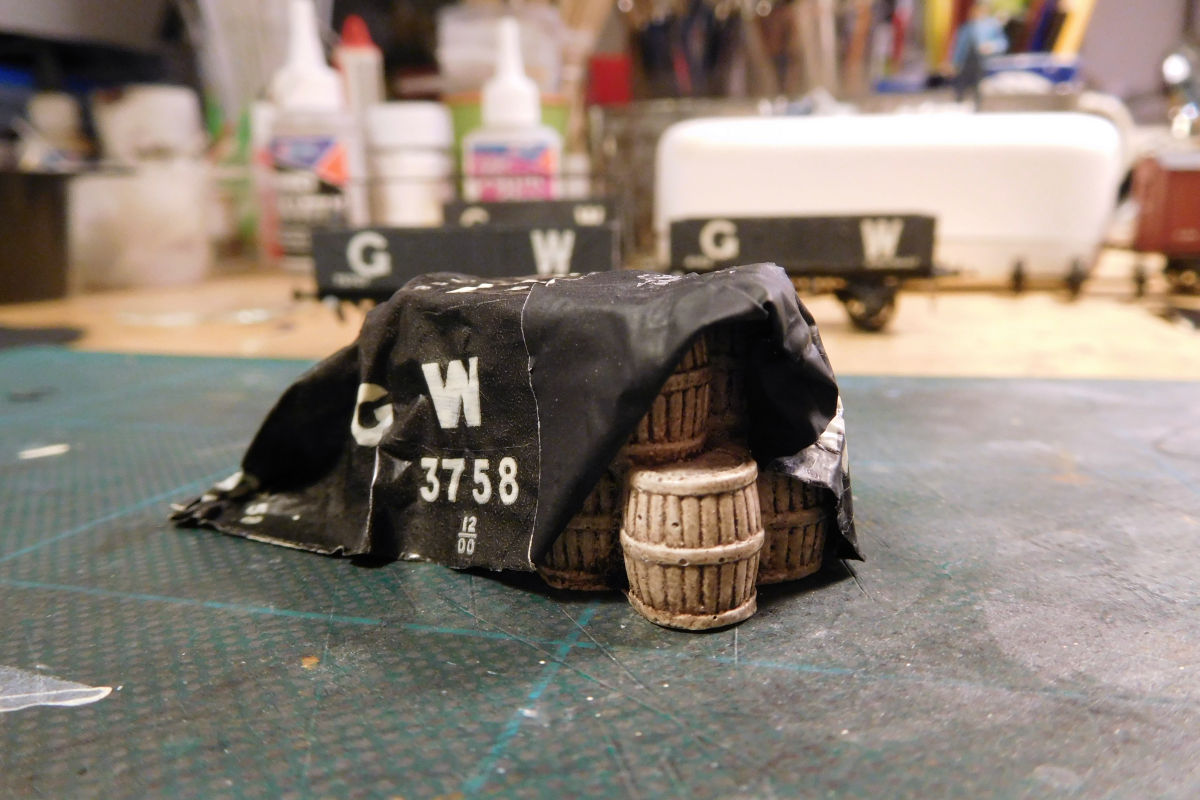
So instead I printed the designs onto ordinary printer paper, gave them a coat of varnish and glued them to the foil with a thin layer of PVA. The designs are appropriate for the 1900s and were originally drawn up by Ian – thanks again Ian!

The sheets were then folded and “massaged” into shape, and given an oily but not too shiny look. This was done by applying 3-4 layers of matt varnish, brushed over with weathering powders when each coat was almost dry (hence the mess!). Perhaps this technique could also be used to give the popular ready-made sheets from Smiths a less “paper”-like look.
Photos show that in general the sheets were more “loose” than one might think. They also show that at the ends, the top was usually (but not always) folded down first, with the side flaps folded down outside that. The foil-plus-paper combo does add thickness to the sheets, so folding them naturally is not always easy and requires patience.

Above are the sheets fitted to two 5-plank Opens to diagram O4, the first GWR designs to feature sheet rails. The sheets look older than the wagons, I always overdo the weathering! The biggest compromise is of course that the sheets have no cords or ropes. For the time being I’m prepared to accept this in return for the ability to add and remove the sheets as I please. My excuse is that the sheets were normally tied down with short thin cords, which can be hard to see in prototype photos. Actual roping was only used on particularly tall or bulky loads.
Even so, the method is obviously a compromise and I may return to these experiments later to see what can be improved. For now I’m a bit tired of wagon sheets though. And politics. Plus, we still don't know the secrets of GWR wagon red. The livery instructions can't be found. I bet the Chinese have them. James, got a minute?
-
Pictures of Charmouth
Pictures of CharmouthWith the accelarated rush getting ready for Warley I stopped posting updates once I reached the painting stage. The new bits are pretty much finished so here's a few up to date photos.
There will always be more to do; one bit that's not obvious in the photos is the backscene. It had got quite faded and darkened over time, its alright for clouds to look dark and gloomy, but not the blue sky!
Using the B&Q colour matching, I bought a match-pot that was just a tad lighter and brighter than the backscene blue and repainted all the blue sky, gently feathering it in with the existing clouds.
What a transformation! It really lifted the effect, and made the whole layout look brighter and fresher than previously.
The use of daylight bulbs in order to counteract the hall lighting at Warley also helped enormously.
I am still doing bits to Charmouth, so I will try to keep this thread updated.
Dave.
-
Pictures of Charmouth
Pictures of CharmouthCladding for the shed is overlapping horizontal planks made from good quality card (0.6mm thickness) I ruled horizontal lines on the sides of the shed at 4mm intervals to act as a guide for gluing. The planks themselves are 5mm wide, giving a 1mm overlap. Glue was PVA, applied to each plank with a brush.
This photo shows the internal base for the roof in place.
The internal roof is made up of more foamboard, mostly offcuts.
Dave.
-
Pictures of Charmouth
Pictures of CharmouthNext job was to finish the roof.
Two pieces of 40thou styrene were fixed to the inner roof, large enough to just overlap the sides and ends of the building. Slaters Corrugated plasticard was used for the actual roof cut into 43 x16mm sheets, with nailheads embossed with a compass point. Fixed in place with the appropriate amount of overhang, between 1 & 2 mm.
The ridge cover is a length of styrene rod and a strip along each side.
Bargeboards are made from fine card, appropriately spaced out so that the meet the underside of the corrugated and hide the slab of the roof.
Sofit(?) boards, along the tops of the walls where the gutters fit, were made from plasticard and spaced so that the gutters (Evergreen 3.5mm half-round styrene rod) are fitted under the ends of the corrugated roof. The plasticard allows the gutters to be fixed with solvent.
Dave.
-
Pictures of Charmouth
Pictures of CharmouthWhile all this is going on, I'm taking the opportunity to add some details to the goods shed. Its never had any guttering, and I've been meaning to add a door to the rather plain slab-like end wall.
Its entirely wooden construction, plywood floor and false roof, while the walls are very thin ply with stripwood framing, clad in planked basswood sheets.
Its in three main parts; roof, body and legs.The legs are glued to a sheet of card thats been ballasted to match the ground cover, and in theory can be lifted out. In practice though its got accidently glued along the edges so has to stay put.
I hope the photos show the construction method, and how I've simply cut a hole in the cladding and added some more planked basswood sheet behind it to form the door.The method is probably a bit overcomplicated and unnecessary, but with long bolts holding it together I can detach the main parts and work on them on the bench if needed.
The steps are four bits of Obechi stripwood glued together and secured with Blu-Tac while the glue sets.
Dave.
-
Small, Broad and Totally Pointless!
Small, Broad and Totally Pointless!Just a small amount of progress today. I've soldered the centre fiddle yard track to the three sleepers I stuck down last night. It will be easy to adjust if I need to, and I'll stick more sleepers down once I'm certain it's OK.

A bit more vandalism to the poor old original layout! I'd had to pack the track to raise it to the level of the old sector plate, as it was quite thick, so now the packing needed to go. I've cut out a short section of the tracks, and stuck down a new piece of cork underlay. Once it's dry, I'll stick down new baulks, and solder new lengths of rail to them that will line up with the track in the fiddle yard. Only one hammer on the layout tonight!

This is the quay siding after the hammers were removed:

-
Inset trackwork on Keyhaven
Inset trackwork on KeyhavenI'm frequently asked about how the concrete effect was achieved on keyhaven and also crops up periodically in reference to "How do I do inlaid track work?" questions.
The inset track on Keyhaven Quay was achieved by use of cork floor tiles abutted to the side of the sleepers, these basic floor tiles, obtained from a DIY chain, near enough match the rail height of Peco Code 75 track. The inset section between the rails uses Fabfoam obtained from a craft shop chain and cut into 14mm wide strips; the foam comes in A4 sheets at around 20p a sheet so a little goes a long way and can be easily laid into curved track of any reasonable radius and is secured to the sleepers with Copydex, fortuitously this also matches the height of the code 75 rails.

The gap between the rail and the adjacent cork floor tile is filled with ready mixed flexible filler from a tube and smoothed over. Using a strip of plasticard on top of the sleeper ends will stop the filler subsiding into the gaps between the individual sleepers. The same filler is used to fill in any small indentations and cracks that are inherent in a natural cork product and smoothed off before being left to dry.


A weakness in my approach was to not put anything over the sleeper ends which led to a slight rippling in the filler as it dried out, a strip of card or plasticard over the sleeper ends would stop that happening. Once the filler is dry a smoothing over with light abrasive paper gives an even finish, the drying process naturally taking the filler down to just below the rail head thus making cleaning relatively easy.
The whole area is then sprayed with a suitable cheap stone coloured spray (Plastikote), concrete comes in a variety of shades but it's worth looking at the real thing before going wild, weathered concrete is probably a lot paler than anticipated when you pick up the spray can. Joints in the concrete are represented by carving lines into it with a craft knife and metal ruler, the lines are then drawn in with pencil. It's then down to you how you much you wish to weather the surface from that point.


-
Mixing Paint-specifically Humbrol colours to get bauxite
Mixing Paint-specifically Humbrol colours to get bauxiteI have been painting a batch of O gauge Bauxite wagons during lockdown. I have used Halfords red primer, Railmatch late and early bauxite and humbrol 133. My prefered method though is to use a darker base colour, Railmatch late as a preshade, then paint a lighter shade in the centre of panels, Railmatch early or Humbrol 133. You can of course add a bit of black to your favorite colour to darken to taste

-
Elsbridge Tramway Company: Elsbridge Town - NeilHB's layout
Elsbridge Tramway Company: Elsbridge Town - NeilHB's layoutA little bit of modelling accomplished today, just testing out my new Posca Paint Pens which were a Christmas present.
I’ve relined ETCo No.3, changing it from white to straw yellow:
I think it looks much better now with the yellow lining.
I then had a go at lining at the First/Third composite tramcar:
Not too sure about the lining around the windows, but I can always paint over it if needs be.
Then the fun started and I lined out the W&S Brake Third - the lining makes a big difference and I really like how this looks:
I need to touch the white up in a couple of places where the pen slipped, but that will be easy to sort.
What do you think folks?
-
Ballast
Lockdown Fen 4mm W&U(ish)Its a mixture of Woodland scenics buff and light gray plus some Green Scenes grey. IIRC the whole thing was very lightly airbrushed with Precision weathered sleepers - a very light brownish grey
Chris
-
Reproducing Varnished Teak - Improving Latest Hornby Thompsons
Reproducing Varnished Teak - Improving Latest Hornby ThompsonsThe Vallejo paints are excellant quality however are not so easy to source. As an alternative look out for the craft acrylic paints which are available in much larger bottles. "Pumpkin" was a close match to the Vallejo colour and at £1.99 represents good value:

This time I did not apply the Clear layer so kept the masking tape in place:

Graining then followed as before:


With the graining coat being performed using artists oils, drying times are more generous and there is no rush trying to complete the graining before the paint goes off. The layer applied is quite thin and the Liquin acts to speed up the drying. Typically the side is touch dry in around 8 hours so leaving it overnight is ideal.
Once cured the masking tape can be removed and another coat of Clear applied.
Anyway, that is enough for tonight. Tomorrow I will try and show how to represent a weathered appearance.
-
Reproducing Varnished Teak - Improving Latest Hornby Thompsons
Reproducing Varnished Teak - Improving Latest Hornby ThompsonsI said yesterday that I would go on to illustrate a weathered teak finish.
No great secret, I simpy use Model Mates dyes:

The dye is watered down and applied over the side and allowed to dry:

Once dry a wetted cotton wool bud is used to remove the stain from the panels:

Continue treating the other panels:

When dry give another coat of Humbrol Clear. You will end up with something like this:


If I was doing this for real I would line and apply transfers before using the dye.
Just the roof to do now!
-
Reproducing Varnished Teak - Improving Latest Hornby Thompsons
Reproducing Varnished Teak - Improving Latest Hornby ThompsonsThanks Mike.
And WOW! To the weathering/aging technique...that looks fabulous......unfortunately I've never seen or heard of the Modelmates products here in Canada. But it looks tremendous!
Gene
In the past I simply used heavily thinned Humbrol Black however you will be working against the clock applying it. I prefer the Model Mates dyes as they remain water soluble and can be removed it you do not like the effect. It might be possible to make something similar using black washable ink.
-
Reproducing Varnished Teak - Improving Latest Hornby Thompsons
Reproducing Varnished Teak - Improving Latest Hornby ThompsonsSo for those of you not able to get Modelmates dyes. I mention the old fashioned way of weathering: create a heavily thinned wash and apply.
The following shows the result. I took some Humbrol matt black, added brown and thinned using Humbrol thinners then applied to the panels. After drying a cotton tip was used with the thinner to remove the excess (as with the ModelMates) resulting is this:

First attempt at a weathered roof. Revell Anthrocite base with Humbrol Gunmetal dry brushed over it. Not really happy with the result.


") Building 1 is also stuck down.
Building 1 is also stuck down.


