


Jeepy
-
Posts
157 -
Joined
-
Last visited
Recent Profile Visitors


Jeepy's Achievements
173
Reputation
Bookmarks
-
SR 4 Wheeled CCT
SR 4 Wheeled CCTI got the transfers done using Cambridge Custom Transfers Sheet BL97:
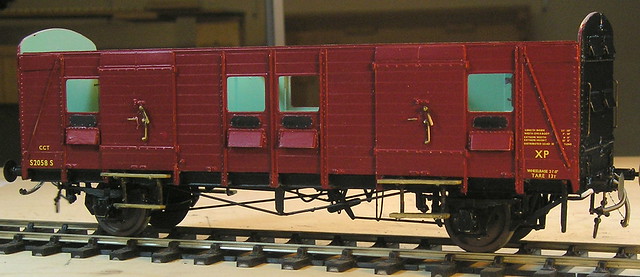 P1010001 by John Kendall, on Flickr
The transfers are very good and I am pleased with the results. I sprayed a coat of Dullcote to tone down the gloss.
Glazing next.A few words on the transfer sheet. There are transfers for 26 vehicles, but only three sets for this Dia SR3101 CCT. Two of the numbers are for 1951 builds. One is for a 1928 build. To be clear, there are transfers for 9 GWR CCTs of varying dia. There are 2 sets for the SR Ferry Service vans 2 for the SR bike vans and several for SR PMV of varying Dia. My opinion is that this is a useful sheet.
John
-
Semaphore Signals - 4mm Scale (Mainly)
Semaphore Signals - 4mm Scale (Mainly)What did you use to squash the operating wires(material? ) behind the arms etc please. Looks a neat solution to a problem area I have had on my builds
Hi Mick,
The wires are Nickel Silver, usually 0.3 or 0.4mm depending on length and need to push (buckling is always a risk).
I use a pair of flat nosed, parrallel action pliers.
They were made by "Maun Industries" and I bought them from Squires many years ago.
One of the best buys ever, I use them all the time.
The jaws stay parallel at all times, so they grip flat sheets etc really well.
(Pivotted jaws tend to only grip on the edges, particularly on thicker material.)
The action has a great mechanical advantage, so squeezing short lengths of wire is no problem.
Steve.
-
Southern
Southern Maunsell Coaching Stock discussionIntroduction
Of late it has become apparent that deciding which Hornby Maunsell coaches to buy to form into realistic train formations has puzzled folk on more than one thread. I've looked into train formations and Sets in some detail for the Treneglos layout and have a good collection of the standard texts (Gould and King) as well as some carriage working notices etc. None of these information sources is particularly easy to get a grip of so, from time to time, I'm going to add in posts looking at various different aspects of the real Maunsell coaches and their model equivalents.
Feel free to add into this repository or challenge anything I write - it's a complex subject matter and much is open to interpretation...
Background
Here's the headline points:
1. Southern coaches were either allocated to fixed 'Sets' or were deemed to be 'Loose' and available to be added into/onto Sets to strengthen them for periods of heavy traffic.
2. The Sets ranged from two coaches through to 8+ vehicles but there were generally fewer Sets as the Set length increased.
3. A train could be made up of multiple Sets - a 10 coach train, for instance, could comprise of 2no 2-coach Sets, a 5-coach Set and a loose coach. The Atlantic Coast Express (ACE) was a great example of a multi-portion train.
4. Just about every Set had two brake coaches - one each end (apart from some 2-coach Sets that had a brake (third or composite) paired with a composite or third).
5. It was common for portions of a long train to be dropped off or added en-route and for those portions to be taken to different destinations.
Now the outcome of all the above is:
A. A typical long train could contain as many or even more brake coaches than non-brakes.
B. The make-up and length of the train would vary along its route.
C. The length of individual Sets, portions and the train itself would vary through the season as additional strengthening Loose coaches were added for peak periods.
D. It is perfectly legitimate to tack an extra Brake Composite (BCK) on to the end of a Set or add one or more Corridor Thirds (TK) into a Set as strengtheners.
Complications
Issue 1: Due to route restrictions Southern coaches (pre-Bulleid) were built to 3 widths. R0 was 8' 3/4", R1 was 8' 6" and R4 was 9'. The important note for modellers is that both Hornby and Bachmann have only ever produced the full width R4 variety of Maunsell coaching stock (in 2mm and 4mm).
Issue 2: Maunsell coaches were designed in 1925 and that original design was tweaked until the final versions were completed in 1936. Four distinct 'body styles' appeared during this period (consider them as motor car facelifts - same mechanicals but different clothing). The important note for modellers is that both Hornby and Bachmann have only ever produced the initial 'low window' and first of the 'high window' body styles of Maunsell coaching stock (in 2mm and 4mm).
This means there are lots of Sets that can't be produced from RTR as they contain coaches that are R0 or R1 or the later two body styles. This significantly complicates matters but, as the majority of modellers aren't too concerned by this detail, the initial 'high-level' posts in this thread will ignore the different body styles. (It's important to me, so we will cover this later).
References
The standard texts on the subject include:
- Maunsell's SR Steam Carriage Stock by David Gould, Oakwood Press ref X37 ISBN 0-85361-555-1 (I'm working from the third edition 2000)
- An illustrated History of Southern Coaches by Mike King, OPC ISBN 0-86093-570-1 (I'm working from the 2003 imprint)
- Bulleid's SR Steam Carriage Stock by David Gould, Oakwood Press ref X40 ISBN 0-85361-4679 (I'm working from the second edition 1994)
Through this thread I'll refer to the coach types in shorthand using the following convention:
B = Brake
C = Composite (a coach containing more than one class of accommodation)
K = Corridor (with compartments)
O = Open (no compartments)
F = First Class
S = Second Class
T = Third Class (this was abolished and became Second Class in 1956 - so a TK became a SK)
Therefore a BCK is a brake coach, with a corridor and First and Third Class accommodation)
More to follow!
-
Southern
Wainwright C-class 0-6-0In Locomotives of the SE & CR, by D.L. Bradley, published by the RCTS, 1961, it says that No. 272 (built Ashford 2/1904, withdrawn 8/1959) and the batch built by Sharp Stewart, nos. 711-725 (12/1900 - 1/1901) were all fitted with both vacuum and (Westinghouse) air brakes. "The air pump of the Westinghouse being attached Chatham fashion, to the right-hand side of the firebox." So, of our list of December 1961 survivors, air pumps should be on 31717, 31719, 31721, 31722, 31723 and 31724.
Unfortunately, that's all the details appertaining to modifications and the only other relevant information I can find is that during the latter half of 1960 Ashford works gave general repairs to 31244, 31293, 31588, 31686, 31717, 31719 and that 31717 received new cylinders. It also mentions, on page 14, that "Tonbridge remained a bright spot, with 31588, 31590, 31592, 31684 and 31716 frequently working passenger turns to Brighton and Redhill and due to a continued shortage of motor-fitted tanks, occasionally even to Oxted."
Hope this helps.
All the best, John.
-
SR Rail-Built Signals
SR Rail-Built SignalsPryor's 'Pictorial Record of Southern Signals' which is my normal 'go to' for any questions on SR signalling does not give any dates for the introduction of rail built posts. I would have thought that pre-grouping installations would still have predominated throughout the twenties unless there was significant layout remodeling and as for lower quadrant arms on rail built posts, Im not saying it didn't happen but I think it would have been rare.
-
Wright writes.....
Wright writes.....2 hours ago, Clem said:I'm approaching completion of the signal box with just guttering, roof slates, name boards and outside step board (not sure what you call it) plus some final bits of painting. A quick question for 4mm building people (I've seen some great work on here). What do you use for guttering that's to scale?


That looks very nice.
I have used various different things for gutters and down pipes over the years but my current favourite is plastic rod and half round section from Evergreen. 1.5mm for smaller gutters and 2mm for larger ones.
When on a building, the lack of a channel inside the gutter is not noticable.
Previously I made a groove along the edge of a sheet of plastic sheet with a rat tail file, then rounded the edge off with a file and cut a strip from the edge of the sheet wide enough to mount the gutter the right distance away from the wall.
I know some people go to the trouble of putting joints and proper fixings on but I have never bothered.
Modelu have just introduced some rainwater products that look very nice but I haven't used them yet.
-
Wright writes.....
Wright writes.....4 hours ago, Clem said:I'm approaching completion of the signal box with just guttering, roof slates, name boards and outside step board (not sure what you call it) plus some final bits of painting. A quick question for 4mm building people (I've seen some great work on here). What do you use for guttering that's to scale?
I have used below good quality and detail.
Wills SS46 Building detail
This kit contains:
• 24 Tall chimney pots
• 24 Short chimney pots
• 2 Large chimney stack cappings (Takes 4 pots)
• 2 Small chimney stack cappings (Takes 2 pots)
• 8 x 80mm lengths of round roof ridges
• 8 x 80mm lengths of angled roof ridges
• 8 x 80mm lengths of chimney stack trim
• 16 x 80mm lengths of guttering
• 8 x 80mm lengths of small down pipes
• 8 x 80mm lengths of large down pipes
• 4 x 80mm lengths of barge board strips
• 2 x 80mm lengths of window sill strips
• 8 down pipe hoppers
• 8 wall tie plates
• 4 soot/drainage manhole covers£7.55 on ebay
-
Semaphore Signals - 4mm Scale (Mainly)
Semaphore Signals - 4mm Scale (Mainly)Those etched cranks from Masokits look like they'd be good for 7mm scale. Thats if they're not too fine for my "sausage" fingers to handle!
JF
-
16t minerals
16t mineralsMike,
The Bachmann 16 tonners are a very easy conversion to EM. I covered it on my blog
I'm told you don't even need to go to the stage of moving the brakegear outwards like I did - they'll just bend out slightly to give enough clearance.
Other than that, they are a nice little model and a very easy way to assemble a train of 16T wagons. That said, the Parkside kits are also relatively easy to put together and offer more modelling input. Horses for courses I guess!
Alastair
-
16t minerals
16t mineralsThese are prior to final decal application and removing some of those incorrectly applied at first build. Airfix's livery instructions were wrong ...
What was wrong with the Airfix instructions? The ones I have in front of me are accurate for one style of early lettering - http://PaulBartlett.zenfolio.com/brmineralweld/e3fb3840d Of course there were many alternative ways of applying lettering.
The Airfix instructions also correctly show the diagonal line aligning with the top of the hinge of the end door, and not the top corner - unlike some in your photographs and several other models illustrated in this topic.
As is well known, Airfix mistakenly fitted brake rigging to both sides of the wagon, but did not model paired independent brake V hangers.
Paul Bartlett
-
Wright writes.....
Wright writes.....27 minutes ago, Headstock said:Morning Tim,
the problem is, that stripping down and cleaning and then reassembling in the manner that you describe, could have inadvertently cured a myriad of problems that you were potentially unaware of. Your problem could have had nothing to do with contaminated lubricant at all. Alternatively, the potential contamination may have been to one component that could have been sorted without a complete strip down. If you fear contamination, then keep your chassis (is that a banned phrase?) away from the workbench. I must admit, I tend to do this by default when not working on the undergubins (tech phrase) This is definitely to keep it safe from harm, my workbench has been known to get a little, shall we say, work stained on occasion. I know of a couple of modellers who keep items like this in a separate room when not working on them, to prevent airborne flux contamination!
Thanks Andrew,
When cleaning the 'chassis' I found that the axles when sliding through the horn blocks after they had been dropped out of the guides were sticky and when in the wrong position caught slightly ... as if there was a small piece of grit locking things. By spinning the wheel it all freed up again, but would catch occasionally. After cleaning this no longer happened. However, without any lubrication it runs smoothly but not as loosely as it did with. I am concerned about not using a lubricant due to potential longer term wear issues.
The clock oil I have used to date is the one sold by Eileens

-
Wright writes.....
Wright writes.....Three products that I use with success on both my OO & O layouts are
1. WD40 - usually a drop on a rag to clean rails etc of built up gunge. I don't use WD40 to lubricate gears / axles, or to generally clean track etc.
2. SERVISOL electrical switch cleaner, in a spray can. A touch on the rails occasionally and let the train run over & disperse it. NEVER had any problems and works well - Just a touch on each rail though. It dries / evaporates without staining if it gets onto ballast. I used to get mine from Maplins, now via ebay. One can lasts years. OK also on loco pick ups etc. Wonderful stuff.

3. Electrolube in a pen. I bought a few of these years ago and am nearly out. just a tiny a drop on gears & bearings etc. Never had any problems with this over the years either. Anyone know where you can buy these now (the pen type as photo below) ?

Brit15
-
Wright writes.....
Wright writes.....2 minutes ago, landscapes said:Hi
I am sorry to say I started the Johnson’s Klear thread way back in 2011.I don’t know if you are familiar with Johnson’s Klear, please forgive me if you are but do not get conned into paying extortionate prices for the old formula in the clear plastic bottle now only available on Ebay.
The new replacement formula which came out about six years ago is exactly the same and does the same job as the old one did, the only difference is it’s a milky colour but still dries clear.
having said that the new formula for some reason has also become very elusive now as well.
Robert Dyas and Asda both use to sell it, I last purchased a 750 ml bottle about three years ago.
Regards
David
If the picture is anything to go by then Pledge "revive it" would appear to be clear and not milky? I also purchased a bottle of the milky formula and didn't get on with it.

-
Wright writes.....
Wright writes.....I drill a small hole inside the springside lamp with my hand drill (something I picked up from Mr Wright). Pop it over the RTR lamp iron and it sits happily on there.
-
Wright writes.....
Wright writes.....11 hours ago, Tony Wright said:I have very little RTR (any RTR stock wheelsets are replaced immediately) but the few RTR locos I have often have factory-set b-t-bs which are a bit under 14.5 mm. Fine on the fiddle yard Peco points, but a bit lumpy through the hand-built pointwork. I believe this is not uncommon.
Regards,
Tony.
The same is true when using the relatively recently introduced OO bullhead track from PECO. RTR back-to-back’s are sometimes a little tight, causing stock to jiggle a bit when passing through the check rails on the bullhead turnouts. Resetting the B-T-B’s to 14.5mm results in smooth running on both the ‘scenic side’ bullhead track, and the code 100 stuff I have used off scene.
-
Wright writes.....
Wright writes.....Hello Tony and all,
I'm a little late in posting on this thread - and I apologise in advance if I interrupt the flow of the fascinating Thompson vs Gresley conversation - but I wanted to say what a great pleasure it is to have the 'Wright Writes' thread going and that we are able to communicate with Tony in this way.
I count myself as one of the lucky ones to have visited the 4mm Little Bytham. To take up a lineside position north of the station, on the west side of the line and witness a seemingly endless procession of beautifully recreated ECML trains is a joy to behold. As one of the 'younger ones' I never saw ECML steam in it's pomp so this is the closest I'll come and what a recreation. Some of the recent pictures in the BRM MI piece looked fabulous.
Seeing as how Grantham's first picture was included in Tony's protoype layouts article in this month's BRM, I'll comment if I may over headlamps (seeing as how the caption to the picture included a gentle jibe on the subject!). Those who have looked at my 'previous layout' thread will observe that headlamps were de rigeur, so they will feature on Grantham - in time! I'm another one though who can't abide the garish 'milk churn' appearance of lamps stuck on straight out of the packet; for me they detract, rather than enhance when they're like that. What I used to do (and will do again) was to deliberately break off the handle part, on the basis that these appear way over scale and are the least visible part on prototype pictures. Their removal instantly reduces the 'too large' look of the appearance.
As others (it appears) have done, I standardised on a flattened 26swg wire for my lamp brackets, removing any RTR ones already fitted. With a 0.6mm hole drilled in the bottom of the lamp, and slightly 'flattened' to match by working a small screwdriver into the hole, the correct lamp headcode could be represented on any loco at the head of a train (and removed again when 'on shed'). There was a little bit of an attrition rate with lamps disappearing (falling off), but not too bad.
Being a private, home-based layout, I could change the lamps as required. Grantham will be more of a challenge being an exhibition layout (especially when coming on/off shed) but we'll see!
All the best Tony and I look forward to continuing to read your informative comments and information on this thread.
-
Wright writes.....
Wright writes.....I agree it is rather neat and tidy. Tony, what distance do you allow between coaches when they're coupled up, and do you put the additional corridor connection on both vehicles or just one?
Jeremy

Distance apart? I've never measured it, though its the width of the jaws of a pair of pliers I use. I just rest the edge of the jaws against one buffer of the coach, then bend the 'hook' end of the coupling down. The goalpost on the adjacent coach is level with the buffers. Obviously, it suits my curves (which are minimum radius of 30", though that's only a couple of fiddle yard sidings not used by carriages), so the user adjusts as necessary - just bend the hook further out for tighter radii, using trial and error.
Only the 'pulled' coach has a corridor connector attached (Modellers Mecca products), the 'intimacy' of the vehicles only needing the one, with its outer edge rubbing against the gangway of the 'pulling' coach. If one retains the 'wings' on the corridor connector, then the gangway of the pulling coach can remain 'open'. However, if the wings are snipped off then the adjacent gangway must be blanked off, otherwise you get 'corridor connecting locking' on reverse curves. I've included a picture of the connectors. If you have tight radii, then both will have to be used to span the distance apart.

The coupling system allows vehicles to be propelled with ease, the corridor connector actually doing the pushing, though its efficacy does depend on the radii one is using. If you're using trainset curves, then use trainset couplings!
Perhaps I should have mentioned that because my couplings pull off the headstocks (like the prototype, a bit), then there is no chance of the type of derailment found with bogie-mounted couplings where 'snatching' can cause the bogie to lift up under load or when starting quickly. The system is dead easy to install (once you've got rid of the 'rubbish' couplings supplied RTR) and incredibly cheap. Just some copper-clad strip, 26 SWG nickel silver wire, 30Amp fusewire and some superglue. Each coupling comes out as pence to make.

I know buckeye-fitted stock had a hook in the headstock for coupling to the shackle-only-fitted carriages built by less-enlightened railways; so if you use my system on non-buckeye-fitted vehicles, one of two vehicles coupled together should have a screw-link coupling hanging down as well.

The last vehicle in my trains has a dummy buckeye and associated pipework, as shown in the picture (prior to painting and weathering). It means, of course, that the train can only run one way, so it's useless for terminus working. For that, an automatic/semi-automatic buckeye or shackle is needed, not, for pity's sake, a tension-lock!
Remember, too, that train-heating hoses were removed in the summer for maintenance (the assumption, even in an English summer, being they were superfluous then), so that would make my coupling even simpler, there only being the need therefore for the brake pipe to be replicated (am I right in thinking this?).
Of course, as previously mentioned, my 'tween-coaches couplings cannot be automatically, or even semi-automatically, separated but since they're employed in fixed rakes that isn't an issue. If you can get a copy, my book on modifying RTR coaches published by Irwell Press (1996, I think) explains all my methods. The DVD, Right Track 4, Modifying RTR Models, also does the same. It's available from BRM.
I've included pictures illustrating what I mean, and a prototype shot showing a train I've attempted to replicate using my methods. The picture of the 'Flying Scotsman' was taken at Retford getting on for 50 years ago (I really am that old!), which fits in nicely with the appearance of the great layout of that name in the next issue of BRM.

This will be running on Stoke Summit at Ally Pally in March, though unfortunately, I won't be there to explain.
-
Wright writes.....
Wright writes.....Plates and bars, an extract. Instructions and diagrams etc. 1956
Original document Copyright BRB Residuary, courtesy of N Rushby PDF J D Faulkner.

-
Wright writes.....
Wright writes.....7 hours ago, polybear said:Absolutely - I had the pleasure of driving the Black Five on L.B. yesterday - Tony has fitted one of the new DJH (coreless?) Motor/Gearbox combinations and to say it was both very smooth and very quiet would be an understatement....
Thanks Brian,
I have no idea whether the new DJH motors are coreless or not (though they're just a smooth as a Portescap, and much quieter). They're certainly a perfect substitute for the previous Mashimas.
Regards,
Tony.
-
Toto, we're not in Metcalfeshire any more!
Toto, we're not in Metcalfeshire any more!Here's a before-and-after showing an attempt to bed in the distillery using DAS modelling clay.
Here's the before

I cut some 2mm card to form a base for the model. The area of the baseboard was a bit rough after we scraped away the previous occupant of the site - a Metcalfe goods shed area.Then applied a layer of clay up to the edges of the card bases. Using a technique I've seen elsewhere added some rough cobble textrue to the clay with the end of a thin plastic tube - in this case the end of a pipette.
Here's the after
-
Private owner wagons
Wright writes.....Private owner mineral wagons were phased out as a result of the formation of the National Coal Board in 1948. However they generally became ‘pooled’ as a result of wartime requisitioning in 1939. Typically a yellow motif with two concentrically placed letter ‘c’s in black was added to signify that the carriage charge was commuted on this pooled wagon. More details here:
-
Wainwright C-class 0-6-0
Wainwright C-class 0-6-0I don't have that photo, however, the photo I was referring to is in "Kent Steam - Scenes from the fifties and sixties" by Michael Welch, published by Capital Transport in 2002. There is a photo of 31716 on page 65, dated 18th May 1961, leaving East Farleigh with two coaches and a van. This has a huge mass of piping on the right-hand side, including what seems to be an air-compressor just in front of the cab, and various bits and pieces between the first and second splashers.
The Steam Reverser is next to the cab. The air brake pump is between the first and second splashers.
-
Wainwright C-class 0-6-0
Wainwright C-class 0-6-0The Steam Reverser is next to the cab. The air brake pump is between the first and second splashers.
I think it's the other way around. All the class had steam reversers located between the first and second splashers on the right hand side; those locos fitted with Westinghouse brakes had the air pump just in front of the cab on the same side. There were initially 15 locos with air brakes, delivered by Sharp Stewart in 1900 for working LCDR stock which was air-braked; the SER was a vacuum brake line. No. 712 of this batch is shown in Fig. 4 of Bradley's book on SECR locos which shows the right hand side of the loco.
-
Wainwright C-class 0-6-0
Wainwright C-class 0-6-0The Steam Reverser is next to the cab. The air brake pump is between the first and second splashers.
Definitely the other way round. All the photos I have show the fittings between 1st and 2nd splashers on every loco, but only those with air brakes have the fittings next to the cab.
I suppose the next question is what version will Bachmann be producing?
-
Wainwright C-class 0-6-0
Wainwright C-class 0-6-0Picked up my SE &CR 271 yesterday, beautiful loco so well detailed and runs smoothly from the off, Now have 592 and 271 and look forward to appropriate coaching stock. I would be interested to know what sort of freight stock these locos would have worked. Does anyone know of any online references to the wagons of the period?
Don't forget that all the Southern constituent companies received far more goods traffic than they originated. Thus wagons from all or any of the North-of-London railways would be entirely correct.


