YesTor
-
Posts
1,300 -
Joined
-
Last visited
Recent Profile Visitors


YesTor's Achievements
1.3k
Reputation
Bookmarks
-
Hattons Class 66
Class 66 in OO Gauge - New AnnouncementThe axle box issue is certainly proving interesting. My order of seven Class 66s arrived on Thursday and out of seven locomotives sadly four have a profound wobble, whilst the fifth a further slight wobble. Initial feelings of dismay. Since arrival all models have been running in for anything up to six hours each and sorry to say with little (if any) improvement.
Some axle covers appear reasonably central-mounted...
Where as others perhaps less so...After some contemplation, the decision was taken to remove all axlebox covers from one of the affected models and, looking more closely at this axlebox configuration, it has to be said that I'm less than keen on what appears to be the general advice that to superglue the axle covers in place is in any way going to help. To my way of thinking at least, 'Superglue' and 'moving parts' rarely work in the same sentence, let alone when the parts concerned are in very close proximity to where said Superglue is to be applied. Removing the axlebox covers pretty much reinforces this train of thought…

It's becoming easier to see why my 'sheds' aren't running as I'd hoped...
In a couple of instances the axle box cover is actually glued to the bogie frame as well as the axle itself...
The result of removing all axlebox covers? Well, in short, the locomotive now runs like a dream... no wobbles, no shuddering, and essentially glides along as smooth as silk... Result!
")
It's pretty clear as to why even only one single misaligned cover could create running issues...
With all of the above in mind it does appear as if the overall design might be a little flawed? Following this, I am now wondering if there might be a better option for the rotating axleboxes...
As the design stands, on simple removal of the axlebox cover it can be clearly seen that the axle length protrudes slightly further out than a typical axle in order to accommodate the attachment of the cover...
I'm wondering if a future design improvement might be to extend the axle length further still, thus eliminating the need for plastic parts to be glued into an already awkward space, and instead clip a moulded axlebox cover directly onto (or into) the end of the extended axle. I suppose it's possible that a small bush may be required in order to prevent wearing of the bogie frame, although the axles themselves seem sufficiently slender in order to likely avoid any friction...
I guess the danger in any arrangement is in the whole bogie assembly becoming too much of a solid unit with little play between the individual axles which would again lead to issues. But perhaps with sufficient tolerances...
Of course, the above idea is too late for existing models, and having now removed the axle covers my next move is likely to be drilling a tiny amount from around the edge of the holes before deciding on the best method of reattaching the axle covers. That will be a task for tomorrow...
cheers
Al
-
Hattons Class 66
Class 66 in OO Gauge - New AnnouncementJust to follow up on my last post having removed all axlebox covers, and basically all that seems to be required is the use of a 3mm drill to gently enlarge the existing holes in the bogie sideframes:
One of the internal section sideframes was loose on my model and I guess some may find it easier to work on this section if removed from the main bogie, however it really isn't necessary as we are only very gently enlarging the holes anyway, but just for reference:
Clean up the axlebox caps as necessary, add a tiny dab of glue to the tip of the axle and insert and clip the cap back into place:
I left the glue to harden overnight, and all looking neat and tidy in the axlebox department...
A quick test shows the 'shed' now running as smooth-as-silk and not a wobble in sight... Joy!
One beautiful model!
cheers
Al
-
Realtrack
Realtrack Class 156On 19/04/2020 at 20:10, Solo said:That's good news re the pre-fitted speakers....has anyone used these with Zimo sound chips though? I normally use projects from YouChoos or Digitrains, I find their range of functions far more useful - the actual engine sounds from the factory-fit 156s sound really good on videos I've seen but I find the functions as listed on the Realtrack website/DC Kits somewhat bizarre (e.g. toilet pipe(?!) and three functions dedicated to passenger announcements), no facility for sound fade-in/out etc.
We have reacted to customers comments and requests over the last 5 years on all of the Realtrack DMU's, the functions we have are:
F0: Day time running mode (Front Lights)
F1: Engines.
F2: Playable High Horn.
F3: Playable Low Horn.
F4: Passenger Doors Open/Close. (With Closing Bleeper)
F5: Manual brake application(When moving) Brake Dump when stopped.
F6: Drivers Door Open/Close.
F7: Compressor Speed Up.
F8: Toilet Pipe Discharge. (Toilet Flushing onto Track sounds)
F9: Variable speed flange squeel.
(Fully automatic, nothing when stopped, increases with speed)
F10: Despatch Whistle.
F11: Guard to Driver Buzzer/optional reply.
F12: Interior Lights (With flicker).
F13: Destination Blinds. On/Off.
F14: Automatic coupling/uncoupling Sounds.
F15: Passenger Announcements 1.
F16: Passenger Announcements 2.
F17: Passenger Announcements 3.
F18: Speed Dependant Detonators.
(Fully automatic, nothing when stopped, faster at speed)
F19: Cab Lights (Directional). With On/Off switch sounds.
F20: Night Time Running (Front Lights)
F21: Parking Mode (Red Lights at both ends).
F22: Wabasto Heater.
The destinations have been designed to suit those printed on the Past, Current and Future Northern Class 156 Units, these can be customised to suit your layouts location.
CV155 to Change destinations:
F15 F16 F17
0 / = Birmingham N S 0 / = Cambridge 0 / = Stanstead Airport
1 / = Norwich 1 / = Lowestoft 1 / = Sheringham
2 / = Barrow in Furness 2 / = Clitheroe 2 / = Manchester Vic
3 / = Colne 3 / = Blackpool North 3 / = Manchester Vic
4 / = Liverpool L. St 4 / = Preston 4 / = Ormskirk
5 / = Cardiff Central 5 / = Portsmouth Hbr 5 / = Weymouth
6 / = Skegness 6 / = Nottingham 6 / = Leicester
7 / = Matlock 7 / = Derby 7 / = Newark Castle
8 / = Grimsby Town 8 / = Lincoln 8 / = Peterborough
9 / = Ipswich 9 / = Norwich 9 / = Liverpool L. St
10/= Sheffield 10 / = York 10/ = Leeds
11/= Carlisle 11/ = Leeds 11/ = Selby
12/= Newcastle 12/ = Middlesborough 12/ = Morpeth
13/= Scunthorpe 13/ = Doncaster 13/ = Hull
14/= Crewe 14/ = Derby 14/ = Stoke on Trent
15/ = Doncaster 15/ = Lincoln 15/ = Worksop
16/ = Chester 16/ = Rose Hill Marple 16/ = Manchester Pic.
17/ = Huddersfield 17/ = Sheffield 17/ = Manchester Pic.
18/ = Shrewsbury 18/ = Buxton 18/ = Manchester Pic.
19/ = Knaresborough 19/ = Leeds 19/ = Manchester Pic.
This is unique in the sound decoder field and honestly our customers love it.
The English ones have an English accent, the Scottish ones have a Scottish lady!!
Legomanbiffo also has Cornish, Bristol, Welsh, Black Country, Liverpool, Middlesborough, Newcastle and South East Accents on our Multiple Units.
Hope you like these.
Arran & Charlie
-
Class 66 in OO Gauge - New Announcement
Class 66 in OO Gauge - New AnnouncementBodyshell reassemby
Okay, this may be useful for anyone struggling with reassembly of those delicate bodyshell components. I'm in no way suggesting that this is the only way, there may well be better methods, but this certainly works for me in keeping those 'dangly' footsteps and pipes under control:
1. Lightly attach a piece of thin scrap card (make sure the card is quite flexible) with a small piece of masking tape (or other low-tack tape) behind each cab door. Having experimented a few times I'll say that's it's quite important to use low-tack tape and ensure only small sections actually affix the card to the body, as you need to be able to slide the pieces of card and tape out easily as you reassemble:
2. Ensure that each piece of card protects the delicate handrails as you carefully introduce the bodyshell to the chassis for reassembly, carefully aligning the doorways with their respective steps on the bogies:
3. Begin to gently apply pressure, pushing the body downwards and ensure that all four doorways are looking like the one below as you push down. Don't force it, if something feels stubborn or over-tight then it's better to slide the body off and start again rather than risk breaking something. Watch those tiny pipes too directly under the grilles on each side, as they have a tendency to sneak inside the chassis block, when they should remain very much outside, as pictured:
4. As soon as you can feel the body begin to ease on nicely, it becomes preferable at this point to actually lift the model and apply light pressure to the top mid-roof area to gently slide the shell equally on all sides the rest of the way down. Importantly, in fact vitally, ensure that the handrail and step assemblies under each doorway are all intact and haven't folded underneath themselves. Keep checking as well that those delicate pipes remain outside of the chassis block:
5. Okay, at about this point you need to begin to slide the pieces of card out at the same time as you apply gentle downward pressure to the bodyshell just as it reaches that last lap before snapping back into place. If for some reason the card won't release then it likely means that the tape is stuck too firmly inside - remember, small and lightly tacky is all you need [see pic 1]. Again, check that the handrails and steps on all four doorways remain outside and protected by the card pieces at all times:
6. And that's about it... pieces of card removed, bodyshell squarely back in place; handrails, steps and pipework all neat and undamaged, as they should be:
The key thing is to take your time, and if something feels forced or strained then go back and start again. It's not a race!
Best
Al
-
2 aspect Ground Signal - colour of lights
2 aspect Ground Signal - colour of lightsPlease see attached circled ‘2 aspect ground signal’ . What are the colours of the lights If they where showing and does this signal work in conjunction with the L/H feather ?
thank you
-
Class 66 in OO Gauge - New Announcement
Class 66 in OO Gauge - New AnnouncementI have the Scaletrains SD40-3 and Hattons 66 in front of me now. The SD has long extended axles and the axle boxes have a deep hole which fits over the axle extension. A good clearance is provided on the side frames to allow the rotating axle box freedom of movement. Also, a packet of six spare axle boxes came with the loco. Difficult to get a photo which shows the axle extensions as they disappear into the side frames. Altogether a much superior arrangement.
John
-
FinetraX
Using the easy-assembly Finetrax pointwork kits in 00 and EM (and in P4 from the S4 Society)Hi Guys,
Many have asked for pricing and I have finally received all the manufacturing quotes from the various suppliers in order to set a final retail price for the standard turnout kits.
So, to summarise:
The new 4mm Finetrax 'E-Z Build' standard bullhead rail turnout kits will have the following features:
-
Available in:
00 Gauge 'Standard' - This uses 1.25mm flangeways and will allow RTR loco's and stock to run without wheel modification (unless the is a rogue wheelset).
00-SF - This uses 1mm flangeways. 'RTR loco's and stock 'should' run through without modification, but a little more strict in having correct wheel 'back to backs'. The base will have the gauge narrow to 16.2mm through the crossing frog area only, the transition between 16.2mm and 16.5mm will be 'baked' into the turnout base.
EM Gauge - Standard 1mm flangeways as per EMG standards.
All of the above will be available in either thick sleeper (to match Peco bullhead and C&L Thick sleeper) or thin sleeper (to match C&L thin sleeper & SMP track).
- Plastic turnout base complete with ALL chairs fitted to the base as one single piece. Includes standard 3 bolt S1 chairs, P Slide chairs, L1 Bridge chairs, PW & PWX check rail chairs, Correctly represented slab & bracket 'A' chair that bolts the V on the crossing frog.
- 'Wood' texture on the Timbers.
- Nickel Silver cast crossing frog, complete with correct blunt nose, correctly aligned over the timber (which has a correct slab & bracket A chair on the base), minimal infill behind the splice, spacer blocks and bolt heads represented, correct wing-rail length, correct end flare on the wing rails, correct knuckle gap radius. Electrical feed wire pre soldered into the cast crossing frog.
- Cast crossing frog has pins underneath that accurately locates into holes in the plastic base.
- Pre machined switch blades, complete with pins pre soldered, the pins will locate into pre drilled holes into the tie bar.
- CNC machined tie bar, with pre drilled holes for both switch rails and 1mm hole for 'switch machine' actuator wire.
- SMP Nickel Silver Bullhead rail.
- Full colour printed instructions
The final retail price for the complete kits will be £22.99 plus postage.
After working solidly on these since March, I hope these kits will help many a modeller in fulfilling their dream model railway plan to fruition!
Thanks,
Wayne.
-
Available in:
-
Templot demo video
Lapford34102's Workbench - Dapol Class 22 new wheels and pickups5 hours ago, lapford34102 said:Use Templot for the template. Really excellent programme except I can’t seem to get my head around it. Can do points on their own but start to put a few into a plan!! It’s certainly me, not the programme and yes, I have tried the tutorials. Perhaps I need to do it on two screens or perhaps at some future show there’ll be a demo somewhere.
Hi Stu,
There was a live demo tonight, but I've just finished, see:
https://85a.uk/templot/companion/live_screen.php
I will do another one soon. If you ask on Templot Club at https://85a.uk/templot/club when it will be and what you are stuck on, I will show you how.
cheers,
Martin.
-
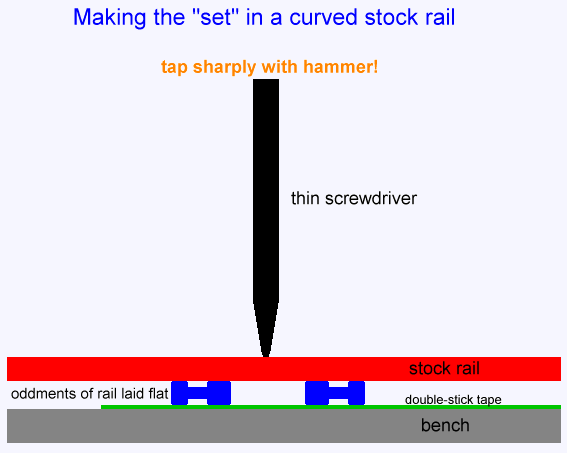
Making the 'set' in a curved stock rail
Using the easy-assembly Finetrax pointwork kits in 00 and EM (and in P4 from the S4 Society)50 minutes ago, Blandford1969 said:At the risk of being shouted at by some. Would it be possible to point us to somewhere where we can see a good way of putting the set in with one of these kits please?
Hi,
Slide the turnout-side stock rail into the base, mark the position of the set on it with a felt-tip pen. Either from the template, or if no template mark it in line with the leading edge of the toe timber (the one the blade tips are on). Then remove it and:
Hopefully the diagram is self-explanatory. Just two bits of rail about an inch long laid side by side with a gap between. The smaller the gap, so the harder you need to tap, but the more precisely located will be the bend. Make sure the stock rail is exactly square across them before making the bend -- a sheet of graph paper underneath helps. Make sure the stock rail is the correct way round for the hand of the turnout. If you get it wrong, save it for the next kit of the opposite hand.
For the B size kits the angle needs to be 1:32 -- it's not much, so don't hit it too hard. Lay the bent rail on the template to see if it matches. If you have over-bent it, you can flatten the bend back a bit with some smooth-jaw pliers. It would help to practise a bit on some scrap rail first. If you printed the template from Templot, it's helpful to print extra copies to refer to while building.
cheers,
Martin.


")