


westie7
-
Posts
741 -
Joined
-
Last visited
Recent Profile Visitors


westie7's Achievements
338
Reputation
Bookmarks
-
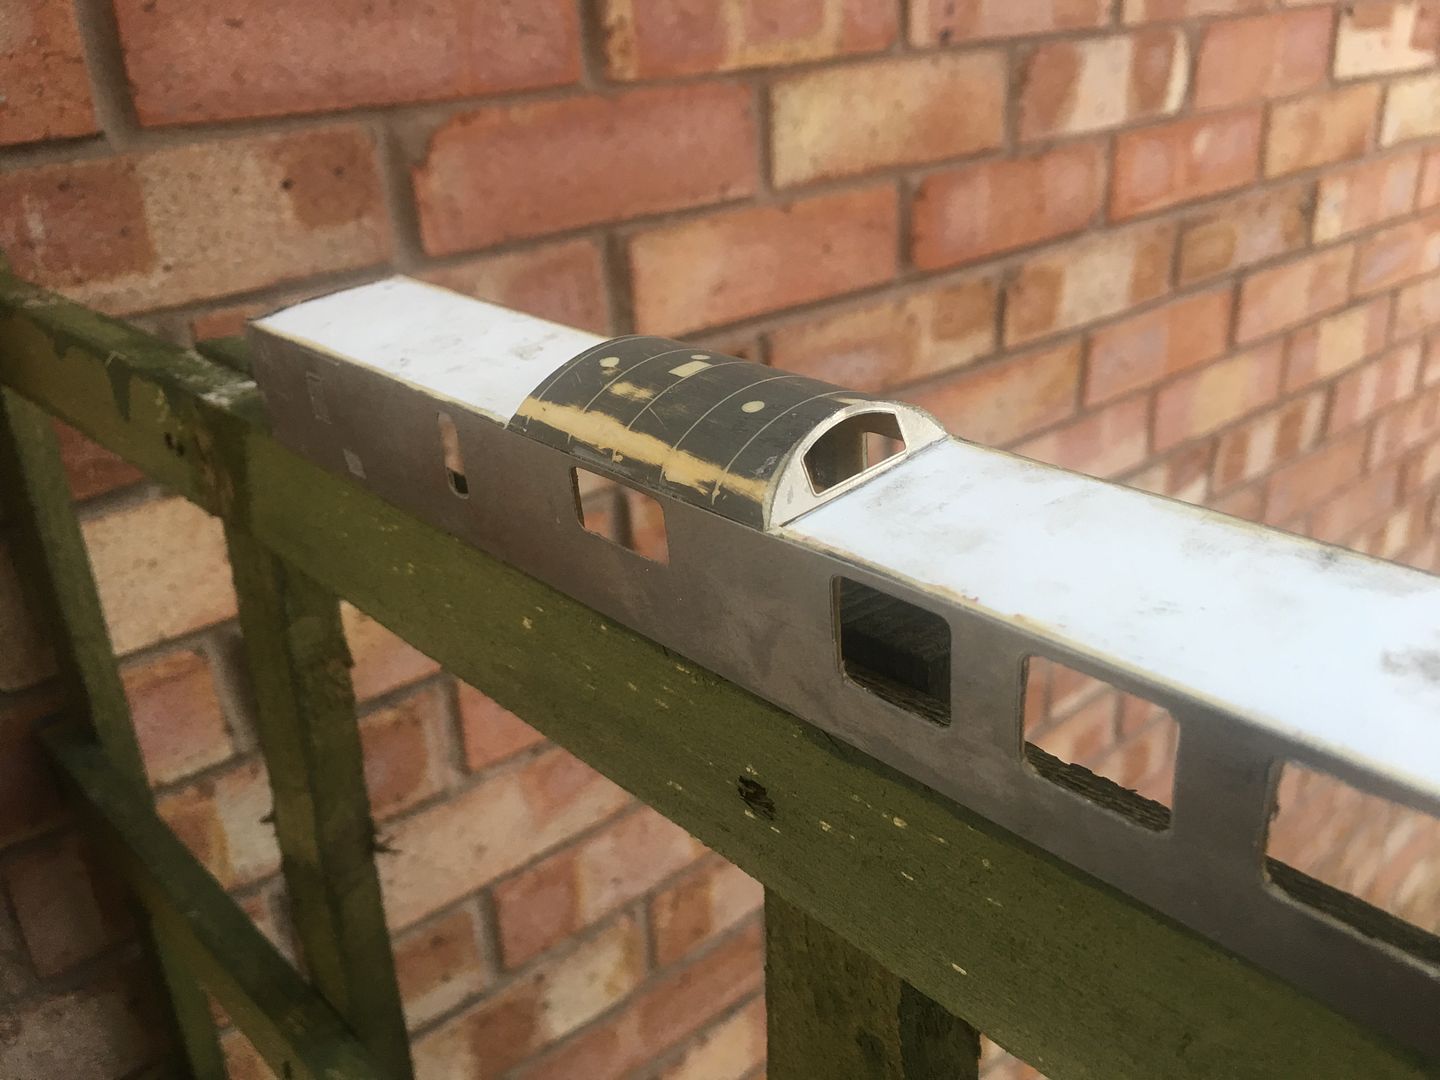
big jim's workbench...onto figures and buildings
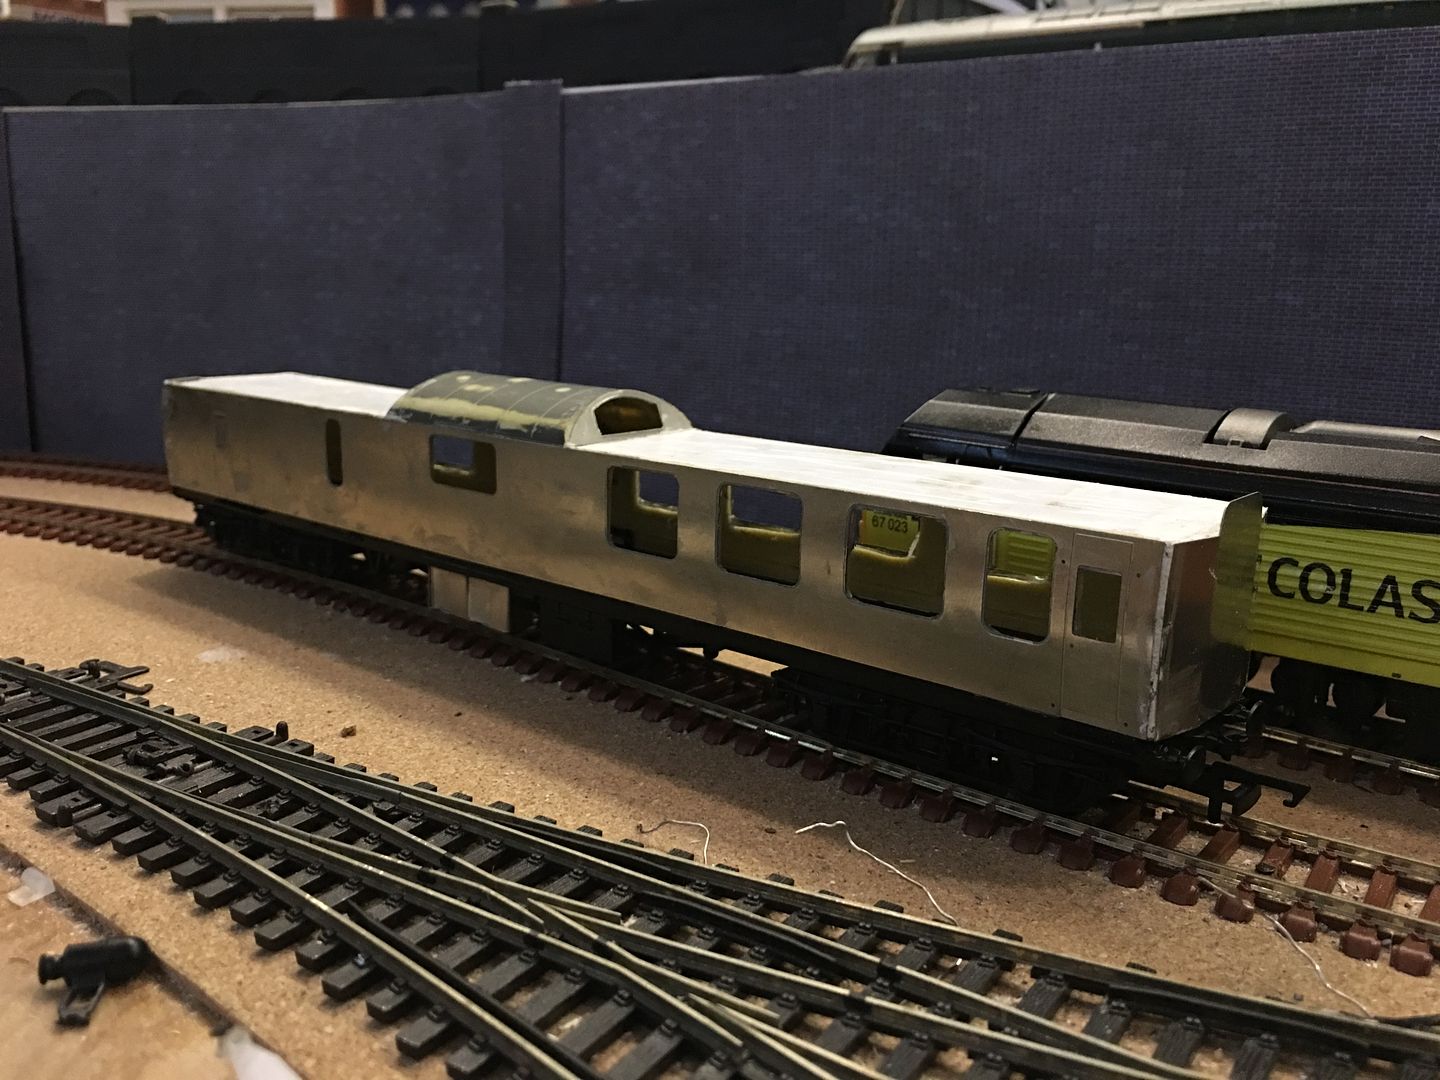
big jim's workbench...onto figures and buildingsmentor is looking good, this has been one build ive really enjoyed doing, only a couple of evenings work to get to the stage shown below and an absolute pleasure to build
this is how i clamped the sides while the glue set, left it overnight and it is solid!
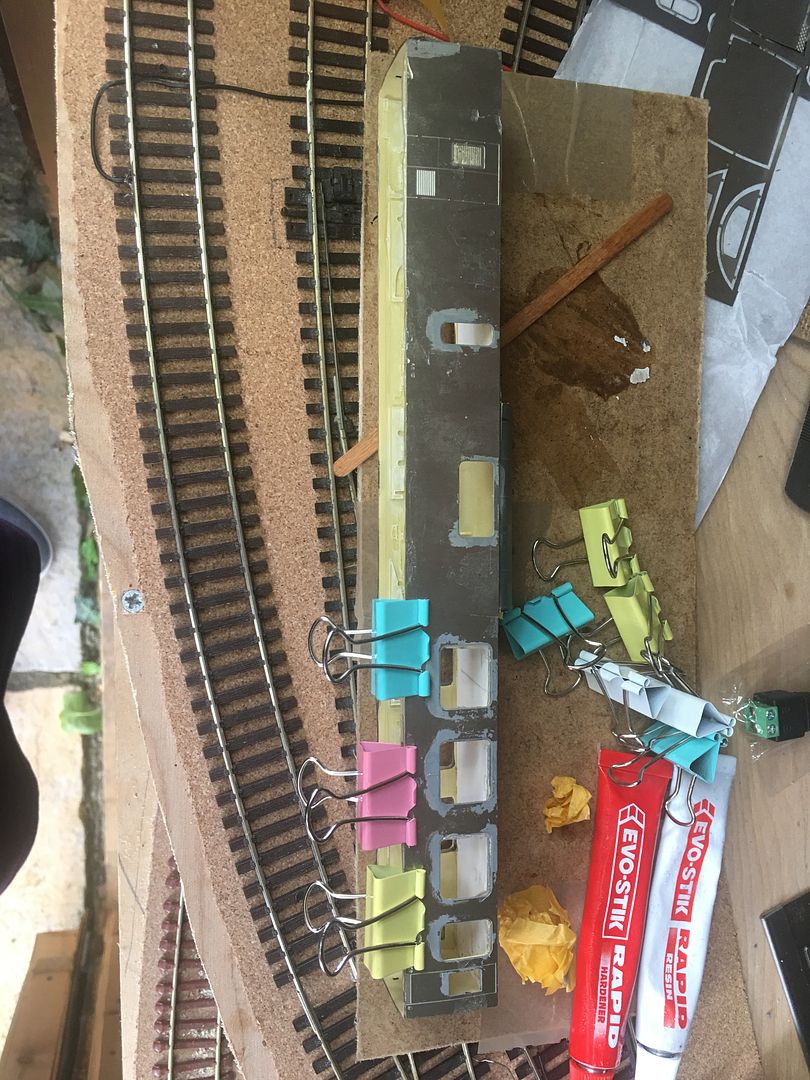
scraped, cut and rubbed the detail off the ends
cleaned off glue residue from around the window holes etc
marked up and curved the end panels
and glued them in place
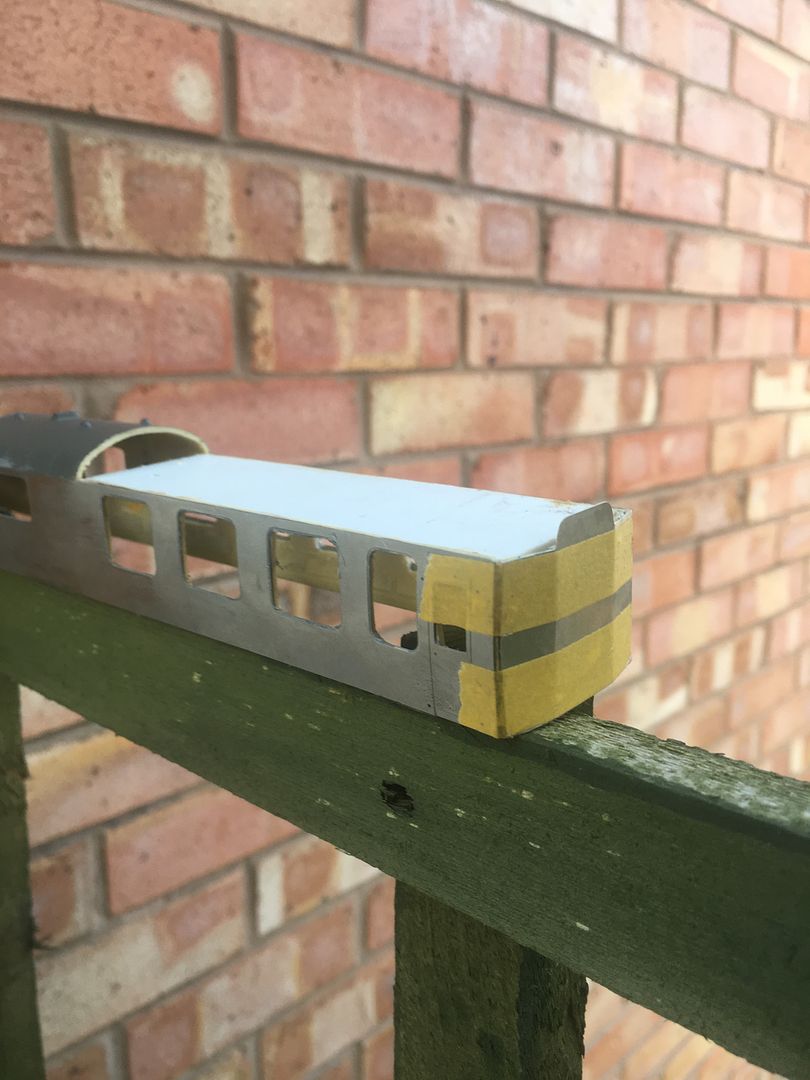

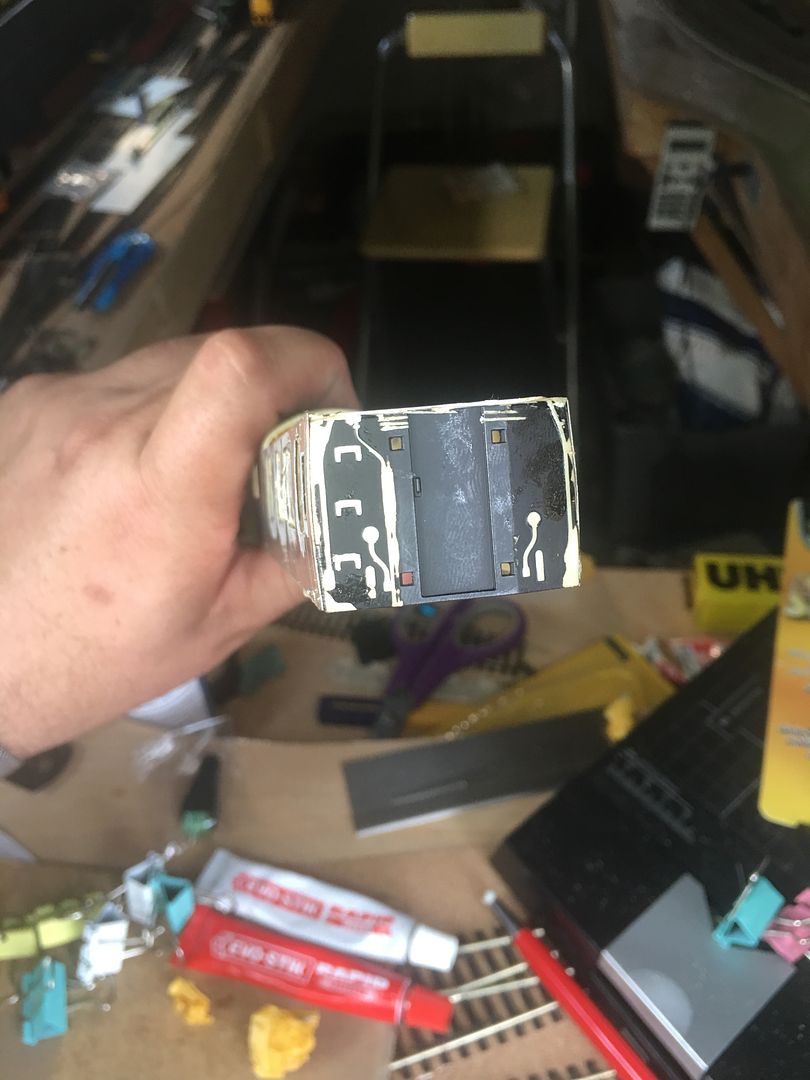
back to the roof, filled in gaps with squadron putty and cut the remaining roof area at an angle for the observation window
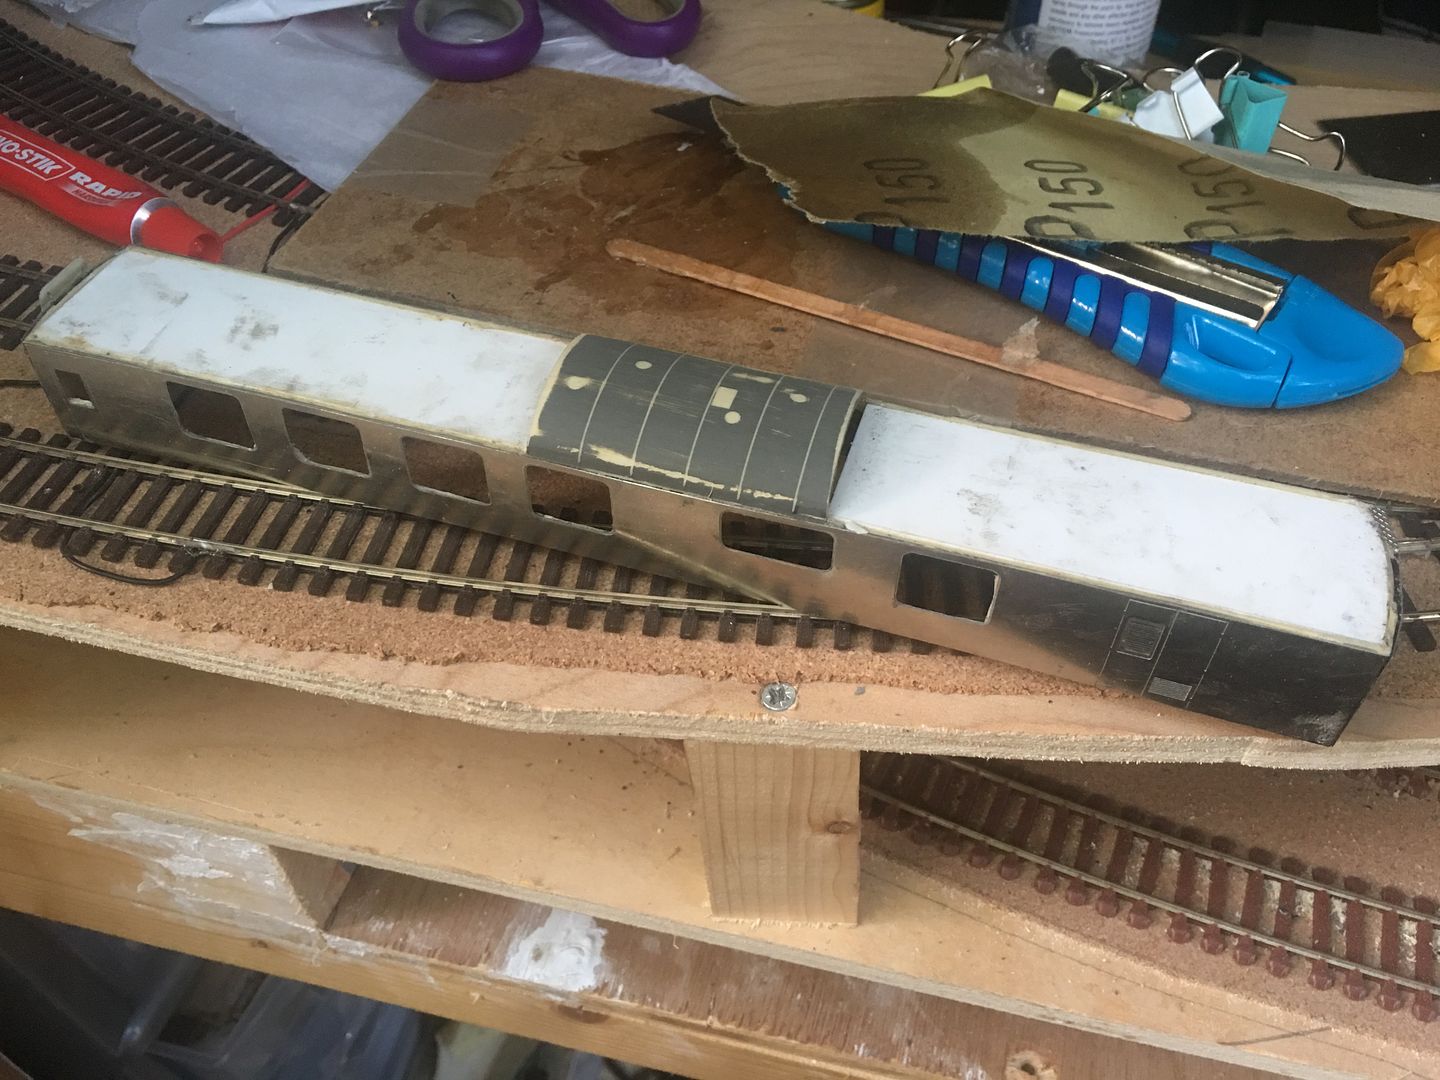
and fitted up
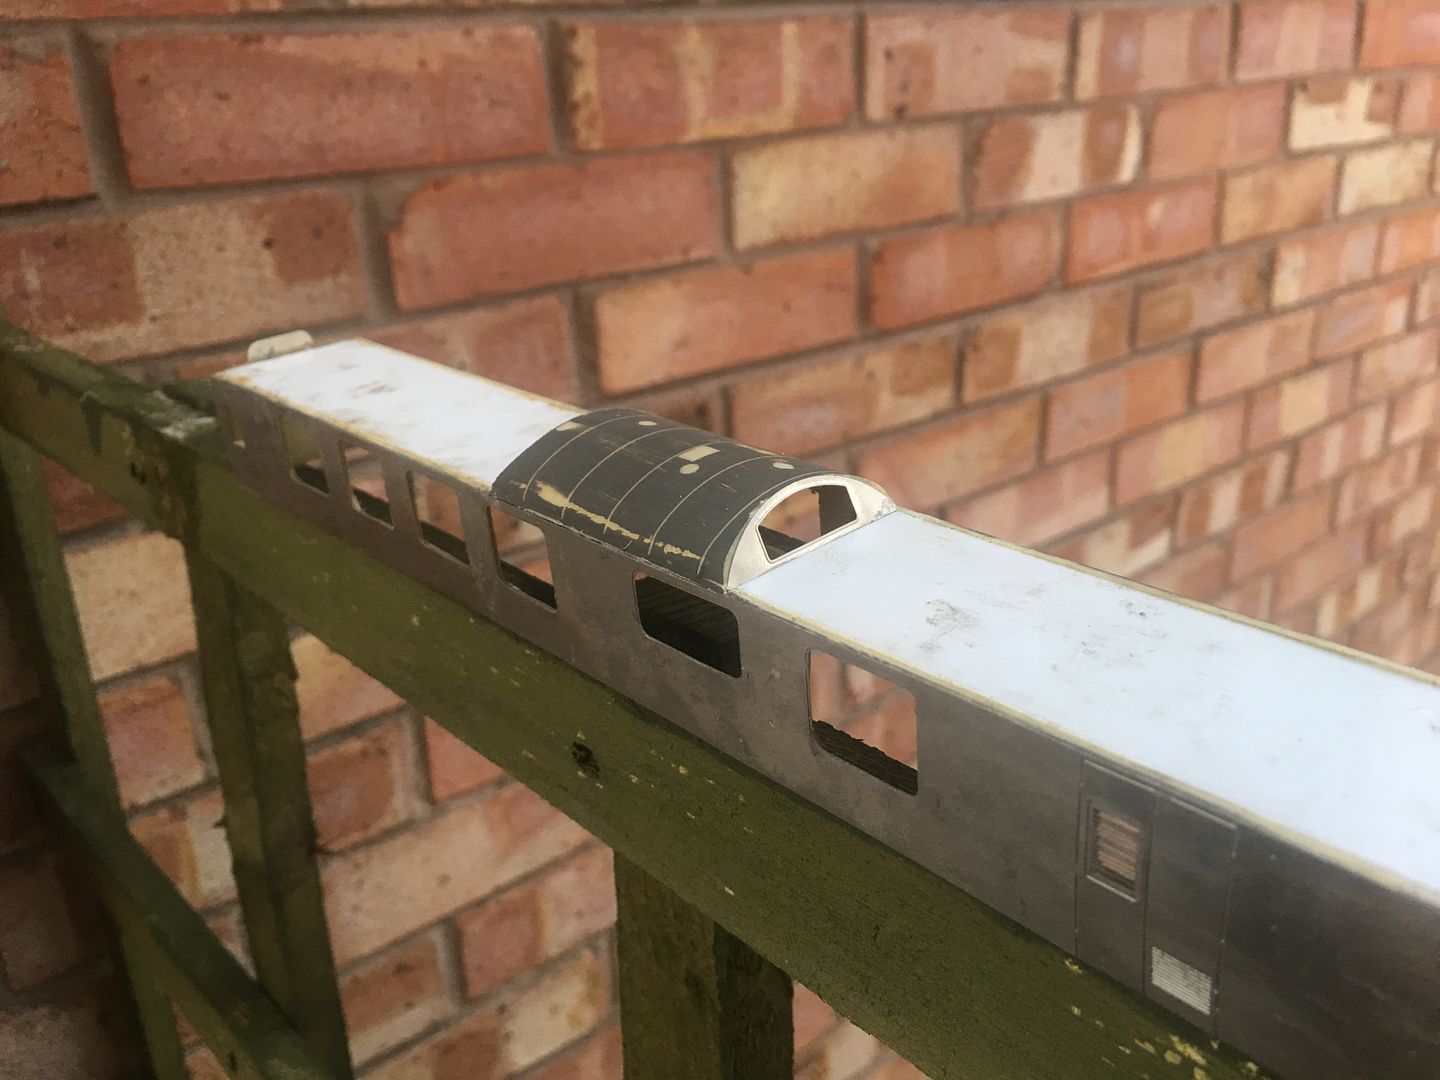
superglued those in place and again squadron putty in gaps
also filled in the edges between the etches and when set rubbed them back
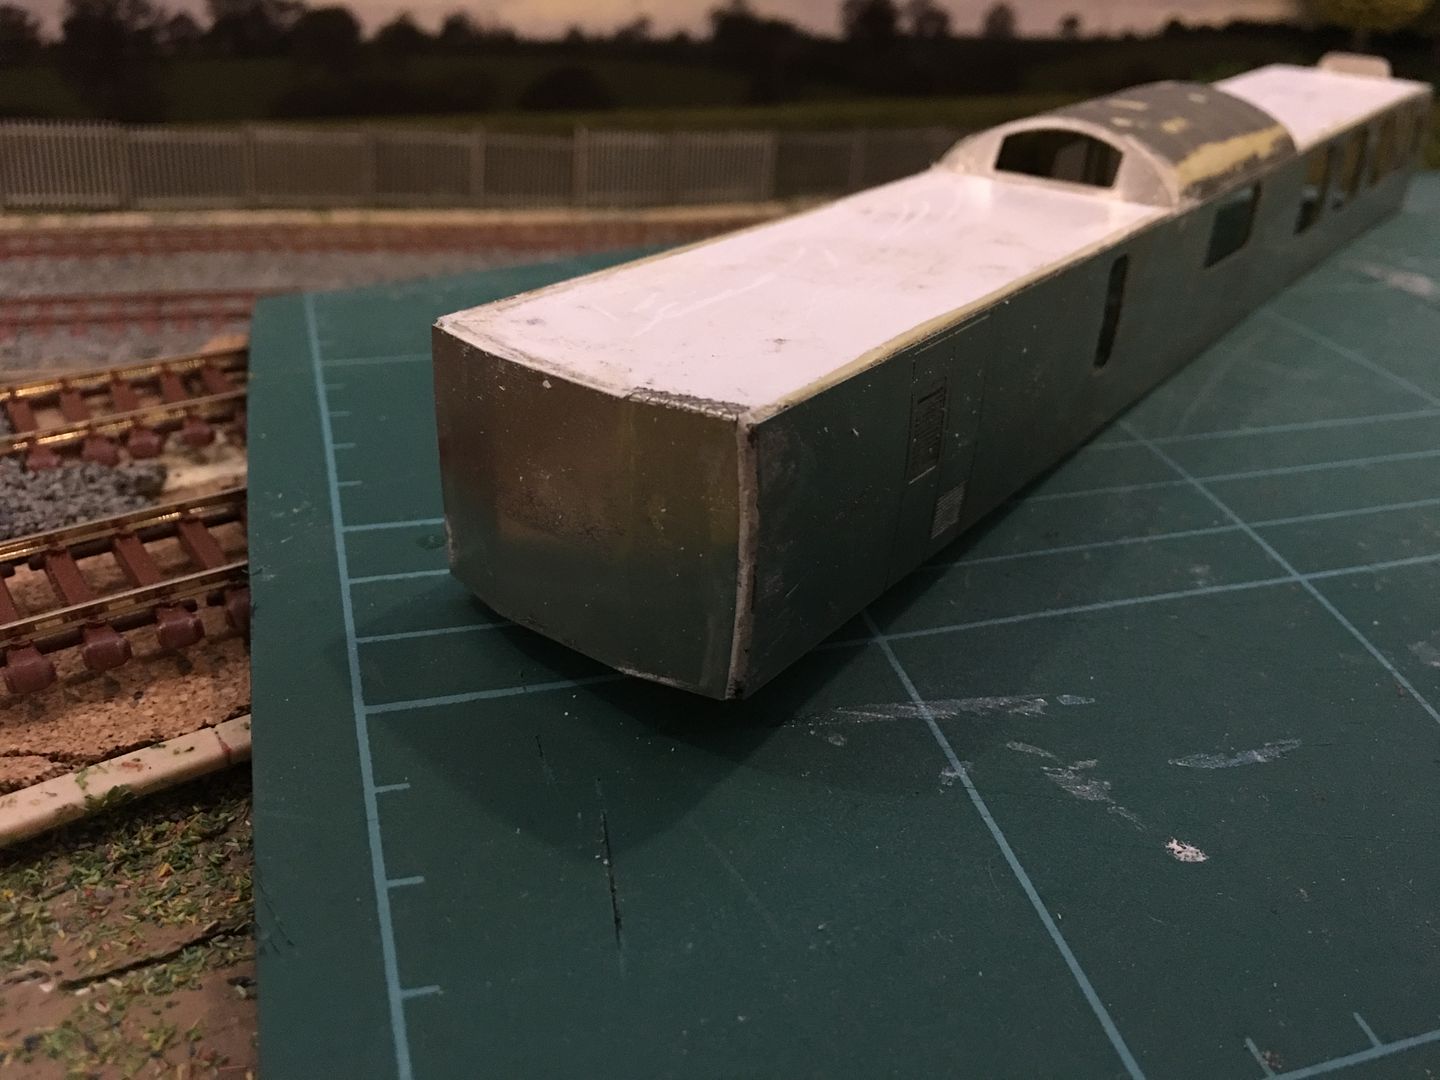
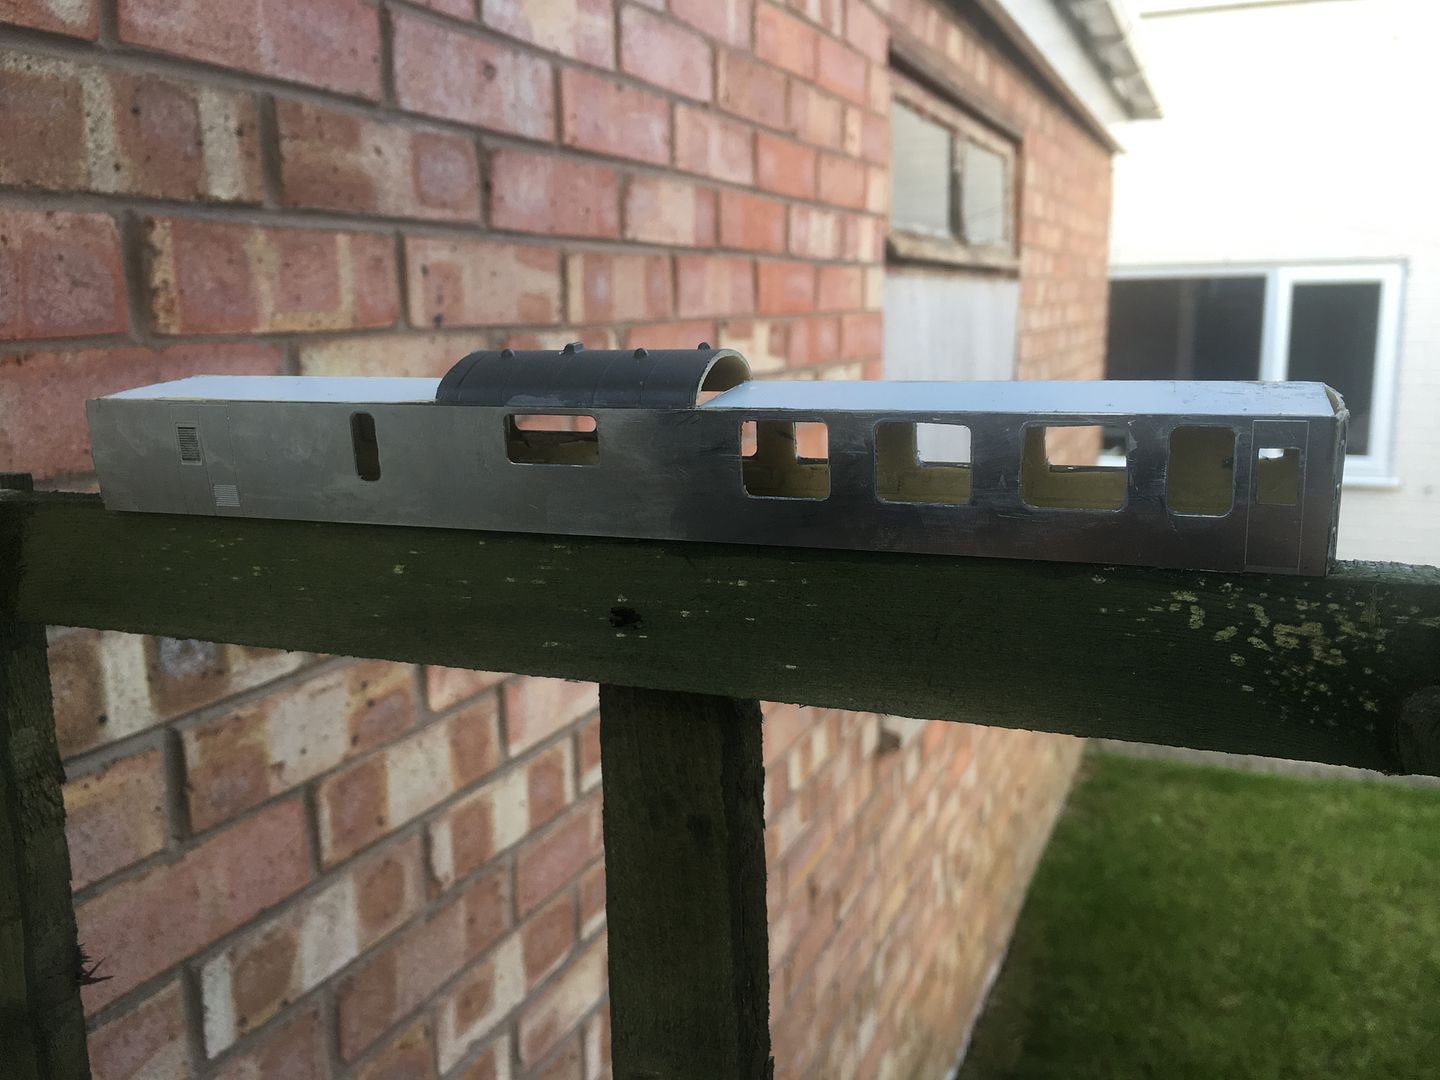
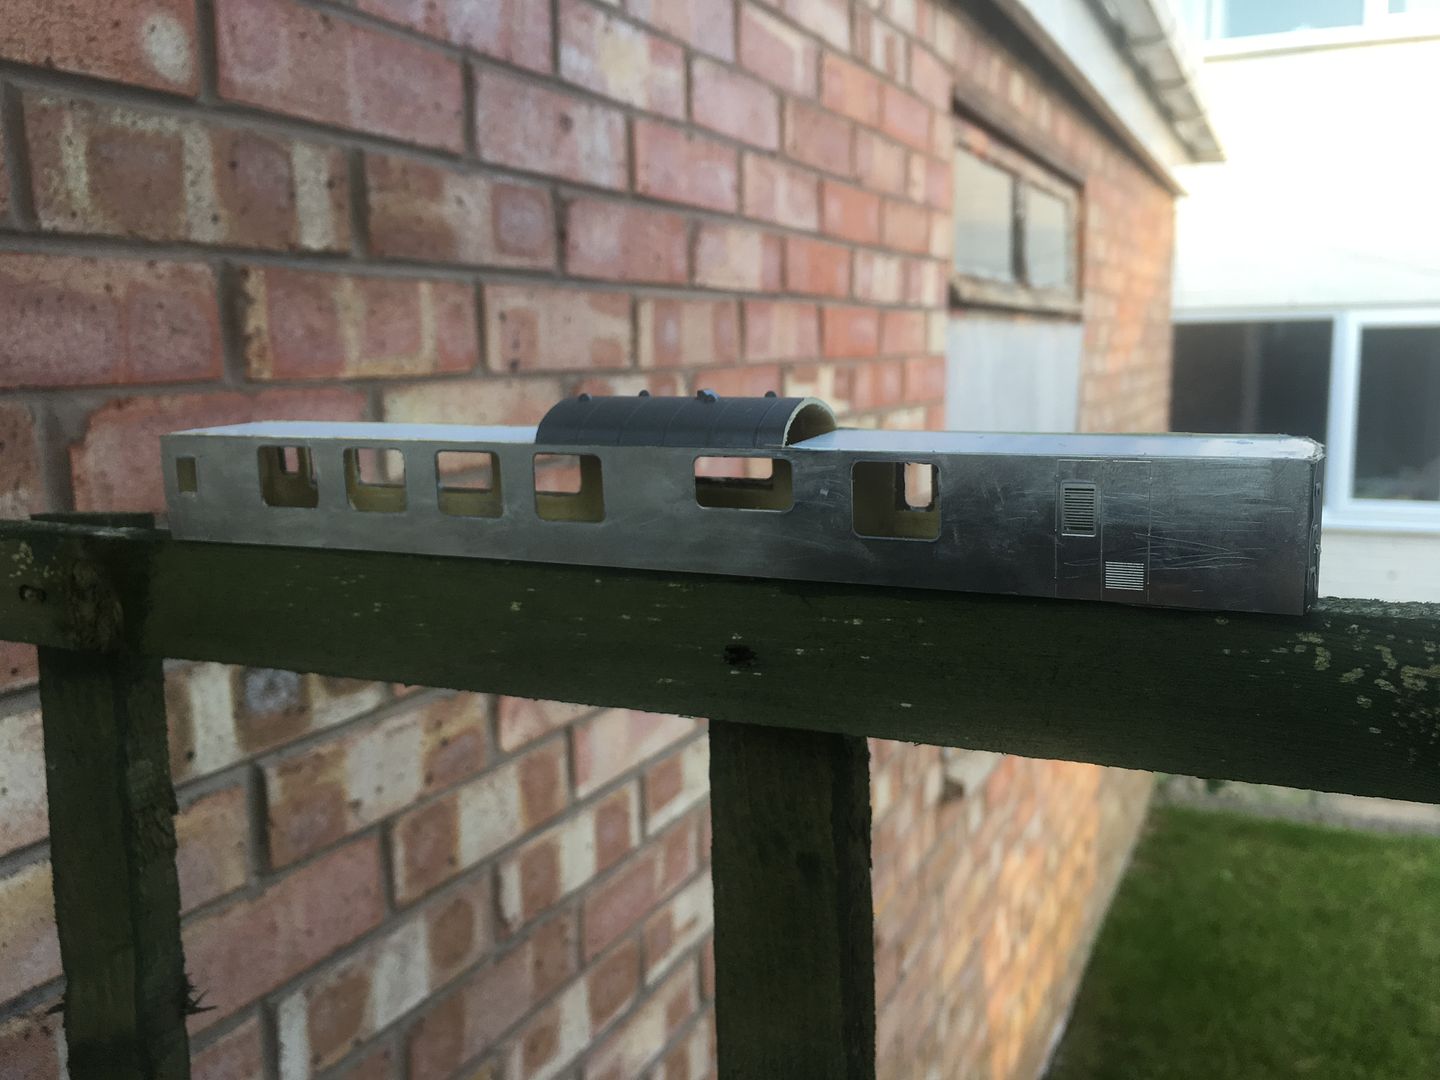
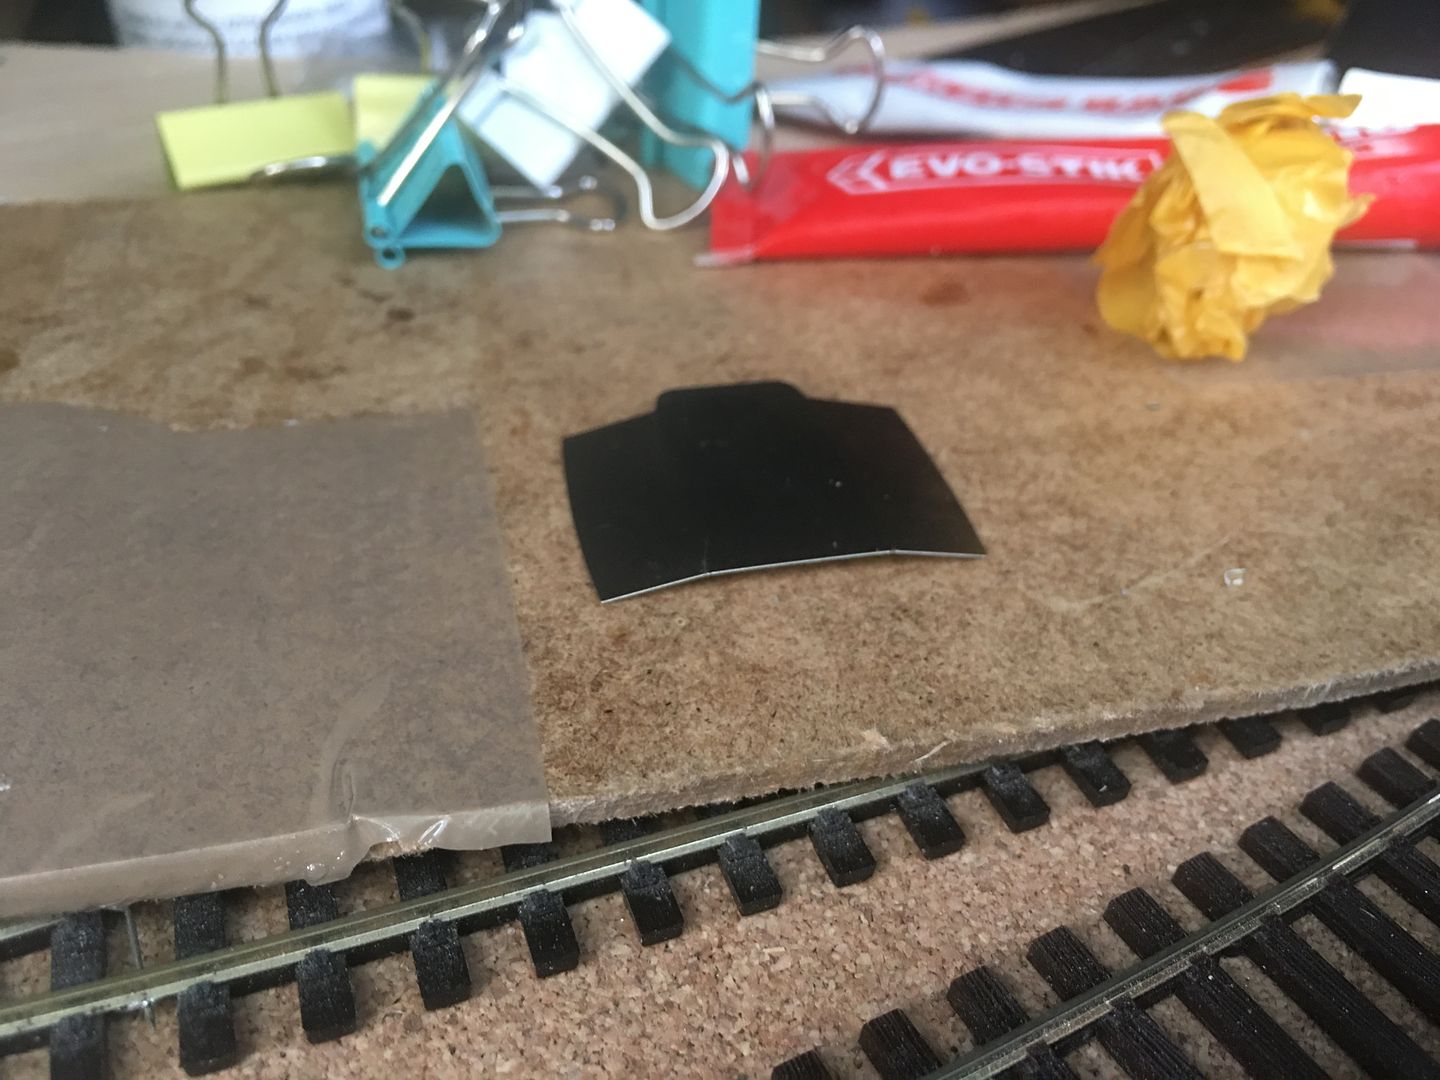
it was then onto someohe finer detail bits of the etch, shane says he had trouble with some of these parts not being produced correctly with no fold scores but i managed to do something with them
generator intake
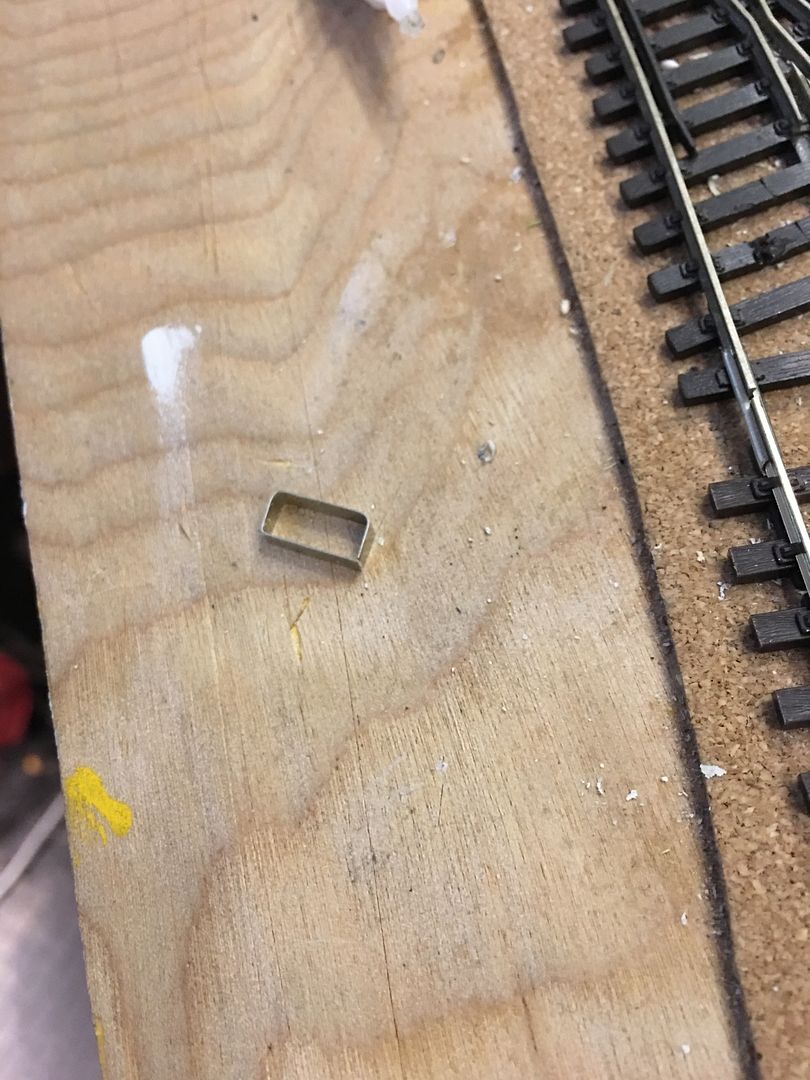
fuel tank
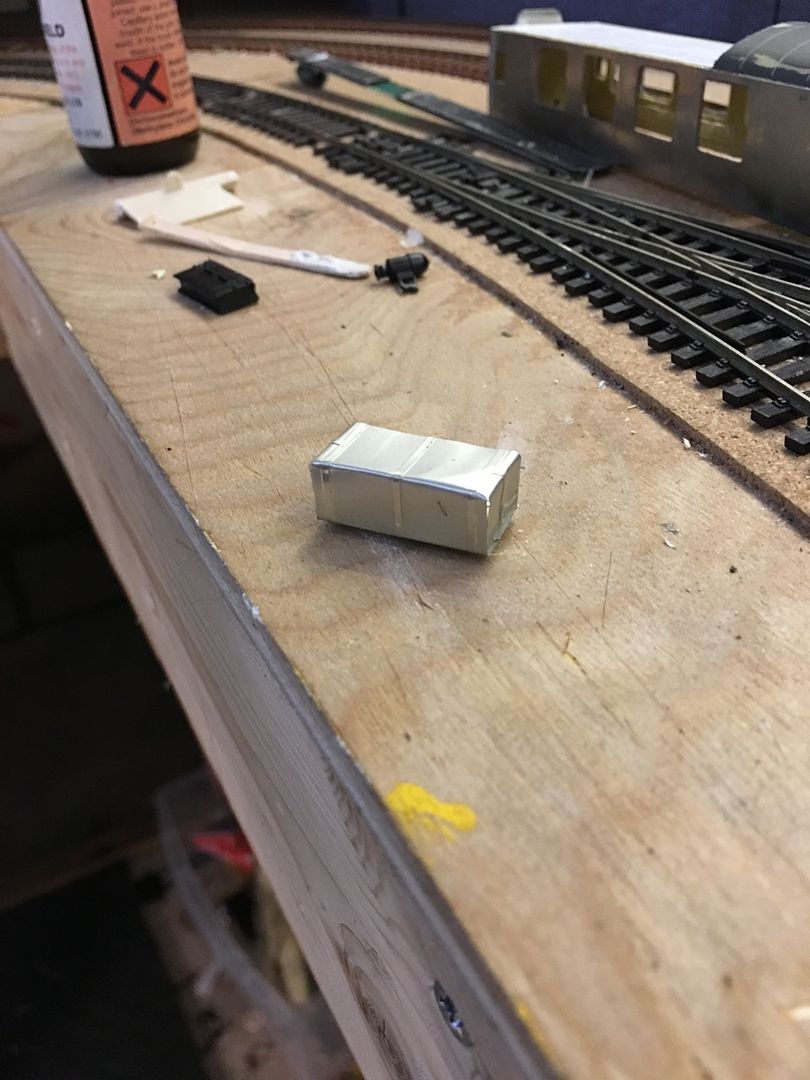
this one i did struggle with though
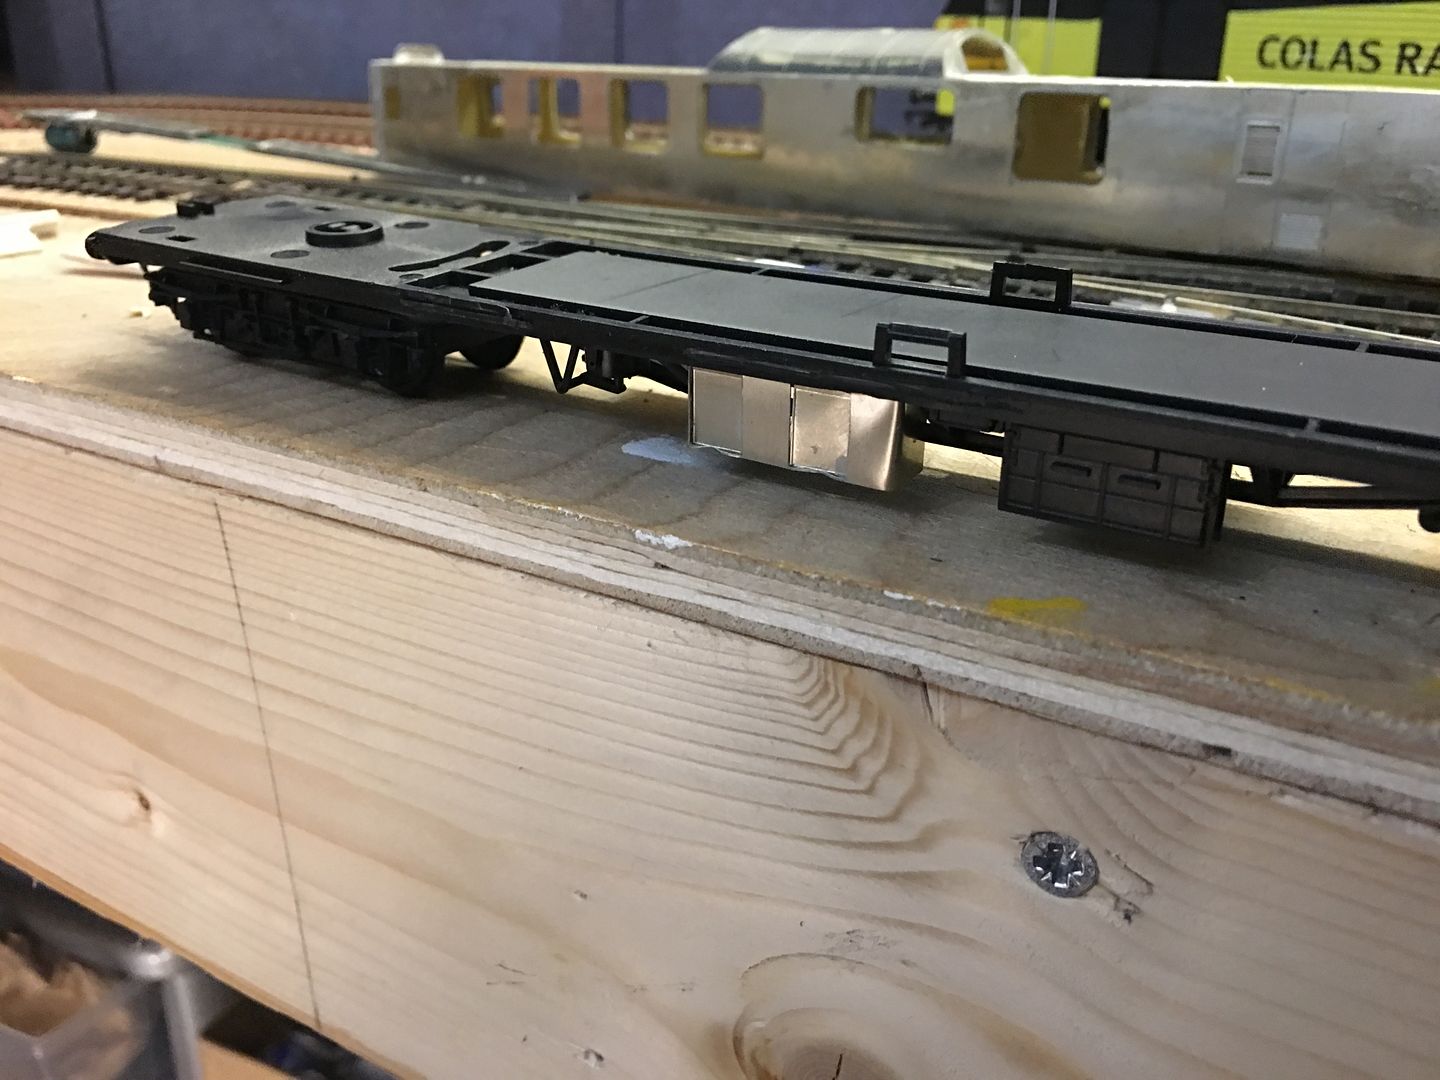
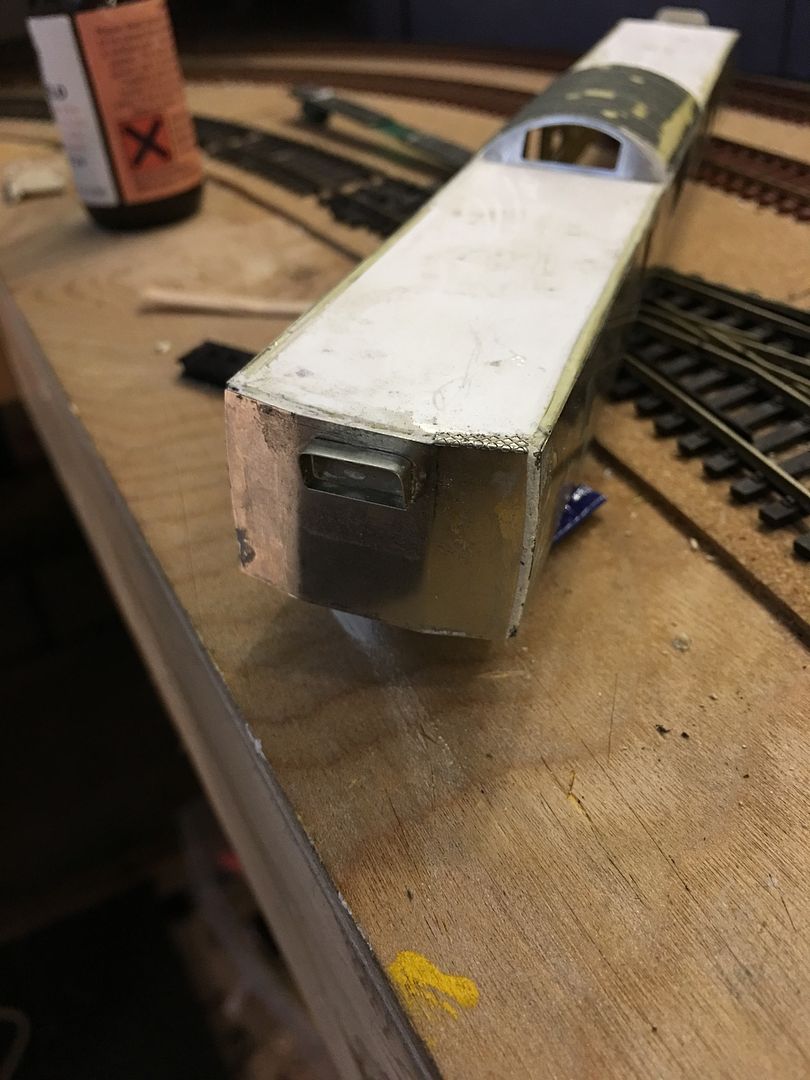
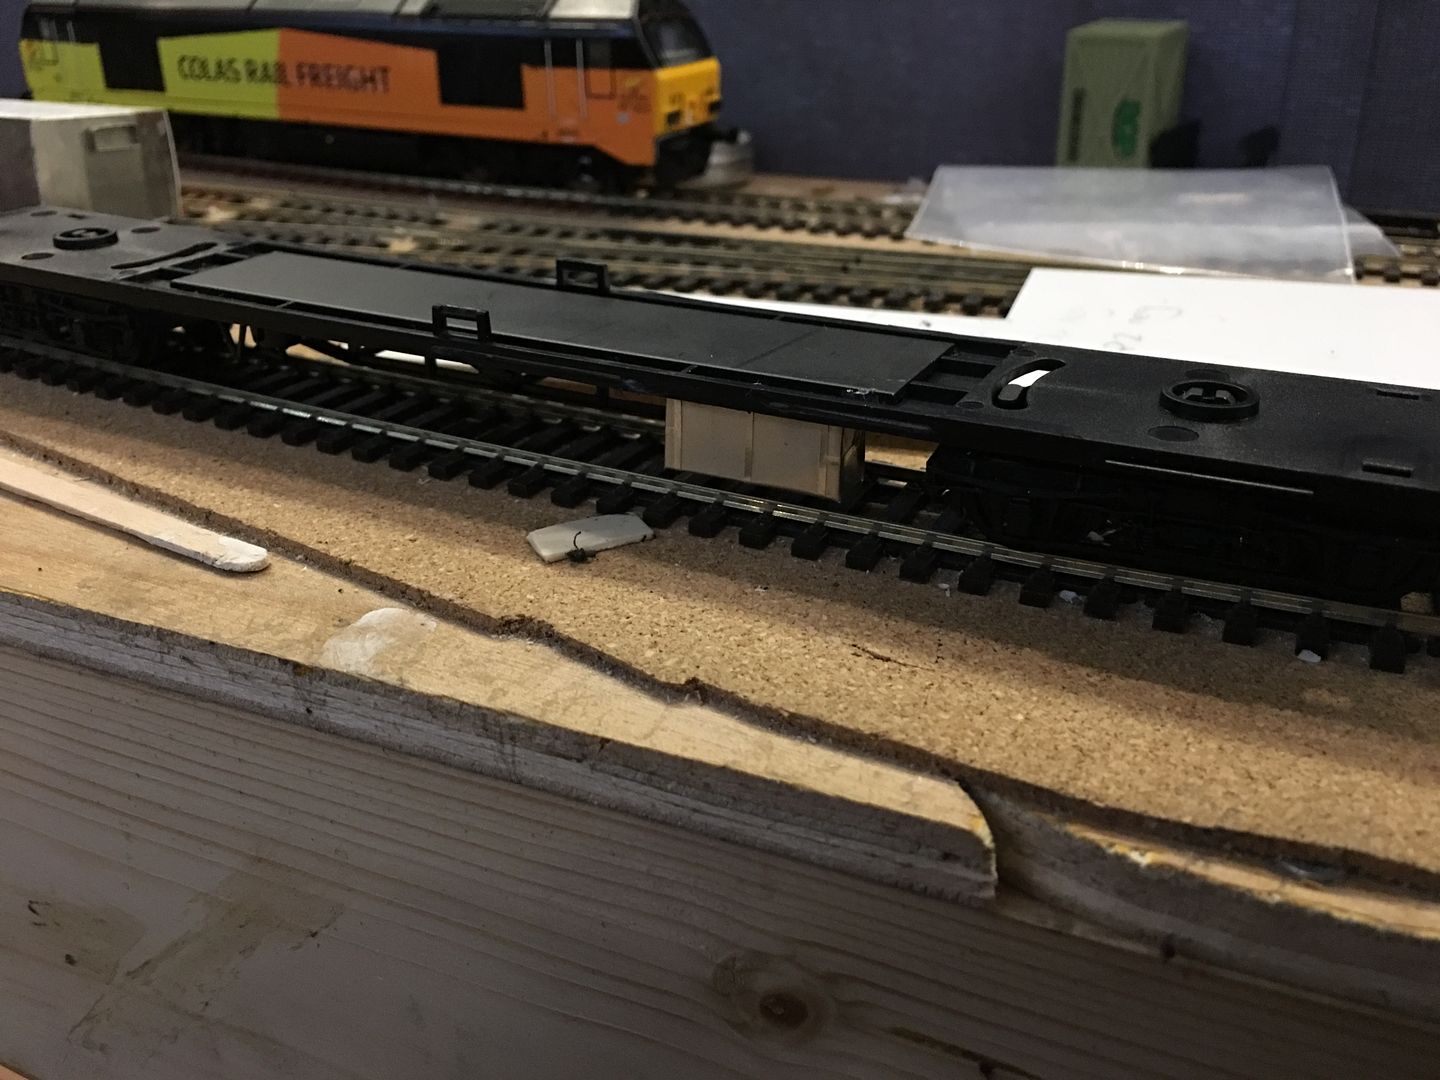
body on the chassis
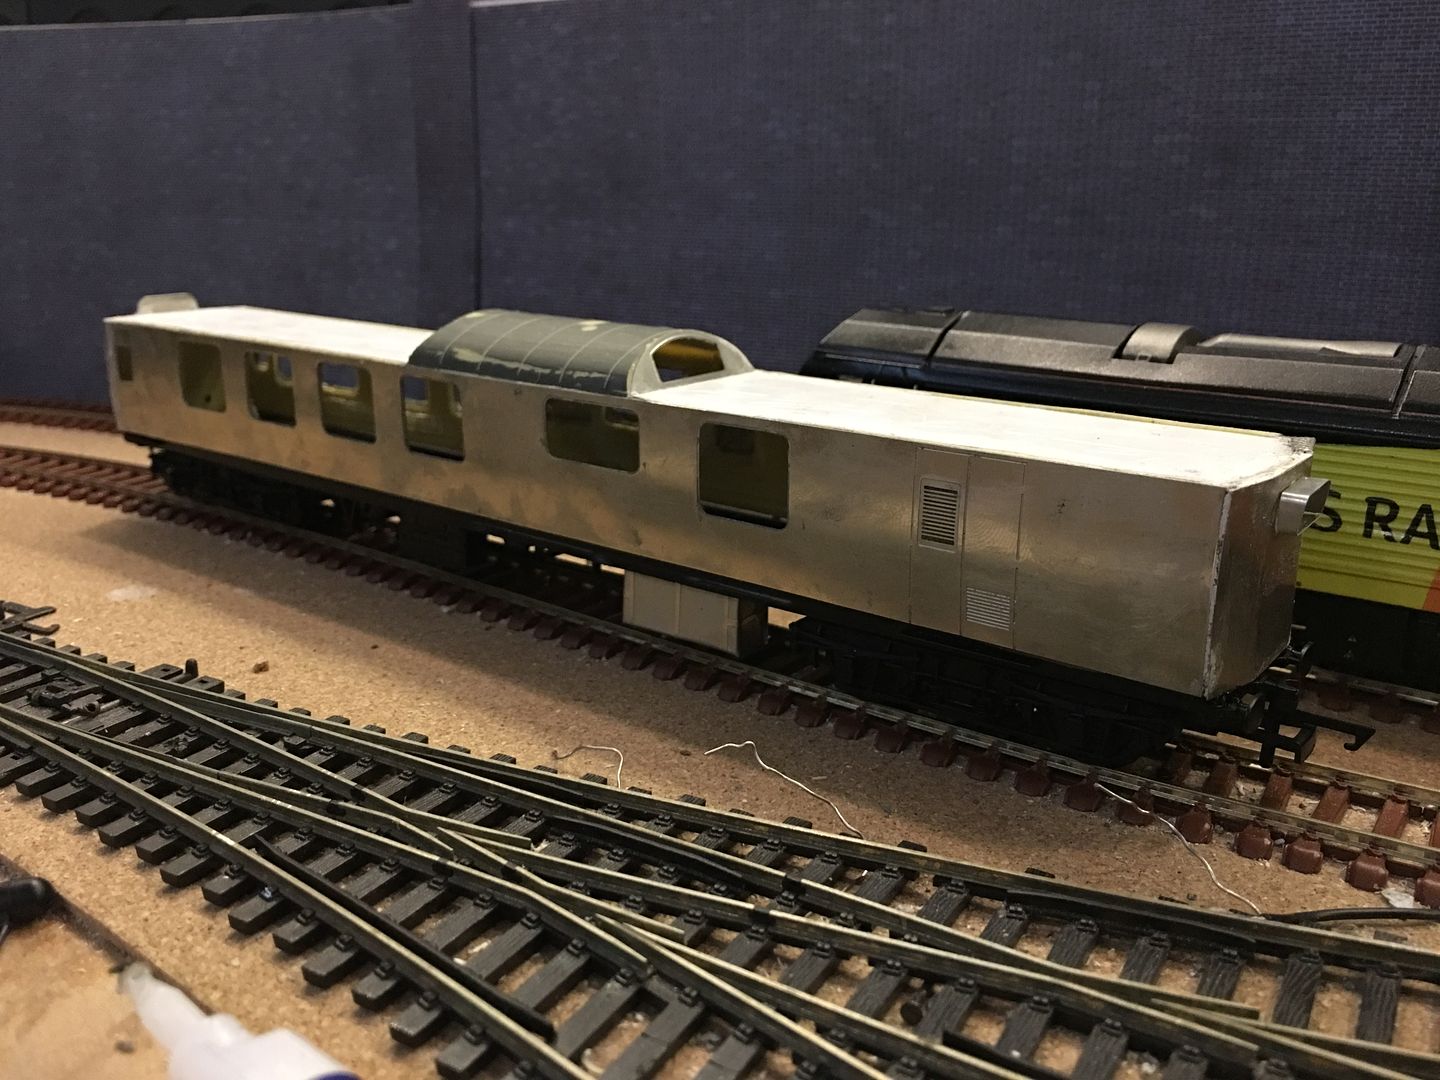
end gangway spot glued in place, will be removed to paint the coach
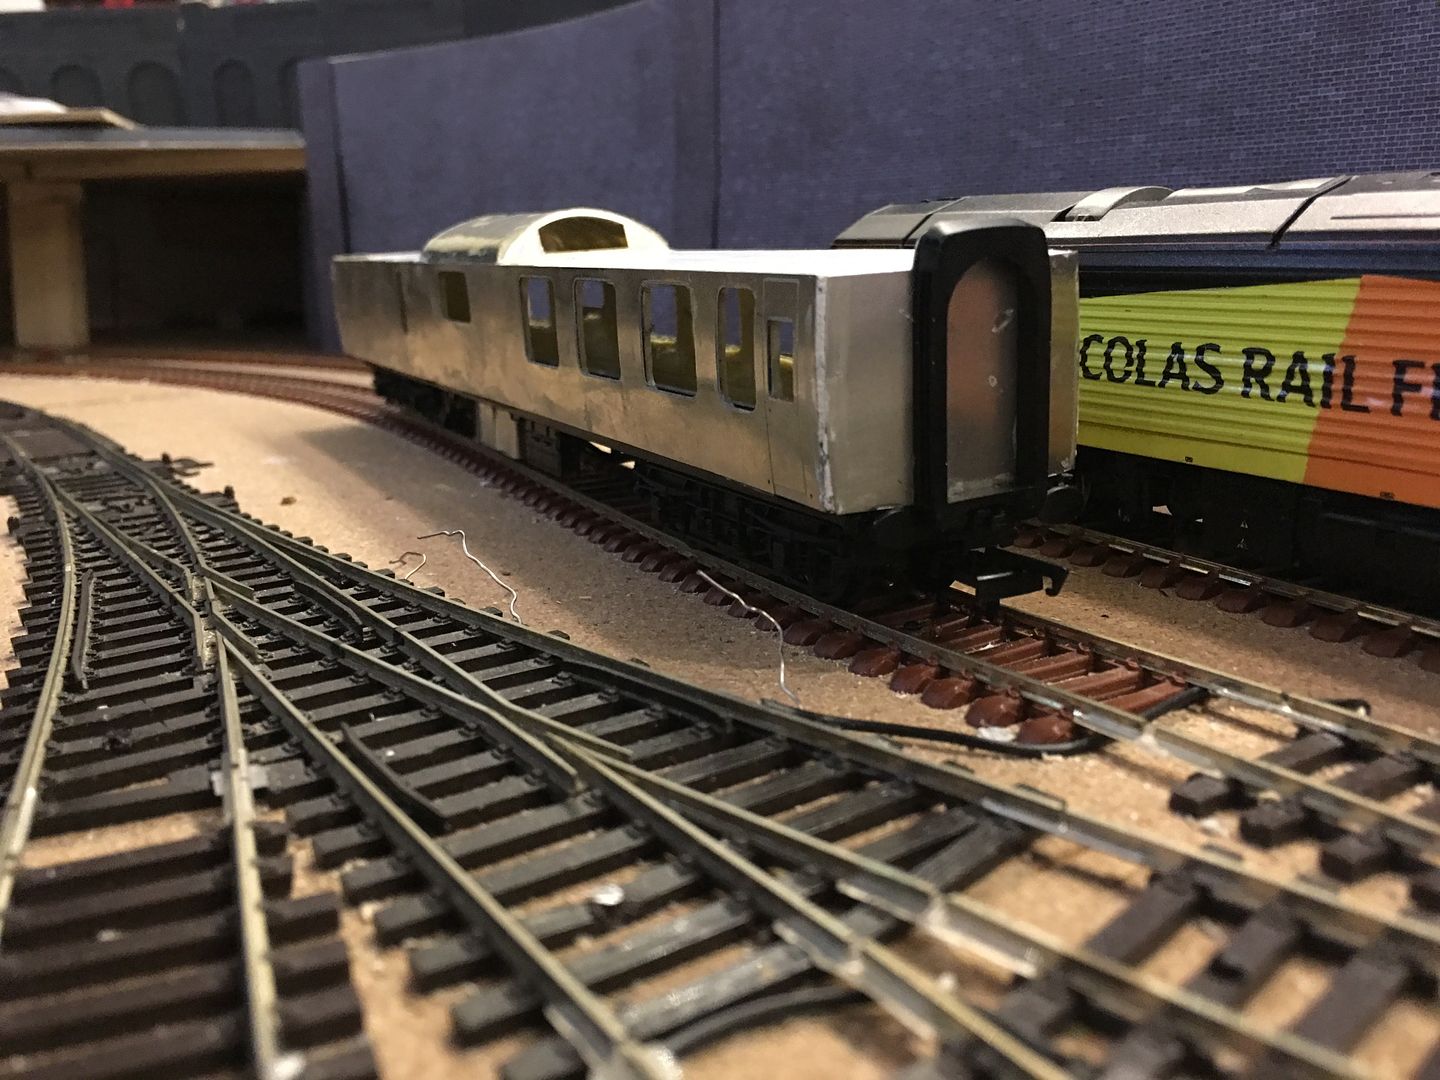
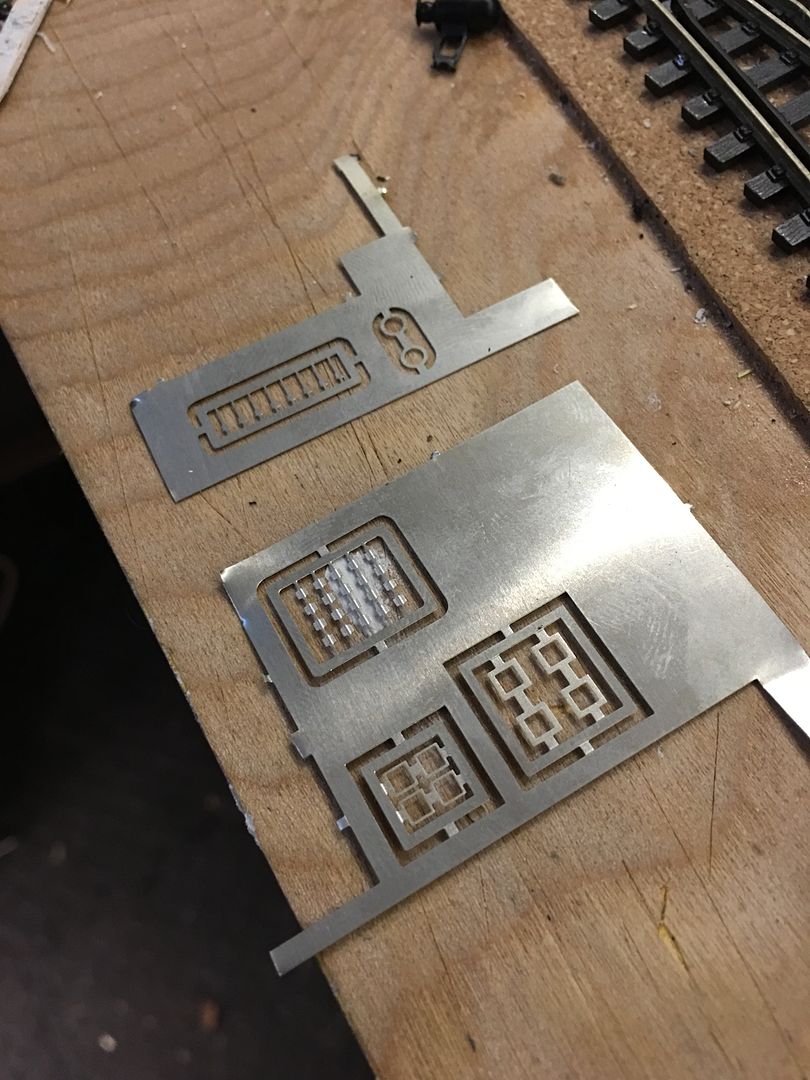
few more its to add, these make up fire pull handles,hinges, door handles and fuel tank gauges
then last job, window frames (on one side) secured in place with glue and glaze
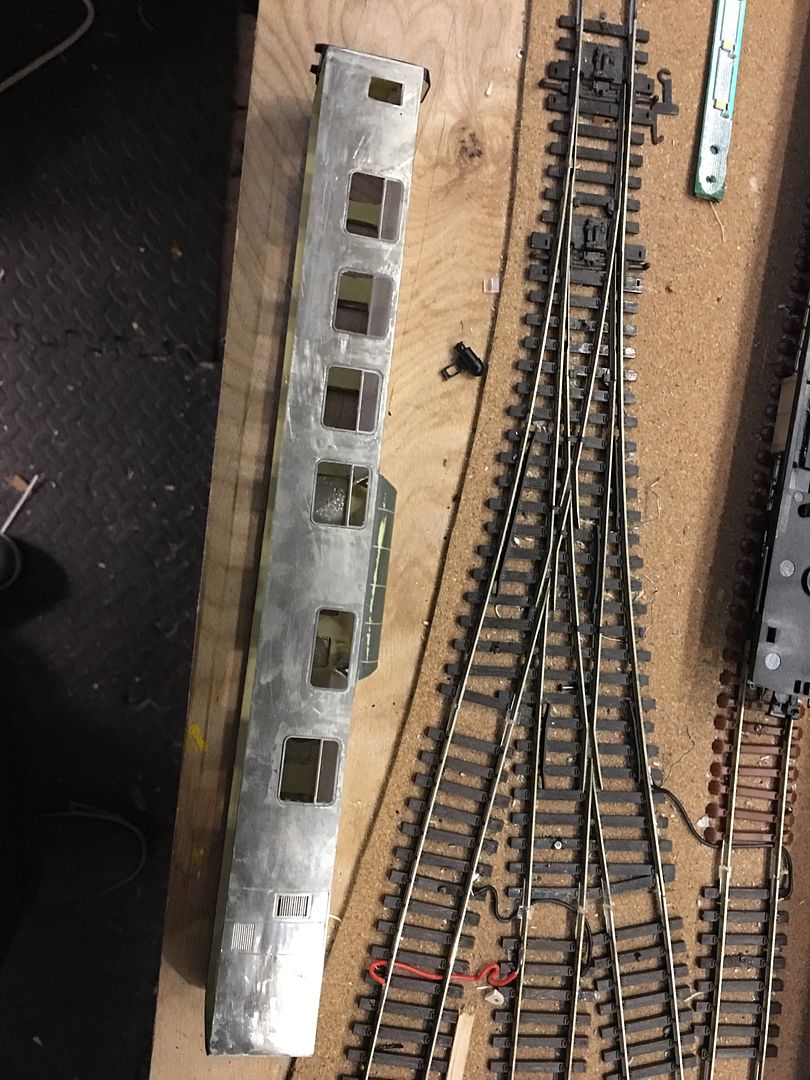
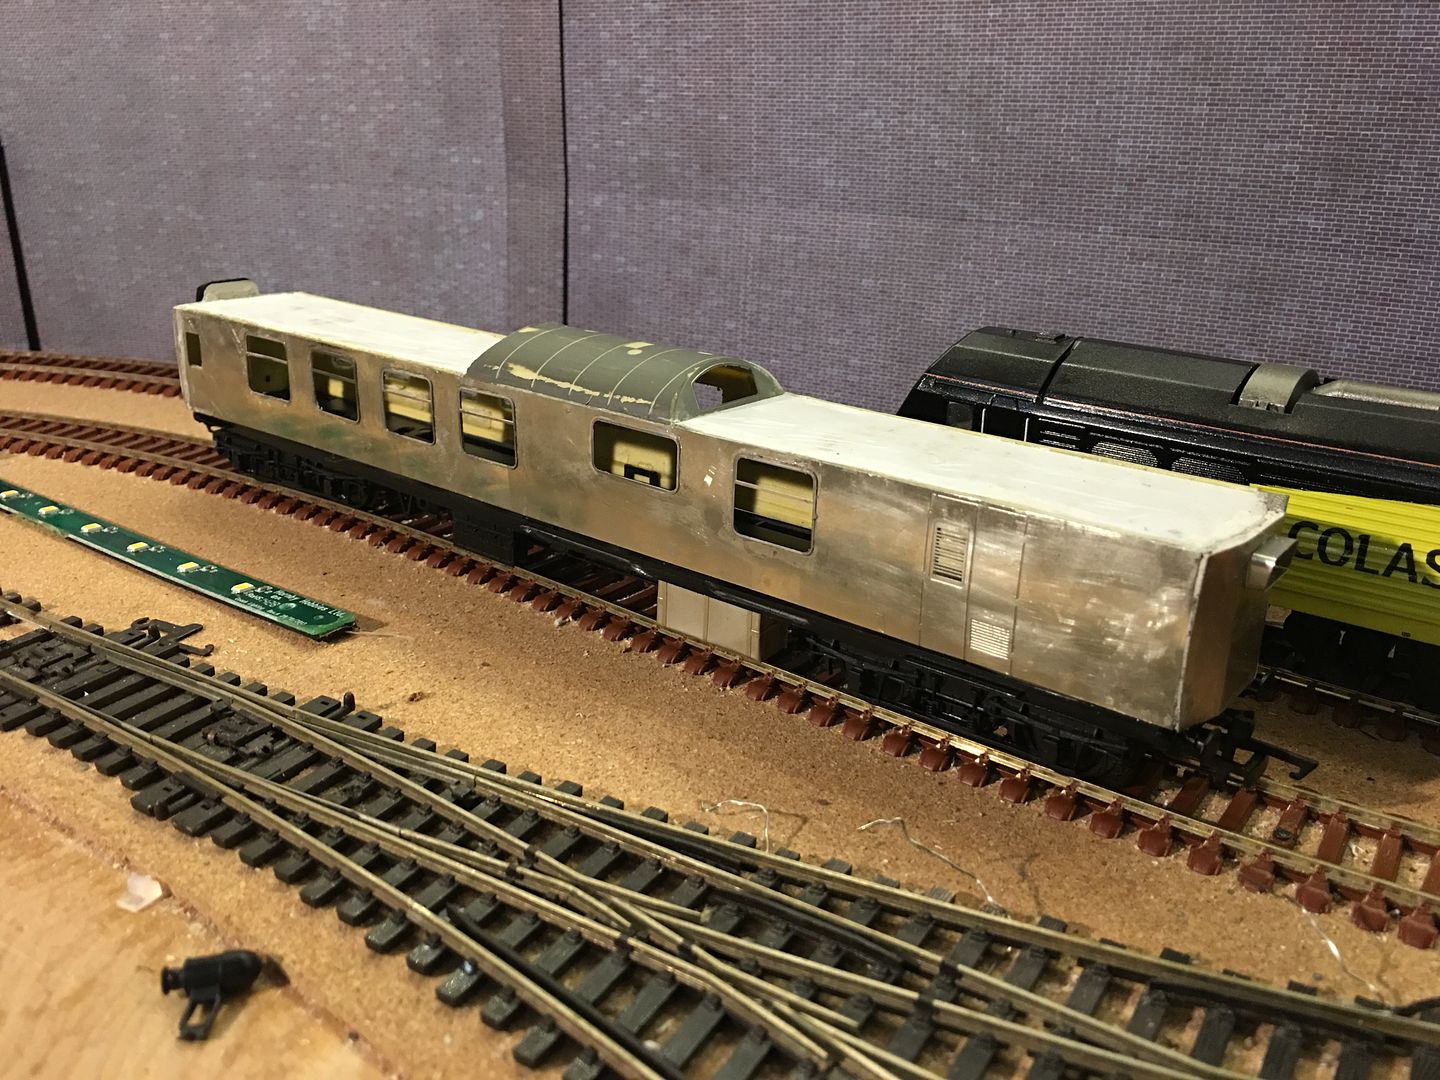
the big bit is going to be the roof areas, luckily as well as prototype pics i have the real thing to use as refrence in work this week!
im going to have a nose inside tomorrow with a view to getting the floorplan as i am feeling like detailing this inside with lights etc, i have a spare lightbar from a Hornby mk2 that is ideal for the job
one final question, my model has the wrong bogies, do Hornby do suitable ones on any coaches in their range?
-
Information on Mk2 micro buffets
Information on Mk2 micro buffetsTo help a future project, can anyone help with any details regarding the Br Mk2d/e/f micro buffet conversions.
How large were the buffet counters?
were they sectioned off from the remainder of the coach?
any details on where they were used?
any information would be gratefully received.
Thanks to all
The counter was the length of a seating bay because the entrance was from where the toilet used to be. There was a narrow shelf by the windows on the other side of the coach as far as I remember, perhaps more like a bum rest. Between the counter and the next seating bay was a standard partition, the kind used between the smoking and non-smoking sections.
The Mk2c ones were used on Wat-Exe, the Highland line and Trans-Pennine. the Mk2d ones were used on some Paddington trains (including the Night Riveria from about 1988) and the Glasgow/Edinburgh to Aberdeen push-pulls. Both types were also used on selected cross-country trains.
I'm assuming you are talking about the TSOT micro-buffets (converted in 1981), not the RFB conversions from the early 1990s.
-
Information on Mk2 micro buffets
Information on Mk2 micro buffets
That's a nightmare in N gauge2. A Mk1 BSO conversion is easier than most people think (apart from the fact it will always be a cut and shut)
Take a BSK and a BCK
Looks like I will be modifying a Mark 2A BSO, that's much easier!
Just waiting for the Farish Mark 2F coaches now
Shortage of Mark 2A TSO isn't helping, but next release is only a few weeks away now (pre-order enough for 4 rakes including 4 for repainting into ScotRail livery)
Can't see how I can include the Mark 2C coaches
-
MK2 Air conditioned coaches - Detail differences
MK2 Air conditioned coaches - Detail differencesTo summarise the exterior differences:
First Open
All FO coaches have both the toilets on the motor alternator (m/a) side (the large cylinder by the left hand bogie).
All Mk2d and Mk2e FO stock have a pressure ventilation cabinet under the fourth window from the right on the m/a side, MK2f FO stock do not have this cabinet. Mk2d 3170 - 90/3211 - 16, all of Mk2e and Mk2f 3276 - 3220/3357 - 81 have Stones air con equipment with 2 small fans on the non m/a side. Mk2d 3191 - 3210 and Mk2f 3321 - 3356/3382 - 3439 have Temperature Ltd air con equipment with one large fan on the non m/a side.
Second Open
All Mk2d TSO coaches have both the toilets on the motor alternator (m/a) side (the large cylinder by the left hand bogie). Mk2e and Mk2f TSO coaches have the toilet to the right of the passenger windows on both sides.
All Mk2d and Mk2e TSO stock have a pressure ventilation cabinet just to the left of the fourth window from the right on the m/a side, MK2f TSO stock do not have this cabinet. All Mk2d TSO stock (except 5653) and all the Mk2e TSO stock have Stones air con equipment with 2 small fans on the non m/a side. All Mk2f TSO stock (and Mk2d 5653) have Temperature Ltd air con equipment with one large fan on the non m/a side.
Brake Second Open
All Mk2d and Mk2e BSO stock have a pressure ventilation cabinet just to the left of the fourth window from the right on the m/a side, MK2f BSO stock do not have this cabinet. All Mk2d BSO stock and all the Mk2e BSO stock have Stones air con equipment with 1 small fan on the non m/a side. All Mk2f BSO stock have Temperature Ltd air con equipment with one large fan on the non m/a side.
First Corridor
Only Mk2d FK stock was made therefore they have a pressure ventilation cabinet under the fourth window from the right on the m/a side and Stones air con equipment with 2 small fans on the non m/a side.
Brake First Corridor
Only Mk2d BFK stock was made therefore they have a pressure ventilation cabinet under the fourth window from the right on the m/a side and Stones air con equipment with 1 small fan on the non m/a side.
Mk2d FO and FK stock have two roof vents at the non roof panel end and one vent on the non toilet side (and a water tank filler) at the roof panel end. All other FO stock have two vents at the non roof panel end and one vent at the roof panel end on the non toilet side.
Mk2d TSO stock have two roof vents at the non roof panel end and one vent on the non m/a side (and a water tank filler) at the roof panel end. Mk2e and Mk2f TSO stock have one vent at the roof panel end on the non m/a side and at the non roof panel end they have one vent offset nearest to the m/a side and another vent on the centre line and nearer to the centre of the coach. Mk2e TSO stock up to 5821 certainly, but not 5827 onwards, had water fillers at each end on the roof.
Mk2d BFK and the Mk2d and Mk2e BSO stock stock have one roof vent at the roof panel end on the non toilet side and a water tank filler where the other vent would be. Mk2f BSO stock have one vent at the roof panel end on the non toilet side.
Mk2d FO stock before 3189, all Mk2d TSO stock, all Mk2d BSO stock, Mk2d FK stock before 13585 and Mk2d BFK stock before 14162 had bump stops on the doors, all other air con stock had no bump stops. Mk2d stock, Mk2e BSO and Mk2e TSO stock up to 5852 had door windows deeper than the passenger windows. Mk2e FO, Mk2e TSO stock from 5853 and Mk2f stock had door windows the same depth as the passenger windows (but door swaps did occur!).
Finally! Mk2d and Mk2e stock have friction dampers on the bogies, Mk2f stock have hydraulic dampers.
Mark 2 air con stock do not all look the same!
-
MK2 Air conditioned coaches - Detail differences
MK2 Air conditioned coaches - Detail differencesAndrew
Do yourself a favour and buy a rake of Bachmann Mk2f stock when they come out. However on a few coaches change the unit with the fans on (and the box to the fans left) and add the pressure ventilation box on the other side using old Airfix modellings and have a mixed rake of Mk2e and Mk2f stock. Then the bodies will not be out of place and the chassis parts can be weathered in to look like the rest of the chassis.
Most of the Mk2f stock had Inter City 70 seats, with permanent middle arm rests which meant you couldn't lie across them overnight, whereas the Mk2e stock had original Mk2 style seats. Whether these should be changed if anyone wishes to make a Mk2e is up to the individual.
Note: 6100 was never allocated to the Western Region it was always on the London Midland, I have changed my original listing to reflect this. This coach is one of the 8 which were out of sync with the rest of the allocations. The Western received 5981-88 from a group of coaches that otherwise went to the London Midland and 6100, 6108-14 were allocated to the London Midland and Eastern when all the stock around them went initially to the Western.
-
Aberdeen Kirkhill T&RSD
Aberdeen Kirkhill T&RSDI very quick update to cover the progress of last weekend.
Fifteen cement wagons now individually numbered with offloading instructions on side boards added. I have ordered some Stenson Models disc brake actuators but they won't arrive from Shapeways until about May. Many thanks to Railtec for supplying the larger style numbers on eight of the wagons, they certainly make a difference. For a complete change for me here's a 45 second video of the rake, not great but you get the idea:
Once the brake gear is modified, and the lock-down has finished, they will all get a proper weathering job from Alex.
I haven't done any more to the other wagons yet, I'll post an update when I have something to show you.
In the meantime many thanks for stopping by.
-
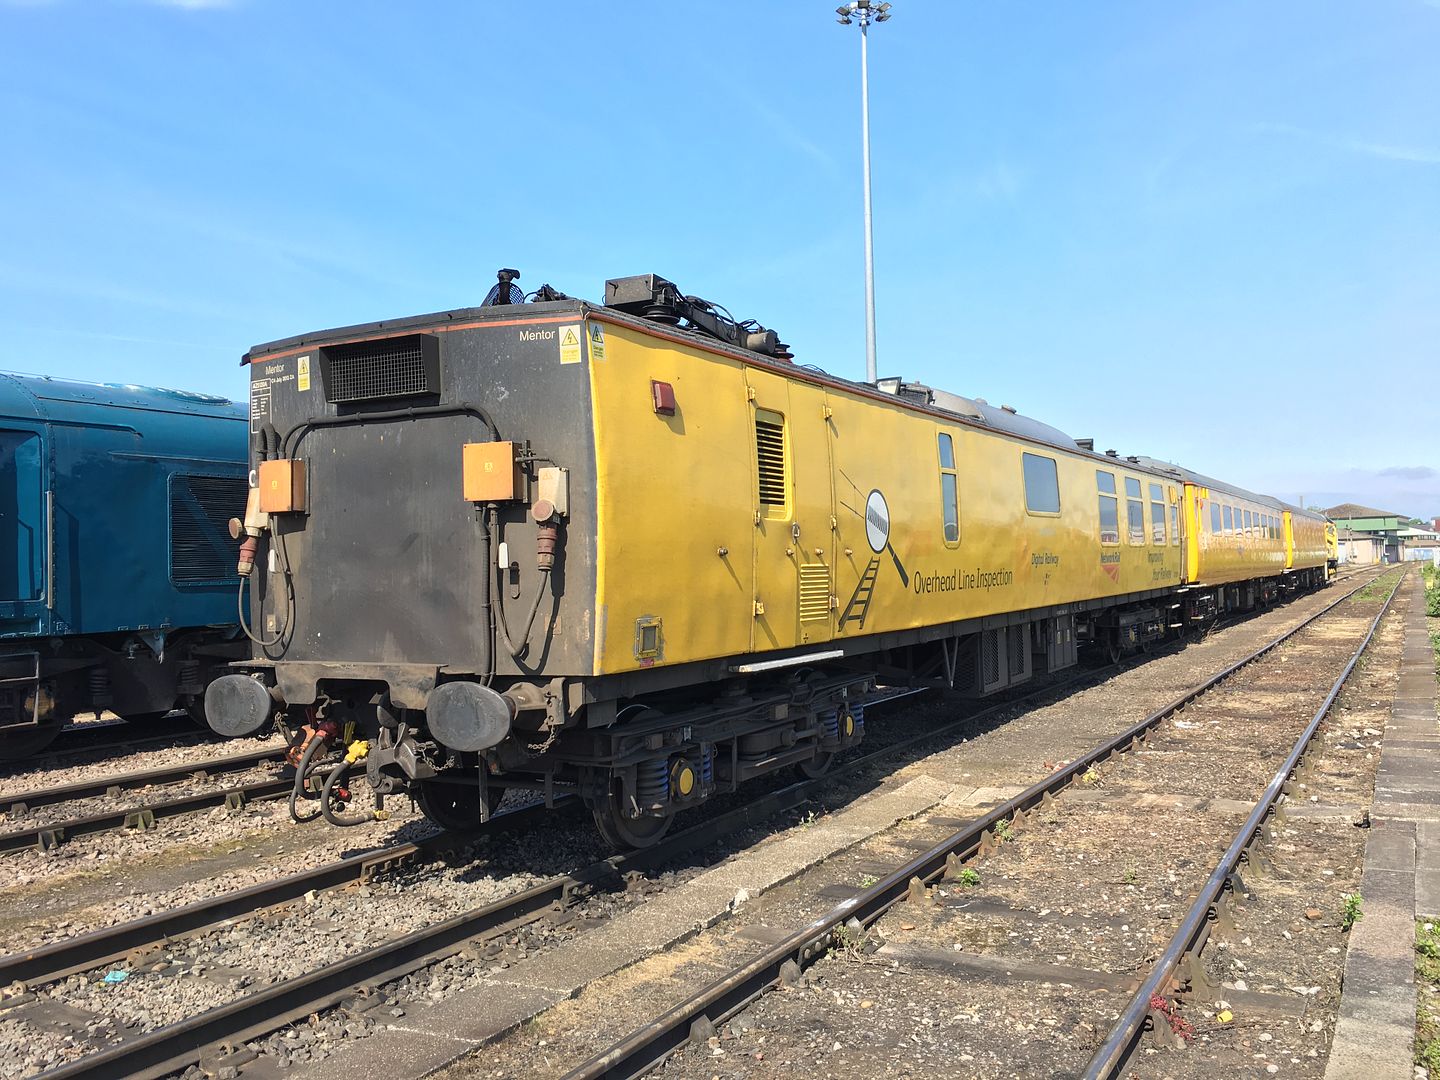
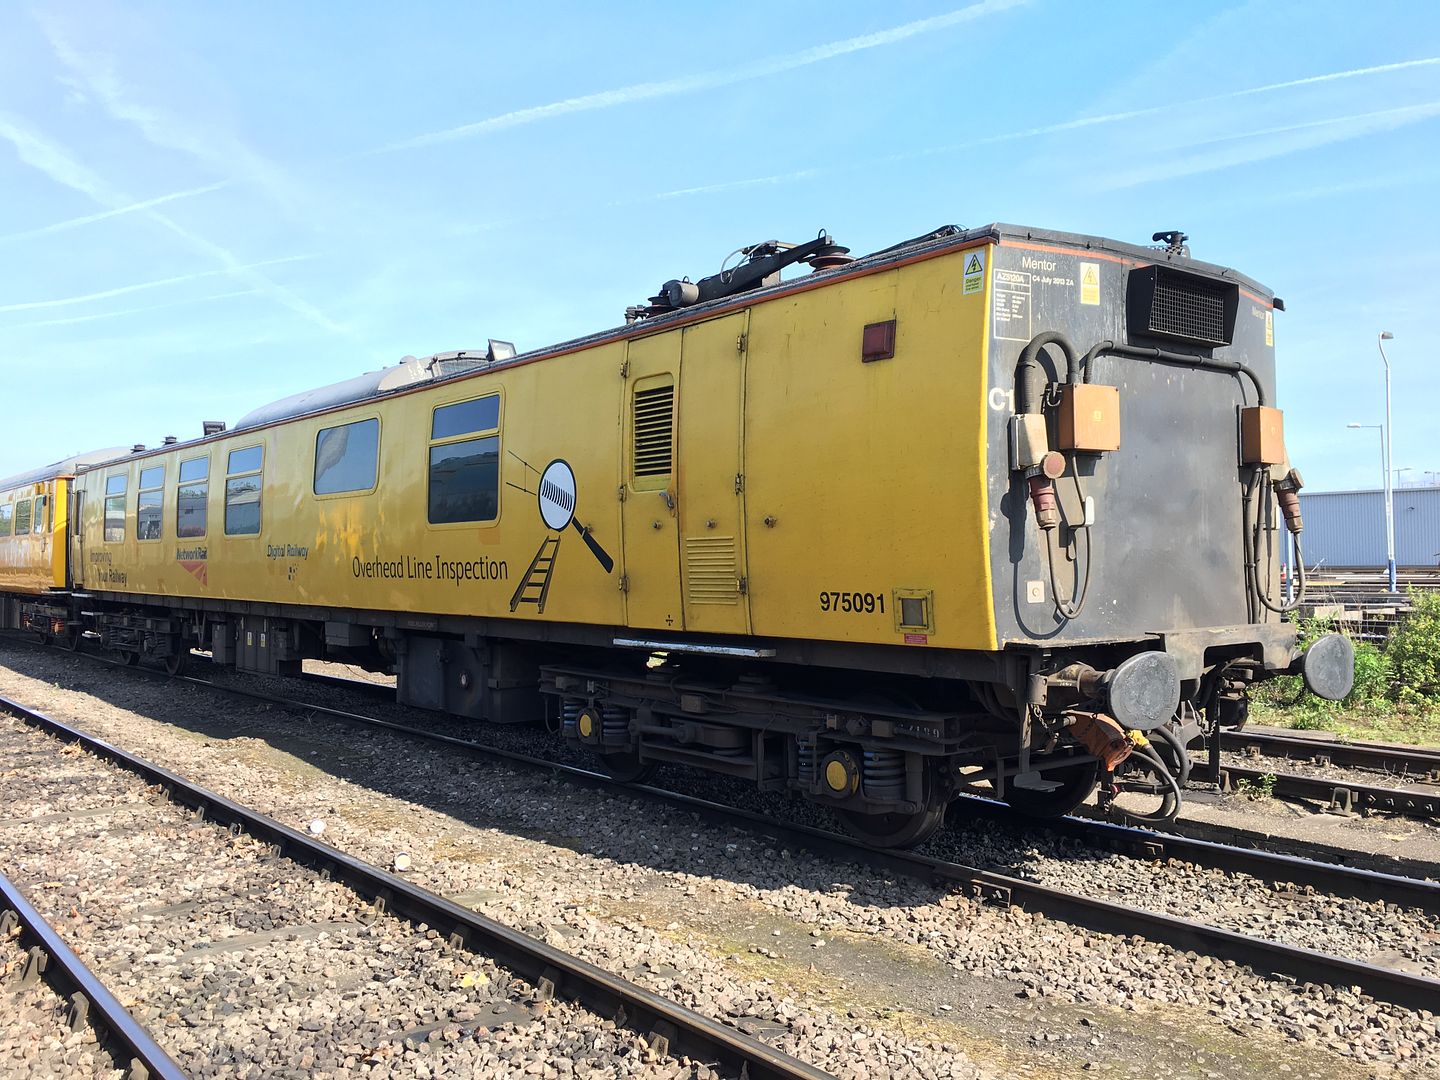
USP 5000C - new kit from Clockwork Ideas
USP 5000C - new kit from Clockwork IdeasI now believe our one (77327) is now the last mainline example in the UK. Will be measuring it up at some point, and asking Plasser for a set of drawings, in order to build my own model.
-
Track Plans for North American Layouts
Track Plans for North American LayoutsOver Christmas I had to do a lot of sitting around holding a sleeping baby so I drew a trackplan to the UK Freemo specs.
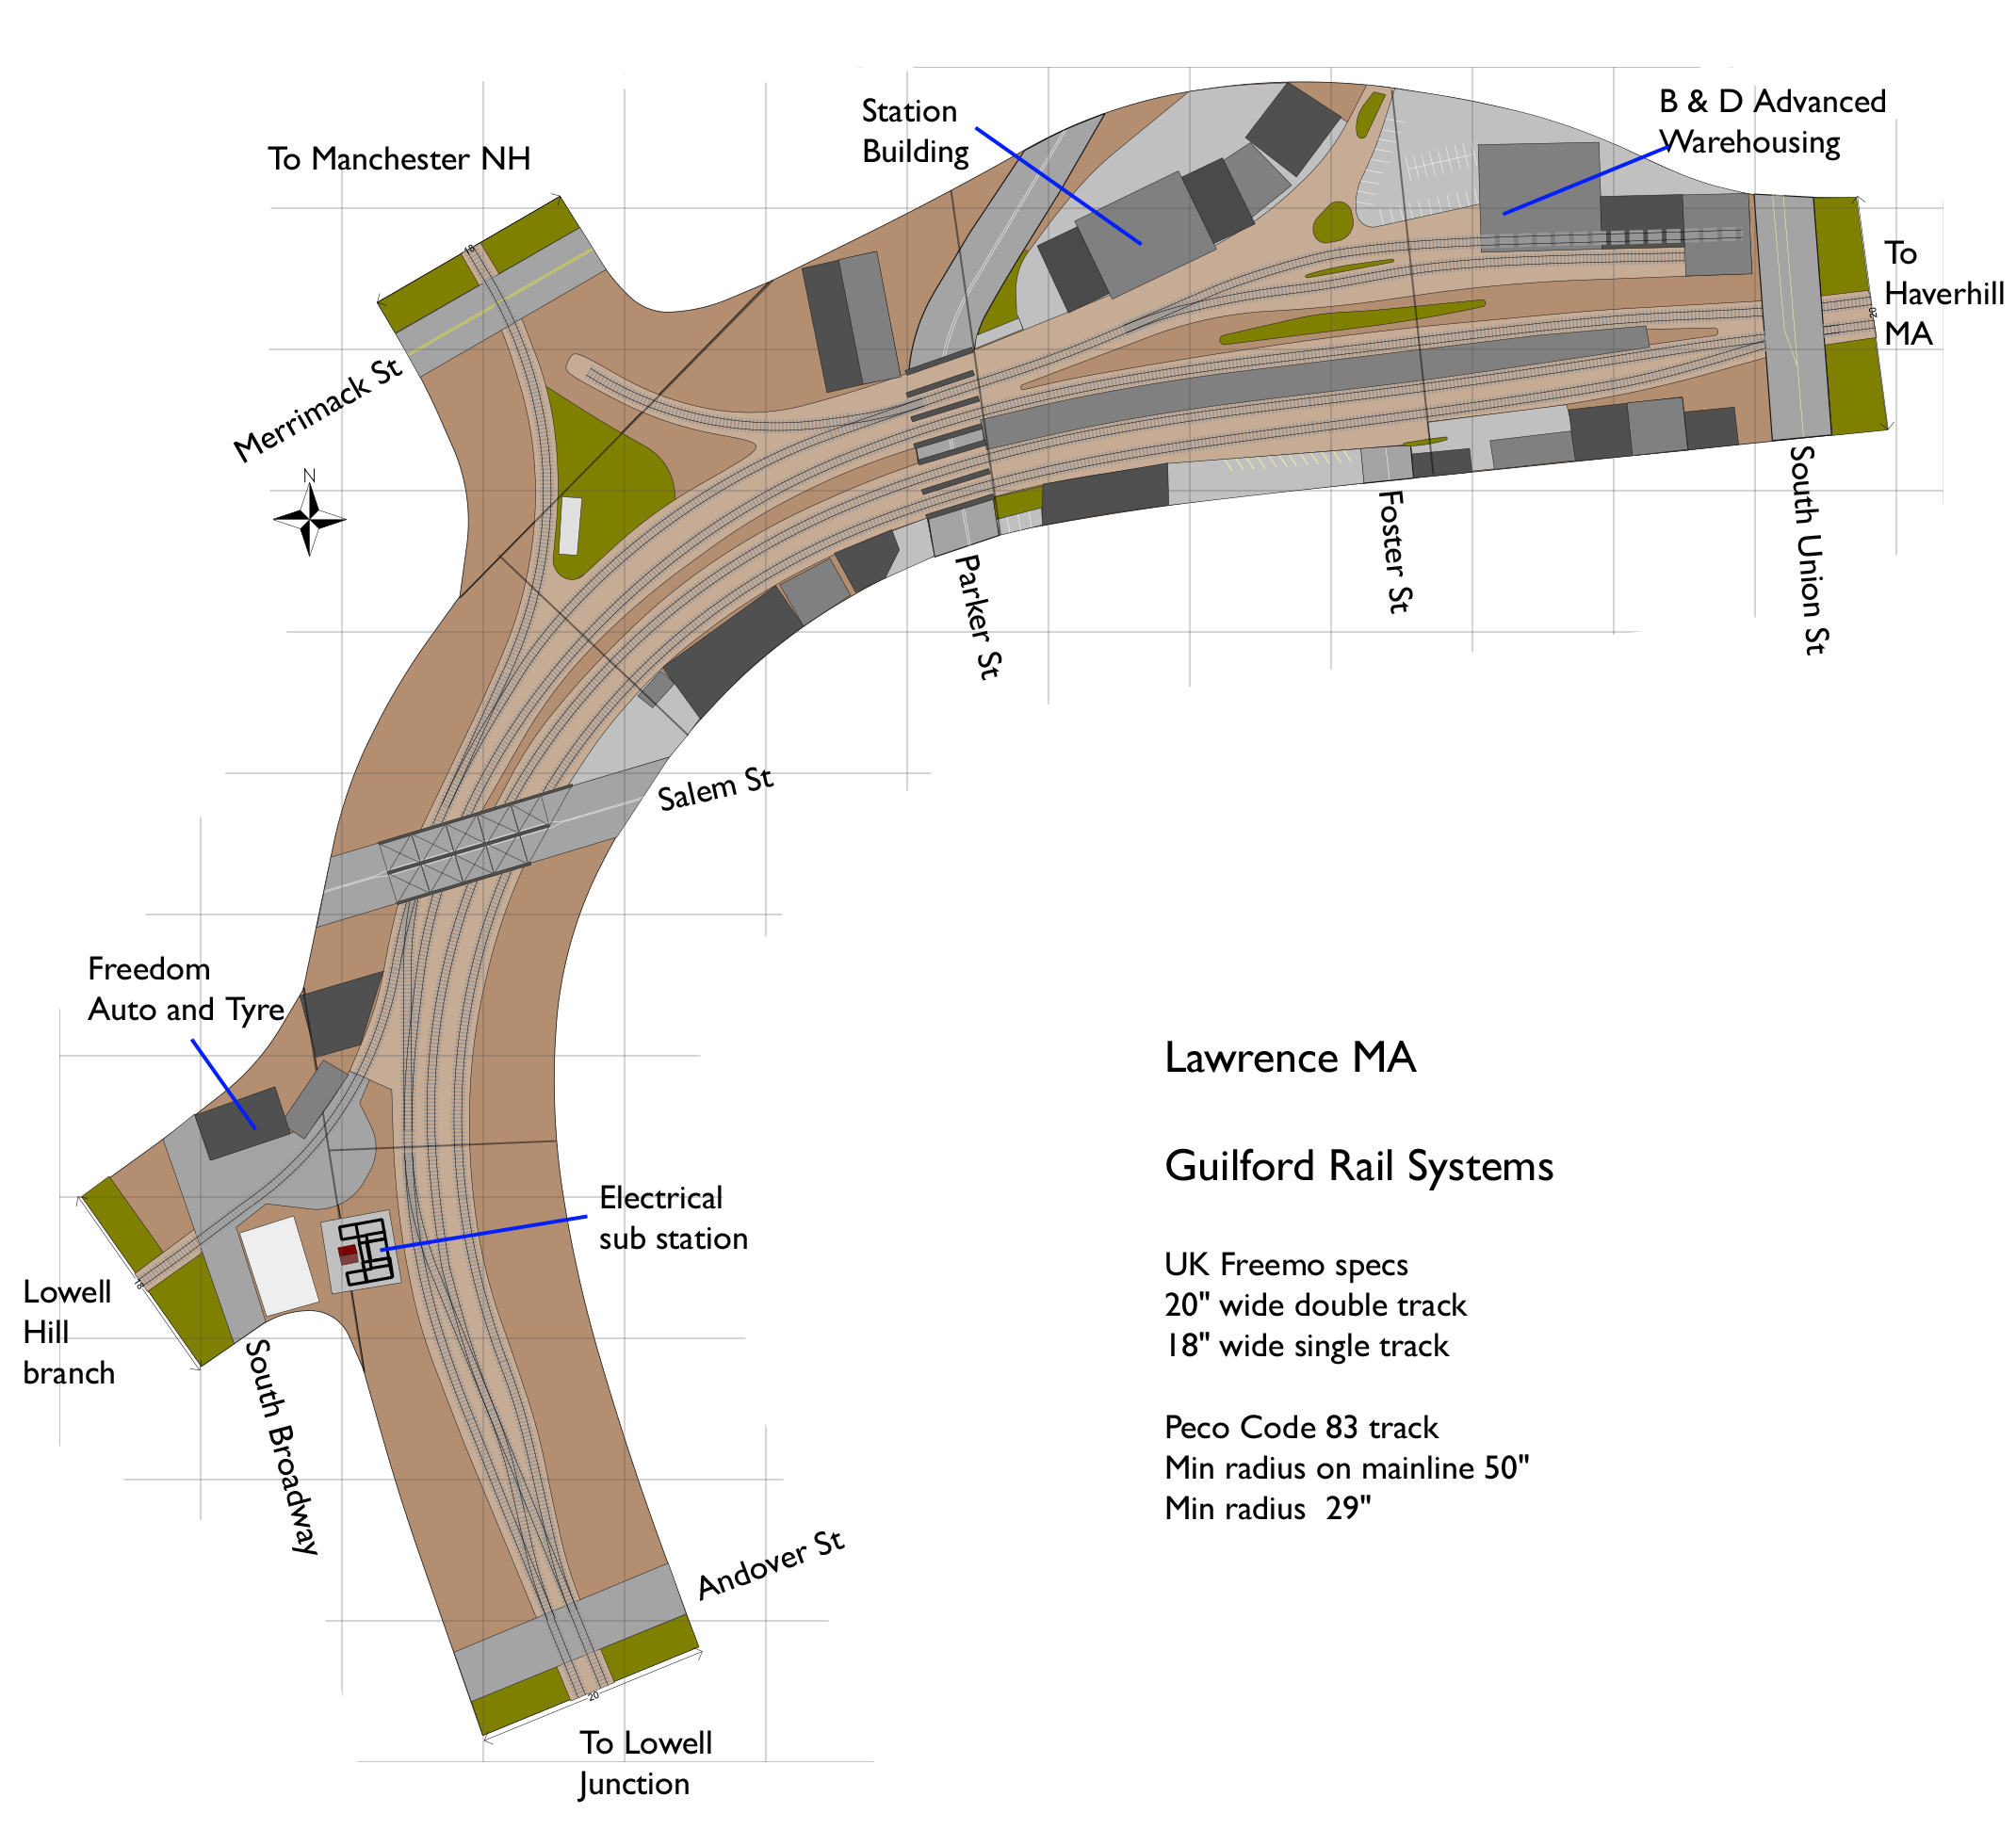
It is based on Lawrence MA, but with the new station to the east of the original station cut off and one of the spurs converted to a siding (which I think it had been years ago)
Contrary to most plans here, its not about the industries, there is only one, B & D Advanced Warehousing, who actually have a pic of a boxcar in their warehouse on their website!
The two links off the mainline are in reality short spurs to single industries, but are the remains of lines to other towns, however Freemo allows themto go whereever you want!
The station platform is accessed by a subway from the road underbridge, it is served by MBTA trains and the Downeaster also passes through.
I got bored before I added all the buildings, hence the bare areas at the southern end.
I don't see myself building this, but I think its an interesting counterpoint to most US designed US layouts and UK designed US layouts.
-
Using the easy-assembly Finetrax pointwork kits in 00 and EM (and in P4 from the S4 Society)
Using the easy-assembly Finetrax pointwork kits in 00 and EM (and in P4 from the S4 Society)Hi Guys,
Many have asked for pricing and I have finally received all the manufacturing quotes from the various suppliers in order to set a final retail price for the standard turnout kits.
So, to summarise:
The new 4mm Finetrax 'E-Z Build' standard bullhead rail turnout kits will have the following features:
-
Available in:
00 Gauge 'Standard' - This uses 1.25mm flangeways and will allow RTR loco's and stock to run without wheel modification (unless the is a rogue wheelset).
00-SF - This uses 1mm flangeways. 'RTR loco's and stock 'should' run through without modification, but a little more strict in having correct wheel 'back to backs'. The base will have the gauge narrow to 16.2mm through the crossing frog area only, the transition between 16.2mm and 16.5mm will be 'baked' into the turnout base.
EM Gauge - Standard 1mm flangeways as per EMG standards.
All of the above will be available in either thick sleeper (to match Peco bullhead and C&L Thick sleeper) or thin sleeper (to match C&L thin sleeper & SMP track).
- Plastic turnout base complete with ALL chairs fitted to the base as one single piece. Includes standard 3 bolt S1 chairs, P Slide chairs, L1 Bridge chairs, PW & PWX check rail chairs, Correctly represented slab & bracket 'A' chair that bolts the V on the crossing frog.
- 'Wood' texture on the Timbers.
- Nickel Silver cast crossing frog, complete with correct blunt nose, correctly aligned over the timber (which has a correct slab & bracket A chair on the base), minimal infill behind the splice, spacer blocks and bolt heads represented, correct wing-rail length, correct end flare on the wing rails, correct knuckle gap radius. Electrical feed wire pre soldered into the cast crossing frog.
- Cast crossing frog has pins underneath that accurately locates into holes in the plastic base.
- Pre machined switch blades, complete with pins pre soldered, the pins will locate into pre drilled holes into the tie bar.
- CNC machined tie bar, with pre drilled holes for both switch rails and 1mm hole for 'switch machine' actuator wire.
- SMP Nickel Silver Bullhead rail.
- Full colour printed instructions
The final retail price for the complete kits will be £22.99 plus postage.
After working solidly on these since March, I hope these kits will help many a modeller in fulfilling their dream model railway plan to fruition!
Thanks,
Wayne.
-
Available in:
-
James Makin's Workbench - 1990s dirty diesels & grotty wagons
James Makin's Workbench - 1990s dirty diesels & grotty wagonsHi guys,
After tackling all the above locos, this year through the (first) lockdown and the Summer, I thought I'd have a bash at personalising my OTA timber wagon fleet, and now here we are!
 OTA Wagons by James Makin by James Makin - Account 2, on Flickr
As most wagons are fairly similar in condition, instead of spending years going through and giving wagon-by-wagon updates, instead is an overall summary and a 21-wagon timber bonanza!
Similar to the first two tackled in the original update, all of these are from the Hornby stable, and then painted and weathered to represent various different ones seen across photos on Flickr.
The starting point was usually to dismantle the wagon, the wheels are fitted with Colin Craig brake discs and weathered, while attention turns to weathering the deck, the ends and the side stanchions.
OTA Wagons by James Makin by James Makin - Account 2, on Flickr
Various Humbrol paint shades are used for the weathering, Humbrols 62, 186, 113, 133, 258 and 32 all come in handy, along with other shades of browns and greys as required. Recommended listening for all OTA weathering projects is the solo album from ex-Girls Aloud redhead Nicola Roberts (the best one really).
Now when it comes to OTAs, most normal people like to use it as a great reason to have fun chopping up tiny logs and running loaded trains, but when I did see OTAs occasionally at Didcot Yard and varying other places, more often than not they were empty, so it seemed fun to model them without loads, weather all the wagon interior and recreate the load strapping from bits of cut up masking tape.
OTA Wagons by James Makin by James Makin - Account 2, on Flickr
There's many different colours used on the prototype, I simple painted some Tamiya tape on both sides and then when dry, slit with a craft knife to about a 1mm width (match to photos) and then glued on to the deck of the finished wagons, twisting here and there to get the often-curled appearance of the fabric straps.
All my Hornby OTAs were either the EWS or teal green releases, but the real things wear a coat of many colours, so here's a few of the versions I tackled:
OTA Wagons by James Makin by James Makin - Account 2, on Flickr
Up first is the irresistible blue of the former Thames Board OTAs, my take on the faded livery being some of the old Railmatch 'British Steel Blue' from the Class 60s.
OTA Wagons by James Makin by James Makin - Account 2, on Flickr
Some of the stanchions were modelled as missing and generally weathered to a battered appearance, drybrushing browns from light to dark around the raised edges until satisfied.
OTA Wagons by James Makin by James Makin - Account 2, on Flickr
The underframes were weathered by mottling on a mix of greys and blacks and browns, with finishing touches like the yellow axlebox covers to complete.
While going through pics, I spotted some OTAs with low flat ends, so did a bodged cut job on my Hornby model, to replicate these faded Railfreight red versions:
OTA Wagons by James Makin by James Makin - Account 2, on Flickr
There's extra stanchions & supports on each side too, added from various bits of styrene strip and angled plastics. The planked decks were just painted in an array of browns and greys, weathered with drybrushed greys, before the load strapping is secured on top.
OTA Wagons by James Makin by James Makin - Account 2, on Flickr
Next up of course is the lovely EWS versions!
OTA Wagons by James Makin by James Makin - Account 2, on Flickr
While most are very similar, I spotted variations in wagons with some having faded or repainted stanchions, while there's plenty of opportunities to have fun battering the parts clobbered by numerous logs!
OTA Wagons by James Makin by James Makin - Account 2, on Flickr
The decks on the refurbished EWS versions are metal plated, and so weathered slightly differently from the wooden plank versions.
OTA Wagons by James Makin by James Makin - Account 2, on Flickr
Layers of light and dark browns and greys are mottled on, and effort gone in some cases to replicate the weathered on the flooring where the load has been sitting, or where rainwater gathers in dents on the floor, all subtle variations that can be seen in real life. Humbrol gunmetal grey is drybrushed across the floor to highlight the checkerplate texture.
OTA Wagons by James Makin by James Makin - Account 2, on Flickr
The inner ends also seem to get a good battering as well by all the logs! Some of the ends are either painted in body colour, or a light grey or browns, photos show a wide variety of styles. Then, a range of browns and greys are stippled on with a large brush until the desired effect appears.
OTA Wagons by James Makin by James Makin - Account 2, on Flickr
Finally, I had to model some of the attractive teal coloured ones too!
OTA Wagons by James Makin by James Makin - Account 2, on Flickr
The original Hornby colour is retained but changes once weathered, flattened and muted under shades of browns and rust patches.
OTA Wagons by James Makin by James Makin - Account 2, on Flickr
Again, significant weathering was done to the stanchions and deck planks to get the full effect of lots of log bashing!
OTA Wagons by James Makin by James Makin - Account 2, on Flickr
It's been great fun putting these all together during the extra modelling time this Spring & Summer, and blasting through a 21 wagon-rake in just a few months is a new speed record for me so far!
OTA Wagons by James Makin by James Makin - Account 2, on Flickr
As we now enter another lockdown it'll be interesting to see what gets blitzed next, I've got a stack of Parkside 'Barbel' wagon kits looking right at me..!
Cheers,
James
-
Mark 2b, By Accurascale and IRM!
Mark 2b, By Accurascale and IRM!1 hour ago, Wickham Green too said:.....one in normal service in Scotland. ( No.5401 on the left.)
Perth : 28/8/88
No 5401 on the left is a Mk2a, the door is a big give away and also Mk2b are in the number range 5434 - 5497.
I guess Mk2b weren’t quite as rare in Scotland in the late 1980s, which was also around the time when I had the usual teenage loss of interest in railways, not helped by ‘Sprinterisation’ either.
Brian.
-
Mark 2b, By Accurascale and IRM!
Mark 2b, By Accurascale and IRM!Hi everyone,
Scottish 2b TSO allocations
From 1988 P5: Polmadie x3
From 1989 P5: Polmadie x1, Craigentinny x2
From Spring 1990 P5: Inverness x1, Polmadie x2, Craigentinny x2
From Summer/Autumn 1990 P5: Inverness x2, Craigentinny x4
From Spring 1991 P5: Inverness x4, Craigentinny x1Cheers!
Fran
-
Mark 2b, By Accurascale and IRM!
Mark 2b, By Accurascale and IRM!1 minute ago, turbos said:As a few known typos crept into the P5 (as mentioned further up the thread), are there any photographs of a Mk2b on a normal service in Scotland?
Brian.
Hi Brian,
Sure. Here's some!
First vehicle is a Mk.2b TSO with ScotRail branding, second is a 2c TSO(T), rest are 2/2a47541 'The Queen Mother' 15.05 Aberdeen-Inverness, Keith 27.05.1990
First vehicle is a Mk.2b TSO with ScotRail branding, then a 2c BSO, a 2/2a TSO, then a 2c CK (half declassified from first class47617 University of Stirling at Wades Bridge, Dalwhinnie, on the 0644 Inverness-Glasgow. 27th April 1989
A couple of Mk.2c, a couple of 2/2a and a Mk.2b TSO at the rear:47578 1B34 1438 Inverness - Edinburgh on May 23, 1990
Cheers!
Fran
-
Hornby 2020 range mk1 RB
Hornby 2020 range mk1 RBThe only other thing I can think of is that an RBR would have had the bright orange plastic moulded seats, remember them? Obviously they would have had false ceilings with fluorescent lights but on a model you won't see them.
Modellers should put the orange curtains in as well, they really make a difference:
From Flickr (Ian Docwra).
-
'Freightliner'-liveried containers
'Freightliner'-liveried containers
Spotted these in Freightliner at Trafford park. They look to be open tops, judging by the row of eyelets just below roof level, but with an end tipping door (hinged at top not sides)?
-
Supermarkets - empty shelves therein
Supermarkets - empty shelves therein
According to the RHA, the average age of a UK lorry driver is 55!!!
Less than 1% of lorry drivers are under the age of 25!
The last bit actually says it all, about the labour issues we as an affluent nation[as well as others] face.
Our younger generations no longer deem it appropriate to be aiming to work in such menial trades. Or maybe, it's the parent of our younger generations who are doing the deeming??
-
RtR VBA Van to EM Conversion
RtR VBA Van to EM Conversion13 hours ago, RobA2345 said:Finished example of one of the vans.
Hi Rob,Really nice work on the VBA - nice to see someone else springing some stock. To be honest I’d not use Bill Bedford springing units anymore now the Stenson Models ones are available from Phil/Colin. The new ones from Stenson Models go together ridiculously well and are really easy to fit - I can’t recommend them enough. I have linked the castings and the units below:
https://www.stensonmodels.co.uk/product/suspension-unit-4mm-br-w-iron-for-Bachmann-wagons-cc02s-11/From recollection everything you need including bearings come in the packs, and the cast axle boxes slot really nicely over the outside of the bearing.
There are also some really other goodies for all sorts of wagons as well as loads of underframe parts, so well worth a look!
Here’s one of the VGAs I converted earlier in the year - it runs beautifully and is sprung very easily! (Needs the underframe spraying black and weathering!)
Hope that helps!
Will
-
Kylestrome’s 4mm Workbench
Kylestrome’s 4mm WorkbenchAs with most of my projects, these Lima ‘Whisky’ hoppers were started with a burst of enthusiastic activity which then ground to halt when I hit a slight difficulty. The problem here was trying to find decent reference material for the whisky advertisement boards and a suitable way of producing them to a reasonable standard. Most of what I could find to work with was of low resolution and my ink-jet prints were not sufficiently sharp. As a search for suitable transfers drew a blank, I decided to modify the wagons to their later, boardless state.
Because LIma, in their wisdom, moulded the boards as part of the sides I was forced into practicing the ancient and honourable art of chain-drillng to remove the offending panels. I also had to remove some of the internal chamber that contains the weight so that I could more easily use files and sanding sticks.
The job of fitting replacement panels was a lot easier than I was expecting, and I managed to finish the whole process in less than a days modelling.
I couldn’t face doing a second hopper with leaf springs so I opted to use some Cambrian pedestal suspension units instead. I realise that I will now have wagons (four altogether) that will be out of period with each other but I’m not going to loose any sleep over it.
Under gubbins
More of the same
The body is not yet glued to the chassis, which is fortunate because it's the wrong way round!
There's only the painting to do now plus transfers and couplings
David
-
Kylestrome’s 4mm Workbench
Kylestrome’s 4mm WorkbenchNow that buying items from the UK has become so difficult I looked at a local German online shop to see if I could something of use, before stocks run out, and came up with this Hornby OTA. Normally, with these articulated wagon chassis, I would replace the wobbly bits with Bill Bedford sprung axle units. In this case, I thought it would be a shame to lose the axle box detail so I decided to have a go at ‘finescaling’ the original underframe.
I cut off the axle guard detail from the metal axle units, with a piercing saw, and glued them onto the solebars and springs. Then I ground off the pinpoints of the two P4 axles and turned some spacing washers to reduce the side-play.
Once reassembled, and with couplings fitted, the wagon runs quite well on P4 track although I’m glad this is only a one-off. I think the friction would probably cause problems if I were to run a whole train of them.
I will probably need to do a partial re-paint to suit my chosen period, and I will add a load with some concealed weight.
David
-
Kylestrome’s 4mm Workbench
Kylestrome’s 4mm WorkbenchI usually like to keep some sort of photographic record of the things on my workbench to remind me of how I made something, but also to justify the amount of money I have spent on photo gear over the years! I thought it would be mean to keep all this stuff to myself so I’ve started this thread.
To kick off, here are some detailing bits for the buffer beams of a Heljan Class 27 that I have on the go at the moment (along with a hundred other things). The parts that come in manufacturer’s plastic bags tend to look a bit strange (to me) and are often not complete. I prefer to make my own pipes and fittings from various bits of wire and tube, and the resulting details, though not perfect, are at least stronger and more consistent across the loco fleet. I also derive a lot of fun by knitting these things myself!
After lots of jolly fun with pliers and a soldering iron
Here we have a full house consisting of (1) steam heat pipes, (2) vacuum pipes, (3) Engine control air pipes, (4) air brake pipes and (5) main reservoir air pipes
A quick sketch so that my memory won't let me down when I do the next loco
David
-
Roco Z21 - DCC not a clue
Roco Z21 - DCC not a clueI have the Roco Z21 and experienced the same problems as you. I watched a YouTube video about how to set it up. Set up the black box and connect that to its power supply. Put the white router box on top of the black box and connect that to its power supply. There is a grey cable that connects from the black box to the router box. Connect the cable into one of the yellow ports on the back of the router. Turn on the mains power and your black box will be flashing red. Press the button on the front of the black box and it should turn blue once it has connected to the router.
i use an Apple iPhone and an Apple iPad to control my locos. The first thing to do is on your device, go to settings and select Wi-Fi and select the Z21 network. When prompted for the credentials for connecting, you will find these on the underside of your router. Once it has connected, go to the App Store and search for Z21 and install the black app and the Z21 updated app. Once installed on your phone, you can then go into the menus and add the locos that you have, entering the address using a four-digit address (I use the last 4 numbers of the running number), take a picture of locos etc. You can then start operating locos. To use another device to control locos, you just export/import your layout to/from the device that you set everything up on. You have to download the apps onto each device that you are using. Don’t forget to use some wire to connect from either the main track or programme track on the back of the black box to your track.
When I bought my Z21 in March 2021, it cost me £322 - just in case you want to sell that too and wanted to know how they cost new.
Regards,
Steve
-
Whisky Grain Hoppers
Whisky Grain HoppersOn 29/03/2021 at 10:07, Waveydavey said:I've been exchanging a few messages with Pete lately and on Saturday received a package of his etches for my grain wagon project. Although he has no more in stock he says he would be willing to get more etched if there is sufficient demand. There are two types of roof walkway and chassis detail etch, one type for the Lima wagon and one for the Trix/Bachmann type. Pete has asked me to point out the walkway etch for the early bodystyle has been done to fit Trix/Bachmann bodies stretched to scale length as he did a few years ago and featured on EMgauge70s and will be too long for unmodified bodies.
If anyone is interested Pete has asked for initial contacts to be via the contact address given on the EMgauge70s site
Oh I like the look of these etches, I'm going to email an interest

-
West Highland Line V4, a 1980's West Highland Line layout
West Highland Line V4, a 1980's West Highland Line layout4 hours ago, young37215 said:Bachmann and Lima side by side, the Lima wagon is too tall and less detailed.
Glad that you've posted this, Rob, as I was going to ask you how you were going about this upgrade project which you mentioned a couple of weeks ago on another thread.
Looking at the two makes of wagons side by side and studying photos taken on the WHL and in one or two wagon books then a possible solution which may solve your running issues and give a more accurrate model of the vehicles used on the WHL would be to mount the Bachmann bodies onto the Lima chassis, although this wouldn't help recover the finances.
The reason I say this is that in all of the photos that I've seen of the ex-grain wagons on the WHL they all have the Pedastal suspension units as opposed to the leaf spring type but also they all have the 8 ribbed body (Bachmann) instead of the 5 ribbed (Lima) type. I've read that they were coded PAF.
The Lima wagon as it is looks a good representation of the Grainflow liveried wagons which did find their way onto the WHL in the late '80s. The Bachmann one is a good model of a PAV. What I haven't found out yet is when the suspension units were changed, I need to have a look at Paul Bartlett's site.
The reason that I am 'so' interested is that I have a rake of the Peco N gauge wagons which are similar to the Bachmann version and have been looking for a source of suitable replacement Pedastal suspension chassis, I can then use the old leaf spring chassis for some scratchbuilt PRAs or maybe have a crack at the PAB ex-limestone hoppers that were also used on the Alumina traffic, if you could find a 3D printed body in 00 this may be an option for you ? However I will be more than happy if someone can prove me wrong and show the leaf spring versions of the PAFs on the WHL as it will save me some work !

Regards,
Ian.


.JPG.ffdf0af2fcb1725d3aab589dcc534b3f.JPG)
