


Spiritofprogress
-
Posts
29 -
Joined
-
Last visited
Content Type
Profiles
Forums
Blogs
Gallery
Events
Exhibition Layout Details
Store
Posts posted by Spiritofprogress
-
-
I have Cubify V14 which ceased being made in 2014. A mate sent me some files which require version 18 but he doesn't have 18 anymore since his computer crash. Can anyone help me out with a download or sell a copy to me.

-
On 16/02/2021 at 01:49, rue_d_etropal said:
I've been using a package called Alibre for many years. It was recommended to me by someone who has done a lot of 3D work, and it suits me. You can build solids and walls. Not as expensive as most others packages, and that includes being fully licensed to do commercial work. There used to be a free download(liited time) so you could try it out.
I have an earlier version of Cubify - how easy is it in making domes and funnels as I find it impossible with Cubify - I resort to creating the dome but where the flange is I cant get the flowing shape and just punch a washer out in card that wraps to the boiler and then fill the radius with modellers putty.
Chris
-
I did a print on the weekend and they look better. Thanks for the tips
-
Mike and Paul. Thank you for the replies. I hadnt seen anything on the lift speed before so I left that setting alone even though I use Chitubox. Well what a dummy I am. I'll do a print on the weekend as see how it goes. The marvels of the group- here I am in Australia and I get a reply from halfway around the world. Yeah!!!
Cheers
Chris
-
 1
1
-
-
On 06/07/2020 at 01:44, MikeTrice said:
It is a long time since I posted anything constructive on this topic so time for an update.
Some of you might have noticed that I have sort of volunteered to print some LNER v2 loco bodies as replacement for the original Bachmann body. Not the ideal time to take this on as certain materials seem to be in short supply at the moment.
To date my preferred resin is that made by Anycubic. Due to shortages I was forced into buying a couple of litres of Elegoo ABS-Like resin instead. I cannot in all honesty say I liked it and with some Anycubic ones coming back into supply have reverted back to them. So what didn't I like? Well it printed Ok but is a bit on the thin side. When printing large jobs the resin would separate out from the pigment and printed items, even after post curing remain slightly tacky to the touch. The Anycubic on the other hand changes colour slightly on curing giving a visual clue to its cured state.
Both the Anycubic and Elegoo resins are a bit on the brittle side if dropped so I investigated the option of adding a proportion of Monocure Flex100 which was bought at great expense from France. In fairness the seller in France did a good job of getting it to me and I don't think was any dearer than anyone else. I tried two mixes, 1 part Flex to 9 parts Anucubic and 1 part flex to 4 parts Anycubic. The new mix tended to need longer exposure settings but I managed to print several test pieces. Now the Anycubic resin is quite stable and when printing the front half of the V2 body they come out very well however when the Flex100 is added the body warped dramatically which I am hoping will be visible in the following image over the straight part of the boiler:
Warping aside I did not find any improvement in the print's brittleness and have now given up trying to use the Flex100 for the time being. Once some of the tough resins reappear in stock I might try them.
Reading various online forums regarding the various exposure setting I thought I would try to change the vertical lift speed from its default of 65mm/minute to 50mm/minute. This controls the speed that the print is lifted from the FEP so reducing it to 50 is less traumatic and is supposed to improve print quality. It certainly looks to be the case and I have now set it to 50 for all my prints. I have also read that a 0.035 layer height is not natural for the Photon so have recently adopted 0.04 with a 12sec exposure and I really cannot see the difference.
The second game changer I read about related to the removal of supports. Now so far I had taken a freshly washed print from the machine and before post curing used a sharp scalpel to cut away the supports, a very tedious process. Various people reported that the easy way to deal with the supports was to plunge the print with its supports in very hot water and just pull them away with minimum marks from the attachment points. Well I can report that it works very well and it has simplified my post print process considerably.
I was starting to get some odd artifacts on my prints and some parts were not printing correctly. The problem seemed to be on tall items after they had been printing for some hours. I was also getting some deposits left on the FEP which did not make sense. A failed print looked like this:
How I resolved this I will leave until later.
Reading various online forums regarding the various exposure setting I thought I would try to change the vertical lift speed from its default of 65mm/minute to 50mm/minute. This controls the speed that the print is lifted from the FEP so reducing it to 50 is less traumatic and is supposed to improve print quality. Where is this setting in Anycubic slicer? TIA Chris
-
 1
1
-
-
On 02/04/2020 at 01:44, 2ManySpams said:
Probably involves elves or a big hammer.
When is the book due?
-
On 01/10/2019 at 04:06, BrushType4 said:
How are you cutting the 45 degree MDF pieces that go around the top of the base brick piers?
Cheers
Chris
-
1
-
-
On 01/03/2020 at 08:45, monkeysarefun said:
I just put everything out in the sun, the IPA evaporates and the resin hardens and sets. I use microfibre cloths to clean the vat and I've been reusing the same one for several weeks without replacement. As long as it is washed in IPA after each vat clean - I use the IPA that i've just cleaned the parts in - it stays soft and useable.
I just use Metho as its cheaper and does a good job also
-
10 minutes ago, JimFin said:
I may be the bearer of bad tidings bit I am afraid you are probably going to have to learn an alternative as I believe Cubify has closed down completely now. This means that sooner or later Microsft or Apple will release an operating system update incompatible with Cubify and it will stop working with no support available for you.
Probably as well to forward plan to learn something new than be forced into it at what would probably be an inconvenient moment.
Personally I use Tinkercad (online) as a first choice and Meshmixer on my local laptop as a second choice although have used Sketchup in the past. It may be about finding what you are most comfortable with.
Nice feature with Tinkercad and Meshmixer ( and I assume Sketchup) is you can import virtually any STL file from any source file and edit it in them so the work you have done in Cubify is not wasted.
While I cannot help with Cubify, attached is an STL file of what I believe you are looking for, you should be able to import, edit and add to your wagons.
Hi Jim, so to finish this off I can import my current wagon into meshmixer as a stl and then import your panel onto the wagon? Am I reading that right? Cheers Chris
-
9 hours ago, 5D_Stoke said:
In Sketchup I would simply draw the rectangle of the panel, draw two diagonal guide lines from corner to corner so they cross in the middle to establish the centre of the panel, then decide how far I want the projection to stick out. Then from the centre of the cross formed by the two diagonal guide lines, draw a line perpendicular to the panel the required projection distance. Then draw four lines to link the end of that line to each of the corners. In Sketchup that will immediately create four new faces in the form you want. Then delete the unwanted flat panel and guide diagonals behind.
That sounds nice and easy but I'm stuck with Cubify. The entire wagon is drawn but I only need these panels done so I can print. Anyone with Cubify knowledge - can you give me the steps as I don't want to learn another program again
-
Thanks. lol now struggling to work out what pictures 3 & 4 are doing in the above diagram. Will try again over the next day or so to see if I can nut it out.
-
Thank you for the replies. I want to print them on my printer. I need 20 N scale wagons but still cant quiet make out what to do. I have re-read rue_d_etropal posts about 4 times but still struggling with how to apply it to the raised panel on the door. I understand about the X being scribbed into the back of the brass sheet but these will be 3D prints so I cant use that method. Maybe a drawing in a couple of screen grabs may be the go so I can marry the pictures to the words above.
Thanks Chris
-
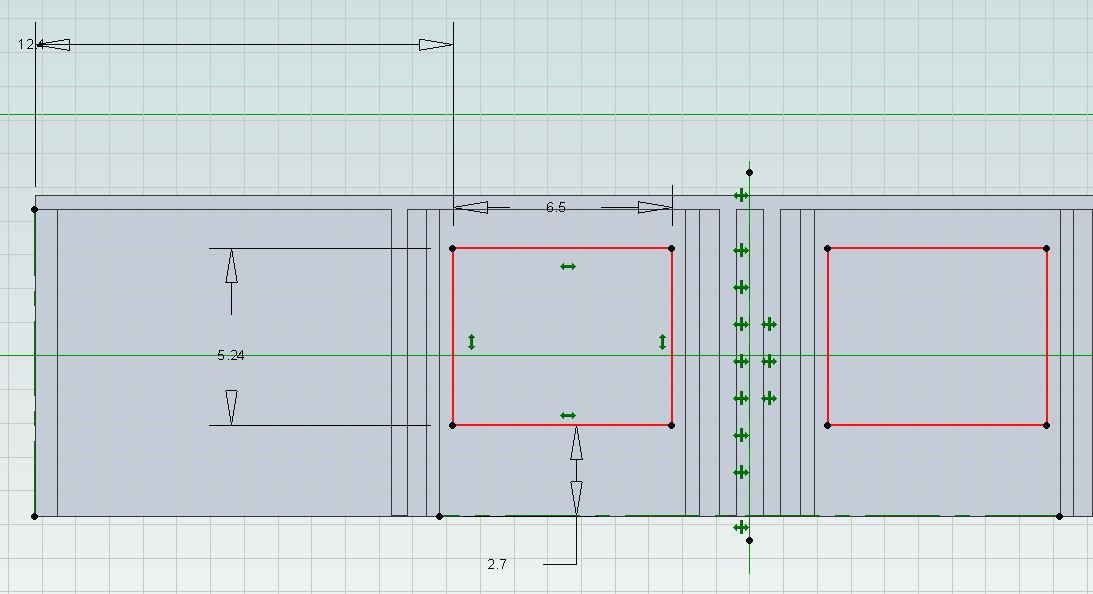
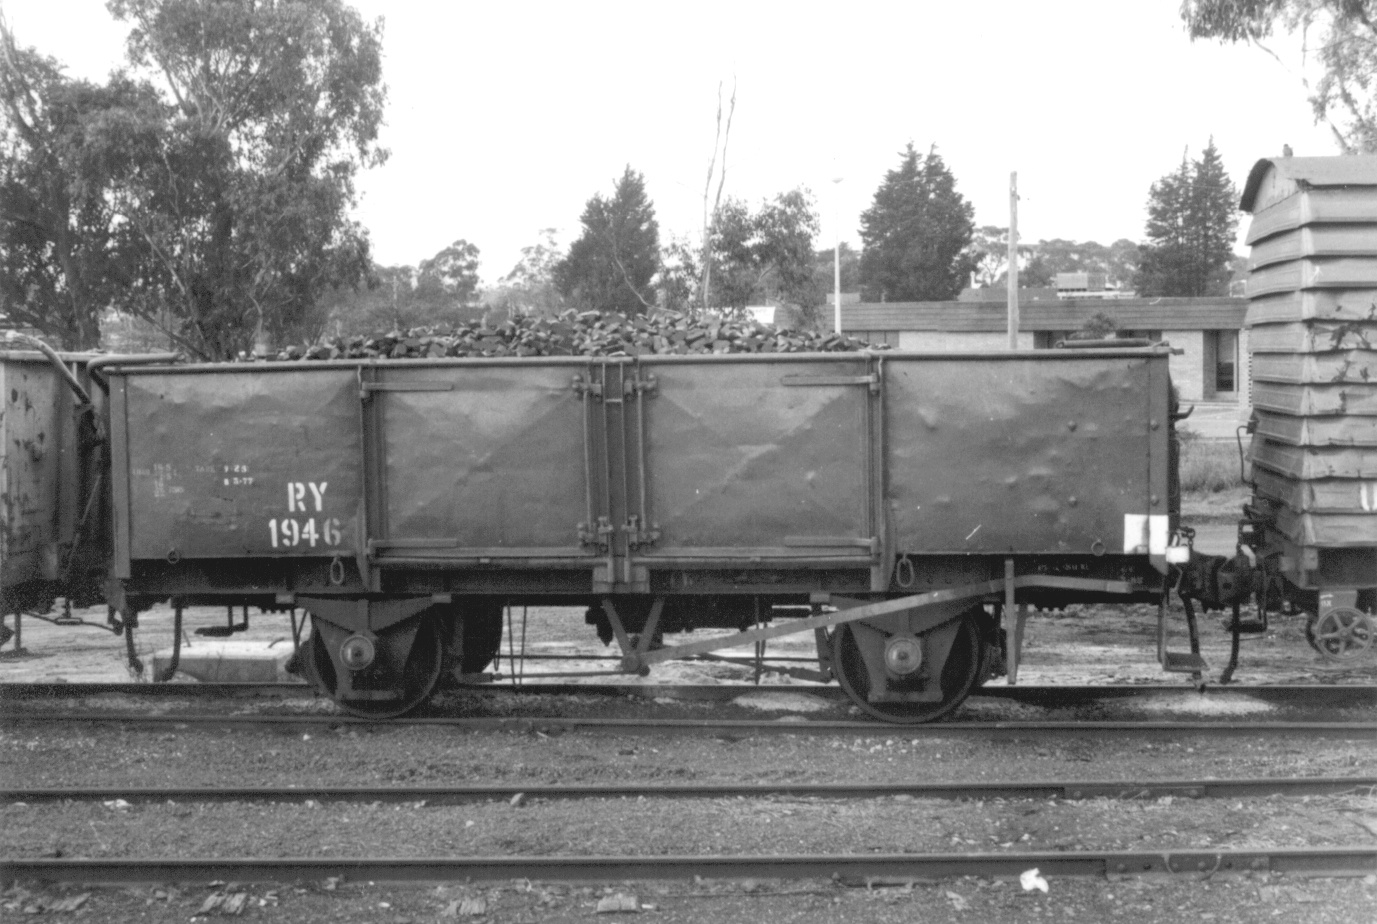
I'm trying to chisel (best word I can find) all 4 sides of the raised door on a wagon to create a pressing that's raised in the middle. I've tried drawing shapes and loft cutting from 2 different sides. I've tried a couple of lots but no cigar! Pictures of the model wagon and the real one. If you can help in Cubify all the better as that is what I use. I will be printing these in N scale if I can wrap my head around what to do to achieve this. Thanks in advance. Chris

-
Martin, I'm here is Aus as well. I do N scale wagons etc. using my laser and brass etching. My N scale VR QR wagon is made from 0.8mm 3ply and the strapping is 0.3mm card.
www.spiritdesign.com.au
Cheers
Chris
-
Sent files today. Found out as I replied to your post they went to into@RMWEB! Silly me.
Cheers
Chris
-
On 23/05/2019 at 21:47, calvin Streeting said:
Ooops did write a reply but It didn't post.. any way will post again. This looks like it should be a draw both side and end profile. Loft them and interct the lofts.. will draw diagrams when back at work
")
Calvin did the plan I sent via email help at all. Cheers Chris
-
Ok, no cubify replies. Can someone show me how to do it in Sketchup and I'll learn it instead as Cubify seems to have died
-
I've tried different ways to try an achieve a compounded roof end but have had no luck. If anyone out there can draw my carriage end in Cubify so that I can then look into the file step by step it would be great. I don't have the funds to purchase another program so I need someone to show the file in Cubify. Pictures below of what I need. There are two styles of roofs. I hope to 3D print a master and then vacuum form the roofs in 0.5mm styrene. Thanks in advance - Chris


-
20 hours ago, Knuckles said:
White Spirit at least I found to be useless against resin but the alcohol works great.
I wouldn't need 1000 cones! Gosh no, I'm not printing that much yet.
Glad you like what you see.
No, our Methylated spirits is not the same as white spirits(Turps) here in Australia. Around 90% of methylated spirits is ethanol; so it's incredibly strong. The main additive is 10% methanol, which is highly toxic, but it may also include isopropyl alcohol, acetone, methyl ethyl ketone or other substances. This cleans anycubic fine.
-
2
-
-
On 21/11/2018 at 21:12, Knuckles said:
Thanks JCL, I'm a bit iffy with 3D hubs. I uploaded a model for someone to print, turned down the quote and then later find (via Quarryscapes on here) the model on the front page of ANOTHER hub as a promotional.
Upon questioning the hub I got a load of gob back, after going through official complaint lines I basically got told to bugg-r off because the information I saught was protected by their privacy policy crap.
So as you can see, first impression was amazing and I won't touch it now.
Seems internal trading or giving away of meshes happens. Removing all the bumf, my 3D mesh/design was stolen so how much money they may have made off it only they know.
With accounting costs I currently can only estimate. Once the STL file has been sliced it gives a pretty accurate build time estimation but no idea on resin costs.
However, as I'm currently building my own designs and they are mostly shells I have a good idea.
Alcohol is getting used up quickly, then there are the cone filters and FEP sheets that get consumed but again it isn't worrying me. At the moment, based on what they cost, adding a set amount on to every estimation likely will cover those for when they need replacing.
3rd time lucky! It printed.

There is the same diagonal line that I seem to get on almost every print and I'm unsure if these can be printed without it, however, smoothing it is a simple file/paper rub with primer as is usual. Blemishes aside MUCH less clean up needed than FUD.
A few supports still failed but nothing significant, there are minor warps on the edges of the buffer beams but I do mean minor.
A few passes with a file would sort them or if you were really picky a bit of milliput sculpted there would be a quick fix. However repeated print setting tweaks may eliminate these issues.
The tank extensions also have a baby warp yet a couple more supports will cure that.
Overall I'm happy, even the cab controls turned out well.
I'll have some pics later when I get time.
Just saw this. Anyway done on all your items fascinating stuff. On cleaning prints. In Australia I use Methylated spirits which is cheaper and does a great job. Resin, filters I buy a bulk pack of paint cone strainers from a paint supplier in boxes of 1000 for about $50AUD
-
I have the complete set except for part no 88 which a few people seem to be missing. Anyone got a spare. please email me spiritofprogress@gmail.com Cheers Chris
-
21 hours ago, SpoorObjecten said:
So i checked your account, you're referring to the model "M P V3-1 30"
This was previously ordered for $95 USD the price has now moved to $225 USD.
Your model contains 30 loose parts which our production team needs to manually handle 1 by 1 (plan them in a printer tray, clean them, sort them, put them in a bag).
For this reason the per part pricing has been changed to $7.50 which will add up to the $225 USD for your model.
Maybe you could consider to sprue the model to save on costs as it will bring down the number of parts.
I wrote a best practice guide on this subject here:
https://docs.google.com/document/d/1Im_cmlhBmQXC0ffl18Z18aOpI5gs_wCy2WcFL9_Re_c/edit?usp=sharing
(scroll down to Using sprues efficiently)
I can certainly sprue the entire lot as 1 part but in the past when I did it you wouldn't allow it and said it was 30 parts. As an end user we cant seem to win here.
-
 2
2
-
-
On 11/02/2019 at 18:07, SpoorObjecten said:
If the price is exactly $300, this means your model contains 40 loose shells (probably 39 small rivets that are not conntected).
Since the pricing per part is $7.50
Feel free to share the Model ID's of your models and I'll be happy to check
Models should have same pricing when uploading it multiple times
Note that you actually do trade with Shapeways Inc (this has changed some years ago), the american parent company.
Shapeways BV in Eindhoven only produces and ships parts but is not actually the company you do business with
As for the pricing formula, there definitely is one
But as you said, it's not doing that we intended it to do, causing some models to be way cheaper than they should be and some other models (which we like printing) being way more expensive.
This is now being looked into, fingers crossed we will all benefit
Sorry should have mentioned both models have been printed before for $100 per set but the new price for the 2nd one is now $300 instead of $100
Chris
-
My pricing by shapeways for FUD is all over the shop so to speak. I can do under frames for one type of wagon and they cost $100 the same under frame with a slightly different details for a 2nd wagon costs $300! What's going on! Since this has happened I haven't printed anything with shapeways and I'm investigating China plus printing my own stuff on a resin printer
-
1
-


")


Cubify version 18 needed
in 3D Printing, Laser Cutting, CAD & CNC
Posted
Thanks, John I will look at Atom but I hoping someone has V18 out there they are willing to sell