


eetype3
-
Posts
90 -
Joined
-
Last visited
Content Type
Profiles
Forums
Blogs
Gallery
Events
Exhibition Layout Details
Store
Posts posted by eetype3
-
-
Thanks folks! I'm on a 'restoration' tip with this one; looking original, but capable on my Code 75 trackwork and, in particular, pointwork. Minimum radius is 27", so sharp curves (in train-set terms) aren't a problem. Eventual plans include adding the Dublo tool van and mess coach, if I can locate examples of each; power will be my Dublo 4MT 2-6-4T :-)
Anyway... overcoming my 'Code 75 blindness' which had persuaded me that the original Dublo wheels didn't stand a chance, I've just test-run the crane set on the layout - without problems. It coped fine with Peco Code 75 medium-radius (36") pointwork including 3-way points, and negotiated 27"-radius Code 75 curves without problem and without riding on the rail chairs.
Hence, green Meccano string it will be; and no need to swap the wheelsets after all!
Just for the sake of completeness, my example is fitted with the following original wheels:
- Match truck/jib carrier: 12mm-dia plastic spoked wheelsets
- Load-spreader bogies: 12mm-dia plastic spoked wheelsets
- Crane, outer wheelsets: 13.5mm-dia plastic spoked wheels on 2mm metal axles (supported by "tin" inner chassis)
- Crane, inner wheelsets: 13.5mm-dia, unflanged plastic spoked wheels on 2mm metal axles (again, supported by "tin" inner chassis)
-
 1
1
-
Hi again :-)
I'm attempting to make my old Dublo breakdown crane compatible with my Code 75 00 trackwork; hopefully via a 'minimum necessary mods' route because I like the ex-factory Dublo condition. I've found a supplier of replica decals (my example needs a repaint, having received poorly hand-painted wasp ends at some point in her history!), but so far I'm stumped on replacing the wheels.
Can anyone guide me how to fit replacement finer-scale 00 wheelsets to Dublo wagons and cranes please? Mine has the retaining clips holding the axle ends in place - I'm not familiar enough with Dublo products to know whether or not this was de rigeur.
Also, my example (acquired for peanuts from an "antiques" (sic) centre) has the inevitable sisal string replacing the original factory rigging, but at least the original hook is still present. Can anyone point me towards an original-spec rigging diagram please, and give me an idea of the material which was originally used for the cable(s)?
As always, any help and advice will be greatly appreciated :-)
Thanks & best regards,
Jim H
-
Hi, I posted a review a while back when my "Esso edition" Sentinel was performing rather less than satisfactorily. Time to set the record straight...
My original beastie was a bad'un. Two days after posting my initial review, the motor started misbehaving and then the geartrain locked-up completely. A little investigative work found that the motor, at less than half-current on DC, would stall at approximately 3/4 of a rotation. Discussing this with my friendly local retailer revealed that this had been seen before (but not on Sentinels), and was apparently caused by excess solder on the polepieces dragging on the casing. Hornby declined to supply a replacement motor via said retailer ("not yet available"), which turned out to be a good thing when the geartrain also locked-up under DC rolling-road test the next day! Repeated attempts to free it off, including a full strip and rebuild, proved to be futile. I still don't know what the geartrain problem was.
Hattons were, as usual, superb in dealing with this - I sent the loco back, and a replacement was sent as soon as the second batch arrived in Liverpool.
My second example runs perfectly on DC, and is also much better built - the glazing and side skirts both fit properly. The tasked Hornby decoder isn't brilliant - "silent drive" it ain't - but I now plan to hardwire something decent in its place.
So, the good bits of my earlier review still stand - and most of the bad bits have been resolved, decoder excepted. Not a bad result by modern standards.
-
OK, here's my take now that I've received my model - R3179 in Esso Bitumen livery. My background: mechanical design, electrical engineering and several years of railway modelling.
First, the good: a lot of detail for the price, and it looks like a Sentinel to me. A particularly fine job with the handrails too - very impressive.
The bad: I'm hoping it's confined to my example, but the bonnets and cab are unpainted; on lifting it from the (well-designed) box, the living room lamp shone through the sidesheets. This return to 1980s Lima practice is unwelcome, and in my view lets the model down badly. Mine's now due a respray - I was hoping to just remove the Esso Bitumen Plymouth printing with T-Cut and retain the factory red finish, but there isn't one... Hopefully someone will offer etched replacements for the Sentinel and Powered By Rolls-Royce plates - such a shame, as the printed versions are excellent. I'd rather pay another £10 for a paint finish.
The overall design of the model is a disappointment, as it has obviously been compromised by the requirement to be compatible with the Hornby R8249 decoder - hence the huge decoder slot. The fact that even this has not been achieved, and that we're expected to buy a version of the R8249 decoder modified with a 4-pin plug directly from Hornby, is rather an insult. If the model had been designed to accept a 6-pin 'N-gauge' decoder, perhaps a better method of breaking the model down to its component parts could have been found. The panel split line between the cab and the front sidesheet is fortunately prototypical for the chain-drive versions - it was a welded joint - but when Hornby get around to the rod-drive locos, the one-piece sidesheet is a very distinctive design feature. I can't help thinking that if someone on the design team had been brave enough to point out the poor choice of the standard Hornby decoder, we may have ended-up with a less-compromised model. Perhaps the motor could have been mounted to drive the rear axle, with a decent-sized flywheel accommodated in the cab and the decoder at the front end of the front bonnet - a better excuse for the half-height cab interior, and better tolerance of average trackwork with such a short wheelbase.
I can live with the poor fit of the cab glazing - it's no worse than the various design tolerance problems that I had to correct/fettle on my pair of 72xx to make them fit together properly - and also maybe with the poor fit of the plastic sideskirts into the metal frame; but the overall impression is that Hornby are steadily losing the plot. After both 72xx and now the Sentinel, I'm losing faith more than a little. I've ordered a Crosti 9F, and it's fair to say that that model will be make-or-break for me.
-
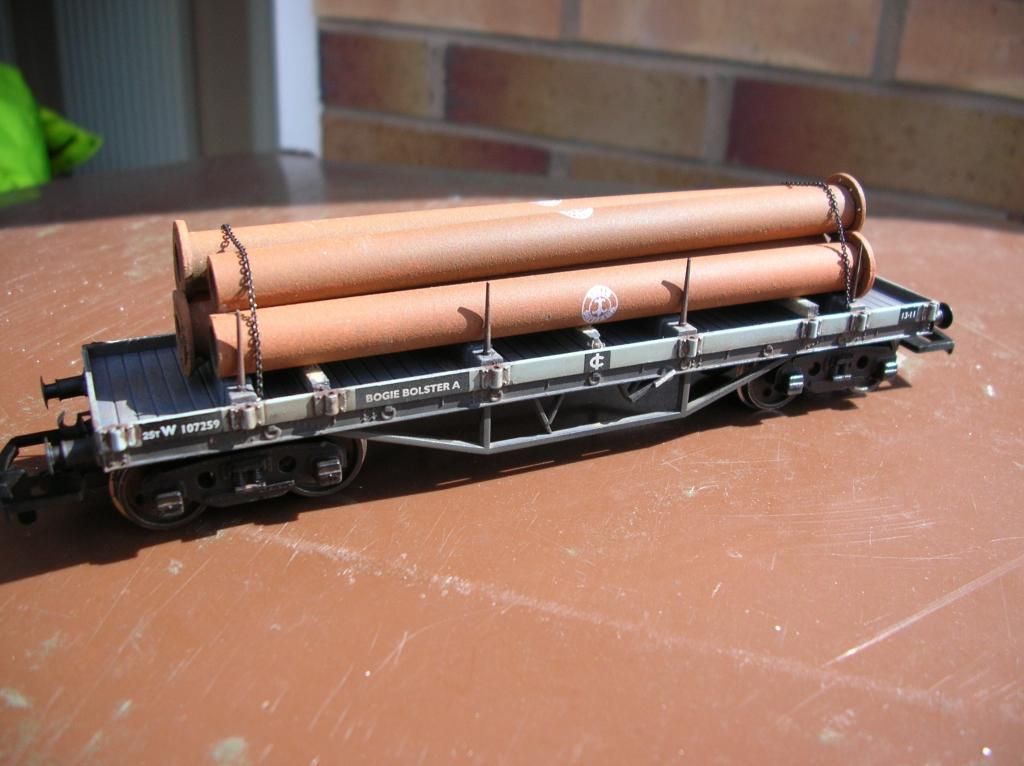
As promised, a pic of the completed Bogie Bolster A:
Thanks again, folks!
-
3
-
-
Gents, that is superb advice - a big 'thank you' to all. I shall be seeking out both the recommended book and the edition of Traction! No doubt there'll be plenty of wagon projects coming my way from Dad over the next few years...
Right, I'll get the chains to the mounts at the ends of the bolsters, and no protection it is. And I'll keep my promise to post a photo when it's finished.
Thanks again,
eetype3 (slowly learning about the '60s after years of researching the '70s and '80s!)
-
Hello again,
I'm working on an old Mainline Bogie Bolster A for my Dad's 50s/60s WR layout. I've finished detailing and weathering it, fitting sprung buffers and RP25 wheelsets, but I've hit a snag with loading it.
I've got a very nice Duha load of flanged steel pipes, and I'm planning to chain it in place; this is the pre-ratchet-strap era, of course (my own '80s layout is rather easier to research!). I've so far failed to find a single period photo of a chained load on a bolster wagon, so I have the following question:
Was anything laid over the load to protect it from the chains? My pipe load is generally pyramid in cross-section, so if I pick-up the chain loops on the solebars, the chains will touch the bottom and top of the side raves, the side of the 'bottom layer' of pipes, and of course the top of the load.
I'm assuming that something was placed between the wagon/load and the chains, particularly when fully-finished products were loaded, but what? I've considered folded wagon sheets, or maybe canvas sacks, but it'd be great to get it right.
Any sage advice will be greatly appreciated! I'll post a photo when it's done.
Cheers folks

-
Back to Bedford HA vans again... Here's a simple tweak to improve the Corgi Trackside HA.
I realised why my two examples didn't look quite right in profile, comparing with photos of the prototype - the sills were missing! Quite representative of the real thing as it approached maturity, but...
Cut 23mm-long sections of 1 x 1mm 90deg angle styrene. Glue to the edges of the plastic "underframe" insert, such that they sit inside the bodyshell with the 'point' downwards - to represent the angled outer sills. Prime and paint - done!
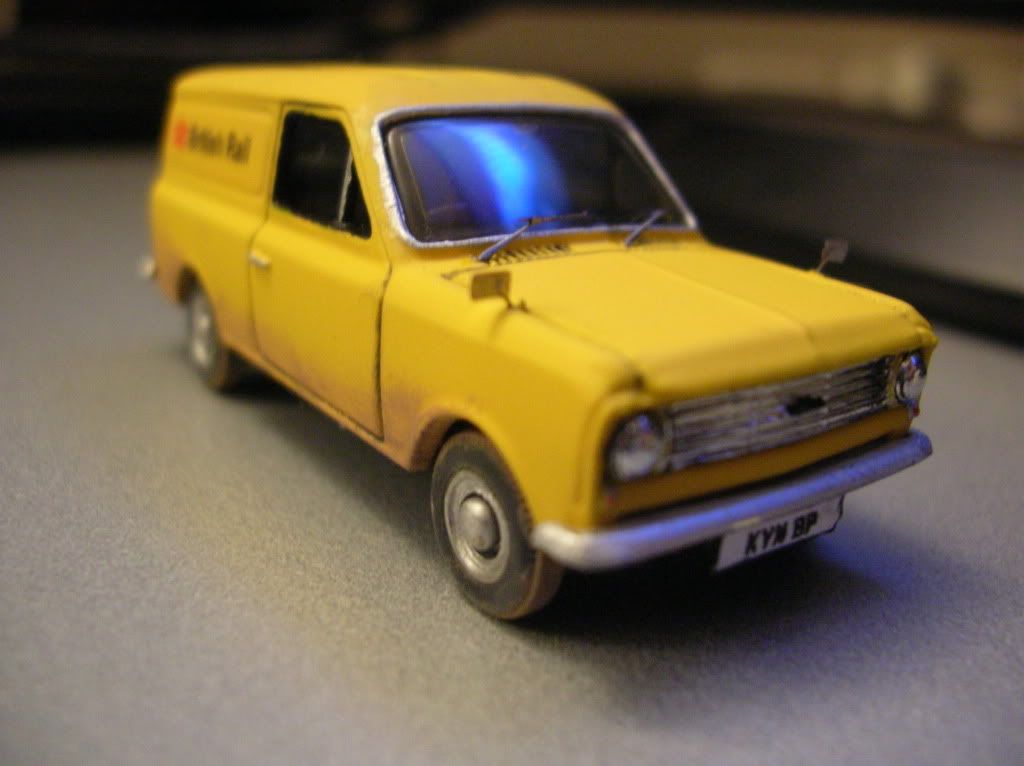
Photo below (which will hopefully work - I'm better with styrene than technology, and I'm not great with styrene) shows untweaked KYM8P on the left, and modified YCH625Y on the right. Took about half an hour, including paint.
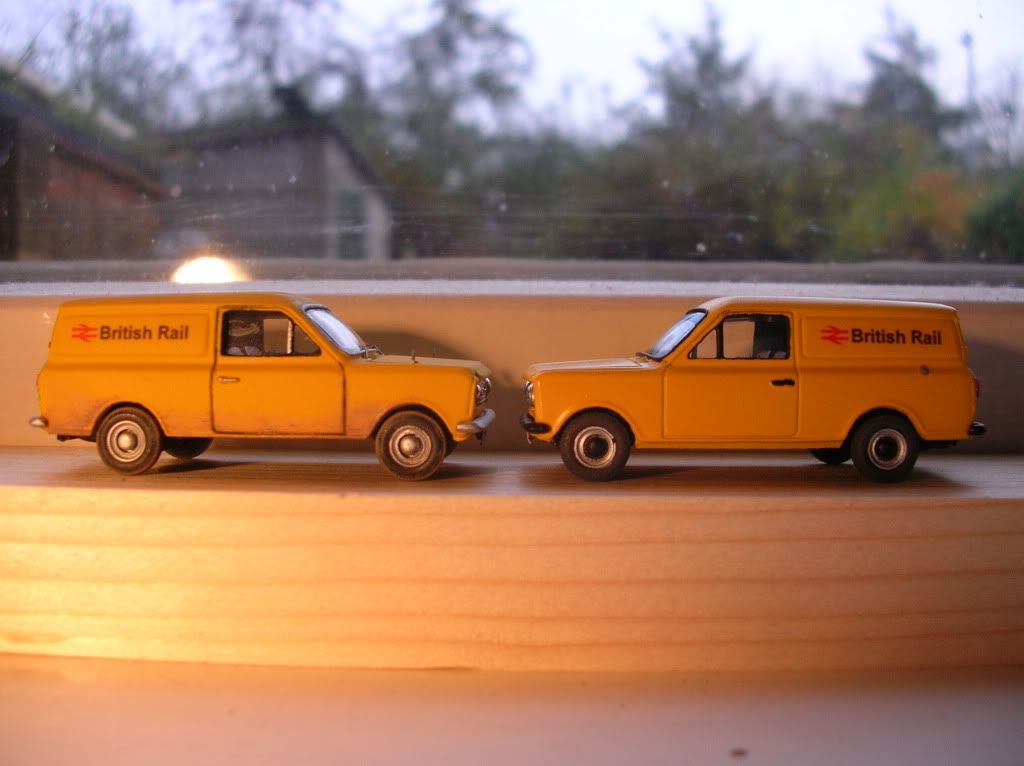
Right, now to provide KYM8P with sills, and finish YCH625Y with roof bars, rear fog lamp and T-handle on the right rear door.
-
5
-
-
Another quick couple of questions for Merf if I may... maybe a bit of a memory test!
On your Flickr 'Railway Road Motors' collection, there are a couple of good photos of YCH 625Y - Llandudno S&T Bedford HA. I've finally persuaded myself to model the roof bars, but picking out other details from the photos:
1. Were the pair of white plastic vents (one towards the top of the bodyside at the rear of the upper panel, and one in line with it but just above the side panel/sill joint), fitted only to the offside, or were there a similar pair on the nearside too?
2. Was the blue windscreen sunstrip fitted from new, or was it a bit of local esprit d'corps later in life?
Cheers!
-
Cheers Merf! I don't hang about...
It's the Trackside model btw, with the track narrowed by cutting the 'brake drums' in half and locking them on the axles with slow-set thick cyano to lose the unlikely negative camber on the rear axle. The rest's just Phoenix Precision pre-84 Warning Panel Yellow, homebrew decals, PP matt enamel varnish and detail painting, plus TPM etched stainless mirrors & wipers. She'll do. Got two RTI resin crewbus bodies in stock now, but can't promise they'll appear here quite as quickly!
-
-
Bit of a random enquiry this one, but...
Can anyone suggest a suitable registration number for a mid-1970s yellow BR Bedford HA van please? I'm modelling a chrome-grille, chrome-bumper version; just a bog-standard van, not an S&T with vents/roofracks/ladder (I'm saving that for next time!). WR or LMR registrations will be fine, to suit either of my fleets.
A pre-'72 one with silver-on-black reg plates would be particularly appreciated!
Cheers all

-
Definintely an improvement on the original, Merf, but...
I bought a Base Toys/BT "D Series", and quickly realised why Ford had not licenced the model.
In brief, comparing with a photo blitz I did on a D1000 Perkins V8 tractor unit at this year's Gaydon Classic truck show with a view to modelling it:
Mudguards incorrect shape
Bumper incorrect shape, and shouldn't wrap around into doors
Doors too long, rear quarters too short, bumper wraparound prevents bottom swage from being incorporated in doors
No inward rake to rear panels (much too upright), and curvature too sharp
Quarterlight/main cab door window relationship incorrect in size and proportions; windscreen pillars in wrong place and wrong shape/angle
Headlamps too close together
Indicators/sidelamps incorrectly shaped and in wrong places
Grille and styling panel above it bear no relationship to the original
Cab roof too flat... etc.
I gave up at that point on a "too much work" basis. I now keep the model in view, as a reminder to research with photos before committing to buy anything!
The Langley Ford D-Series cab is a work of art and is available separately - highly recommended. I've yet to see the RTI Ford D-Series in round-headlamp form, but given the quality of other RTI cabs I have in stock, that will probably be worth a look too.
-
Empty I hope, at 6 tonnes SWL!

-
 Inspirational and very useful thread - thanks!
My contribution: Coles Argus 6-tonne crane, based on the example which appears in the background of many Crewe TMD photos. I worked from about 6 grainy images, plus the one Merfyn added of 428 PRO on Page 29 of this thread. Mine's plated as 429 PRO... I've added the registration plate, cab safety cage, rear-view mirror, red Arrows of Indecision and OLE warning flashes, plus some weathering. Please excuse the pic quality; it's from my phone due to my digicam being stored unserviceable at present.

-
1
-
-
Hello
Just discovered this thread; good work, fella!I'm also reassured that it's not just me that is being overrun by Derby Sulzers B)
The harbour corner is looking really good; I'm looking forward to the 'phot opps' that the completed scene will offer.
-
Two Thumbs Up on the Duffs; nicely subtle, as always B)
On the DAF: There's a howler, unfortunately. The trailer wheels have protruding naves/wheeltrims, hence are overwidth (the platform raves are the widest point - 2.5 scale metres across - to maximise payload area). Wheeltrims to suit dualled tyres tend to be flat. Might be worth considering replacing them with a set of dual inset-nave wheels, or shaving-off the protruding naves and drilling some holes to represent wheeltrims. Are you going for Kuehne & Nagel livery? The colours look very similar
-
Lovely 31! Really good weathering job; reminds me of sitting in a BRUTE at New Street and watching the blue 31/4s depart for the east, while the rest of the enthusiast fraternity were watching Hoovers
Thanks for the memory.I have a Hornby SD 31/1 with headcode panels which at the moment just needs some more weathering (I've got better at it since I augmented Hornby's factory job) and some tweaking to the CVs to dim the lights a bit, and a Lima skinhead which cost me ??18 on eBay and had never been run. I prefer the Lima shell, I think; something about the subtle angle of the cabside window panels looks better than Hornby's version. Guess I'll find out for sure when the Ultrascale wheels arrive and I've fettled the shell!
25 244 looks great. My own Hornby 25/1 was my first ever refinishing job, and is on that long, long list for a Bachmann chassis and a respray (too faded; it looks like a 70s Panda car!). And a Shawplan scavenger fan grille to replace the A1 Models drainage grid currently fitted

-
Those 25s do look good - nice and subtle. I've built a Bachmann 25/3 with similar mods but a few more tweaks to the chassis. Without major rebuilding, we can't correct the fundamental Bachmann errors (windscreens too sharply raked back, with correspondingly shortened cabside windows/too steep quarterlight angle, plus the effects on the size of the windscreens themselves; and of course the two versions to date of the triangular bodyside access panel, one set in a deep trench and the other standing 2" proud of the surrounding bodywork. The Bachmann 25/1 suffers similarly). Hopefully Bachmann will give the model a decent shell and underframe moulding before too long; the chassis remains one of the finest-engineered units available today IMO. My two 25/1s will use much-modified Hornby shells on chopped Bachmann chassis and underframes, although they trail a pair of 37s, a skinhead 31 and a discy 40 on my "to do" list... I've got as far as detailing one shell and acquiring another raw one.
The layout extension looks impressive - I'll be following your progress


DCC sound decoders for US diesels
in USA & Canadian Railroads
Posted
Hiya - I've just discovered this thread, less-than-coincidentally soon after discovering the joys of US HO-scale diesel railroading (after too many bits falling off/indifferent running from several recent British OO RTR locos, but that's a different story...).
Sound is perhaps the most divisive aspect of railway modelling because we all perceive it differently. I'll liken it to musical preference; for example, I'm a bit of a bass-head but my collection includes everything from modern-classical through all aspects of indie, prog and metal to modern electro, but I cannot abide country music - but even then, with the exception of Sheryl Crow. Doubtless many of you would not appreciate my iPod's eclectic offerings, but some may embrace all or part of my preference...the way we listen is equally important as what we're listening to; some enjoy clarity above all, others appreciate a balance and still others like chest-rattling bass, and all possible combinations of the above generalisations exist. Nobody's right or wrong, but it's handy if your particular audiophilic sensibilities match those of the individuals who recorded the sounds and mixed them for tiny speakers.
Anyway, back to subject - and assuming that the common element is a quality speaker with a matched enclosure because without that, all discussions regarding sound quality are rendered moot - would you hook-up your audiophile amplifier and CD player to your laptop's speakers? - I find that the ESU Loksound Select and Select Direct sound decoders are the most impressive overall and hence, also the best value. ESU LLC's EMD Roots-blown 645 soundfile is my favourite so far, fitted to my GP38 - it's all there; the deep throb, the generator whine, exhaust resonance at higher notches, the whole nine yards. I'm delighted with it. The same applies to the factory-fitted ESU sound decoder in my Intermountain SD40-2, which is simply superb straight out of the box.
Conversely my experience with Tsunami decoders has been less satisfying; I was expecting big things of my Athearn Genesis SD70ACe but it disappoints with indifferent sound (and no switchable start-up/shut-down, despite the air-start being present and playing each time the loco is powered-up on DCC, regardless of whether or not the loco address is selected on the throttle). I'll upgrade the speaker first but I foresee a switch to ESU in its future. My Tsunami EMD 645 non-turbo, bought for my SW1001 project, is also so-so. Perhaps I'm expecting too much from a decoder which effectively announces itself as a generic representation - but to me, the 8, 12 and 16cyl non-turbo 645 EMDs sound very different, particularly in the lower registers, so it's not good enough for me.
I have no connection with ESU except as a satisfied customer. Sound decoders represent a significant investment, hence anything less than "great" is always going to disappoint.
Hopefully ESU LLC will release a 16-567 turbo soundfile in future so I can model another favourite, the GP35!