


gazman424
-
Posts
101 -
Joined
-
Last visited
Content Type
Profiles
Forums
Blogs
Gallery
Events
Exhibition Layout Details
Store
Posts posted by gazman424
-
-
Hi Jonathon,
Hope all is well. I'd sent you a couple of PM's regarding the Dia. 265 Coach sides I was doing for you, but it was around the time that RMWeb was being upgraded and I think they were lost in the ether!
I promptly forgot about them and have just found them during a tidy up, so if you would still like them, just drop me a PM with a suitable address and I'll stick them in the post.
Take care!
Gaz.
-
Hi Scott,
this might help;
Keep up the good work...
Gaz.
-
 1
1
-
-
Hi All,
So I presume with that train of thought, it is also presumably acceptable to wander about inside airport fences, as long as you don't actually walk about the runway?
It's an operational environment, regardless of public perception that it'll be ok, it should be only trained personnel that should be within trackside fences. There are many risks that the public have absolutley no awareness of, and should somebody be injured or killed, the Railway is liable. The fences are there for a reason.
Gaz.
-
 1
1
-
 4
4
-
-
Mike,
Can I just thank you for your contribution to this, and many other threads. For someone whose only memories of Gresley coaches in service is limited to the odd Departmental examples, your willingness to share your encyclopaedic is very much appreciated!!
Gaz.
-
1
-
4
-
-
Morning Gibbo,
Maybe worth giving York Modelmaking a shout;
http://www.yorkmodelrail.com/community/bespoke-laser-services/
They mention artwork preparation...
Gaz.
-
1
-
-
Morning Scott,
The Brake Van and Dia.23 Fish Van (the brown one) are both the end product of my Emblaser 1 laser cutter. The were designed via Coreldraw, and allow me to achieve accuracy and repeatability which I could only otherwise dream about. There was a fairly steep learning curve with the laser, and one was finding materials which suited my needs. I have settled on card, which seems to satisfy my needs.
The panelling and louvres are either 'scored' - one pass of the laser - or cut right through to achieve the effect required. The axleboxes are built up in layers. The underframes are also card, very similar to the way you construct yours;

The longitudinal slots are where the brakes are fixed. The Vacuum cylinder is a 3D print, which I am now able to do myself thanks to plenty of overtime and the purchase of an Anycubic Photon 3D printer.
If you have any other questions, please let me know!
Gaz.
-
3
-
 1
1
-
-
Morning Andrew,
The coach was designed to be built around my Emblaser 1 laser cutter. I used the 'Jenkinson' method, in that a robust inner box was constructed, to which the outer,detailed sides and ends are added.
The panelling was built up from layers, and I hope the drawing below, a screengrab from the relevant Coreldraw file, explains it.
I use 2 almost identical files, this one has the red 'score lines' for door openings etc, where as the 'cutting file' omits these.

The sides are cut from good quality card, nominally 0.3mm thick, which is as cheap as chips compared to plasticard. There was a learning curve, for me, about gluing these, as I was so used to working with plasticard. I use Permanent Spraymount for joining the large layers, and for detail work such as the bottom panelling, I use Roket (correct spelling!) card glue, applied to the rear edges with a cocktail stick.
The card takes paint well, especially after a coat of primer.
I hope this clarifies the matter a little, but please let me know if you require any more informtion.
Gaz.
-
1
-
1
-
 3
3
-
1
-
-
- Popular Post
- Popular Post
Hi All,
Firstly, it was very nice to finally shake your (wrong!) hand at the Glasgow show, but I clearly caught you in the middle of a tricky piece of assembly! I haven't had a great deal of modelling time, but thanks to an impinged shouler, then managing to kick the bottom of our very solid wooden bed, which resulted in a broken toe, I have an enforced period of 'recovery' which has allowed me to progress some long-standing projects.
First up, an ex-NBR Brake 3rd;

I have recently discovered it should be numbered 'SC330E', so that will require changed. All scratchbuilt, including the roof, buffers,bogies and various details, which are 3D printed.
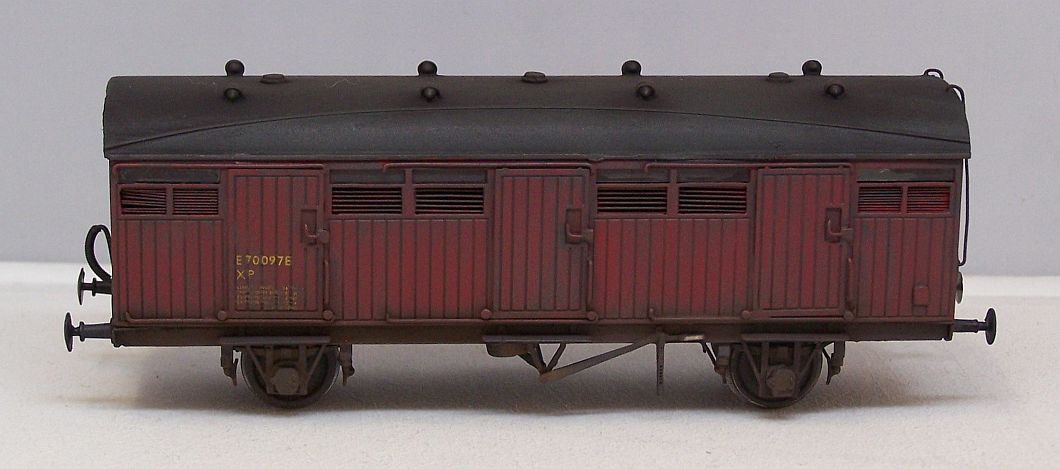
Next, a scratchbuilt Toad E. Why? Because I was looking at the price of wagons really and I was shocked to see how the price has risen, so as a personal challenge, I wanted to see how cheaply I could turn out wagons.
The only bought in parts are the wheels, bearings and buffer heads, with the body and underframe being assembled from laser cut card, and 3D details providing the rest. The couplings are my own design, etched by PPD, and are compatible with the B&B and DG types I was using.

Obviously, there is still a lot to do, including the really enjoyable handrails, but it has proved that my forthcoming stock needs can be supplied by these methods.
As you say, the satisfaction from finishing projects such as these far outweighs obtainting RTR, and is much cheaper also!
Keep up the fantastic work!
Gaz.
-
15
-
1
-
4
-
Hi All,
Been a long time since I've posted, but sadly the mojo has been full steam ahead, but with no time to employ it!! Anyway, I've managed to the finish the exNBR Brake 3rd;

I'm also beavering away with a scratchbuilt Toad E;

Still in a very (obviously) unfinished state, but it'll get there!!
Gaz.

-
9
-
-
Thanks Jonathon,
Although, I do make the most of modern technology so the real hard work is done by CAD, my laser cutter and recently, my 3D printer.
Essentially, I am producing my own kits.
Gaz.
-
Thanks Jonathon,
“Tipsy turbo”? Sorry, I replied on my phone and autocorrect thought it would be hilarious to change it from “topsy turvy”!!
Gaz.
-
Thanks for the prompt reply. That clears that up but leaves me with my Dia.62 and it’s tipsy turbo brake compartment conundrum!
All the best!
Gaz.
-
On 03/02/2019 at 20:32, jwealleans said:
Bit of weathering while I felt like it this evening as well. Since Thurston last went out I've built about half a dozen carriages which we can use on Wickham Market and they need weathering to match the rest. These were across the bench in the early part of 2017, I think.
D 244 Lav Compo. These are Bill Bedford sides on MJT everything else.

Comet D 62 Brake Third.
Some NPCCS as well:
ex-NER D 171 Milk van. We have a photo of one of these up the Framlingham Branch, so this will be used on that part of the layout. Hence the S & W couplings.
D & S D 87 Milk Van. Bit of a rescue job this one, hence the less than perfect grilles. I have a D 86 almost ready as well. You really can't run a GE Area layout without at least one of these kicking about.
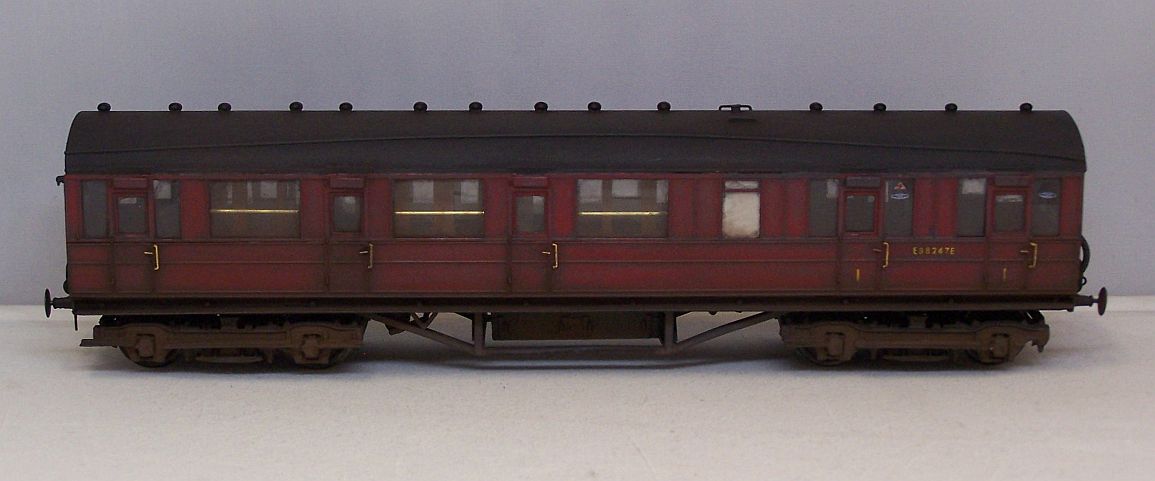
Hi Jonathon/All,
Love the rolling stock pics, but i'm slightly confused about your excellent rendition of the Dia.62. Going by the diagrams in Michael Harris's "LNER Standard Gresley Carriages", the drawing differs in that the coach is portrayed with 5 compartments and the brake section reversed i.e. the Guard's door in the centre. In the "LNER Carriages" reprint, also by Harris, a picture on page 52 appears to back up the diagram, and also shows that the brake section doesn't carry the usual end windows.
However, in "LNER Standard Gresley Carriages", a picture on page 105 shows a 5 compartment Brake Third, but with the Brake section in the conventional manner. The number also seems to match the Diagram.

This is my scrathbuilt attempt before weathering, and to say im puzzled is an understatement!! Hopefully your superior knowledge can shed some light on this perplexing mystery!
Keep up the good work!
Gaz.
-
4
-
1
-
-
-
-
Evening All,
A Kirk Gresley related post, in that it has a Kirk roof!

Scratchbuilt, with the addition of Hornby bogies, MJT parts and oodles of inspiration from this thread.
Gaz.
-
10
-
-
Evening Folks,
May I pick your brains - I've just purchased a Photon and I'm having problems with printing. Using Anycubic grey resin, I can manage to print at 100 microns, but obviously at the expense of finer detail.
My prints fail after a beep from the machine, then the x-axis stops moving but the machine seems to still be going through the motions of reading from the memory stick.
I'm wondering what settings people are using, as I've seen some cracking prints on this site, so fine detail looks achievable...
Thanks,
Gaz.
-
Good Afternoon Tony,
May I respectfully post my articulated effort?

Scratchbuilt, with Hornby bogies, and MJT roof, vents and door handles. Amazing how a picture shows up the little bashes this has taken since built...
Gaz.
-
9
-
-
Hi Guys,
Like many others, I wasn't satisfied with the shape of Hornby's offerings. I decided to scrathbuild my own. I would be interested in what you think of my rendition, given that I copied published drawings and dimensions from various sources.
I apologise in advance for the very poor picture, which I took with my phone for quickness.

All comments welcome...
Gaz.
-
6
-
-
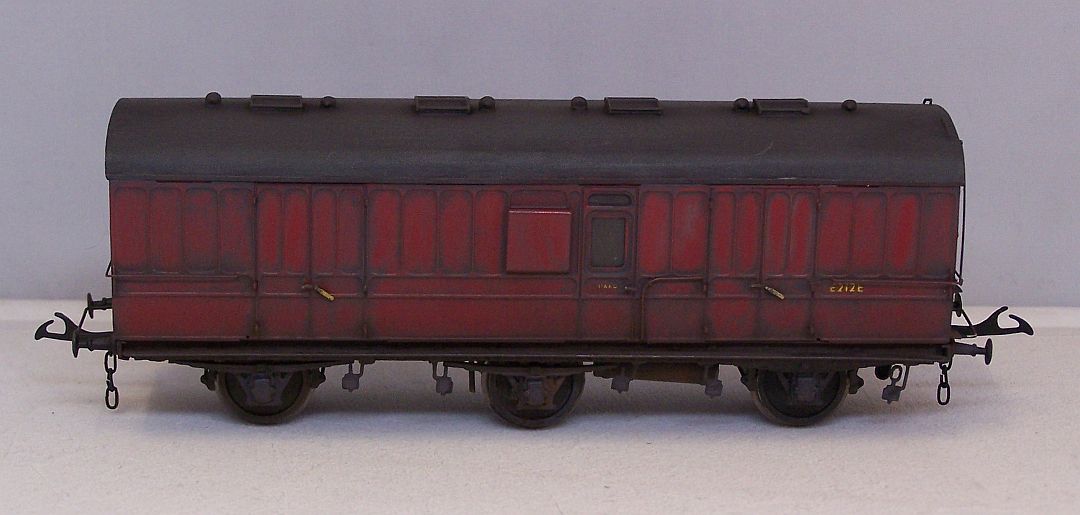
Morning All,
Despite having minimal modelling time, I've managed to nearly complete my D1682 LNWR 6 wheel CCT.
Only weathering and painting of the handrails remain, then she's good to go!

Gaz.
-
16
-
-
Never thought about using card to scratch build with.
Done many card rolling stock models?
What's it like to work with?
Where did the idea for using card come from?
Any particular make/thickness you'd recommend?
Cheers
Scott
Hi Scott,
Can I paste a previous reply to that question? I'm on my lunch break so dont have loads of time!
Quote;
"I built this coach using the 'Jenkinson' method, very proficiently described by Mike Trice here;
http://www.rmweb.co....nkinson-and-me/
I generally use 3 thicknesses of card;
The interior is constructed from 1.25mm thick mount board;
https://www.amazon.c...0?ie=UTF8&psc=1
The sides from 0.3mm thick card;
https://www.amazon.c...0?ie=UTF8&psc=1
And I also use 0.4mm thick card;
https://www.amazon.c...0?ie=UTF8&psc=1
I laminate the layers using a spray adhesive, and have had good results with this;
https://www.amazon.c...0?ie=UTF8&psc=1
For other gluing, impact adhesive and PVA, the cheapo stuff from your local supermarket designed for kids, has also been used.
Obviously, all the materials above can be had from other suppliers!!"
Any other questions, please ask!
Gaz.
-
Looking good Mr G
What materials are used in this model?
Hi Scott,
It is 99% card. The roof is just placed on at the moment. Buffers are from Wizard, W-Irons from Comet and the wheels are Romford. The middle axle is off until the chassis is painted. It still requires lamp irons, and I'll fit B&B couplings before the chassis is painted.
Gaz.
-
Hi All,
Not much use to those seeking to purchase parts, but it was a fairly straight forward scratchbuild a few years ago.
Hopefully it might encourage you to have a go...

Gaz.
-
8
-
-
Hi All,
Had next to no modelling time thanks to work and fitting/ glazing new interior doors. I've managed to get the LNWR CCT into primer though.

Hope to get more done soon.
Gaz.
-
3
-


Scottish Signal Boxes
in Railways of Scotland
Posted
Hi all,
Unusual box in the Central Scottish area in that it had no track circuits right up until it's closure.
Gaz.