Jump to content
 
  • entries
    129
  • comments
    741
  • views
    181,777

Ropley - One side down.....


TomE

1,105 views

05JAN12-001b.jpg

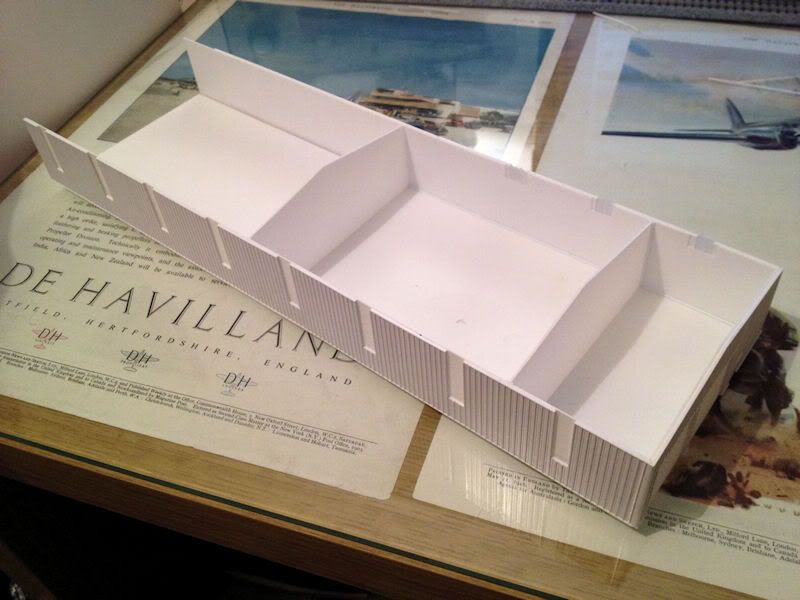
.....one more, and the roof, to go!

Hi all!


Today has mostly been spent cutting strips of Microstrip and applying them to the Northern side of the Carriage & Boiler works. The photo above shows the completed Northern wall of the section being modelled. There is about another 1/3rd 'off scene' to the building which gives some idea of just how long this thing is! Still to go in are the windows, however I've left the inner layer of plastic complete for the time being to prevent any warping. The photo above shows the building temporarily assembled on it's base.


On the Southern side I'm about 1/3rd of the way there and then there is the roof too, which also has the same ribbed cladding, so still a lot more micostrip to cut although it's proving to be a strangely cathartic task!


Onwards & upwards!


Tom.

  • Like 5

9 Comments


Recommended Comments

So all those ribs are individual lengths of microstrip? Looks very neat and tidy.


I had to achieve something similar recently for ribbed bridge girders but ended up building a sort of ribbed sheet by edge-gluing lengths of U channel and plain strip together. It worked out in the end but was very fiddly (the sheet wanted to crack and curl up all the time).


I suspect your approach is more sensible and probably uses less material to boot.

  • Like 1
Link to comment
  • RMweb Gold

Thanks Will!


That's correct. Many, many, many individual strips of microstrip applied using a small metal ruler to try and keep things as straight as possible.


If I were to do this again, I'd give serious thought to having the thing laser cut, or even possibly etched, although in terms of cost this is I suspect the cheapest way of doing it, and I'm happy with the way it's turned out so far. The big test will be what it looks like once painted!


Cheers,


Tom.

Link to comment

Hi Tom


Your work with the microstrip looks really effective.


One concern I have for you, having done something similar with thin strips of plsticard myself is the tendancy for them to create distortion. You may be using a thick enough piece for the main wall so it does not happen but when I did it using thinner layers I found it started to bow quite badly- this did not start to happen straight away though, maybe not till a month or more later.


Here's hoping it all stays nice and flat - can you add a ceiling to keep the top of the wall in line?


Best wishes


John

  • Like 1
Link to comment
  • RMweb Gold

Thanks John!


The evergreen V grove sheet used for the side walls is fairly thick, and this is backed with 20thou plastic again, so the walls are fairly stiff. Even so, there will be another set of internal walls between those shown above, and your suggestion of a ceiling is a good idea, just to be on the safe side!


Cheers,


Tom.

Link to comment
  • RMweb Gold

Great work Tom. The trick to keeping plasticard laminations flat is to use an odd number of layers. I would suggest adding a third, thin layer on the inside which should equalise the stresses. When building models like this I also tend to make the walls complete with all layers before assembling the building so the walls can be left under weights to dry completely flat.


Looking forward to meeting up at Leamington in a couple of weeks


Jerry

  • Like 1
Link to comment
  • RMweb Gold

Hi Jerry.


Thanks for the tips! I have been keeping the walls underneath a few books whilst they are not being worked on to help try and keep them flat, but I'll look at adding a third layer to the inside also as you suggest.


My main concern is that once the window openings are cut from the inside layer on the North wall, it's going to weaken the structure somewhat, but a ceiling as suggested by Dave hopefully will help. It's a shame Evergreen don't do their sheeting in transparent, that would have eliminated the need to cut out sections of the wall!


Looking forward to Leamington too!


Cheers,


Tom.

Link to comment
  • RMweb Premium

Aside from Jerry's mentioning of odd numbered laminations, a recommendation from a professional model builder I spoke to was to avoid using solvent to bond the layers, this included solvent based contact/impact adhesives such as Evostick. He used acrylic based contact/impact adhesives with great success. I'm unfamiliar with UK brands though I'm sure Bostik and the others have something suitable.


Tom, I'm really enjoying your blog, excellent modelling with the trackwork being particularly impressive,


Regards


Michael

  • Like 1
Link to comment
  • RMweb Gold

Thanks Michael!


I've used mek-pak here, mainly because that’s what I’m used to, but I'm always open to trying out new materials when it comes to building construction, so for the engine shed & wheel drop, I'll have to see if I can find a suitable acrylic based impact adhesive to experiment with!


Cheers,


Tom.

Link to comment
  • RMweb Gold

Tonight I've tested out the method I was thinking of using for the roof, but incorporating a ceiling as suggested by John. It seems to work quite well, and the ceiling also helps with the guttering, which forms part of the cladding around the edge of the roof. Hopefully this picture shows the method:


IMG_1107c.jpg


And here is the real thing:


RopleyPD.jpg


The ceiling will have to be split down the middle, as the Northern wall is taller than the Southern, but other than some refinement I now have the method sorted!


Cheers,


Tom.

Link to comment

Create an account or sign in to comment

You need to be a member in order to leave a comment

Create an account

Sign up for a new account in our community. It's easy!

Register a new account

Sign in

Already have an account? Sign in here.

Sign In Now
×
×
  • Create New...