Jump to content
 
  • entries
    172
  • comments
    1,475
  • views
    376,644

Jointed Coupling Rods and some other issues with Hornby Duke of Gloucester


Silver Sidelines

4,616 views

I was my intention to finish with Duke of Gloucester (DoG) and to move on. First however I would just fit some jointed coupling rods (from a Britannia). It seems that nothing is quite that straightforward with my model and I uncovered some other issues that hopefully will not bother too many of you, but just might be of interest to some of you.

12327268005_1b91851e15_b.jpg

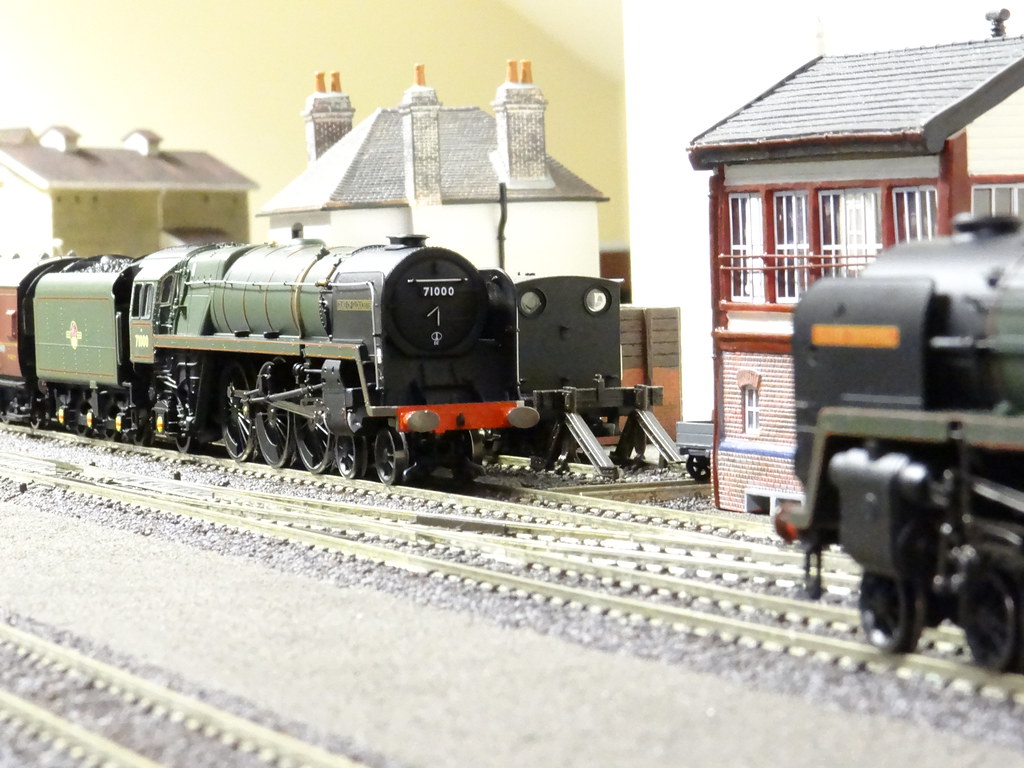
Hornby R3191 Duke of Gloucester – a rare view in service


When first taken out of the box my model was a reluctant runner first crawling and then speeding up and then crawling again. I thought that I had cured this behaviour when I removed the bottom plate and adjusted the pickups. Well this weekend when trying to reverse the loco (on curved track) I was aware of a shower of sparks from beneath the driver’s side of the cab!


The picture below was taken when the engine first arrived but I have added the little red arrow to highlight a patch of bare metal – part of the gear mechanism which seems to protrude on one side more than the other.
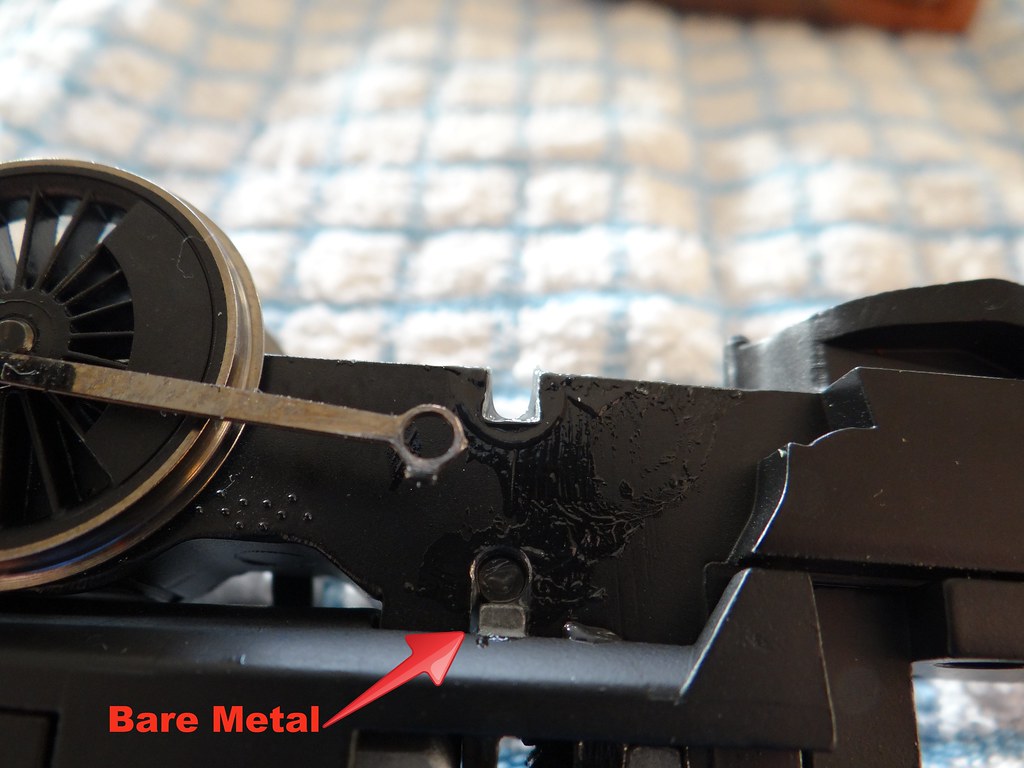
11625647586_3d51b3c255_b.jpg

Bare metal


Now that my engine has ‘run in’ (started to wear out) there is seemingly sufficient ‘play’ in the drive axle to allow the top of the wheel to come close to this area of bare metal resulting in the observed electrical shorting (sparks and slow running).

12410042693_052a9273d2_b.jpg

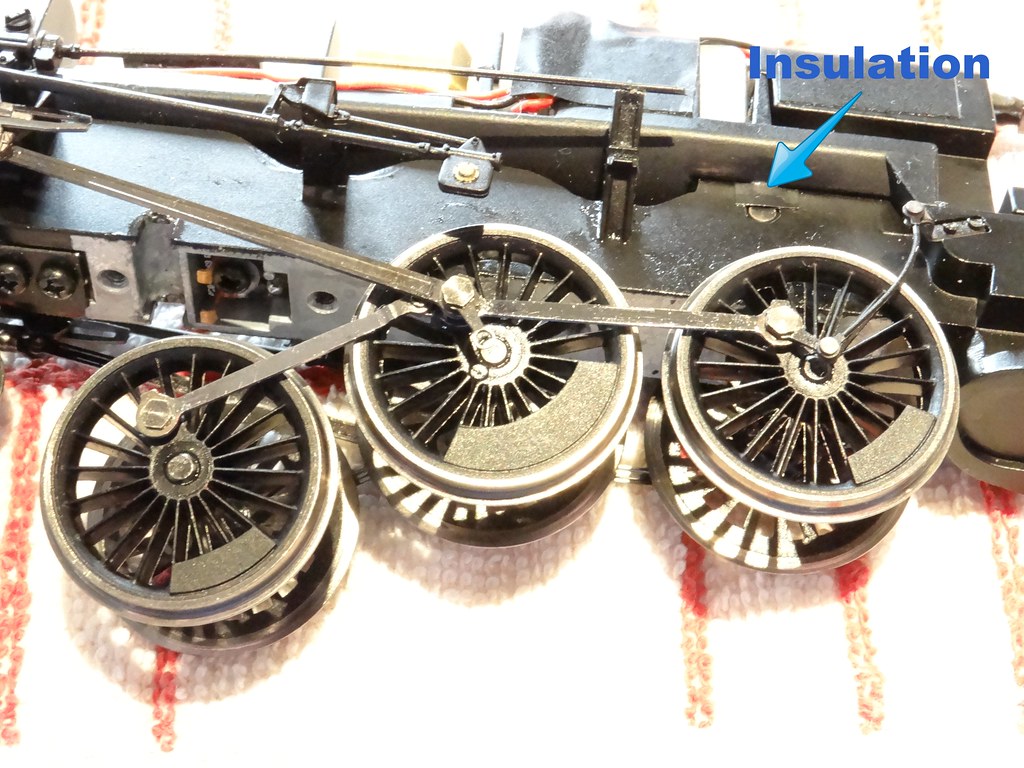
Insulating patch! (and jointed roads)


The quick fix was to cover the unpainted metal with some insulating tape. There is a lot of lubricant at the location so perhaps not a permanent fix. Plan B will probably be a coating of black paint. (I had a similar problem with a Hornby Dublo 8F where I fitted larger diameter metal rimmed wheels to the pony truck only to find that the flanges would occasionally contact the metal chassis shorting out the controller and bringing the engine to an abrupt stop.) In the longer term I guess I could dismantle the engine and grind off the protruding metal so that the bare face was recessed.
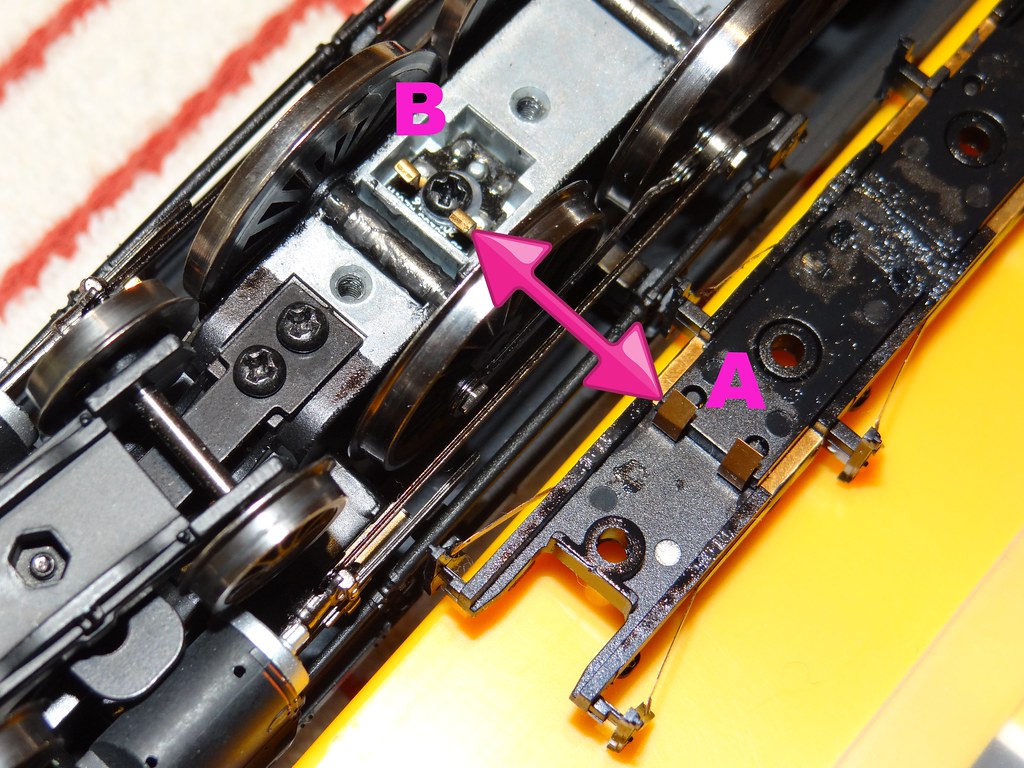
 

12410264454_f80dfe120c_b.jpg

Current collectors


A second issue that I have noted relates to the means that Hornby have adopted to take the electrical current to the motor from the wipers on the wheels. On two occasions I have reassembled the engine, put it on the track, only to find that it was completely ‘dead’. On both occasions I had the wheel sets out and in order to do that I had removed the bottom plate. There is a lot of lubricant around the axles on my model and all that I can think is that this was finding its way on to the contacts labelled A and B in the picture above. Certainly cleaning these contacts before refitting the bottom plate brought the engine back to life.


12416731075_95f08f9931_b.jpg

Fluted or solid?


Other members of RMweb had suggested replacing the DoG one piece coupling rods with the jointed spares for Britannia. That seemed an easy fix. I would buy the necessary spare parts. From the Hornby Service sheet for post 2008 loco driven Britannias the relevant Spare Part is No. X9599. However on arrival I noted that the Hornby spares are fluted rods not solid as on DoG (or on any of my loco driven Britannias). There are plenty of pictures of DoG on Flickr, some from the 1960s and lots in preservation. These confirm the rods should be solid. Tracking down pictures of Britannias is also easy. The official picture for 70000 shows the engine with fluted rods. However subsequent ‘in service’ pictures from the 1960s and in preservation show solid rods – as fitted to the latest Hornby models. Perhaps there are some other Hornby spares which I should have purchased? However I like a challenge so the fluted rods were dismantled, reformed and fitted to show the solid side outermost.


Is there a difference in performance now that DoG is fitted with jointed rods? Subjectively I would say it runs more smoothly – although my model still seems to find all the humps and bumps in my trackwork. Quantitatively with the jointed rods fitted my Gaugemaster Controller had to be turned down a full notch to match the speed with the solid rods – so perhaps much less internal friction. The same was true when coming to a stop using the Inertia Controller – with the jointed rods the engine ran on much longer - again suggesting much less internal friction.


For interest there are two HD videos on YouTube

One with

, and one with the newly fitted
.


I have to say perhaps not a great deal of difference – but it did fill in a rather wet Saturday.


The pictures above on the Hornby boxes are quite revealing. DoG (top) is shown correctly with solid rods – but look at the dummy joint on the firebox section – that is not how my model was assembled. The picture for ‘Oliver Cromwell’ (bottom) shows fluted rods which is incorrect as both prototype engine and model are fitted with solid rods. How do Hornby manage to get these things wrong?

  • Like 1

22 Comments


Recommended Comments

The first 25 "Britannias" were originally built with fluted rods - they were replaced with plain ones later in their service lives.


70013 would be correct so long as it carries its original (i.e. first) livery.

Link to comment

Hello Horsertan


Thank you - I knew someone would know

The first 25 "Britannias" were originally built with fluted rods - they were replaced with plain ones later in their service lives. 70013 would be correct so long as it carries its original (i.e. first) livery.

However the first livery would have been Early Emblem -so  not Late Crest as shown on the Hornby box.


Regards


Ray

Link to comment

The initial batch of Britannias (and other standard classes) were originally fitted with fluted coupling rods, as Horsetan says. Mainly as a result of problems caused by driving wheels shifting on their hollow axles, a change was made to plain rectangular rods. These were fitted to the later locos from new (with solid axles) and were retr-fitted to the earlier locos (or at least some of them). In some cases, only one half of the rods were swapped so a few engines were seen with both fluted and plain rods on the same side!


It looks as if you've fitted the jointed rods the wrong way round. The joint should be behind the connecting rod, between the driving and trailing coupled wheels. In the photo illustrating the insulation, the joint is shown in the front section of the rods.

Link to comment

They also had hollow axles, but these had to be plugged when it was found that the wheel centres were shifting on their seats....!

Link to comment

Hi Dave


Thanks - and oh bother!

.....It looks as if you've fitted the jointed rods the wrong way round. The joint should be behind the connecting rod, between the driving and trailing coupled wheels. In the photo illustrating the insulation, the joint is shown in the front section of the rods...

I thought that I had taken a good look at some pictures but I can see that you are right.  Oh well the next wet day and perhaps I will get my mini disc cutter out and grind some metal away at the same time!


Regards


Ray

Link to comment

Just glancing through one of my books, I've found photos of 70004 still with fluted rear section rods in 1964 and 70014, 70023 & 70024 in 1967. Not only late crests but 70014 was paired with a BR1D high-sided tender. 70004 and 70024 clearly have plain front rods but the front rod isn't visible in the 70014 & 70023 pfotos (hidded behind the con rod).

Looks like all sorts of combinations could be seen.

A classic case of finding a photo of your particular loco at about the time being modelled.

Link to comment

Hello Dave


Thanks for looking in the old books.

Just glancing through one of my books,....

A classic case of finding a photo of your particular loco at about the time being modelled.

I did spot a picture of 70013 on the web after it had been moved up to Carlisle (63ish) and that had solid rods - as in preservation.


Thanks again


Ray

Link to comment

Hello Dave

It may not have been wet but job done.

.......It looks as if you've fitted the jointed rods the wrong way round...

12435087874_cfcf516bd4_b.jpg

Rods Reversed - excess chassis metal ground down and painted black


Ray

Link to comment

The protruding shaft is a common Hornby problem and a sod to spot, I had the same problem on a Q1 and simply tapped the shaft across slightly

Link to comment

Hello David, Thanks for the input.

The protruding shaft is a common Hornby problem and a sod to spot, I had the same problem on a Q1 and simply tapped the shaft across slightly

I don't think I realised just how poor the design and construction of this engine - it just isn't thought through.  I have inserted a 'wee' washer into the drive gear train to stop the little shaft protruding out and touching the wheel rim - it also makes the engine run quieter.


Regards Ray

Link to comment

I've been trying to discover why my Hornby A3 and Standard 4 short at curves for a long time. I'm going to see if the protruding shafts are the guilty ones!

Thanks!

Link to comment

My loco ran "lumpy" out of the box so decided to try the jointed coupling rod suggestion. First results were disappointing with the loco running even more lumpy going forwards. However, it ran beautifully backwards!

The rods I had used were an old, well travelled pair and the rivets on later examination were a bit on the slack side.


I conclude that tightness of these rivets is fairly critical. Because the drive is from the rear wheels, any sloppiness is pushed forward so presumably quartering is being disturbed. In reverse, (now "front wheel drive") any slack seems somehow to be distributed more evenly.


I'll try re-rivetting my rods but would suggest to anyone trying this solution that not just any old set of rods is going to do the biz!

Link to comment

Good Morinng Elgar

My loco ran "lumpy" ..... First results were disappointing with the loco running even more lumpy going forwards. However, it ran beautifully backwards!

.......I conclude that tightness of these rivets is fairly critical..

A familiar story.  My DoG is running nearly very well.  Jointed rods will not cure lumpy running.  Jointed rods seem to offer less friction on curved track and make for smoother running.


I requartered one set of wheels off DoG - the rear drivers with the speedo cable.  I checked each pair of wheels.  I took a piece of white card and accurately drew two black lines at right angles to each other.  I then placed the wheel set over the lines where they crossed and checked by eye to see if the two wheels were offset at 90 degrees.  In my case I decided that I could make an improvement.


After this success I decided I would tackle City of Lancaster which whilst running smoothy always swung around from side to side.  Like you I thought that the rods might be at fault. A replacement set did not make any difference.  I couldn't detect any problem with the quartering but did eventually purchase a new wheel set.  Substituting the new wheel set introduced a whole new set of problems.  Substituting just one new pair of wheels (again the pair with the speedo cable) completely resolved the issue.  Why?


If you do alter the rods, you should perhaps overlay the jointed rods on to the original DoG rods just to check that the hole spacing still matches.  When I was attempting to reverse the fluted rods I made a mess of things by making one set of rods too short - hence some rough running.


Speak again


Regards


Ray

Link to comment

Thanks Ray,


Don't think I'd expressed things too well re the "quartering". Despite having a wheel quartering jig bought when the excellent Modelspares was still trading, I haven't actually checked my DoG wheelset yet! I was just using the term to describe the symptoms of the problem. I've put the original solid rods back on and run the loco a bit more and it has freed up a bit. Like your CoL my DoG developed a bit of a "waddle" with the jointed rods which is not there with the solids.


I'd checked my jointed rods carefully against the originals and they were OK (funny thing is I can't now remember where the hell they came from!) One thing I need to have a look at concerns the crankpins on the centre drivers. On my loco these had not been fully pushed home - thought this might have been to ensure clearance between the return crank and the simulated gearbox of the plastic Caprotti bits. Will try pushing the pins right into the recess provided and see if it makes any difference. (Was interested to note that Hornby has punched the locating hole in the return crank at a slight angle to bring the business end of the crank into alignment with the axle) I'm obsessed with Caprottii stuff and

am working on how to get the centre of the gearbox bearing to align with the axle. Have improved the reversing rod problem by cladding it in Albion Alloys brass tube from Expo but it's a bit thick so will have to redo it in the next size down!


Incidentally, had an EMail from Hattons today informing me the my order for R3191 was not going to be fulfilled as Hornby had eliminated it from the production list - looks like the whole range is going to be pulled so we'll have to make the most of what we have! Tried ordering a couple of bits from Service Sheet HSS400 but East Kent didn't have any (surprise,surprise!)


Feel sure we will speak again.


Regards


Bob

Link to comment

Thanks Bob

... my order for R3191 was not going to be fulfilled as Hornby had eliminated it from the production list -.

I guess Hornby would only have made say1000 or perhaps 2000 units but that with so many returns from the first batch there have not been many spare for new sales?  You do wonder where all the returns will end up. R3191 must always have been a Limited Edition - how else would they sell R3236?


The crank pins on the inside of my driving wheels for the centre pair of wheels were not pushed home - but I cannot see that making any difference.  Interested to hear of your problems with the reversing rod - is this you trying to keep it straight?  As made by Hornby it is not clever design.


Yes speak again


Regards


Ray

Link to comment

Hello Ray,

Have been out of circulation for best part of two years and came upon this thread while looking for something else! I expect you'll be light years ahead of me but just in case not, I took advantage of a keen special offer at Hattons last week and bought my very first "train set"! (DoG with 3 Pullmans and some other gubbins).

Was setting about correcting the smokebox front problem when I noticed that Hornby had already done it for me - just as well as this one has the very firmly glued in type you encountered.

Hope you are keeping well, best regards

Bob

Link to comment

Hello Bob


Yes we are still here.  Getting a bit buffetted by the wind today and wondering when summer is coming.  (Or was that the first Tuesday in June?).


I was interested to hear that you think Hornby have corrected the smokebox overhang problem. I haven't read that anywhere else.  


Yes a number of people have commented on how good value the Hattons Duke of Gloucester Pullman set was.  My understanding was that they were the Railroad versions, both the engine and the coaches.  If you have been keeping up with my other Blog Posts I commented recently on a Hornby Railroad County and I was not impressed as to how detail had been sacrificed to save costs.


Hornby quality is very up and down.  Duke of Gloucester has gone away and the arrival of the Q6 (which is excellent) has prompted me to unbox some old rolling stock and indulge in a little North East nostalgia.


I hope yuo being out of circulation was not too serious an issue and that all is now sorted.


Regards


Ray

Link to comment

Hello Ray,


Thank you - yes, we're gradually getting back to "normal" again. The items were indeed all Railroad quality as you'd expect at that price. (I notice the latest one has been shorn of its speedo cable to save another 5p!)


I must be one of the world's worst photographers but am going to pop off one of the smoke deflectors and try to get a snapshot. I've presently no idea how to get any pic onto RM Web let alone get it to appear in any particular place! Will try to work it out so you can see what current production looks like - hope I won't have made myself too stupid!


In the meantime I've measured the dimension from the front boiler band to front of smokebox and make it 37mm. This is the same as the DoG I modified in 2014. If I'm honest, I can't really remember now what that one was like before it was attenuated but do remember it seemed quite a lot of stuff cut away (Certainly the smokebox rivet line was lost during the process and had to be

restored)


Hope to be in touch again soon.


Regards


Bob

Link to comment

Hello Bob


Sounds interesting.

...I've measured the dimension from the front boiler band to front of smokebox and make it 37mm. .


I still have two original models, one of each.  My guess with a small ruler is 37.5 / 38mm.  There wasn't much to lose at the bottom to get the smokebox to sit flush - just that mine were well glued in.  So that is the way they have stayed.


Pictures to RMweb (or any where else) can sound daunting until you have had some practice.  For RMweb the pictures need to be already loaded on the web.  I think you can have an album on RMweb.  In my case I use both Flickr and Photobucket.  Both are 'free' although I pay £15/year for extra privileges on Flickr.  Once your picture is loaded onto Flickr/Photobucket (or where ever) it will have a web address / URL which you copy/use to add into your RMweb 'Post'  For example you can use the tab 'My Media' in the bar at the top of the 'Post a Comment' window.  There are other ways and I use the left hand button in the top bar to toggle back to BB Code Mode and enter the picture in HTML (I said it might sound daunting).  Try the simplest first.


Regards


Ray

Link to comment

Thanks Ray, you've gone to a lot of trouble and I much appreciate it.


Gulp! Sounds daunting indeed to my nearly 78 year old brain cell!  I've now found my headset magnifier and been taking a closer look into this matter! 


I'm beginning to think that the reason I thought Hornby had fixed the problem is that I had actually removed less of the overhang than I thought which is why the two models look so similar!

Measuring up again with my (analogue) micrometer in several places round the circumference shows that, in fact, I hadn't got the front quite "square" so the effect was more noticeable at the top than the bottom. I was (subjectively) quite pleased with the result at the time but you clearly took the better option in leaving the thing alone!


Should have known better - for Hornby to alter the mould would have been a major undertaking!


I'll try to follow your instructions above just to see if I can manage it even though I don't seem to have anything to contribute just now!


Best regards

Bob

Link to comment

Hello Bob


I am impressed.


I'll try to follow your instructions above just to see if I can manage it even though I don't seem to have anything to contribute just now!


..

I am guessing that you 'take' digital pictures and that you have stored images on your computer?  I suggest that you try loading some of these pictures on to the Internet.  I would suggest that you open an account on Flickr and follow the instructions.  After getting the pictures on to Flickr there are straight forward instructions for linking the images to say a Post on RMweb.


Regards


Ray


https://www.flickr.com

Link to comment

Create an account or sign in to comment

You need to be a member in order to leave a comment

Create an account

Sign up for a new account in our community. It's easy!

Register a new account

Sign in

Already have an account? Sign in here.

Sign In Now
×
×
  • Create New...