The 891mm Project Intro and Progress
The Project
Both myself and my father are keen railway modellers.
Up until earlier this year, we have spent many an hour discussing many potential projects, often circulating around our interest in 4mm P4 Finescale modeling.
With a number of local exhibitions under our belt demonstrating "Frampton", it soon became clear that many of the exhibitions were a bit "samey". Not withstanding the excellent modelling often on display at exhibitions, a number of layouts genre's appeared to be the same...Primarily British Railways, steam, diesel and electric, transition period, with a smattering of the odd American layout here and there. Nothing really jumped out as "new" with many of the similar items of stock being used on various different layouts. Over many coffees we decided that something different needed to be done, something unusual, but not considered "twee".
Many Google searches later looking for inspiration I stumbled upon a web page containing many PDF files of Scandinavian Locos and Rolling stock diagrams. Thumbing through the PDFs I came across a number of Railcar Loco and wagon diagrams all of considerable size and function. Further investigation revealed that in excess of 1500miles of 3' gauge track existed and operated by many companies until their inheritance by SJ in 1947. A possible option...
As part of the deliberations of the project, scale was an obvious consideration.
Primarily I am a 4mm finescale modeller, with no experience in the proprietary larger scales. My father, he too primarily models in 4mm but also has experience in 7mm (O gauge) 14mm (Finescale O narrow gauge) as well as some experience with the Imperial 'S' Scale.
Closer consideration of the project highlighted a number of issues, the primary one being that there are no commercially components available parts for the rolling stock, especially in the UK. It soon became clear referring to the drawings that many proprietary items produced for other scales could be used and/or modified to fit the chosen 1/35 scale...or completely scratch built.
A primary consideration for the viability of the project would be the availability of wheels. A number of calcs were undertaken and a review of the ranges available and suitable options were identified, large 4mm loco wheels to small O gauge wheels. The best suited example being "S" Scale coach and wagon wheels for most Locos, wagons and railcars.
So with a scale identified (8.71mm - 1'), adopting 1/35 scale would coincidentally makes the 891mm track gauge scaled down to exactly one inch...ideal for the easy manufacture of track gauges!
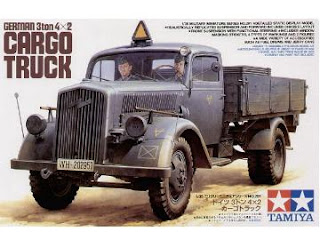
3ton 4x2 German Cargo Truck
Before going head long into the project I wanted to get an appreciation of the scale. Although only "slightly bigger" than O gauge I thought I'd best have a stab at getting to grips scale. I picked up one of the excellent Tamiya 3ton 4x2 German Cargo Truck kits. Obviously a military kit, I had visions of being able to use it for the future layout. A lovely kit to put together (although some obvious ejector pin marks) it comes with a whole host of "extras" including driver and navigator.
It seems ironic that the first thing that is going to be (nearly) completed on this project is something non railway related, however I thought it would be important to establish an "eye" for the scale. Certainly as the build has gone on, one thing that has already struck me is the scale of colour. Not as mad as it sounds, it??™s quite clear - to me anyway - that 4mm scale rust colour is not the same as that in 1/35 scale...or 8.71mm/ ft...A discussion for later.
So the lorry is near completion and is to be finished in a well work worn condition adapting the techniques outlined on the excellent Terrapin Narrow Gauge site. Final assembly, painting and weathering to complete.
I'm certainly looking forward to getting this kit finished and ready for use in a small cameo somewhere on the layout.
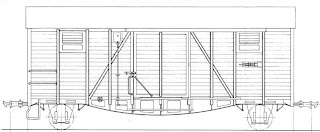
891mm Gp Van
Following on from a previous request on RMWeb for info on the Gp van I came across a stumbling block - no further info, nothing not even with my very broken Swedish. That was until out of the blue I was contacted by a member of the Smalsparigt forum with a whole load of detail photos and drawings of these van...success! I felt guilty as the generosity of the information provided was outstanding, and I had nothing to offer in return.
With information in hand I have been able to make a start on the construction of a Gp van. The body is constructed of 3mm plywood sections, braced to ensure that the risk of warping is reduced. Plasticard Evergreen sections are used to replicate the external framework. The side windows and end detail is still yet to be completed as many of the detail parts on the exterior. To replicate the rivets/bolt heads the intention will be to use military modellers detail parts to provide the relief and detail of the many bolt heads and rivets on these wagons! I'm also considering the Archer Transfers Rivets/ Bolt Heads as an alternative.
An hour or so of work later completion on the side door and various additional body bracing...
As I'm progressing with the model it is becoming apparent that in the larger scale "things" are more obvious. Where as in 4mm a dimple can be used to represent a bold head, in 1/35 it??™s not so easy and don??™t think the Archer Decals will be an acceptable option. So I have ordered a packet of Plus Models 1/35 scale etched nuts and bolts and these will be used on the van to represent the various (!) bolt heads found on the vertical body stanchions.


4 Comments
Recommended Comments
Create an account or sign in to comment
You need to be a member in order to leave a comment
Create an account
Sign up for a new account in our community. It's easy!
Register a new accountSign in
Already have an account? Sign in here.
Sign In Now