Jump to content
 
  • entries
    63
  • comments
    218
  • views
    49,182

Dirty limpet: Poor man's Bruninghaus springs.


Will Vale

737 views

weathered-limpet-1.jpg


I did some more work on the limpet I started the other day. I applied the modern warning flashes (very nice Fox transfers) and blacked out the DC prefix on the data panel which I forgot to do last time. The body has had a little bit more work with washes and powders to try and tone down the contrast a bit, otherwise it's much as before. The white filler on the inside is to cover a soldering iron mark from the denting process, it'll get sanded down and painted over tonight hopefully.


The other main job was the underframe - I fitted Smith's instanter couplings (my first time!) and had a go at a cheapskate modification to the springs to make them look a bit more like the correct Bruninghaus variety. I had a quick try at paring off the originals as suggested by Nigel Burkin and James Hilton, but found it really difficult. As a compromise, I fitted slices of Evergreen U channel about 1mm by 2.5mm to each end of the Bachmann moulding using styrene solvent, to represent the collars around the real springs. This was quite easy (and cheap!) and does kind of suggest the Bruninghaus springs, but I don't know if it falls under the category of "best left alone" - in a sense it replaces the accurate-but-for-wrong-prototype originals with something which is closer to the prototype, but less accurately made. What do people think?


weathered-limpet-2.jpg


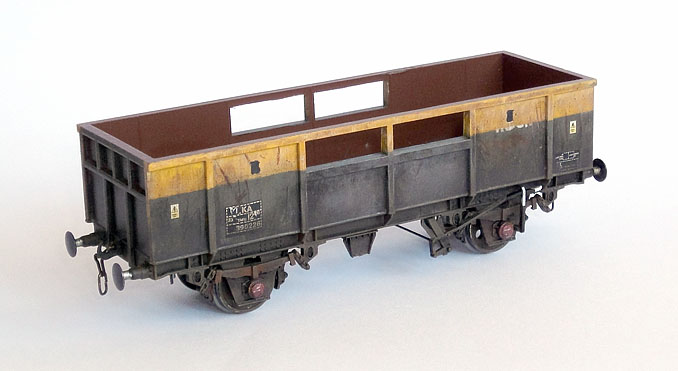
I've been looking for a convenient underframe colour to use as a default on these 4 wheel wagons, and I've ended up with Vallejo "Leather Brown". It's a pretty good base, and it's nice to have something which doesn't need mixing. I shaded it with a black ink/grey paint wash and then drybrushed lightly with Games Workshop "Graveyard Earth". Various details were picked out with powders, and a few final spots washed to give deeper shadows.


I have another 4-ish to do in this livery, comments and criticism would be welcome before I start painting them in a batch. Any pics of slightly less battered examples would be useful - I've seen several modellers do nice weathering jobs with mainly small rust spots on (faded) factory paint and these look very nice, but I haven't found pictures as a reference so far - is it because ZKAs/MKAs all got tatty before digital cameras were commonplace?

5 Comments


Recommended Comments

The spring modification isn't bad - it could be improved by adding a sliver/fillet of plastic at each end of the spring to make it less tapered? Pairing off the originals to replace with white metal is a little tricky, but does make such a big difference!


The weathering job looks superb. What denting have you managed to achieve with a soldering iron? Any close ups?

Link to comment

Thanks James!


Have a look and see if you prefer the left spring on the second picture - that has some of the bottom of the moulding cut away to flatten out the line - I think this is maybe better than adding to the other end since it lifts the spring up visually, but it was a pain as mentioned. I know you've done the full job on this - how did you get in to pare them away, maybe I can get some tips?


The denting was mostly with a halogen lamp since all I managed to do with the 2mm plastic and an iron is to make gouges :( I used a mask to soften one panel at a time and deform it outwards. I'll take a picture later on so you can see the results - it's only really apparent close to end-on.

Link to comment
is it because ZKAs/MKAs all got tatty before digital cameras were commonplace?


I suspect that may have a lot to do with it...only some of the Limpets got "proper" dutch paint though, from memory most got a yellow band added above whatever livery it was in as a POA - the state of some of the late MKA images is due to big chunks of whatever paint was left being many many years old!

Link to comment

Will - yes the one on the second picture, left is visually the best!

I used a sharp scalpel with a curved blade and tool my time. They don't need to be perfectly flat as the casting will sit on top of the area you remove them from. IIRC I cut through the springs at the ends and then up the sides of the W irons - which removed the spring ends. I then carefully and slowly carved in at each end. The blade was new and I took my time... eventually there is enough of a cut that the scalpel can be twisted slightly to snap the spring detail off :)


I look forward to seeing the photos end on - it looks lovely! (as does your older EWS MTA work IIRC?)

Link to comment
yes the one on the second picture, left is visually the best!

Blast, I think you're right. It's more obviously better in the photo than it was in the bare plastic. That means I've got 24 springs to modify, let alone the PNA ones :(


from memory most got a yellow band added above whatever livery it was in as a POA

I need to try and capture that better. Maybe I should mask off the yellow stripe, weather the bottom, then unmask and weather the whole thing a bit more? It does make sense of what they look like.

Link to comment

Create an account or sign in to comment

You need to be a member in order to leave a comment

Create an account

Sign up for a new account in our community. It's easy!

Register a new account

Sign in

Already have an account? Sign in here.

Sign In Now
×
×
  • Create New...