Jump to content
 
  • entries
    6
  • comments
    14
  • views
    3,078

OMWB 7th Sep 2010 - plenty going on...


eetype3

398 views

Mornin'


Finding myself with an unplanned day off due to problems with a pool-car tyre and a large crosshead screw (sigh...), I decided to update my blog. Here's my workbench as it stands today:
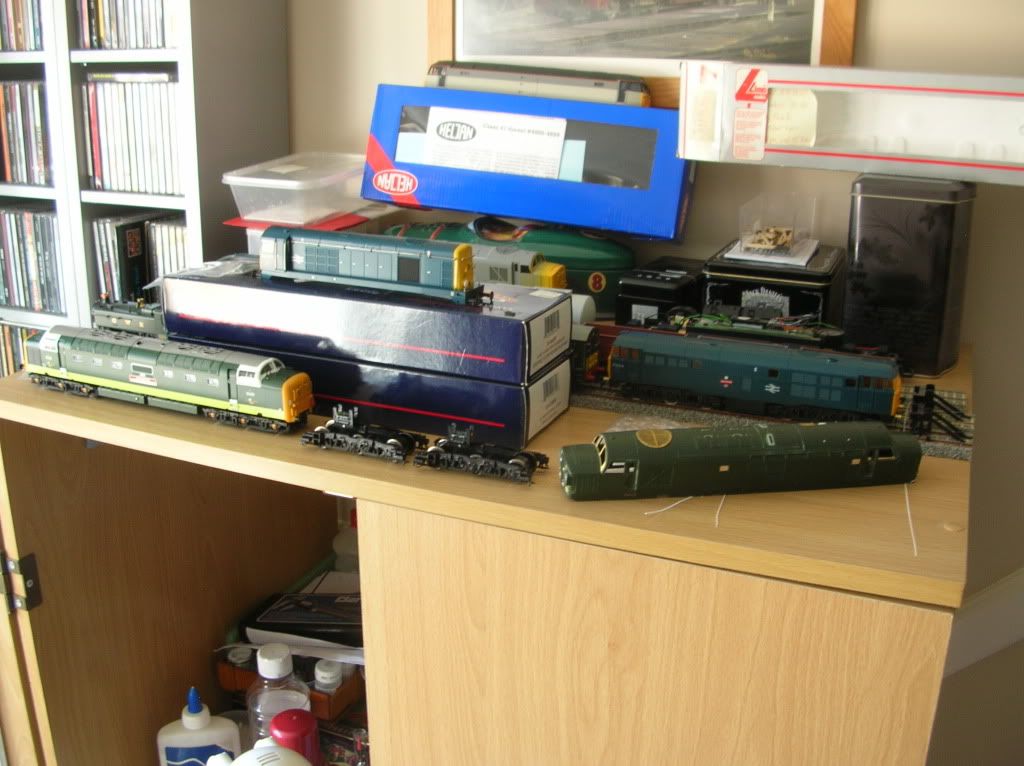
 

Workbench7thSeptember2010001.jpg


Visible are:


55 002 KOYLI, Bachmann 4-axle drive version, now fitted with phosphor-bronze pickups on all wheels and an Olivias Trains LokSound decoder and DCC Supplies bass-reflex speaker. Now capable of the tear-jerking yowl of twin Napiers in full flight B) and awaiting full buffer beam detail and better buffers.


Toffee Apple 31, which will be either 31 005 or 31 018; Lima, fitted with Ultrascale wheels, ModelTorque motor and a scratchbuilt 8-pin DCC interface. Awaiting paint stripping and detailing plus scratchbuilt buffer-beam valances.


37 100; long-term project based on a Lima shell - I work on this when I'm waiting for bits of other projects to dry.


37/7 shell; ex-ViTrains 37/4 and due even more major work than it's already had to become an ex-splitbox example in Railfreight livery. Sidelined for now as I've subsequently switched from the Craftsman windscreen panel etch to the Shawplan version, so major rework is required. I have a feeling that this loco is my Nemesis... :rolleyes:


20 034, 1982 Tinsley condition; one of my intended Tinsley pair, awaiting decals and medium-heavy weathering.


Heljan TTG 47: awaiting developments in Nottingham!


Hornby Hymek: an eBay bargain, to be extensively detailed and finished in heavily-weathered green livery. Already fitted with Ultrascale wheels and extra pickups.


"The Coal Rake": various kitbuilt and detailed RTR 16T and 21T minerals; awaiting decals and weathering, plus the other 10 wagons needed to form a decent rake.


Hornby Class 31 bogies: removed for weathering from my Immingham 31/1.


Lima 9400 0-6-0PT: snapped-up on a whim through pure nostalgia. I haven't owned it long enough to decide its fate yet :D


The current plan is to finish the Deltic and then concentrate on the Tinsley pair. I knew that this was becoming an obsession when I realised that I was ignoring more than half of the average RTR generic buffer-beam detail kit in favour of more accurate fittings, pipes and hoses... B)

7 Comments


Recommended Comments

Well, if that how tidy your workbench is with all of that to work on... it must be spotless when you're only tackling one task at a time. That's a lot of projects! Enjoy the Deltic.... I find that the three pipes provided are ok... although not too accurate, but it does need the airbrake pipes and screw link coupling.... and the brake exhauster exhausts at the No. 1 end. Don't forget the nose end steps and lower ETH modules (with pipe/wires) on the left hand side pair. If you add these, the difference is astounding.

Link to comment
  • RMweb Gold

Don't listen to Jon mate, he pretends the real ones he photographs are models!:rolleyes: Seriously, have a look at his pictures of his much improved Bachmann Deltics they are awsome. His weathering is just how we all remember them. You certainly have a busy workdesk! Keep up the good work

Chris:)

Link to comment

Well, if that how tidy your workbench is with all of that to work on... it must be spotless when you're only tackling one task at a time. That's a lot of projects! Enjoy the Deltic.... I find that the three pipes provided are ok... although not too accurate, but it does need the airbrake pipes and screw link coupling.... and the brake exhauster exhausts at the No. 1 end. Don't forget the nose end steps and lower ETH modules (with pipe/wires) on the left hand side pair. If you add these, the difference is astounding.


Cheers Jon :)


I've already fitted Markits/Romford sprung coupling hooks (which will have modified Smiths screw-link assemblies fitted after painting; the Romford screw-link is hyawge. I normally fit the Smiths hooks too but there's insufficient clearance available on the Deltic; the Romford hook shanks are shorter and just about clear the bogies!). Pipes and hoses are underway, plus scratchbuilt ETS fittings. As you say, the exhauster pipes are a must, plus all the external pipework on the buffer beams. When I manage to beat the apparent global shortage of 1mm brass strip - even Mainly Trains have run out! - I'll knock-up the footsteps too. I'm also increasingly dissatisfied with the scavenger fan grilles and frames; I think I might extend the project a bit and fit replacement Shawplan items. However, the decals for the Tinsley 20s have arrived... ;)

Link to comment

Also note that I closed the RH door on the workbench; leaving it open would have headed-off any comments about neatness & tidiness at the pass! :lol:


Incidentally I've used Hornby 31 buffers on the Deltic (since the photo was taken). Pull-out the Bachmann buffers and retrieve the springs; razor-saw off the shanks flush with the nose, then drill-out the existing holes to 3.2 mm. The Hornby 31 buffers (3.17 mm diameter shanks) can then be pressed/glued in place, leaving 3.25 mm (including flange) of the shank protruding. That gives a lovely "these shrouds really are fitted over the buffers" look and also provide the top footsteps and side inspection covers. They've got genuine steel heads and are sprung too. Eeeez niiiiice B)

Link to comment

Progress on the Deltic has been hampered by a week working in Scotland; this weekend has seen the ETS fittings made and painted, the nose-end steps made and epoxied in place (carefully checking clearance for bogie swing and articulation!), plus the airbrake pipes fitted to their adaptors prior to gluing in place and replicating the joining pipework across the bufferbeams. Next step will be filling the existing (huge!) holes in the bufferbeams and adding the bufferbeam gussets, before fitting vacuum pipes and the No.2 end exhauster drains. Steam-heat fittings are yet to be made, but will probably be based on those supplied with the Hornby class 31 plus scratchbuilt hoses and end fittings. With excellent luck and a following wind, I hope to post pics next weekend.

Link to comment

Create an account or sign in to comment

You need to be a member in order to leave a comment

Create an account

Sign up for a new account in our community. It's easy!

Register a new account

Sign in

Already have an account? Sign in here.

Sign In Now
×
×
  • Create New...