


DavidK71
-
Posts
165 -
Joined
-
Last visited
Content Type
Profiles
Forums
Blogs
Gallery
Events
Exhibition Layout Details
Store
Posts posted by DavidK71
-
-
A bit more progress on the TPM conversions of the Dapol B-set coaches. First of all, the C.60 full third:

This is the K40 full brake, showing the end converted to a TPO gangway:

Underframe modifications have been completed, and the underframes and bogies sprayed matt black. The roofs have been sanded flat, then sprayed with primer, then sanded again where needed, then sprayed etc. what feels like fifity times, but at least the old roof ribs and ventilators are gone. New ventilators are from Etched Pixels, new roof ribs are some 0.5mm tape I found online, and the water tank covers came from the spare etches box. After some debate, I have decided to leave off attempting the roof handrails.
One change I've made is that I want to follow my usual approach of painting the sides before attaching them (they are just held on with blutac for checking and photography purposes), so I've put a thin layer of plasticard behind where the etched sides have holes to represent the door locks, necessitating yet more filing off material from the donor body sides. The result looks like it will work, though. There is also an interior in the full third, though it's not come out visible in the photograph.
Next is spraying the ends and roof, then painting the coach sides, glazing and final assembly.
-
 5
5
-
-
Some of the handles went pinging away into the carpet - lost for ever. I need to go and lay down in a darkened room for a bit.
I generally lose at least a third of the door handles to the floor...
-
1
-
-
Please could you post a picture of the jig you made for rolling coach sides?
I'm not sure if it deserves the grand title of 'jig', but here goes with a very quick photograph:

Unfortunately the card seems to have warped a bit, it used to be flat, but you still get the idea: an etched coach side can rest with the bottom of the side raised up, ready for gentle rolling with a metal rod of some kind. Hope this helps ...
-
On 23/02/2015 at 15:06, R Marshall said:
Here's a few pictures of my 1st foray into coach kits - this is an Etched Pixels Thompson CL.
It's looking very good 🙂
On 23/02/2015 at 15:06, R Marshall said:The 3D-printed roof is also shown with the torpedo ventilators added - these were very fiddly to fit.
One problem with these printed roofs is that they're not very smooth. I know it's not a very helpful suggestion after you've done all that work getting the vents in, but it might be worth taking them off, then spraying the roof with something like Halfords filler primer and sanding it down to get a smoother finish. I spent a while painting and sanding the roof of the milk brake I posted a photo of, and even so I'm not entirely happy with the roof.
Of course, you might also decide to not worry about it 🙂
On 23/02/2015 at 15:06, R Marshall said:The assembly is very light at this point, so I'm wondering whether I'll need to add some weight.
Are there white-metal battery boxes to go on? They add some useful weight underneath.
-
On 08/02/2015 at 22:33, R Marshall said:
I'm just starting out with an Etched Pixels Thompson CL
Yay, always good to hear of someone making coaches in N/2mm 🙂
QuoteDid you try to keep the underframe clear of paint where it's inset to take the sides, or will the impact adhesive lock on to the paint anyway? I'm worried a lighter strip might show through.
I do try to keep most of where I'll glue the sides free of paint. This isn't so much about whether it will adhere (though that is a valid concern), as Evostick Impact tends to react a bit with paint it comes into contact with, so if you're not careful enough you get a sticky glue-paint mixture that, if it shows anywhere, can be difficult to get rid of. I try to make sure that the paint covers the ends and goes a little bit under where the sides fit, and when gluing the sides I will try to not have any glue too near to the edges of the sides.
QuoteIn the meantime I need to drill for grab handles before rolling some curve into the sides - this is the bit I dread most!
Just take your time and you'll be fine 🙂
Good luck, and post some pictures!
-
Only one post in 2014, and now it's 2015 already. How did that happen? So, not a lot got finished in 2014, but one vehicle did make it off the workbench: this odd little thing is an Etched Pixels O.13 GWR milk brake, in BR(W) crimson.
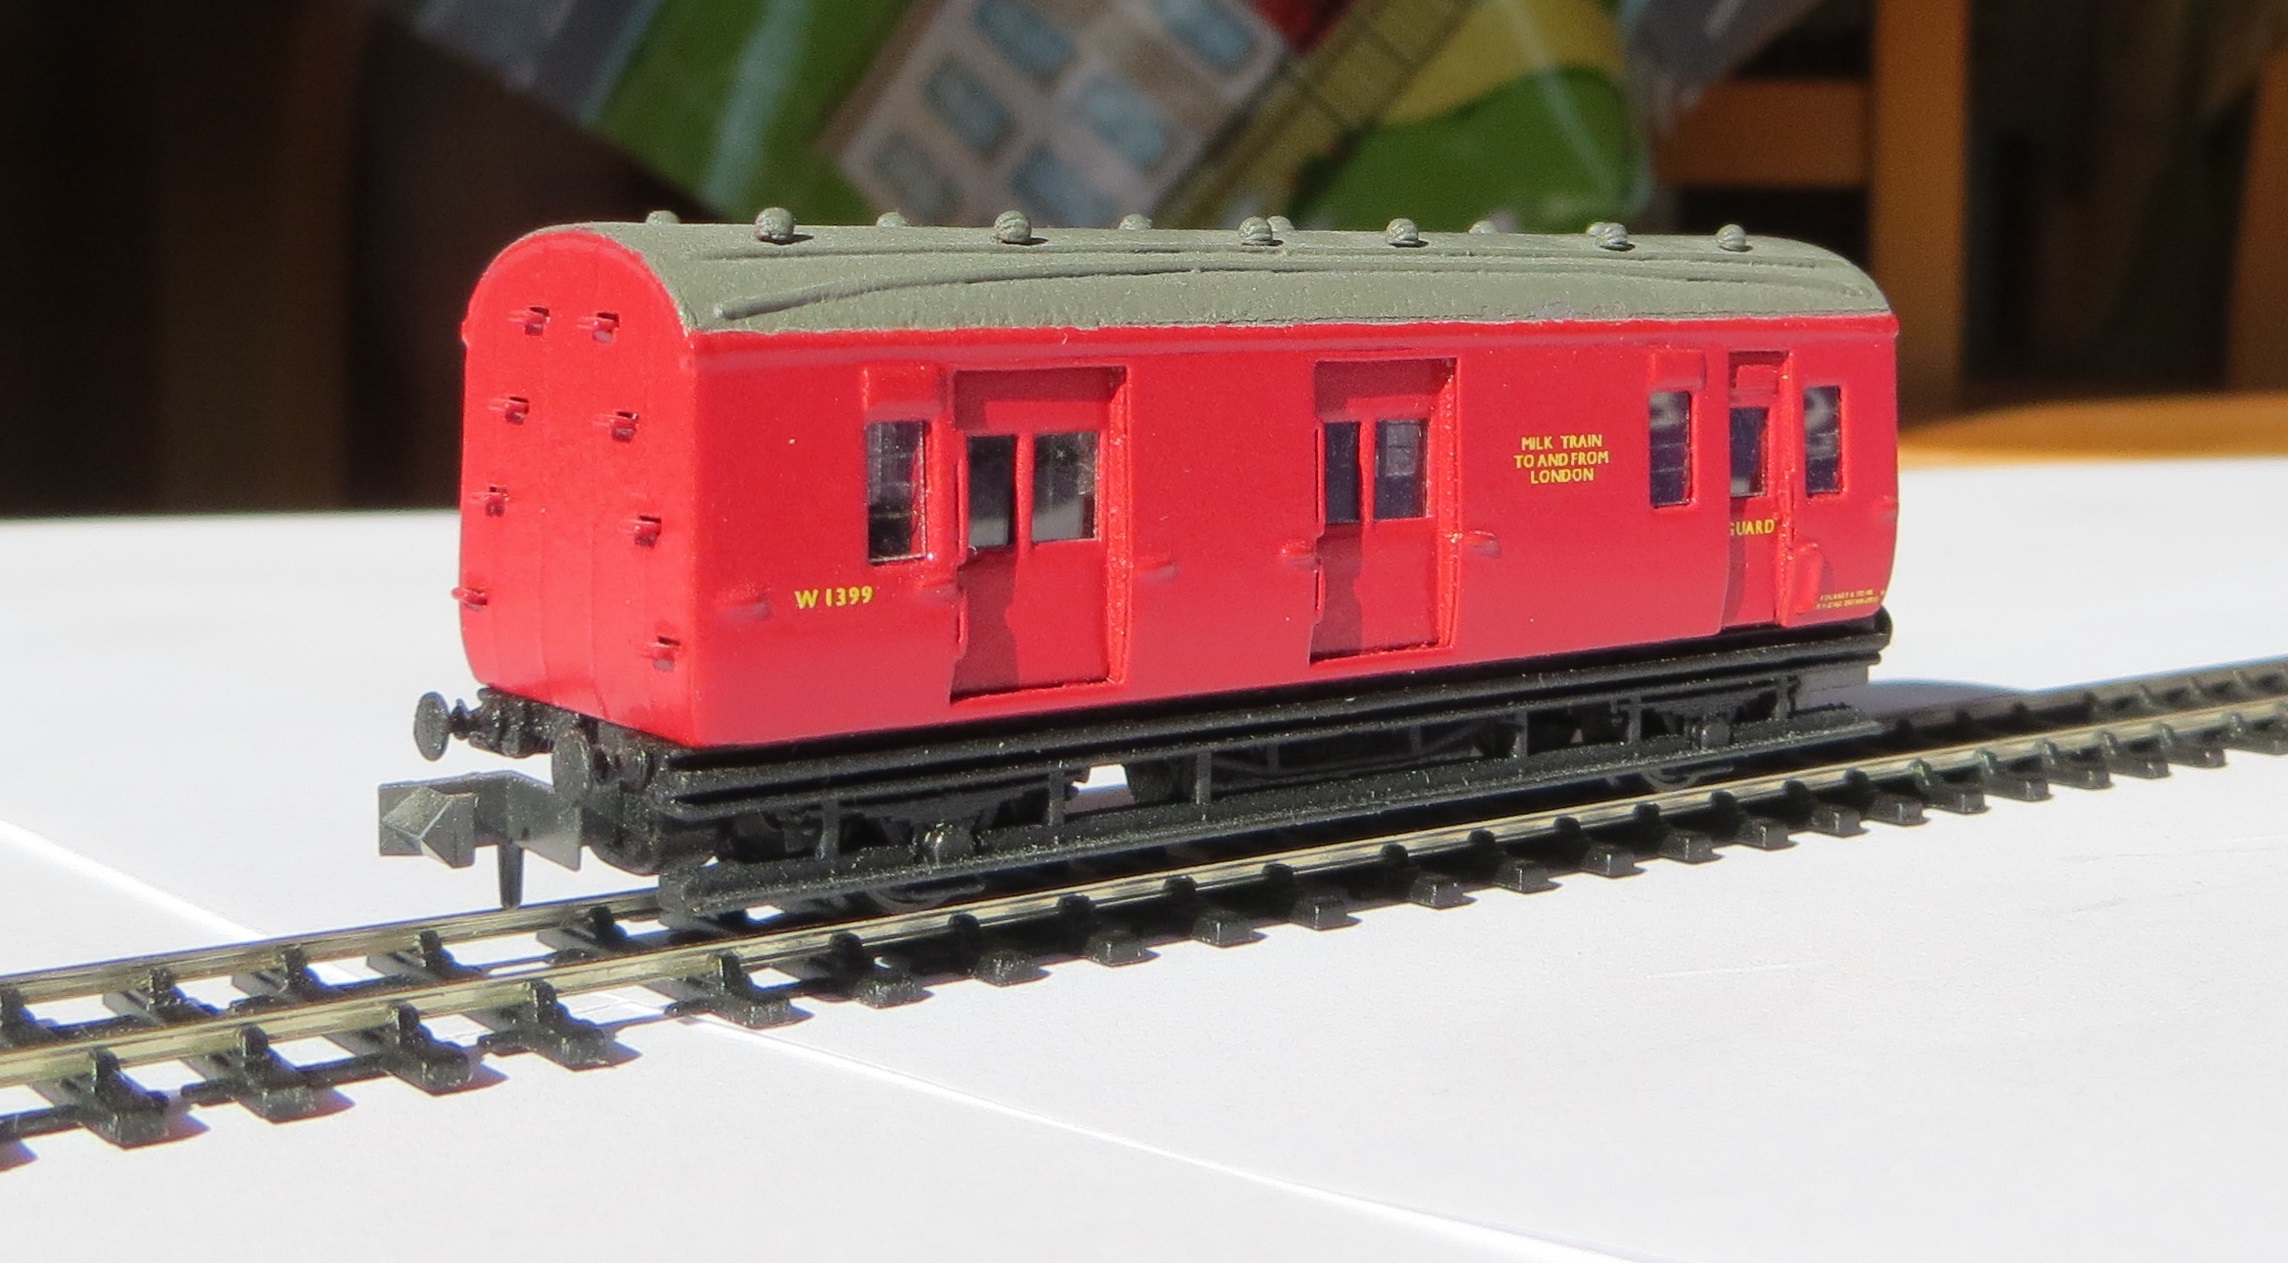
This consists of brass sides and ends overlaying a 3D printed shell, with an underframe made from a cut-and-shut of two Peco brake van underframes. While not in the same league as richbrummitt's 2mm reduction from a Blacksmith's kit (see http://www.rmweb.co.uk/community/index.php?/blog/416/entry-8241-back-of-the-queue-o13-milk-van-part-2/), it does look the part. If I were to do another I would try harder to get the 3D printed roof smoother (possibly with Halfords filler primer) and the rainstrips are a bit too prominent, but overall I am pleased with the finished result.
The H.24 restaurant car now has a complete body shell, and is just waiting for the weather to be warm enough for spraying in order to do the sides.

A new project is two TPM conversions of Dapol B-set coaches to a K.40 full brake and a C.60 third. So far this has got as far as remodelling the underframes and savaging the body shells - shown here is what will become the full brake. I am intending to build this as W1177W, which had one centre gangway and one offset gangway for use on TPO trains. There are two photographs of this coach in Kevin Robertson's "Great Western Coaches in Colour" with an L.25 sorting van behind it, for which I have an Etched Pixels kit that I will build one day.

The underframes needed quite a lot of work: removing one of the battery boxes and adding a new one, moving the vacuum cylinders and adding V hangers and dynamos. I now need to decide whether to add roof ribs to these coaches - it's hard to tell from photographs how visible they would have been in real life. Decisions, decisions ...
Finally, there's this, which I am rather pleased with:

While it doesn't look that exciting, this is a 2mm Association GWR Pressed Steel bogie, with N gauge wheels from Etched Pixels on 13mm axles. To get this to work I used NBrass pin point bearings, which are rather deeper than the usual 2mm Association bearings. The result doesn't run quite as smoothly as when used with 2mm Association wheels (possibly due to increased contact between the axle and the larger bearing), so there is more work to be done, but this is a promising answer to what I am going to do with all the Masterclass kits that I have that need Pressed Steel bogies, given the continued unavailability of N gauge coach wheels on 2mm Association axles.
-
6
-
-
Such a long time since the last post ... I have not been entirely idle, though. I have been working on an Ultima kit of the GWR O.13 milk brake, and I also have another project on the workbench.
First of all, I should say that I really don't need another ex-GWR restaurant coach. But ... when I got the sides for the H.15 restaurant coach from Bill Bedford, I noticed his range also included H.24 sides, so I couldn't resist getting a set of those too. Plus I have a weakness for more unusual coaches like sleepers and dinners. This is what I've got so far:

This is a real mixture of bits and pieces. The basics of it are built around an Ultima 70ft GWR coach floor and underframe, with Masterclass models battery boxes and 2mm Association bogies.
The gas cylinders under the floor I had printed by Shapeways in FUD, based on an STL file I generated with OpenSCAD. Similarly, the seating and surrounding structure was printed by Shapeways in WSF, the idea being to provide a lightweight interior and support for the ends and roof. The ends are those that came with the sides from Bill Bedford. As you can see, there's still a long way to go.
-
6
-
-
On 16/09/2013 at 23:15, D869 said:
We still need to work on your track though

Is this better? 🙂 This is fiNetrax code 40 track from http://www.britishfinescale.com/, and very nice it is too.
-
8
-
-
On 16/09/2013 at 23:15, D869 said:
Superb job David.
I especially like the way that the top crimson band and lining appears to have been designed without these coaches in mind - just like the real thing!
We still need to work on your track though
There might have been some cursing of Swindon for not just leaving off the top crimson band as I struggled to get the lining decals in place ...
I suspect you of trying to tempt me towards 2mm trackwork 🙂 However, for the moment I do have some code 40 fineTrax track on order for experimentation purposes. So many ideas to try, and so little time.
-
Today it was bright enough to photograph the D.69 toplight van third. I didn't manage to track down a photograph of a suitable left-handed example of this diagram to base the model on, so I've chosen to number it as W3398W, and will have to hope no photograph emerges showing 3398 as right-handed!
As noted in an earlier post, I constructed the interior partitions by printing out a pattern on acetate with a laser printer, then painting it once assembled. I'm not entirely sure that this was a good idea, as when I came to finally assemble the coach I noticed a very slight but annoying downward bow in the resin roof in the centre, which I corrected by propping the roof up with plasticard. I suspect that if I'd just used the supplied etched partitions the roof would have been kept in shape by that.
This is the first complete Masterclass Models coach I've assembled, and I have to say that they are lovely kits. I haven't seen photographs of many other Masterclass toplights finished, so all I can say is that we should all dig them out of the to-do pile and get going ... 🙂
-
11
-
-
A search on Shapeways suggests this: http://www.shapeways.com/model/825399/inspection-saloon-caroline.html
-
On 21/07/2013 at 14:24, D869 said:
Do you have enough for a layout yet?
The supply of coaches is not a major impediment to creating a layout, the one year old daughter and the house bought as a fixing-up project definitely are! At the moment modelling is really done in the odd free moment, which coaches are quite suited for - layout or even loco building would require rather more attention over long periods of time than I have. I will get there in the end ... 🙂
-
The H15 restaurant coach is now nearly done:


Applying the lining transfers to a partially panelled coach was an interesting challenge, and one I hope to not be repeating any time soon! I am not entirely sure about the lining above the windows - there should be a thin band of crimson above the lining, but the space available at this scale is just not enough. Perhaps I should have just left the top lining off, as at normal viewing distances it tends to blend in with the roof cantrail anyway.
One other change is that the bogies are now attached with bolts fixed to the coach body, and a nut underneath the bogie screwed in place, rather than the other way round. Testing showed that the nut is less likely to come unscrewed than having the bolt underneath.
You might also notice that the coach is riding fractionally higher on its bogies than in the previous unpainted photograph. This is a compromise to get it to go round curves at all - it is nearly as long as an Intercity Mark 3 coach, after all. I've just put a washer from the 2mm bogie etch in between the bogie and the coach, so it can always be lowered back down again.
Anyway, overall I'm very pleased to have produced something quite unusual. Hopefully Farish won't be including a H15 in their 2014 catalogue ...
-
8
-
-
I could use some seating suitable for open stock myself but haven't found anything to suit yet. Is Mike Howarth stuff still available or is it old stock?
He sells on eBay as "mikeskits", and the auction text gives the impression that he's selling off the last of his stock. At the moment it doesn't look like he's got any seating available for sale, except bundled up with his carriage kits. Once my supply of his seating runs out it will be time for a 3d printing experiment.
Can I ask how you formed the tumblehome in the coach sides? It's something I've always struggled with, especially with nickel silver sides.
D869 provided some very good advice on this here: http://www.rmweb.co.uk/community/index.php?/topic/38124-building-an-n-gauge-coach-kit/page-3&do=findComment&comment=543449
I've followed this advice and made a crude jig from cardboard and sticky tape, in proper Blue Peter style. From the local DIY store I got lengths of 5mm and 10mm brass rod which I use to do the rolling. It is a bit nerve-wracking as it is the one stage that can't be restarted if it goes wrong, but I think the only real danger would be pressing too hard, too soon, which would cause the metal to fold. I tend to start gently until the side has a slight curve it it that looks right, and then start increasing the pressure while rolling the rod back and forth. I have found that it's virtually impossible to get the tumblehome curve as low on the side as it is on the prototype, but in practice that doesn't seem obvious once the side is painted and in place. Good luck!
-
1
-
-
Further progress on the D.69 toplight brake third: the body carcass has been assembled, the roof detailed and the sides have been started on. In this photograph the roof and sides have been loosely attached with blu-tac to check that everything lines up:

Unfortunately the photograph cruelly shows up that the tumblehome isn't quite even at the brake end of the coach. From previous coaches I'm reasonably confident that this will not be noticeable once the coach side is painted. You can also just make out the steps on the ends of the coach: my kits seemed to be missing the etches containing the steps (or more likely I lost them somewhere) so I ended up making replacements from brass strip, then filing them all down to size once assembled. Not the most fun task!
The level of detail on these Masterclass coaches is rather wonderful. I especially like the side lamp irons which are so delicate (and a bit difficult to get into place).
The next task is the interior, and then to start on painting, assuming the weather ever warms up enough. As the coach is already reasonably heavy I'm reluctant to use the supplied etched corridor partition. My current plan is to print out a replacement on an acetate sheet (used for printing overhead projector sheets) and make a floor and compartment walls from plasticard.
Also, I've found the link to the photograph of a D.69 mentioned in my previous post: http://www.flickr.com/photos/robertcwp/8035238616/in/set-72157603653607671
Also making progress is the H15 restaurant car, again shown with sides and roof just held in place with blu-tac:

The sides haven't yet had a tumblehome added, and the roof has a very slight bow in it, which is why there's a gap between the roof and the side at the kitchen end - once the roof is securely glued in place this gap should disappear. The fittings on the roof are something of a guess, based on photographs and the 4mm Comet Models instructions for their H15 kit. The interior is made from plasticard and a couple of sets of Mike Howarth plastic seats which I picked up on eBay and cut up to fit. On close examination it's rather crude, but tucked inside an unlit coach it will be quite serviceable.
-
8
-
-
Having sent off an order to Chris Higgs for his latest Masterclass Models GWR coach kit run at the start of the year, it seemed like a good idea to start work on some earlier Masterclass kits. Out from the drawer came two 70' coaches, which have now progressed as far as the underframe being completed (except buffers), and the body is just being started on.
First up is a toplight brake third, to D.69. This is from pretty much the end of toplight building, so it has angle truss rods, and the body panels are all steel. (Hurrah, no panelling!) It is running on 9' plate bogies.

Even with just the underframe, putting this next to something like the 57' GWR full brake I made last year gives you an idea of how massive these coaches must have been in real life.
I found a photograph on Flickr by R.W. Carroll of a D.69 BTK in carmine and cream, W3403W, to base the model on. Unfortunately I've since realised that W3403W has the brake end at the wrong end compared to the kit, oops... As I've not found any information on which were built left-handed and which right-handed, I'll have to take a guess when I get as far as numbering.
The other Masterclass kit I intend to do something a little different with. The actual kit is for a 70' panelled toplight third, but I am going to build it as a H.15 restaurant coach, using sides from Bill Bedford. These were originally built as part of the 'Concertina' series of coaches, though they did not have recessed doors, were heavily rebuilt in the 1930s, and lasted until the late 1960s.

This is also running on 9' plate bogies, following pictures of coach 9542 in Russell's books. Since these coaches did not have full-length foot boards, I've used cosmetic solebars from Ultima, who also provided the dynamos and vacuum cylinders. Gas cylinders are represented by lengths of plasticard rod from Eileen's.
The etches for the truss rods and queen posts on this kit are impressively thin, making assembling them a challenge. (There were a few breaks along the way, requiring them super-gluing back together.) In the end folding up the inner truss rod assembly was too much: instead I used square plasticard rod to hold the separated pieces in place:

Right, now on to the coach bodies ...
-
7
-
-
Ooo, do let us know when it is announced. I have looked at his products before and they are very nice but have been a bit early for me. If he is moving to the Collett and Hawksworth period I may have to start saving the pennies (or ask Father Christmas for an IOU
 ).
).Chris Higgs posted an announcement on the 2mm Association mailing list. There is a temporary URL for the flyer - I can't see any harm in reproducing it, so here it is: https://docs.google....Q0JyN3lRNkQxZDg
-
1
-
-
Oh, I think more Masterclass coaches are an excellent reason to hijack a thread 🚂
I can see from the flyer that I shall have to invest in some, despite only now getting round to building bogies to go under one of Mr. Higgs toplights. So much to build, so little time ...
-
I've got a few of them.
How far have you got with them?
-
This prompted me to go take a look in my books. Russell part 2 fig 106 is undated but shows a toplight FK that appears to be blood and custard. It still has its panelling and it seems that the top crimson band is confined to the raised panelling with the lining in the recessed part. I think this means that the crimson doesn't overlap the toplights at all but it's hard to be sure from this photo. 'GW Coaches in Colour' (Robertson) has a 1955 picture on page 26 which shows part of W3955W that has no panelling. On this one the crimson slightly overlaps the toplights and the top edge of the door.
I hadn't noticed that that photo in "GW Coaches in Colour" before was of a toplight, thanks. Looking through Russell Appendix 1 it does seem that in general for steel no-panel toplights the crimson is slightly lower than the top of the toplights. Given the difficulties of representing such thin bands in 2mm / N I think an 'approximate representation' is the best we can hope for. A sneaky solution for at least one coach might be to put plasticard behind the toplights and fill them in with modelling putty, to represent the toplights being plated over.
Fortunately for me the Masterclass toplights I'm intending to do are steel without panelling, which should help a little. My intention is to build the coach with the sides attaching last, which would allow me to try leaving off the top crimson band to see how it looks - if the result is terrible the sides can be stripped and redone.
The 1955 photo would suggest a nice weathering project too.
It does look a bit unloved. Looking through Russell at all the photographs of somewhat tired first class toplight coaches, I'm struck that while the opporunity to ride in one today would be fabulous, if I'd paid for a first class ticket in 1955 or so I can't imagine I'd be too thrilled if a dirty old toplight pulled into the station. How times change ...
Glad I'm not building any toplights in blood and custard

If it was easy what would be the fun in that?

-
2
-
-
Painting and lining the top of the sides looks like a (ahem) fun job.
Oh yes, much fun was had!
Actually, the top of the sides posed an interesting question. Looking at pictures in Russell shows that the top crimson line was very thin indeed, and I had wondered about leaving it and the top lining off altogether. (The Great Western livery for toplights without lining above the windows was much more sensible.) In the end I added the crimon line and lining, partly because, relative to photographs, the strip above the windows is a bit too thick in this kit. It's noticeable that the unbuilt Masterclass toplights I have have a somewhat thinner strip above the windows, so I'm not sure what I'm going to do for those.
May I ask how you do the lining? I use ModelMaster transfers but I am always on the lookout for new ideas.
This was lined with the ModelMaster / NGS lining transfers. I have considerable respect for the people on here who manage to line with a bow-pen - I can't imagine ever being able to get that to work, especially on the uneven join between the crimson and cream paint.
My basic approach with the lining is to first give the side a coat of gloss varnish (actually Halfords lacquer spray) to get a good surface for it to sit on. To start with I brush MicroSet on the side, then put the transfer in warm water until it's ready to slide off. Sliding it off is the tricky bit - if I try to push it off the backing paper vertically I find I can never get it straight again, so I generally push the lining horizontally so a little bit is hanging off the left, get that lined up and on the side. Then I hold the left edge of the lining down against the side and draw the backing paper away to the right - if I do this in a smooth action generally the lining will rest on the side pretty nearly straight. I then use a cocktail stick and a brush to straighten any bumps in the lining. It's also sometimes necessary to run a thin brush coated in MicroSet underneath the lining if it won't move freely any more, which often happens to a section if it's left in place without being moved for more than a minute or two. Finally, run over it with a brush and then a piece of tissue paper to push out any final lumps.
One thing I've found that doesn't work well with the lining is MicroSol - that tends to make the lining curl up in the vertical direction. I generally just add a spot of MicroSol at the end on any recesses in the side (e.g. where the door edges are) but don't use it anywhere else.
I also take the view that lining transfers aren't that expensive, so if the first attempt doesn't work, take it off (with more MicroSet) and keep trying until the result is satisfactory.
-
1
-
-
After a few hiccups and problems, the K.22 full brake has escaped from the workbench:
As I had expected, painting proved to be a challenge, as the sides and floor formed one piece that was folded up to form the body shell. As a result, I couldn't use my usual approach of painting the sides and then attaching them as the final step. Instead, a lot of masking tape and touching up was needed.
The worst moment was removing the masking tape after spraying the top carmine line, which revealed a very obvious run. There was nothing for it but to strip the coach and try again. As it is glued rather than soldered, just dunking it in paint stripper would effectively take me back to the start, so I ended up carefully cleaning the sides with paint stripper and a large number of my other half's cotton wool buds. (Let's hope she never notices how many are now missing.) At least I've learnt that it is possible to strip the sides of such a coach without destroying the whole thing.
Lining and applying decals also revealed a rather awkward mistake. The running numbers should really be above the hand-rails, not below, just below the lining. Unfortunately I think I set the boundary between carmine and cream just a fraction of a millimetre too low. Combined with the fact that 2mm/N lining is, by it's nature, overscale, there wasn't room for the running number in it's proper place. Gah! I couldn't face stripping the coach (again) and trying to move the handrail, so I've settled for having the running number sit below the handrail. At least it's one thing I'll be ready for with any future toplight coaches.
After the saga of painting and lining, getting the roof to sit exactly right was also not entirely stress free. This roof is rolled brass, and in the end I resorted to gluing it to hidden supports in the coach, then putting weights on the roof to hold it in place for 24 hours. Thankfully it has stayed in place so far!
Despite all the above, I'm very pleased with the result - my first toplight coach. More to follow ...
-
10
-
-
Nigel, thank you for the explanation of your roof rainstrip technique, I will definitely give this a try.
On 28/08/2012 at 13:30, Nig H said:One final point - you don't seem to gave added door knobs and grab handles in all cases, or have I missed them? Maybe you will consider doing this, but get the holes drilled before you attach the sides to the body, and allow for glazing too.
You are right, I haven't added knobs or grab handles to most of these coaches. When I first started building these coaches I wasn't confident that I could successfully attach them to the painted sides, so left them off. I try not to go back and rebuild kits once they're done - they're a record of my ability at the time, and if I started trying to correct every flaw I can see I'd never get anything new built. 🙂
Anyway, I think that I'm now ready to try tackling grab handles etc., so the next coach I build I will have a go. The next likely to be out of the pile to be built is a 70' toplight 3rd from Masterclass - that's a lot of grab handles!
-
1
-
-
Ex-LMS brakes were not unheard of on the western region. There are some shots of a class 22 at Instow with a very similar vehicle on a milk train somwehere. I will post a link if I can find it.
Thank you, very interesting photographs. That is an impressively unloved class 22 ...


Building an N gauge coach kit
in Kitbuilding & Scratchbuilding
Posted · Edited by DavidK71
Some nice weather has seen spraying happen, and as a result the H.24 restaurant coach has emerged from the paint shop:
As mentioned in a previous post, this is made up of all sorts of bits from Etched Pixels (floor, trussing, corridor connectors, vents and some of the underframe), the 2mm Association (bogies and battery boxes), Masterclass Models (roof), Bill Bedford (sides and ends) and 3d printing from Shapeways (gas cylinders, kitchen roof vent and some of the interior). I was inspired to do this by a photograph of W9557W marshalled in a train leaving Paddington in Rusell Volume 2. The coach is unusual in having no tumblehome at all on either the sides or the ends, giving it a very distinctive, 'boxy' appearance that I think is rather appealing, or at least unusual.