

Richard Mawer
-
Posts
772 -
Joined
-
Last visited
Content Type
Profiles
Forums
Blogs
Gallery
Events
Exhibition Layout Details
Store
Posts posted by Richard Mawer
-
-
Looking good Richard. If I may just make a small observation on the operation. It would not be normal practice for the Director to stay at the buffer end of the platform when the stock was withdrawn. It would follow the stock up the platform and be held at the signal there.
There is provision to do that on the "other" Buckingham as the trains depart on the Grandborough controller and the pilot/train loco trapped at the buffers can follow it up on the Buckingham controller. When I say it can, I mean it could if I found out which wires to reconnect where! There is a push button (home made sprung plunger) on each platform, which when depressed puts the length of the platform onto the Buckingham controller. As soon as the departing train has passed the starter signal, that is returned to danger, otherwise the trapped loco would be on its way following the departing train. As soon as the signal is put back, the plunger can be pressed and the trapped loco started.
If you don't have that sort of provision, you could just send the loco up the platform as soon as the train has departed.
Cheers,
Tony
Hi Tony,
A good point.
And of course Peter would have hand made the plunger! Ha ha.
At present the operator would need to wait for Train Out Of Section, and then the platform starter needs to be pulled off before the loco can move up. This defeats the point being made.
So I will need to make some mods to the wiring, but I've thought of a way. I need to decide if I only want it to work whilst the advanced starter is off, or at anytime. The latter would allow an operator to exit a loco from a platform without using the starter, which would be wrong.
Anyway, good to hear from you.
Rich
-
I think it would perhaps look better as a girder bridge across all three tracks (with or without the wall between the second and third).
An arch converts the downwards vertical force of the weight of the bridge itself/traffic over the bridge into sideways forces. Thus an arch needs fairly substantial abutments (or another arch) each side to press back against the arch. I'm afraid that wall between the two tracks just isn't man enough to support an arch :-(
I thought some of the sideways force would be transmitted through the girder over the small portal and into the abutment. The wall only taking the vertical force. But the idea of a girder across all 3 is quite good.
For now though it will stay as it is. The view I have photographed is not seen. Mostly it is seen either from the rear where due to a retaining wall hiding the quarry line, only the double track arch will be seen; or the bridge is seen 3/4 end on. From that angle it looks far better. When I get time I might well play a full girder.
Thanks for the advice.
-
QUARRY LANE BRIDGE
I have always planned to have a bridge masking the entrance to the quarry. The bridge spans all 3 tracks, but only the 2 mainlines come out. There will be a removable retaining wall hiding the quarry. It will be removable so the loads can be put in the trucks. The problem is the lack of space between the quarry line and mainlines.
I knew there would be nothing like the space needed for a standard product. I would need to alter something. I bought a Metcalf kit and took a load of measurements. The arch was too wide to enable the edge to be between the mainline and quarry and not have the other one far too wide. So for the main arch I had to take 18 mm out the middle. I also chopped the side of the main arch off to leave just a wall.
I had to construct a single arch on the side off the main arch. There is only room for a thin wall between the arches. I thought a single high level arch for the single track was the way to go. Here is the card carcass cut down.

The single track arch looked wrong so I decided to make something along the lines of a flat beam and lower. This is after a blank went in on the single track and the brick overlay added.

I had to extend the length of the parapets, but it all still lined up and looked right when the abutments went on.
The single track flat arch could not just be brick. It needed a beam of some sort and to look right it needed to be higher. I used other parts from the kit and this is the end result.

The clearance through the bridge is very fine particularly down the quarry. But here it is in situ.


-
 1
1
-
-
Hi Richard
I do agree with Kevin.
From my experience rail high infill over the sleepers can be a nightmare operationally......even the slightest bit over rail height will cause a pannier to stall and of course its impossible to realistically infill points
One of the reasons I am relaying my brewery was poor operation resulting from cobble inlays......they looked nice mind you........before this thread started I had already determined to go sleeper high (or a tad over) with ash and pave/cobbble the space between some of the sidings for road access.
I was encouraged to see exactly that in the first photo you showed.
I do enjoy following your thread
Best wishes
John
Rich
I would agree but in your case you have a set of points in the middle of the yard so a potential problem if you build to the top.
Looking at many of the pictures in the above I couldn't see one set of points with the ground level above the sleepers (there might be of course but I did only have a quick scan of the 'numerous' pictures.
So what about just going to the top of the track on the outsides, leaving the middles to sleeper top, which helps with the points, then in places have timber crossings?
Regards
Gents
Thanks for the comments and advice.
I seem to have caused some confusion. I was only talking about building the levels of the ground on the OUTSIDE of each track up to the rail level (as opposed to the sleeper level). I have already achieved that. The trouble which I had and which I think Ray was trying to find a solution to, was getting artex stuck to the inside of the rails by accident.
I do not intend to build up the area between the rails up to rail level. I am keeping that as sleeper level. That's how it look in the various photos I quoted. I am happy with the levels I have got in the photos of Evenley that I posted. Ie the ground between sidings is to rail level and the ground between the rails is sleeper level. This also means I do not have to build up levels within the points. As you say Kevin, that would be a real problem. I will paint the sleepers between the rails with sleeper grime, rust and soot. I will ballast between the sleepers of the points with cinders in the normal fashion. I will also use cinder ballast along the goods loop - to sleeper height.
The only exception to this which I was thinking about is to have a small area in front of the goods shed with ground between the rails up to rail height. This way vehicles could drive over the tracks and around the goods shed. I am short of space at that end of the station and need to have some way for vehicles to access the yard. Only here was I thinking of using the plastic strip to create flangeways and use filler between them. However, I do like your idea Kevin of using planking between the rails in those small areas.
I hope that clarifies matters, but it does accord with your concerns and advice Gents - of which I am grateful for by the way :-)
-
3
-
-
Another idea could be laying a length of individual track on the inside giving wheel flange clearance, which in way mirrors what might have been done in real life.
Further idea might be a strip of thick card, guessing 1.5mm, cut to fit between the chairs then this could be painted off board, perhaps sprinkled with ash powder on the top surface and then fitted.
Is there any reason to go to the top of the track with the finish as most goods yard just had the surface level (or slightly above) the sleepers? If you did this then the points don't become an issue!
Hi Kevin,
Thanks for the ideas. I'm always happy to take advice from fellow modellers, but very happy to take scenic advice from you. Little Muddle is a wonder.
I agree that many yards (and in particular marshalling yards and Loco yards) had the ash/cinders to the top of the sleepers with the rails standing proud, but there were plenty of goods yards (meaning where wagons were unloaded rather than just marshalled), where the surrounding ground was up to rail level.
http://www.nrm.org.uk/img/nrm/worksphotos/Derby/1997-7397_DY_1697.jpg
and in the goods yard of:-
That's the effect I want here.
Lots of colouring to be done and if I can get anywhere near the realism you have created, I shall be very happy. You seem to have used a lot of creamy, grey, beige type of colours - far lighter than I would have done without looking at reality and your photos.
We must arrange these visits. I know the ball is in my court.
Cheers
-
Rich
I have a vague idea that someone laid a narrow strip of plasticard on the inside of their rails to protect the flange-way, the strip being removed whilst the infill was still flexible. Presumably it would need a form of non-stick on at least one side.
Hi Ray.
That's another good idea. I had been thinking of just sticking masking tape along the flange way for the next yard.
But I am thinking that I need to build the levels up between the rails for an area around the goods shed where vehicles would be able to cross the lines given the restricted space. Using some strip would be really good for that.
cheers
-
THE WHOLE NINE YARDS
In fact I only have 4 yards: Evenley yard, Buckingham West goods yard and Loco yard and Brackley Road yard. They need ground cover. In steam days it would not have been ballast in the current fashion. Ash would have formed the basis, but there would have been mineral/coal spills as well. In the loco yard there would have been ash, coal, water and oil all spilled all over. In all cases the muck and ash would have been built up to the top of the sleepers at least and in some cases it was up to the top of the rails. That’s the effect I want to create.
I decided to start with Evenley yard. I could have used fine cinder ballast, but from looking at photos the surface nearly always seemed to have been highly compacted and smooth where people and horses and carts and lorroes would have frequented. In busier yards there were often cobbled areas between the tracks, but I'm not convinced that would have been the case at Evenley which is more of a country junction local goods yard and marshalling point.
I have already trialled decorators caulk (flexible filler) which was very successful, but it comes in small tubes. I have also tried artex (textured paint) and for this area it seemed to fit the bill. It comes in bigger tubs and remains flexible. It is light weight too.
I spooned the stuff in between the tracks and smoothed it out to rail height with a wooden lollipop type stick. Any overspill in between the rails was added to and then smoothed out to the top of the sleepers.
It does tend to get everywhere and is not going to be as easy to use as air-drying clay, but is probably no worse than plaster.
I found out that it shrank a bit on drying, so it took two nights of application.

At first it looked like it had been snowing heavily in Evenley.

There are still a few indentations, but these will become puddles/ worn areas.
Although I had tried to keep the artex off the rail tops and from building up against the inside of the rails by the use of the sticks, there was still some to clean off. This was easy to do between 12 and 24 hours after application. The artex just peeled off the rail tops with the help of a screw driver edge or rail rubber. What was far harder was getting it out of the rail webs. Without doing this, the stock wouldn’t run properly of course. It took quite a while with a small screwdriver to scrape it out.
Once tested with stock and a loco, I decided to paint the artex with a base coat of watered down acrylic raw umber. Upon reflection this is still too dark for the dirt areas and not "red/orange" enough to refelect the iron stone of the area. More to do.

I will spray soot and sleeper grime along the tracks in the yard so they will be more black and after various washes over the land between the tracks this will be a mixture of mud, dirt, ash and general crud. I might use some static grass in the area near the cattle dock.
I will use cinder ballast around the points and in the goods loop. This is less compact and I think will look better in those areas.
-
4
-
-
We've visited this one, in legislative detail, in the past -
http://www.rmweb.co.uk/community/index.php?/topic/70648-cattle-wagons-and-limewashwhitewash/
Hi. Yes I now know. I read that thread last night after people pointed it out. Like I said, you learn something everyday.
I appreciate its wrong, but it's done and I like the look of them. But thanks to everyone for pointing it out.
-
Yes that’s true, the use of lime stopped around the 1920’s but if you look at photos of the 30’s or so, they were obviously using more than just water.
All cattle wagons had the same white wash in the lower areas.
This had never crossed my mind. I just assumed the practice continued.
I've just done some simple research and yes it seems to have been outlawed in about 1926, give or take a year or so.
I've found pre-grouping photos showing brilliant white lower sections. I've found photos from the 50's where the wagon colour is fairly uniform (for what one can tell in black and white). I've found photos from the 30's but the lower sections are obscured. So I can't tell if the replacement disinfectant used in the 30's left white residue or not.
I've already compromised on a few locos. A City and a 48xx at the same time? The signals are hardly scale models. The locos have plastic coal and electric motors and the rails are only 16.5mm apart in 4mm/foot. So I guess I'm going to have to compromise on this one too. I think they look quite good/different with the wash and its quite low key on most anyway. But thanks for the info chaps - you learn something everyday!
-
2
-
-
UNDER THE WEATHER (ING)
Today I have spent a cathartic few hours with some brushes, acrylic paints and powders. Some of the coal wagons looked far too clean and many of the interiors clearly had never seen a nugget of nutty slack in their lives. Now every coal wagon interior is black, some with coal residue as well. All the exterior bodies are weathered. I used black washes to allow the planking to stand out. I am surprised by how effective that is. Some wagons are just toned down. Some have clearly been heavily used. There are over 50.
The loco coal wagon bodies wouldn't take a wash. I'm not up to portraying rusting steel bodies, so I used powders to dull it all down and add dirt. I did the underframes with frame dirt muck as well. I now need to do all the rest of the coal wagon underframes as well. But today's rain meant nowhere to spray varnish to seal the powder. The 6 loco coals were enough to form a fog.
There are about 80 other wagons to do now!
I'm trying to hone my skills on wagons before moving onto coaches and then locos.
One type of wagon that has really been bugging me is the cattle vans. So I tackled them too. I toned down the roofs with washes and thinned grey paint. They all have slightly different shades now. I used black wash again to bring out the planking and then added the lime wash to the lower sections.
They looked quite good wet. I think some might need more lime now they have dried.

Here are 3 at Evenley. The bulldog (to be Pershore Plum) has pulled in with a Banbury to Buckingham West train.
The two black dots are screws in the partition. They will be covered with backscenes.
The colour coding for shunting can be seen on the soul bars. Blue, orange and pink for these three. Its a compromise I have to accept to make shunting more interesting.
-
6
-
-
WEDNESDAY'S OPERATING SESSION

The view from the railway room door. Yours truly on the left and Michael. Buckingham West is in the centre and Evenley behind us. Its Friday and the clock says 10.18. The mixed GWR & LNER stock from the Leicester express has been removed from platform 1 leaving the Director at the end of the platform. A Banbury train sits in platform 2 and stock for an express is in platform 3. Over on the right, behind the water tower, going round the continous run (Charlton Junc) before going to Banbury, is the down Wolverhampton freight.

A last slurp of tea before we start the session. This shot shows the actual Charlton Junctions under the Buckingham station throat, and Buckingham's yard shunter in the headshunt on the bridge.

In the foreground are Buckingham's private sidings. The gas works on the left appears to have run out of coal. The dairy is in the centre and Ricketts Engineering on the right.

Its now 12.17. John tackles Buckingham West. The Fly (pick up goods) has arrived in the yard from Brackley Road, hauled by a pannier. Michael is taking time out at Brackley Road to sort his camera out. Meanwhile Dave is sitting down on the job at Evenley having completed the shunting of the coal train from Severn Tunnel. It' sitting in Evenley goods loop to the left of Dave and is due to depart for Buckingham at 12.35, so John had better deal with that Fly quite soon.

A minute later and John brings the yard shunter down to clear the Fly.

John and yours truly both at work on Buckingham West. The station and carriage sidings are full of passenger stock. John brings a Banbury train into platform 1.

-
17
-
-
CARRYING COALS TO BUCKINGHAM
It's the title from an old article from Railway Modeller in the late 1970's or 80's written by Cyril Freezer about Buckingham Great Central. And I can still recall it: it had such an impact on me.
Why bring that up? Because in tonight's operating session (after all the issues mentioned in earlier posts about my 28xx's and ROD) I'm delighted to report that one of the 28's pulled the loaded coal train of 23 wagons straight up the incline with no trouble at all. Bingo!
-
1
-
-
I was thinking more of reducing the width of the opening through which the ballast flows by infilling the corners of the aperture in the vertical plane rather than fixing something to the base.
I doubt you'll be able to glue the infill in place all the way down but I'd have thought that you could apply adhesive to the top of the strip and fix it there.
Hi Ray,
You are dead right and I have done that. If you look at the top altered section, there are two pieces of plasticard. The lower one is glued across the aperture. There is a corresponding one on the bottom. When I had added just these, it did indeed restrict the flow away from the edges but some of the ballast "escaped" underneath the card and spread out again. I got a decent shoulder but with a thin and straggly extra 5mm or so beyond the proper shoulder, formed by these "escapees". By adding the plasticard to the base as well, these straggly bits are eliminated.
If anything, I need to file the card on the base down a bit more so that the remaining brush can act more strongly and reduce the amount of excess on the sleepers.
Its almost there.
-
1
-
-
I feel a battle going on now as to who runs the branch line service from Little Muddle to Encombe Town - Railcar or 48xx.
I'm pretty sure the true answer would be the 48xx. Apart from the Lambourn branch railcar, the rest were dsigned for secondary mainline fast services. Seems a bit weird what with single and then two car units, but they were built for speed and acceleration from what I've read.
But they do look very good, especially in such great surroundings. I'm sure they will be running on many branchlines around the country.
-
MORE BALLAST TRIALS
Following Ray (of Virney Junction fame)'s suggestion, I've modified the spreader. A few bits of plasticard have been glued on. This is it upside down, of course.

As well as narrowing the delivery apperture I had to cut back the front, narrower brush. It was just spreading the stuff far and wide.
It now produces narrower shoulders of ballast. But the increased height means it also leaves too much between the rails. I will have to brush that along, but that's not too great a hardship. It was the width outside the sleeper ends that looked wrong for 1930's.

The lines of rucked up foam outside the ballast shoulders is from sharp edhes to the plasticard before I filed them.
It does indeed need some random tonal variation from colour in the glue, washes and air brushing.
I shall have to consult the books again for when to have a cess (ash) between tracks and when to join the ballast of one track to that of another (if you get my meaning). These days its just ballast everywhere, but it was far more sparse and neatly manicured by comparison.
-
3
-
-
I have been playing with ballast colours. I think I'm happy with this as a base.

It's 4 parts brown to 1 part buff.
I intend to airbrush sleeper grime over the rails and sleepers (centre and edges) to add shading, leaving the shoulders lighter. This colour is the closest I can to the colours in The Big Four in Colour. I wish I had the skills, time and genius of Kevin and Little Muddle. But there is just so much track to ballast even if I could those results at all.
-
4
-
-
Hello Rich again Pulling Trucks! Don't underestimate how much effort can be needed to overcome rolling resistance. I bought this little axle box trimmer off eBay some years back. They are still made in the States and I do believe I have seem them advertised by someone like DC Concepts or Gaugemaster. There can sometimes be a problem in fitting the tool because of the position of the coupling block and on occasions I have had to remove the little rubber friction sleeve. All my wagons (Airfix and Mainline) are now fitted with Bachmann metal wheels. Invariably I have had to use the tool to open out the axle boxes. Regards
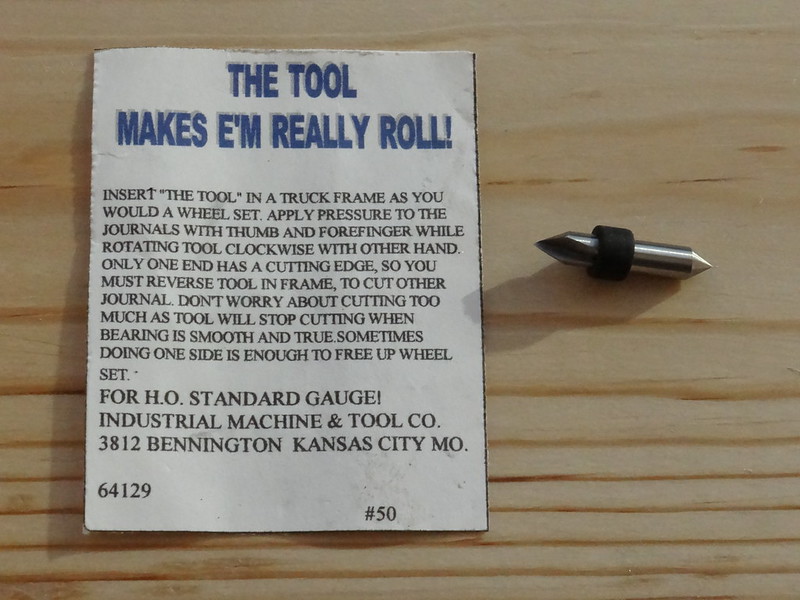 Truck Tuner
All my wagons, bar a couple which already had great wheels, have been rewheeled. I have used mainly Bacmann but sometimes Hornby wheels. Many dropped in without issue and the an freely. But some needed reeming out. I used a number of different sized, but small drill bits. There are still a couple which drag a bit, but most are fine. I didn't know about that tool. A bit late now, but still nice to know.
-
ON THE PULL
Last Wednesday I had a couple of friends over for an operating session. The first long freight only just made it up the incline with some added power. That was headed by the ROD. The second one didn't really get past the foot of the incline. It needed the hand of God. That was one of the 28xx's. On the previous day's timetable the coal train struggled and that has 23 on going up the incline.
It seemed that for some reason my 2-8-0s were losing pulling power.
Then it struck me, part of the issue was that the trains were getting heavier. The opens have loads and most wagons are weighted to improve handling. I've eased the coal train burden as mentioned above by putting sheet steel under the loads instead of 5g ferous weights. That's 100g or so off the whole train.
To combat the issue with the locos I adopted the old principle and added lead to the underside of the keep plates. It didn't seem to make too much difference though and the locos are fairly heavy already. Then one of the 28's started derailing its pony, so I added weight to that, but it seemed then to become even poorer at pulling.
Tonight I trialled all 3 on the incline with a 19 wagon load. The ROD was best and got up but was right on the limit of slipping. One 28 needed help towards the top and the now poor one hardly started up the hill before skidding. Hmmmmm.....
So I have removed the added weight and added 2 extra magnets under each. Each 2-8-0 now has 3 magnets pulling it down onto the steel plates under the incline. The ROD and better 28 now tackle the hill even better, almost without needing extra power. Much better than adding weight. I'm so glad I put the steel under the track and used magnets. It's made a huge difference.
The other 28 still couldn't get past go. Then I remembered something Ray of Silver Sidelines of this Parish (see above) once suggested when dealing with the Dukedog. Was the pony (bogie) keeping the front drivers off the track? It didn't look like it, but I loosened the holding screw a touch and hey presto, problem solved. It never ceases to amaze me how tiny changes make such large diferences on steam locos.
-
I thought I would explain it bit more from my earlier post by attaching this picture.
Yes, the ballast is as I described - Carrs 2mm Light and Medium grey, track edge Carrs Ash and isolated areas on main track
then I then put patches of thin washes over it as well of -
Vallijo - Cork Brown
- Olive Green (in patches to look like moss)
Lifecolor - Roof Dirt
Then washes from the brush cleaning pot for a sort of grunge mix!
Some areas I left untreated to look like new ballast.
Left to dry then another application to build up colour / shading
Hope you don't mind me posting this picture but I thought I needed to explain that I had not relied just on the ballast colour.
Kevin, of course I don't mind! Its all great advice and the photo shows how good the end results are. The inconsistent shades are so realistic. I presume the washes are applied by a reasonably large brush, sort of shloshed on to some degree.
I'm going to have to play around and see what looks right.
Thanks again.
-
Richard
Could you modify the existing spreader by narrowing the width of the apertures on their outer edges to narrow the coverage area? Could you slide and glue a suitable width piece of plasticard into the apertures?
You know what, Ray? That's an exceedingly good and simple idea. So much better than buying something else that may or may not work. Why didn't I think of it?!?!
Thanks Ray.
Thanks also for the steer on the Wickes adhesive.
-
Agree about the width of the ballast, are you going to paint the track before ballasting?
I used Carrs N gauge (2mm) ballast in two tones of grey (light and medium) but wasn't to selective in the mixing to get an uneven mottled effect, then used Carrs ash for additional colour variations especially sidings and where loco's stood normally added to the drying grey ballast.
Kevin
With so much track (someone worked it out to be a scale 5 miles of track - I think - could have been a mile. I can't remember, or be bothered to work it out again, but its a lot) I wasn't planning to paint the rails. However, I was going to blow over the track with a thin coat of sleeper grime at the angle from which it is viewed. This will tone down the nickel silver.
I do like the look of your ballast, but didn't realise you'd used grey!!!! I'd dismissed grey. I was banking on browns. I'm going to have to check your photos again! I like the idea of not a perfect mix.
Does anyone have experience of the Proses spreader regarding ballast width? I don't really want to buy another and find it is the same as the one I have.
-
Hi Rich
Maybe it's just my viewing of your photos, but the ballast you've used looks very 'fine' to me. Which ballast have you used and which applicator?
Hi Graham
Its Woodlands Scenics Fine Ballast. I've looked at the Medium and worked out that the stone sizes are about half the size of a human head! So I've gone for Fine.
I'm using the Golden Valley spreader.
You've made me look hard at the ballast and now I'm thinking the shoulders are too wide for 1930's. Looking at The Big Four in Colour and GWR in the 1930's the shoulders seem to be very narrow and close to the sleeper ends along main lines. There is even a cess between the running lines in many places. That might be a hang over from the Broad Gauge days. I think general along main lines I need to find a narrower spreader. I simply have too much track to do with a spoon and a brush. I need to get some scenic progress before I die! Does anyone know if the Proses spreader produces narrower shoulders?
-
AND THE RESULTS ARE IN......


So I have learnt that I will need to be more careful with not leaving ballast on the sleepers. It looks wrong and sloppy.
I also need to mix the adhesive and water better. There are a few very obvious "snots of cream glue that stand out a mile. I need to make sure there aren't any when I do it for real. They don't sink in or go away as it dries.
Now to consult "The Big Four in Colour" to get the ballast colours sorted.
-
6
-
-
BALLAST AND GLUE
I think I've got the hang of the ballast spreader.
I have trialled two strengths of glue/water mix on some grey ballast. I'm trying out Wicks multipurpose flooring adhesive. Ray H of this Parish (Virney Junction) suggested it. It's got vinyl in it so hopefully won't set rock solid. I'm looking for some flex. Seems a bit cream coloured so far. Lets see how it dries.
The new white patch on the black square is artex. I'm hoping again that its flexible when dry.
I am delighted to say that the Artex has set and is very flexible. I think I shall use that in the Evenley goods yard and see how it goes. I will mix some black paint in, but it will only go light grey. It will have to be sprayed over with black and sleeper grime anyway. I think I will try pressing some Woodland scenic Cinders (not Ciders) into the surface once it has half dried as well. I need to consult some books for general colouring.
The vinyl adhesive worked a treat on the track too. The ballast is firmly glued to the foam, even with the weaker mix. But in both cases it is still flexible. I can bend the foam up to the sleeper edges and the ballast just goes with it and does not crack or lose adhesion. I can still squash the track into the foam. I was after that amount of flexibility in the track still.
Now to trial mixing the ballast colours to get a 1930's steam railway type of colour pallet. I know from my club days not to use a single colour so I am thinking of using the standard Brown as my base colour with a touch of buff added for the main lines, some iron ore added in the Evenley environs and some dark brown added I the other station areas, suitably sprayed over particularly where locos stand.
Fingers crossed.


Buckingham West
in Layout topics
Posted
BUSY WEEKEND ON BUCKNGHAM WEST
It started with a coat of paint to the artex. Armed with a photo from Little Muddle, I tried to match the paint colour. Amazingly light! Almost cream. But I was happy with the finish as a base coat. It looks even lighter in the photo!
Having experimented with the ballast spreader I decided it was time to try some ballasting for proper. I have never painted or ballasted track, so this felt like a big step.
I think the goods loop at Evenley would have been finished in cinders not stone ballast. It is not a running line because you can only reverse into it and it is effectively the yard. So I used the spreader to ballast woodlands scenics cinders. I then had to add more between that line and the first siding. I’m pleased it didn’t need too much tidying up. I fixed it by dribbling 40:60 vinyl adhesive/water with a few drops of washing up liquid via a pipette, but whilst this soaked in, it didn’t permeate into the ballast too well. It stayed quite local as it were. I then sprayed it with water and washing up liquid. Once soaked, the glue washed in. Next time I will soak it first and then apply the glue. The glue is cream in colour, but it dries clear.
I also ballasted 3 points for the first time. They still work!
The last time I had my airbrush out was before we moved house. I was pleased that it still worked. I went to work on the artex. I used Lifecolour acrylic Sleeper Grime up the centre on the tracks including the cinder ballast. I spilled this over the edges. I next used Weathered Black over the coal yard area and where locos habitually stand on the loop by the signals. I finally opted for track dirt, but I’m disappointed with the colour. Its very red. Luckily the ironstone in the region justifies it. Overall I’m happy with the results.
The barrow crossings are 5 matches glued together. I’m pleased with that look too.
I fully recommend using a good quality mask even for acrylics. The particles of paint are so fine that they are dangerous. Mine is a cartridge mask by 3M. In the scheme of things, it’s not a lot of cash.
The last work on Evenley is the coal yard. Here you can see the colour of the glue I’m using.
With the stock back in the yard now. Its just gone 2pm on Saturday and the yard is full. The Fly (pick up goods) is about to arrive and this is going to be an interesting shunt!
This weekend I also made the structure which hides the Quarry. Whilst being an important source of traffic on Buckingham West, it is off stage and the stock is stored in a hidden siding. The bridge that nobody likes is the entry point, but this angle is the one normally seen. This might explain why I preferred the arch.
The cover, which will have brick paper added to the front and foliage above, comes off so the loads can be added to the wagons.
Whilst I had the airbrush filled with weathered black I added some smoke to the Quarry Lane bridge.
I also went back to the areas of modelling which feel more like home : electrics. At the end of Buckingham West yard headshunt there is a dead section with a diode. The pilot will stop outward, but when reversed, it should come back. It wouldn’t. Turns out the diode had come unsoldered. Even though all this is well under Brackley Road, I managed to resolder it.
Tony Gee previously raised a good point about not keeping locos at the end of a platform as the stock is taken out. Although this came from a photo where the operator had failed to release the loco as told to in the timetable, it got me thinking. On the ‘real’ Buckingham Peter Denny's master piece now owned by Tony) the Buckingham operator can drive the trapped loco behind the departing train. I only have 1 platform where that happens, but another where stock from an arrival has to be withdrawn and the trapped loco can follow the stock out. I had a spare channel on an H&M duette - I use 2 of them to power the Banbury diode matrix, the Banbury controller, the cleaning brush, the bells and buzzers. So I have wired that spare controller via 2 push buttons into platforms 1 and 2. It is pre-set to power the loco.
As long as both the platform starter and the backing signal are ‘on’. Then by pressing the new button, the loco moves up the platform. So the process is:- as the stock is withdrawn from the platform (either by the pilot or as a departing train), once the loco passes the platform starter it is placed back ‘on’, the loco at the end of the platform is de-isolated, and the new button pressed so the trapped loco follows the train up to the platform starter.
I’ve also given all the freight stock (apart from just a handful) a basic black wash. This brings out the planking detail, tones down the colours and shine, breaks up the evenness of the most roofs and stops the stock looking like a toy. It’s amazing what a difference a bit of mucky water can make. It also acts as a bit of a primer for future full weathering.
I can’t believe I’ve not actually run any of the timetable this weekend!