


MarkNJ
-
Posts
37 -
Joined
-
Last visited
Content Type
Profiles
Forums
Blogs
Gallery
Events
Exhibition Layout Details
Store
Posts posted by MarkNJ
-
-
Gentlemen,
I am in the process of building the Mercian kits in O and HO. I am at the point of installing the tank braces and noticed a couple of details that seem to have been over looked due to the lack of a proper GA and the similarity of this loco to the Jinty. Mainly it is the location of the tank fillers and lifting brackets.
On the accompanying photo clippings it seems the tank fillers are a lot further aft than we all thought and the front lifting brackets are where the tank fillers are assumed to be located.
This post is meant for information and is in no way intended to detract from the excellent work done by k222009.
Best regards
Mark

-
 1
1
-
-
Hi Tex,
I live in northwestern Canada and have the same issue getting suitable paints. I have been trying Citadel and The Army Painter brands as the local gamers store carry them. The Army Painter is excellent paint and adheres to brass very well once cured. I found Citadel not so good for brass. Both ranges have a large selection of colours though the local store only carries a small selection. The Army Painter "Chaotic Red" is a very close match for LMS/BR maroon.
I have heard excellent reports about Vallejo paints but have not had chance to try them myself.
All the above should be easily available in the USA.
All the best
Mark
-
3
-
-
Hi Chas,
The Jubilee just needed setting up once, after it was balanced.
All the best
Mark
-
On 08/09/2020 at 13:13, Chas Levin said:
Hi Mark, that is a key point indeed, because weighting etched brass locos is something that concerns me. The first loco I built was whitemetal, but as I move forward with the superstructure of my first etched kit, being able to discount weighting issues would be - forgive me - a great weight off my mind!


What type of system do you use, and what types of locos?
Hi Chas,
I model in various scales and gauges and I have tried various systems except CSB.
I find horn blocks are not an absolute necessity but make life a little easier. My O scale MOK 9F uses both springs and compensation beams and is a very smooth and powerful loco even around the 72" radius curves and points on my outdoor layout.
In 4mm scale I have a Gibson Jubilee which is fully sprung and once set up is smooth and pulls well. I also have a High Level Andrew Barcklay 0-6-0 which has just compensation beams no extra weight and has better traction than my old K's J72 which is about twice as heavy.
My HO steamers are all fully sprung, but I think the springs are a bit too stiff to compensate properly.
I hope this is some help to you
Mark
-
 1
1
-
-
Hi there,
I find the main advantage of compensation is improved traction, this means I do not have to weight my locos, just balance them.
Cheers
Mark
-
 1
1
-
-
Hi Ian,
Those etches look beautiful.
Mark
-
Thank you both for the help.
Mark
-
Hello Peter,
Some very nice modelling going on here. 3D printing has opened up a whole new era in the ability to model the very early railways.
My self and a friend have been working on some 3D printed parts. I do the drawings in SketchUp Make and he has the printer, the main issue for us is exporting the drawing in a format his printer will accept. SketchUp Make only exports as .dae or .kmz. which are not compatible with my friends slicing programme.
I see from your screen shots that you are also using SkechUp Make and checking on your printers web site it's slicing software also does not support .dae files. How do you get your info to the printer?
Best regards
Mark
-
On 18/04/2020 at 13:38, dpgibbons said:
Does one need a sophisticated sandblaster to clean metal kits? Paasche recommend 65psi for their air eraser, which is beyond the capability of many airbrush compressors. Badger's cheaper mini sandblaster works from an aerosol can but is it up to the job?
Hi there,
I have used a full size sand blaster, but find it is a little too aggressive for the finer model sections.
The Paasche works well from 30 psi upwards. The secret is to eliminate any moisture from the blasting medium.
Also resist any temptation to reuse the medium any impurity will result in a blocked nozzle.
I have used a 3/4 hp contractors compressor with tank for the last 30 years. I found the aerosols to be totally useless.
I started with the Badger unit until it wore out then upgraded to the Paasche which I find does the job admirably.
Hope this helps.
Mark
-
3
-
-
45 minutes ago, Porcy Mane said:
There you goes. (From Transport Age)

That's great thanks Porcy.
Mark
-
Hi all,
I thought I would share the modifications I made to this excellent kit. I made the sides removable and the clamps operational so I could pose it being loaded. I also sprung the buffers as I find with the Dingham couplers I use it improves operation.
Does anyone have details of the palletized brick loads the wagons would carry. I had a look on line but did not see much.
Regards
Mark


-
 4
4
-
-
Hi there,
I can strongly recommend grit blasting. I have been doing it for the last 35 years and find it makes painting a breeze even on brass. I do not have access to the various etching primers I read about on the forums so had to find another way to make the paint stick (especially to brass) and grit blasting was the answer. The fear of paint lifting when removing any masking was eliminated.
I use a Paasche air eraser with their aluminium oxide grit or Badgers.
Mark
-
4
-
-
I have an outdoor layout and use PECO 124 bullhead flex with hand built pointwork using Marcway components.
Not very unusual until you realize I live in the Yukon with -40deg C winters and +28deg C summers.
When I was planning the layout I contacted PECO regarding the suitability of their track, they did not recoomend it due to the temperature variation. Not wishing to hand build the regular track I ignored their advice and used their flex. After 3 years the track is as good as new.
I was surprised that the PECO flex track was cheaper than the components from Marcway for the regular track which I would then have to assemble.
The rail and sleepers for the pointwork I bought from Marcway. They were a lot cheaper than PECO points and enabled a more flowing formation.
I hope this helps.
Mark
-
1
-
-
On 05/11/2019 at 15:38, hendie said:
While waiting on a new side frame to arrive, I thought I would get on with something that I have been studiously avoiding so far... the diamond windows.
Part of the reason for the avoidance is that those windows are very fine, and I was terrified of having to cut the "glass" to fit. When I designed these I tried to keep as true to scale as I could - which meant I only had a 0.1mm ledge behind the frame to rest the "glass" on.
First things first - let's get them painted.
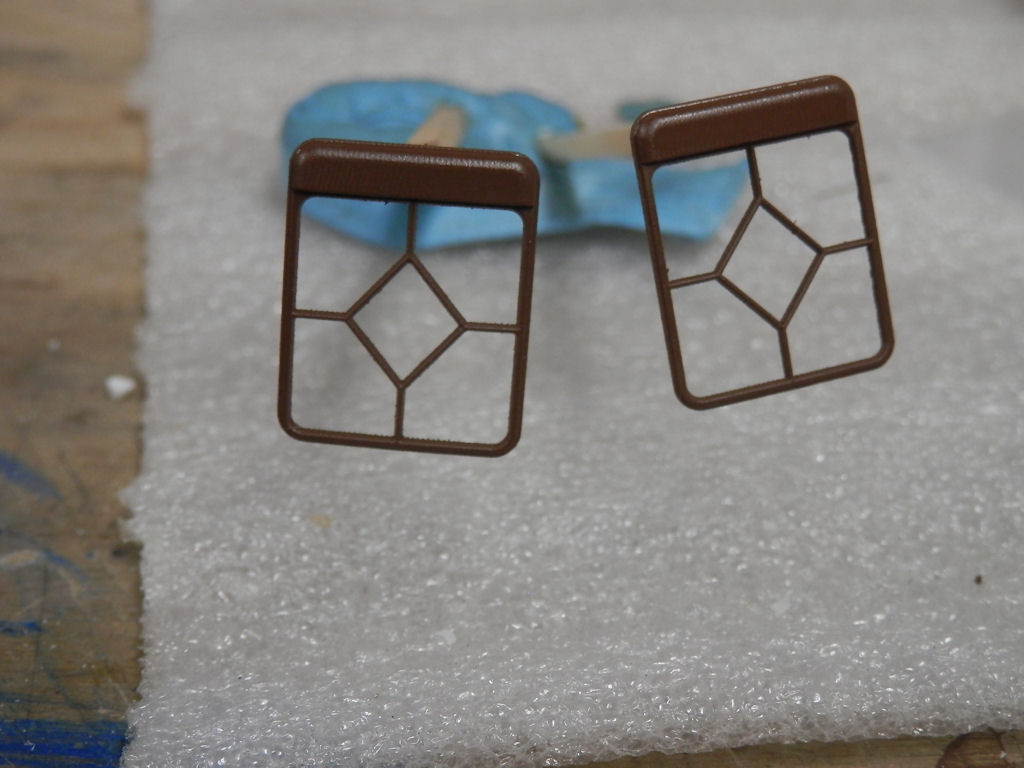
Now, not only did I have a ridiculously small ledge to fit the glass onto, I also had a radius of about 1.6mm which had to match very closely or you would see gaps around the window somewhere.
To my absolute astonishment, I got this match on a first try
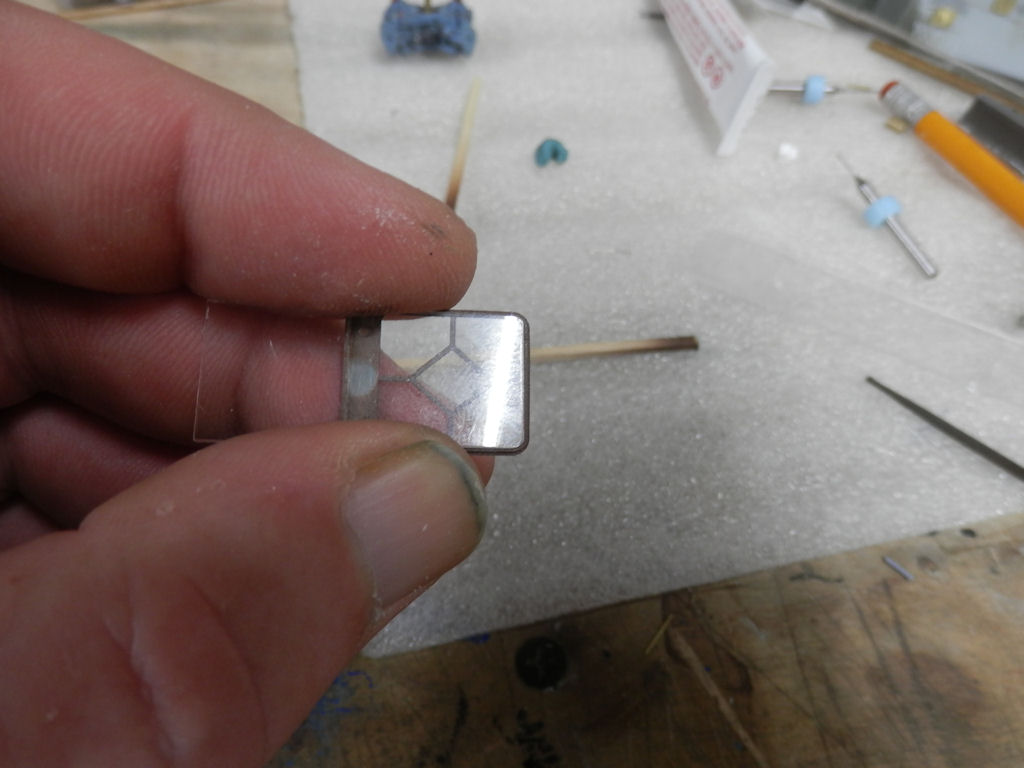
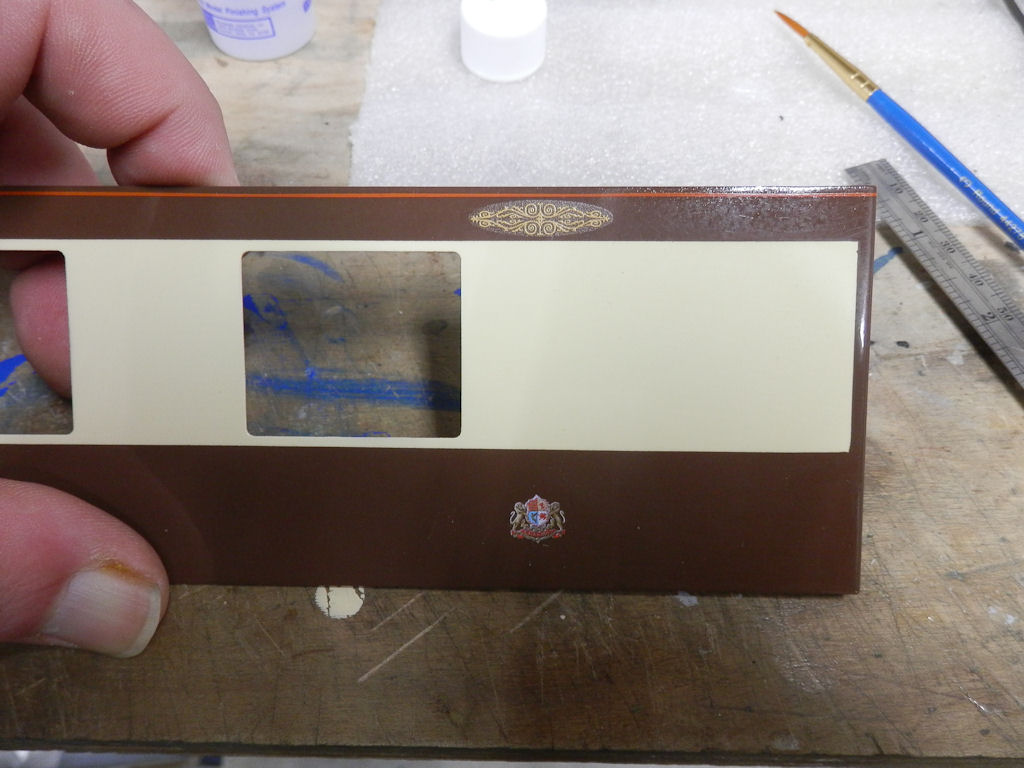
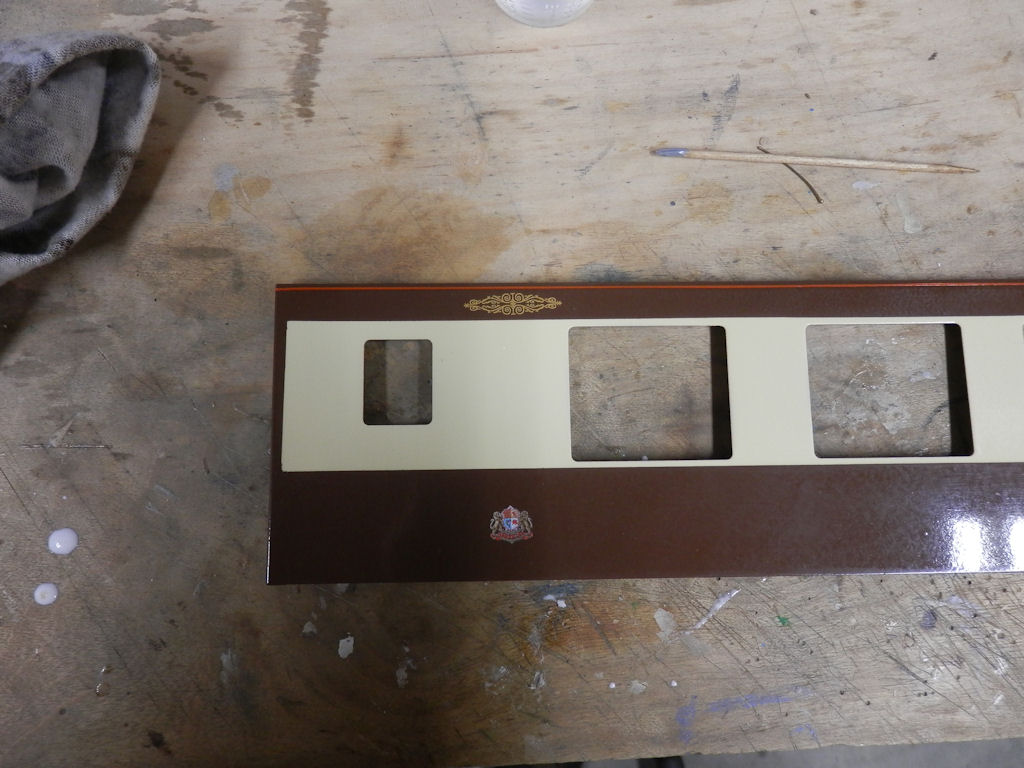
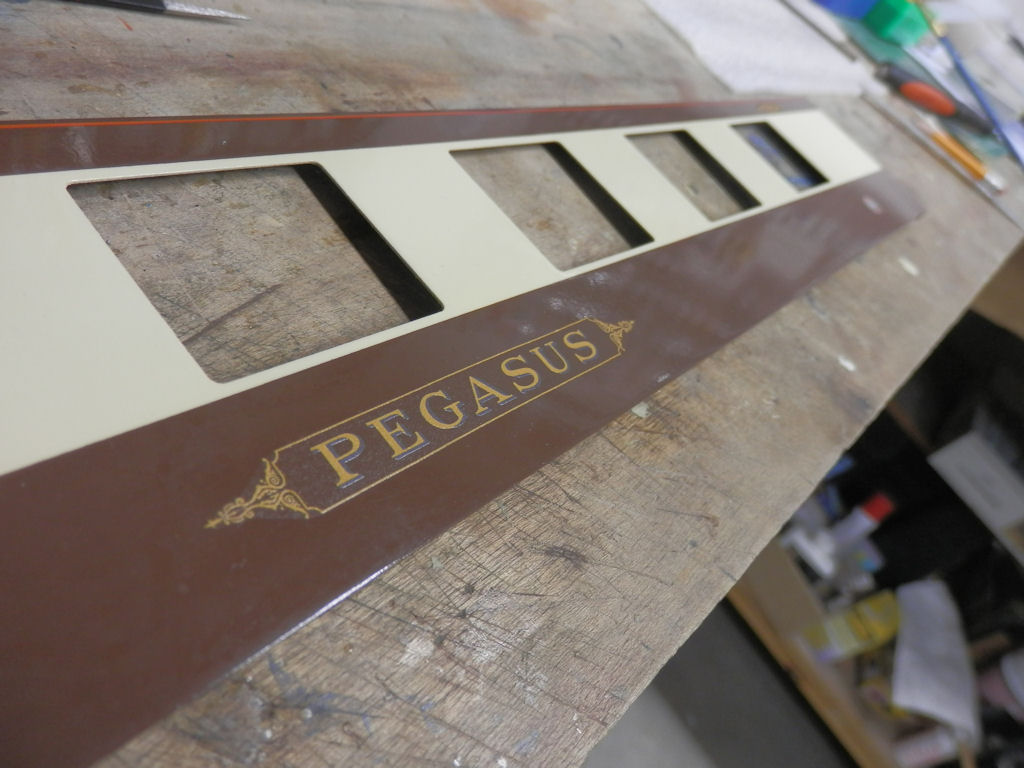
Now I had a different problem to solve. The diamond windows on the real Pegasus are frosted/obscured glass. One window on the bathroom and the other window is at the kitchen and I guess no-one wants to know what goes on in either of those locations.
But how to create a frosted glass look ? Quite simple really (after a couple of false starts) I found that 1500 grit micro-mesh produces a very passable frosted look after a few minutes light rubbing.
The glass was then set into the frame using superglue. As much as I dislike the stuff, the amount of area I had to glue onto was so small I didn't really have any other choice. I applied superglue very carefully around the perimeter on the inside face and let capillary action do it's stuff. Luckily I did not have any catastrophic happenings.
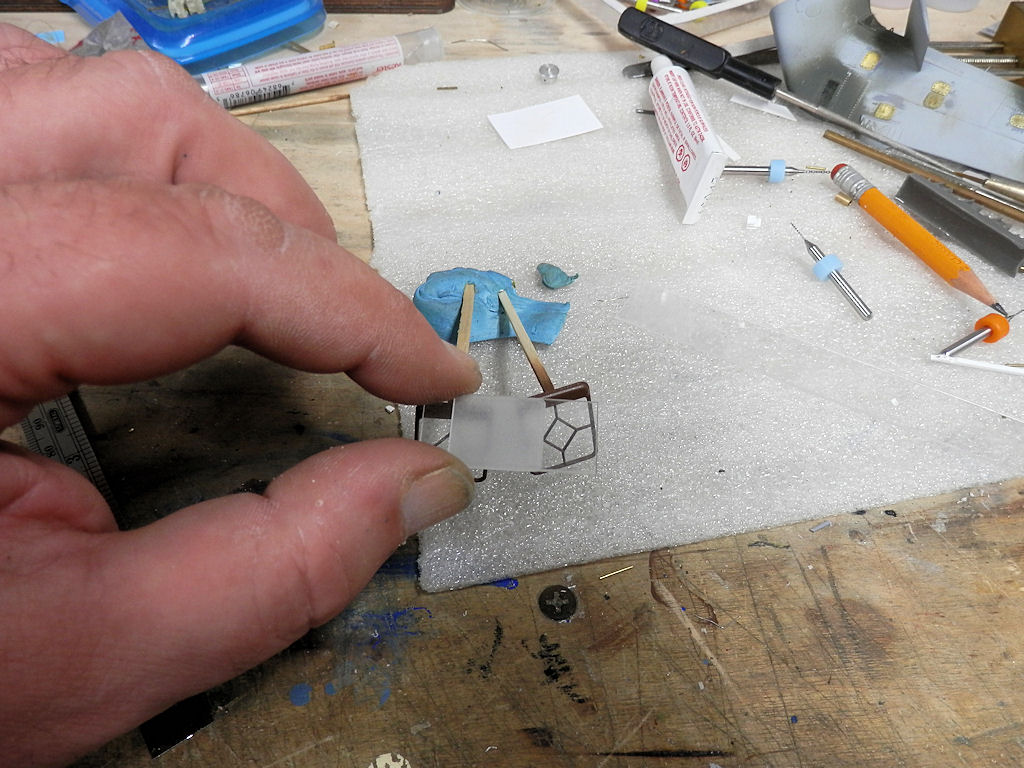
There! I think that will work.
Then the window can simply drop into place in the side frame. The one above is just dropped in to see what it looked like - it's the side-frame with the window in the wrong location, so it's now my "test" piece
As I was painting these frames I saw that my stock of Italian Dark Brown (I'm using it for teh Pullman Umber) was getting low, so after the modeling session I went to order some more -SHOCK ! HORROR!!! Testors/Model Master have discontinued this color. EEEK !!!!! WTF??? As I am going to need some to paint the new side frame I then spent a frantic hour or more searching t'interweb for a source. Nothing. None at Amazon, None on Ebay, and none on any of my usual hobby website haunts. I found a source in Canada who doesn't ship to the USA, and I found another source about 3 hours away in DE but won't mail paint.
Eventually I found a source in NJ who had two jars left so I bought 'em straight away.
Of all the things that have bothered my about this build I never imagined that paint would be one of them (at least, not after I found a suitable color)
Hi Hendie,
I know what you mean with erratic paint supply.
On 05/11/2019 at 15:35, hendie said:Today started well.
I woke up, which was a bonus I guess. After that, things started going not so well. And when I say not so well, I mean not well at all. Which is really a bit of an understatement as things went downhill fast. Drastically. And when I say downhill I don't mean just a bit of a slope, I mean disastrous. Bad. Really bad. So bad I don't think I've had a badder modeling day. It would actually be quite funny if it wasn't so disastrously disastrous and not very good at all.
Read on dear readers...
Lets begin with something that wasn't completely disastrous then. Transfers.
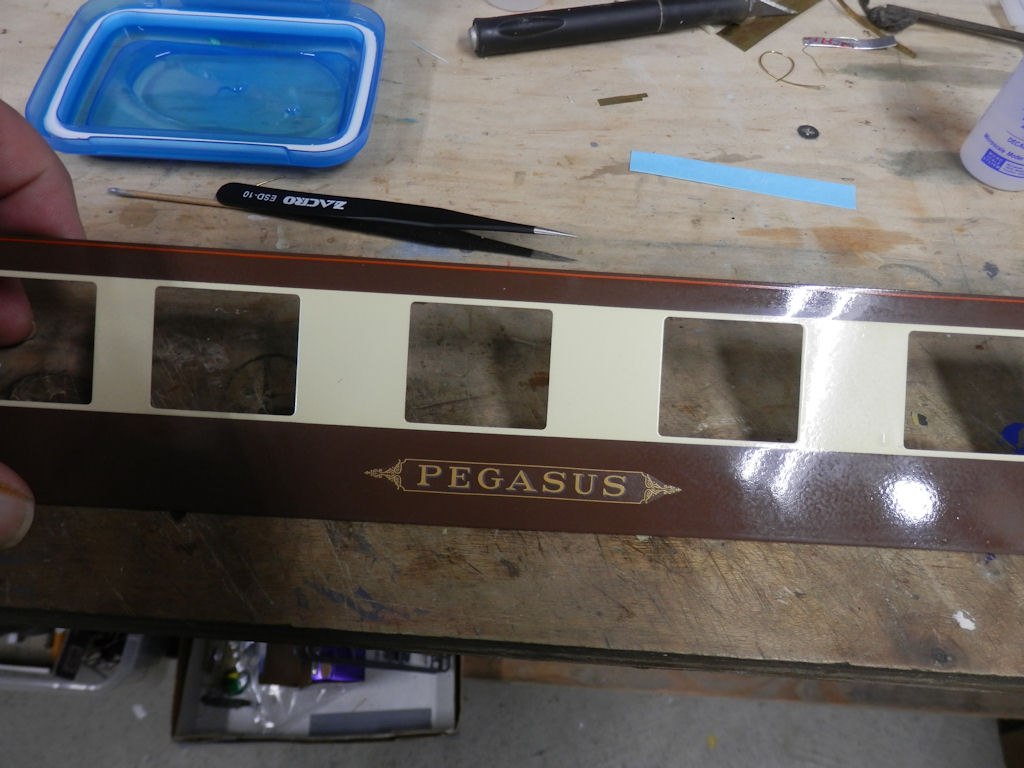
I decided to bite the bullet today and see if I could get some of those transfers I'd wait so long for actually on the model. Out came the drawings and out came the reference photo's. Measure twice, cut once they say - so I paid very careful attention to the locations and measurements. The first transfers on were the scrolls just below the cant rail.
Masking tape was used to to provide locations. Dook 'em in water and slabber some micro-1 on the side frame in anticipation.
In the end, the scrolls were not too difficult to apply though you have to be really careful. The transfers are wonderful quality but very delicate, and even micro-1 will start to dissolve the carrier film if you leave it too long. So, scrolls were positioned gently and when I was happy with the location, were pressed down with a damp kitchen towel. The same procedure was applied to the Pullman crest.
I did a test piece just prior to this and found that when I applied micro-2 the transfer wrinkled (as expected) but some of the wrinkles did not flatten out... so so far I have not applied micro-2 to the side-frame. I'm just too scared!
Same process at the opposite end.
Apologies for the out of focus shot, - this was meant to show how flat the transfers were with no air bubbles or wrinkles. Trust me - there's no air bubbles or wrinkles! Honest guv.

So far so good.
Now it was time for the big test - the name plate! This is just over 3 inches long - 80mm in new money.
After 4 successful transfer applications, my confidence was building. You (me!) just had to be careful. Sounds easy - right?

So how'd it go then ?
Well, how's this?
Looky here.. all nice and flat - no air bubbles, no wrinkling. Looks good n'est pas?
Well, apparently my inner modeler did not think so. I spotted a slight, very slight curve towards the end of the SUS and decided to try and rectify it.
!
Wrecked the transfer I did - completely. Well, it was lucky I had two printed on my test sheet wasn't it?
Well, I should have had three printed as I wrecked the second one while applying it. I'm sure frustration was creeping in and had something to do with it. I should have stepped back and gone for a walk or something, but no... I ploughed ahead and messed it up.
At least I learned something - I think I tried to remove the second transfer from the backing sheet too early and it stretched a little bit... but I did have some success with the other transfers which was encouraging.
But now we come to the howler of the year. No, the howler of the decade, indeed, the howler of my entire modeling career.
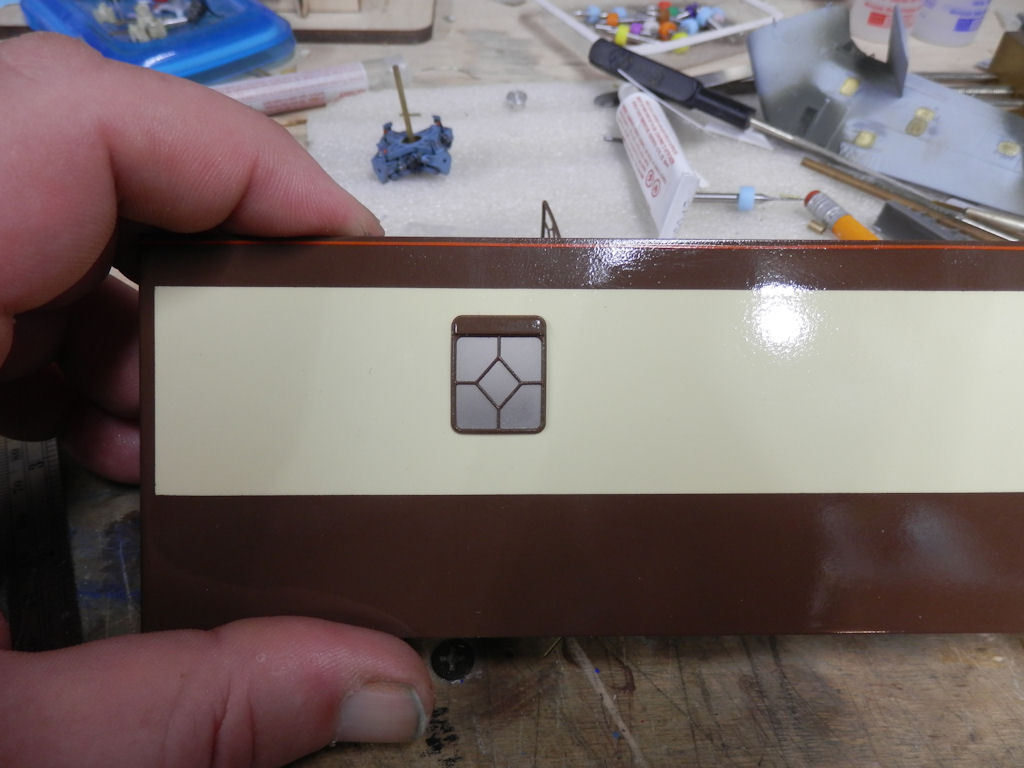
Take a ganders at the photo below. Notice anything strange ? Out of place ? Simply wrong? No ?
Believe me - there is something wrong. Badly wrong.
I've been working on this damn car for around 5 years now, and I have handled and worked these side frames for several of those years. I've painted, stripped, painted, stripped ad infinitum and I completely missed it all these years... until today that is.

dammit!
dammit!
dammit!
dammit!dammit!dammit!
Here... this photo may help clarify things a tad.... notice anything now ?
Window ?
The small window ? Sitting by itself over there on the left?
See where it is located in relation to the end of the side-frame?
Yes, he (me) says sheepishly... it's in the wrong darn place isn't it ? How on earth did I get that wrong? And why did I never notice it until today of all days?
I could leave it as is - as that window is in the kitchen area - but ... I'LL KNOW IT'S WRONG!!! and all you do too now.
So I gave up modeling for the day.
I shall have to mull this over, but I can see that I will need to try and call in favors and have another side frame made out of brass - this time with the windows in the right location.
I cannot unsee that which I have seen. - though why I couldn't have seen it three years ago is beyond me. . Is all I can say.
It's not all doom and gloom in the hend cave now. I must admit to being severely peeved when I first spotted it. However, now I've had time to settle down a bit I've come to realize that it's not as bad as it could have been - what if I didn't spot the error until all the transfers were on? or worse... when it was completed ?
My plan is to take the week to calm down and reorganize myself - then I shall contact my tool shop that did the side frames for me last time around and see if I can pull in that favor. I'm sure it will be okay, it's just embarrassing having to ask for that favor.
The up side is now I have another test side frame complete with all paint and clear coat as the final versions so I can test out clear coating over the decals without worrying about messing up the paint job.
yours sheepishly and somewhat very, very embarrassingly
Hend the crap draftsman (though it's just as well I did it right on the real thing or that really would have been embarrassing! not to mention, a career defining moment!)
*** later that week...
I found out how I made the mistake though. I checked all the drawings this morning and found that i used a drawing used to show the different skinning panel arrangements. That was the culprit. I also checked the author of the drawing... and it wasn't me!
Small consolation though at this point. If I ever meet a certain Mr. McLaren again I'm going to give him a good slap!
Still my fault though - I really should have double checked
Hi Hendie,
My commiserations on the window location error, it also looks from the photos like they are a bit too low. It looks like the tops should line up with the main windows, or even a tad higher.
Keep up the excellent modelling.
Mark
-
Hi there,
Yes it is suitable. Just make sure you let it fully cure before applying decals. I use an automotive acrylic hi gloss, this works very well.
Mark
-
1
-
-
Hi Emmo,
If you have access to a lathe you can enlarge the axle hole, then glue in a piece of Tufnol then bore that to the correct diameter for your axles.
Best regards
Mark
-
The crumbling carrier film is usually caused by old age and improper storage. An overspray with a clear gloss finish before use usually makes them workable.
My choice for setting solution is Solvaset which is very aggressive but really settles the decals over any ribs and rivets.
My experience with the excellent Railtech decals has shown that a setting solution is detrimental, especially anything with a white component to it. I have found that is causes them to curl up instead of snuggle down, and they then resist any attempt to flatten them.
Mark
-
Back in the day the rule was to match the sealing coat to the decal. Some decals had a matte finish and some a gloss finish. Once that has cured you can then use your preferred final finish.
A high gloss base is the only way to get a consistent quality finish with water slide decals be they matte or gloss.
Mark
-
If you are using an airbrush with well thinned products you will not lose any detail definition. I have done many Z scale repaints which required a gloss coat for the decals followed by a dull coat to seal everything.
Mark
-
 1
1
-
 1
1
-
-
Painting progressing slowly.
Thomas has his out door coat on now. Just the red buffers and hanging iron, and grey for the the footplate. And of course the lining.
I'm really pleased with the finish. Spending a session messing with the air needle, nozzle relationship was well worth the effort. I now feel happier to spray the jubilee green.
Hi there, here is an Agenoria Jinty I painted as Thomas for my next door neighbour's boy. He likes to come over and drive the trains on my outdoor layout.

Mark
-
8
-
-
So after diligent research Canadian Tire have a spray bomb in their Premier Paint range called Strawberry Fields gloss. This is close but a bit bright, I decanted some and then added tad of blue acrylic and a bigger tad of black acrylic this came very close to Bachmann's rendition of BR Maroon.
I then stopped in at a gaming store in town and they stock two ranges of paints for wargaming models. Games Workshop Citadel "Blood for the Blood of God" is a great match for for the redder version of BR Maroon. The Army Painter Warpaints "Chaotic Red" is just about a dead match for the Bachmann colour.
I do not know how people rate Bachmann's maroon, the coaches I own are the only real reference I have. Photographs especially on the computer are totally unreliable as far as colour matching goes.
I hope this helps anyone who lives a little of the beaten track.
Mark
-
1
-
-
You'll probably want to stop in to Hobby Junction ( https://www.facebook.com/pages/Hobby-Junction-Express/510527825743449 ) then. They're shut on Sunday and Monday. Friendly crew and an Alladins cave of stuff. Nothing British unfortunately but lots of other modelling supplies.
John
I'ii add it to the list.
Mark
-
Relieved to hear that you will add red oxide Mark. CT do a grey primer for metal which I would use for a brass model, foillowed by red oxide.
I suspect Canada Post will not ship aerosol paint. Steve sends his stuff by post and I have had Tamiya paint shipped from here: https://hobbywholesale.com/ No British Railway colours though.
Getting proper railway colours here is getting incredibly difficult. Badger DM&IR Maroon is an exact match for LMS Crimson Lake, which in turn is very close to BR Maroon. Udisco here in Montreal carry it and do mail order.
I haven't done any recent business here: http://www.britanniamodels.com/ but they may have paint.
John
Hi John,
I am due to be in Montreal towards the end of the month so I will try and get to Udisco.
Thanks again for the help
Mark
-
1
-
-
Well, Mark, my first comment is that I would prime the vehicle with Canadian Tire Red Oxide. The top coat of red is translucent and the grey may well come through affecting the final colour.
Can't speak to CT car colours, last time I checked (a long time ago), most seemed to me to be metallic.
Steve at Model Railway Imports sent me some Humbrol acrylic BR colours so there's a possibility.
I do like the Stove R and built the Comet kit in 4mm. Two of my efforts (BR Mk1 CCT and BR(S) CCT) were in the latest BRMNA journal, both brush painted with Humbrol acrylic.
I have a D&S 4 wheeled LNER milk van and CRT 6 wheeled LNER passenger brake on my rountuit shelf.
John
Hi John,
You are quite right about the grey primer, I was planning on spraying a coat of red oxide prior to the top coat.
I also have built the Comet 4mm version and I used the Humbrol acrylic but I was not happy with the shade. I weathered it and now it looks OK. I wanted a more pristine look for the larger scale model.
The reason for wishing to use auto paint is it is available here in Whitehorse at Canadian Tire, Canada Post seems reluctant to allow people to mail fluids, which makes it very difficult to get supplies from the usual stores.
Thanks for the help
Mark


Fowler LMS Dock Tank 0-6-0
in Kitbuilding & Scratchbuilding
Posted
Hi Mike,
That is a view I do not have, thanks for posting it. Apart from clearly showing the locations of the tank fixing brackets it confirms the location of the filler between them.
As for the absence of lifting brackets on this loco, just one more mystery to ponder.
Best regards
Mark