


MAP66
-
Posts
947 -
Joined
-
Last visited
Content Type
Profiles
Forums
Blogs
Gallery
Events
Exhibition Layout Details
Store
Posts posted by MAP66
-
-
On 29/02/2020 at 20:06, chuffinghell said:
I had my mojo tested in exactly the same manner, having everything out and then not being able to find anything or any space to work.The longer I left it the more daunting the prospect of tidying up became until like you I couldn’t even put my hands on something as simple as my craft knife
So I know exactly how you feel
I agree with Kevin, the name board looks great, what did you use? I confess that I’m tempted to cheat and drawing one up to have 3D printed
Thanks for the supportive comments Chris and the bottles of Doombar done the trick, order is now restored.
The station nameboard is a Smiths kit by W&T. It consists of a small sheet of black plasticard for the backboard, about 4 lengths of brass 'U' type profile for the board surround and 4 white metal posts and one brass letter fret. So enough for 2 nameboards. I brought another letter fret separately as I needed another letter T, there's only 2 on the fret.
Hopefully your not modelling 'Llanfairpwllgwyngyllgogerychwyrndrobwllllantysiliogogogoc' I'm not going to attempt to calculate the number of letter frets you would need for that!!
all the best
Mark
-
Well I'm progressing very slowly at the moment, sort of lost my mojo a bit, happens when I have to clear up due to having too much stuff out at once. When it gets to the stage where it takes me longer to find my paintbrush than it would to ballast a metre length of track then I have to stop and restore order to my work area. Luckily, I have a couple of bottles of Doombar in the fridge which will help dull the pain of becoming organised again.
One thing to report though, I manged to knock up the station name board which took forever to do because I couldn't find anything.
Now time for Doombar...

-
 8
8
-
 1
1
-
-
Hi Jerry
When I first saw the title of your thread, I thought you had gone continental,'Reeuse' sounded French
 but soon realised my error.
Looks good so far, Im looking forward to seeing this develop.
All the best
Mark
-
 1
1
-
-
11 hours ago, Ian Holmes said:
Nice work. My un-named Lincolnshire branch line terminus nearly ended up as a P4 layout.
Thanks Ian
I'm curious to know, why it didn't?
-
22 hours ago, Jerry1975 said:
Very nice indeed, I really like this, the illusion works very well.
Jerry.
Thanks Jerry
I'm very pleased with how its turned out and I will definitely use the technique on future projects, which is why it was good to experiment on something small first and get peoples views.
All the best
Mark
-
9 hours ago, sb67 said:
That really looks fantastic, it blends in so well and the painting of the fence on the backscene is superb. Great stuff!
Thank you Steve and glad you like it.
My initial painting of the posts was a little clumsy, so a little touching up still required and then some really feint wire lines drawn in (steady hand stuff).
All the best
Mark
-
1
-
-
11 hours ago, 1722 said:
'providing an illusion to deceive where the baseboard ends and the back-scene starts'
It really does. Wonderful modelling.
Cheers Chris and thanks for the comments.
All the best
Mark
-
Phew, finally managed to run the final 4 lengths of wire through the fence posts, would have tried the patience of a saint but only because I put the static grass down first. Otherwise it wouldn't have been a problem. I have started to paint the pathway and fence posts onto the back-scene, still needs a little work to tidy up but gives a good impression of providing an illusion to deceive where the baseboard ends and the back-scene starts.
-
4
-
 4
4
-
-
25 minutes ago, jamest said:
Hi,
Been following this for a while and I am really enjoying the build.....and the fact you take the time to explain what is happening so well.
Can I ask where you got the platform lights? apologies if you've already mentioned it.
Looking forward to seeing it develop further.
Regards,
James
Hi James
Glad your enjoying the build and my general ramblings in attempting to explain the way I have gone about things.
The station lamps are from Gaugemaster, they are 'Taper post oil lamps GWR stone' pack of 3 GM814. I think they do a pack of 6 in the range as well as gas type lamps and also cover the other big 4 styles not just GWR lamps.
All the best
Mark
-
 1
1
-
-
22 hours ago, Ian Holmes said:
Just for fun: Imagine a spotty teenager persuades his dad to take him down to a small deserted terminus Station somewhere on the east Lincolnshire coast, not too many miles from Mablethorpe. Where he witnesses the arrival of the lunchtime train from Louth. Perhaps he would capture images like these...


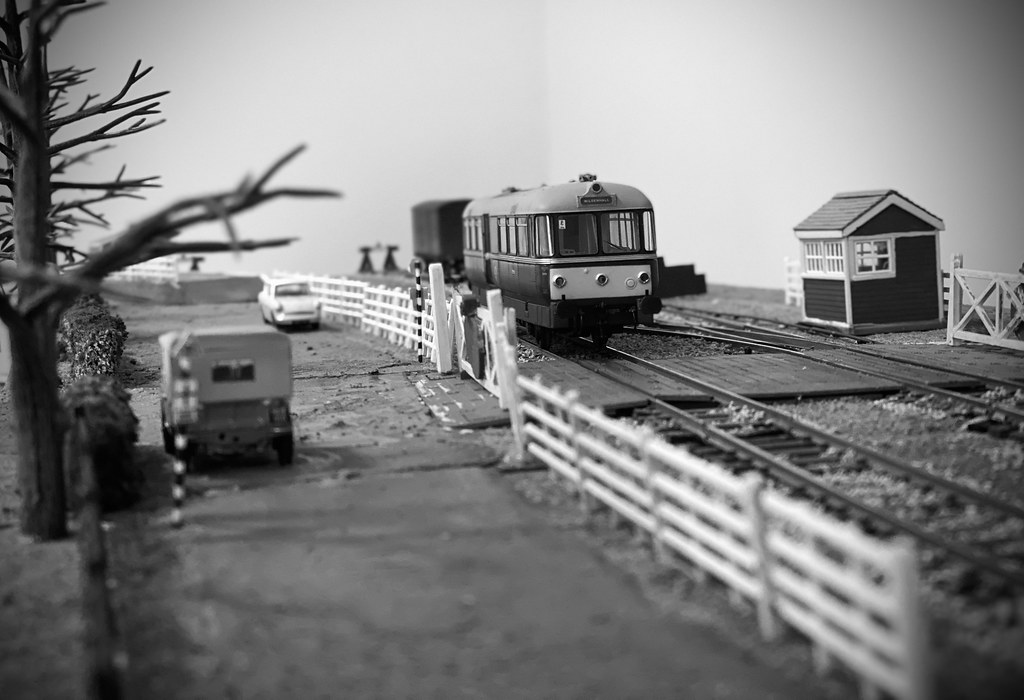

"Bloody Hell son! Get down off that tree!!!"

Looks fantastic Ian and your signal box looks strangely familiar.
-
1
-
-
9 hours ago, chuffinghell said:
Looks great!
I do have reasonable success with static grass using a War World Scenics applicator (Same as the Peco one, WWS make them for Peco)
However I'm yet to perfect making tufts but then I've been using grease proof paper instead of foil so that might be where I'm going wrong
Last year at Ally Pally, I remember WWS demonstrating their applicator and the grounding nail was not used, the guy demonstrating stated that the fibres pick up enough charge as they fall through the air and still land upright.
I would not have believed it if I hadn't witnessed the demonstration for myself.
-
1
-
-
Just a quick update tonight, not much progress to show but I have partly built the signal box and placed it roughly in the spot where it will be on the layout. Eventually it will probably be placed a little more to the left than it is now but have gone a bit too far with the static grass and I will need to scrape some off to allow a level base for the SB.
I have run in 3 lengths of wire through the posts another 4 lengths to go, now realizing I should have done this before the grass as the lower post holes are buried in the grass. Never mind, its all a learning curve.
-
9
-
-
15 hours ago, sb67 said:
Fantastic little layout MAP66. I love the attention to detail and I have to keep studying the pictures to see where the backscene joins the baseboard. I'm looking forward to seeing the fence posts, that's a good idea to carry them on to the backscene.
What have you used for the ballast and groundwork? It looks very convincing.
Thank you sb67 for your kind comments, I have very much enjoyed following your thread 'Rustons Sidings' and in my view your ground works look spot on, looks like real soil from the pics and your grass is excellent.
The ballast I have used is sieved desert sand and stone mix ref JS75 by Javis, I happened to have quite a fine sieve which removed all the over scale lumpy stuff. The sieved remains, where in my onion, about right in size.
For the track in front of the platform where all the filth and gunk would normally accumulate and congeal with the ballast I represented this by first infilling all the sleepers with ready mixed deep gap polyfilla up to a level just below the sleepers. While still wet I then sprinkled on a few pieces of the ballast and gently tamped down in between each sleeper and outside of the rails. When dry I painted with several washes of very dilute sleeper grime and frame dirt by Rail Match and and a touch of Vallejo Black Grey 70.862 where there is likely to be more oil deposits left on the track bed. Away from the platform, I just apply the sieved ballast in normal way, brush into place then apply via a pipette water borne thinners again from Rail Match to saturate the ballast and then again via a pipette the good old dilute PVA with a touch of washing up liquid.
For all the other ground works I have used the deep gap filler, its very easy to work with and can build up to a depth of 20 mm in one application, so ideal for micro layouts and dioramas. As a tip always apply some dilute PVA to the surface before placing the deep gap filler over the top. The PVA helps pull the filler onto the surface. When this is all dry I paint with brown acrylic and then apply static grass (combined mixture of colours and lengths) where needed using puffer bottle with some fine turf scatter sprinkled on top to bulk it out a bit. Where I have left bare ground I add some various brown washes and finally dry brush white and sand coloured weathering powders which is how I created the footpath.
All the best
Mark
-
1
-
 1
1
-
-
2 hours ago, SDJR7F88 said:
The second instalment of a new and exciting project, creating a WW1 Micro Layout in a Hotel Room!
In this update we take a look at the many little details I've been painting in preparation for the build, including over 30 Creates & Boxes, 25 Artillery Shells, 70 Sand Bags, and 15 W^D Models Figures, plus much more!
Hope you enjoy!Absolutely superb, excellent detailing with the painting and so well documented and presented. Looking forward to when it all comes together.
All the best
Mark
-
1
-
-
And so it begins, now committed to painting on the footpath and fence line onto the back scene.
I have marked out the post positions, next they will be painted on along with the footpath. Then maybe some feint wire lines.
-
7
-
2
-
-
Further to my last post, the fencing arrived today so I have quickly fixed a few posts in place to illustrate what I'm trying to achieve.
The pic below shows how the fence line runs into the photo backscene and will disappear behind the left side of the signal box to then reappear on right side as a painted fence and pathway drawn onto the photo backscene. This will diminish in size and eventually will link up to the fence line already shown on the backscene. Should work in theory, just need to practice my painting and forced perspective skills.
-
4
-
-
7 hours ago, Kevin Johnson said:
Mark the footpath area behind the platform looks really good and tricking the eye you have achieved really well.
Thanks Kevin, comments much appreciated.
I also intend to place some GWR type post and wire fencing following on from where the station fencing ends and then loosing it behind a small ground level signal box. I am going to experiment on a scrap of the photo ID backscene painting the remainder of this fence line disappearing into the distance. If the technique works I will then transfer onto the real backscene.
Wish me luck!
All the best Mark
-
On 18/02/2020 at 20:50, simonmcp said:
Amazing blending of layout and backscene, I thought your baseboard went back to the fence! I think you have coloured the bridge really well, nice and subtle.
Thank you Simon
If I've managed to trick the eye, then I am more than happy with the result with only having 6" of depth to work with.
You mentioned the tunnel mouth, so I've stuck up another pic of the tunnel mouth, as I said in previous post, I'm not going any further with detailing the tunnel mouth until all the platform detailing is completed, but this is how it looks at the moment. I have just used coloured pencils for all the brick faces and concrete colour paint for the copings and mortar lines. Eventually when completed I intend to have trailing vines and loads of greenery added with some additional water staining etc.
All the best
Mark
-
5
-
-
2 hours ago, Gypsy said:
Pipework lagged and some light salt weathering (quite pleased with that)...

Very Convincing and the lagging looks so life like that its probably contains asbestos. Excellent work.
-
9 hours ago, marc smith said:
The latest photos show how well your backscene and model landscape blend together really well. Looking good sir
")
Thank you Marc
I tried to blend in the back scene in an attempt to disguise the join where the horizontal meets the vertical by using various blends of green/brown static grass and flock at the join. The join is still apparent, just depends on the viewing angle as on some pics its almost invisible. Also forming a curve with the backscene at the left hand end also helps as it eliminates the crease you get with a 90 degree angle.
All the best
Mark
-
1
-
-
A few more progress pics tonight. I have decided to complete the platform end and surrounding detail first before I then move along the track to the tunnel mouth. The footpath leading up to the platform and running behind the shelter is now pretty much complete. I have just ordered some period GWR signage and posters for the shelter and fencing which should complement the seats and station name-boards. So that will keep me busy for the next week or two.
-
11
-
2
-
-
On 09/02/2020 at 19:35, luke the train spotter said:
So chances are if you're space starved for a layout you'll probably be space starved for a workbench. This is something I'm seriously taking into consideration and planning as I hope to take some different modelling bits to uni with me when I hopefully go to it in September. Fingers crossed! But anyway, I present the all inclusive boxfile workbench! Simply pop it on a table and open the lid and you've got a very compact workbench! For this I've used a standard A4 boxfile, 5mm foam board (bought very cheaply from hobby craft in A2 sheets) and some hot glue as well as an A4 cutting mat. Simply super glue the cutting mat to the inside of lid and then divide the actual box into different sections of what you want. Here's a picture of my one in progress.
 It still needs a lot of work and some elastic bands to hold everything in place when in transit. In there I have got a handful of brushes, 3 files, craft knife, 30cm steel ruler, PVA glue, super glue, rocket card glue, section full of cotton buds, up to 14 valleyo acrylics, 3 valleyo washes and 2 humbrol weathering powders. It's impressive what you can fit in this tiny space and entirely customisable to what you want to put in it! I plan to neaten it up a bit and add an LED strip along the top of the actual boxfile for illumination when modelling. Not an expensive or difficult thing to do but a great way to make your workbench super compact and mobile!
Hi Luke
Sorry just seen this, what an ingenious solution for those lacking in work space (which is me). Thanks for sharing.
All the best
Mark
-
1
-
-
On 12/02/2020 at 09:16, marc smith said:
Really like this project
Despite your baseboard not having much depth, the backscene works really well.
I definitely prefer a tunnel portal or overbridge to a level crossing in this instance - As you say, the road on a level crossing would go "nowhere"
From the tunnel portal, a high-ish retaining wall will help complete the scene
You can help disguise a lack of distance between the backscene and retaining wall, by using copious amounts of bushes / greenery on top of the tunnel
And it's surprising how much some over-hanging greenery / ivy can detract from a retaining wall being on the same plane as a backscene
Looking good. I'm looking forward to seeing this one complete
Hi Marc
Thank you for your feedback and kind comments. I agree about the tunnel mouth some very well placed greenery is required to help blend this man made structure into the surrounding natural landscape and look like its been there for fifty years. Level crossing probably not going to happen, what was I thinking of!! I am planning making a few trees, had a go at this previously using copper wire armature covered in grout and sea foam branches for my CBC entry 'The Coal Drop', I thought it looked quite good, here's a couple of pics showing said tree. For this project the trees will be a lot smaller and probably placed near the lamp hut and maybe to right of the tunnel mouth.
All the best
Mark
-
6
-
-
12 hours ago, Kevin Johnson said:
Mark nice work on the footpath. Look forward to seeing the tunnel mouth painted, weathered and fitted in place.
Thanks Kevin, I appreciate your continued encouraging comments, keeps me focused and on track

All the best
Mark


 but soon realised my error.


")


Tyteford Halte
in Boxfiles, Micro layouts & Dioramas
Posted
Thanks Kevin
It was a tricky one to assemble, but I'm pleased with the end result.