


CCGWR
-
Posts
112 -
Joined
-
Last visited
Content Type
Profiles
Forums
Blogs
Gallery
Events
Exhibition Layout Details
Store
Posts posted by CCGWR
-
-
Looking real nice Peter, what brand in the turntable?
Connor
-
On 17/08/2019 at 01:19, 60012 Commonwealth of Australia said:
Thanks Connor.
The C class is brass, and haven't been available for a few years now, but were $1400 or thereabouts when released. The r-t-r carriages were $150 each, the two kitbuild ones are $45 for the kit (paid $100 for the built one), and my 3D print of the swing door design was $50, but they aren't available yet - I'm slowly working on the design with the long-term intention of releasing them as kits, but I only have the basic bodyshell done, it lacks any underframe or end detail.
For cheaper steam locos, there are still a few Eureka R classes around ($660), Phoenix Reproductions are releasing D3s next year ($660), and Eureka Models will be releasing K classes at some point in the next century, going by their progress (or, more specifically, lack thereof) on them over the past ten years since they were announced. Orient Express Models (mentioned below) have produced SAR F class tank locos, at $550 for a plain DC loco, $595 for DCC, and $700 for DCC Sound. Unfortunately R-T-R stuff is extremely expensive for Australian stock (A point I want to make in frustration every time I see people complaining about price increases from Hornby or Bachmann, both of which still have incredibly low prices compared to any Australian stock), with the average steam locos being in excess of $650 (360gbp), carriages being $150 (83gbp) or higher, and wagons between $50 and $70 each (28 to 45gbp), with most being sold in packs of 4 or 6 for $240-$280 (134-156gbp), or in some cases packs of 2 or 3 for $100-$180 (56-100gbp), depending on the manufacturer.
Diesels are far more reasonable, at $295-$335 (165-187gbp) but just as hard to come by as they tend to sell-out quickly. As far as any R-T-R items of VR or SAR stock are concerned, particularly locos and coaches, my main piece of advice would be if you want something and can afford it, buy it, as if you wait then you may find they suddenly become sold out, as I found with the Auscision VR X classes - there was one in the condition for my era in a shop for several weeks, and by the time I made my mind up to get it, it had sold.
These prices are the reasons I go for kits, being much more reasonable. From Steam Era, the main manufacturer of VR rolling stock kits, the prices are $20 or so for a 4 wheel wagon, $30 for bogie wagons, $35 for guards vans, and either $45 or $60 for carriages depending on the type. Plus Kadees at $5 per wagon, and paint (a can of TS-33 Dull Red suits VR Wagon Red, and will paint 6 or so wagons, at $12 a can), putting the price for a standard 4 wheel wagon at $27. Still not cheap, at least compared to UK stock, where $27 will buy a R-T-R wagon, but beggars can't be choosers. They have some loco kits out, which are good, but at $600 each are almost as much as the R-T-R ones. For South Australian stock, Orient Express Reproductions have a decent range of R-T-R wagons, including O, D and M bogie vehicles, and OBf and DWf 4-wheel vehicles, and End of the Line Hobbies have a very extensive range of kits, covering SAR, AN and CR, including a couple of resin loco body kits (520 and 720 classes). Links for the three are below, no connection but have dealt with all 3 on several occasions before. The End of the Line Hobbies site could be better set out - most items are rarely shown as "In Stock", but my understanding is they cast items as-required (being resin cast kits). Some require underframes or wheelsets, whilst the Steam Era kits as stated above have everything minus couplers and paint (and in some cases etched handbrake details, but the kits are slowly being upgraded to include these).
http://www.endofthelinehobbies.com.au/
http://www.orientexpressmodels.com.au/OER/index.html
I hope that this somewhat long-winded response is of use, and I'm happy to help provide any more information if you would like.
Peter
Thanks Peter
-
On 15/08/2019 at 01:15, 60012 Commonwealth of Australia said:
Some more progress on track laying over the last couple of nights. But first, trains!

C26, a modified brass loco with scratchbuilt tender body, with a 9 car plus goods van passenger train, consisting of
SAR D van (R-T-R); VR BC swing door passenger carriage (Kit built from a 3D printed kit, both designed and built by myself); VR ABW passenger car (Kit built by a friend); VR ABE passenger car (R-T-R); VR BE passenger car (Repainted R-T-R); VR BE passenger car (R-T-R), VR BW passenger car (modified kit, built by myself); VR BE then AE (both R-T-R), and finally a VR CE van, also R-T-R.
In the background K160 is "shunting" wagons in 3 road to marshall a stopping goods to Ararat, whilst a set of SAR vehicles with a couple of VR added in awaits a guards van and loco to head to Adelaide. The next 3 photos are different views of the same scene.


As for the actual progress, 3 of the 5 turnouts in the SA end yard throat have been laid, along with the catch points for 3 and 4 roads.

The track up the incline to the coaling stage has also been laid, as has almost all the remainder of the underlay around the turntable approach tracks, with only a small piece in front of the coaling stage incline remaining to be done - the small triangle of bare baseboard between the incline and the two turntable approach roads.


The cans being used to weight the track down while the glue dries were only taken off for the photos, in particular the track up the incline will need to retain the weight on it for at least 18-24 hours after being glued, to ensure the glue dries completely so the track doesn't spring up (being an 8% gradient with not much transition has it's disadvantages, even though it is required to fit the space I had).
Some adjustment will need to be done to get the turntable at the right height for the rail heads to line up - I have started the work to do this, I will just need to go through trial and error to get the height right. The track and inspection pits around the turntable and approach roads will most likely be added on the weekend, as I plan to focus on the SA end and the mainline tracks tomorrow and Friday nights.
As enjoyable as moving various pieces of stock and locos around is, I'm extremely looking forward to having all the track laid, and start wiring it up.
Peter
Great Work Peter, really enjoying following the progress of this layout. I have always got an Australian layout idea going on in my head, how much roughly (I don't need to know exact costs) but how much would that C Class and coaches be worth?
Regards Connor
-
The 64xx were always 165psi as far as I know and the 7400s were 180psi because they were not auto fitted so were more intended for freight which dictated the extra power I think, maybe there were boiler swaps changing the pressure but I'm not aware of any. I would assume they would be slide valves but don't hold me to that.
This site shows the difference in Specs of the two classes: http://www.greatwestern.org.uk/m_in_060_5400.htm
Regards Connor
-
Nice Peter, Understood about the desire to do shunting, I also enjoy this opertaional aspect of the hobby. Is the fiddle yard going to be hidden (from public view) or sceniced. We have a exhibition layout in South Australia known as 'Strathburn' which is that exact concept.
Regards Connor
-
37 minutes ago, KNP said:
On a bright and sunny morning the auto train gets ready to depart for Encombe Town.

Looks Beautiful Kevin! Is the point rodding Wills? and What colour/ how did you paint the rails
Regards Connor
-
 1
1
-
-
Looks like a nice plan mate!
Is that the actual track plan of Bordertown or is it adapted? I like the idea of a continuous run and the fact that you are going DCC. Question, looking at the track plan you are only going to be able to have 1 train running around at a time due to there being 1 track (of course you can run more than 1 on the same track) but looking at the size of the fiddle yards would it be possible to amend the plan to have 2 continuous run tracks to give more operation?
Regards Connor
-
7 hours ago, Jack P said:
Alex, elaborate on this if you please? Did you give it to them to weather, for you to then observe to help you with your own weathering? I love my H2, Will certainly be getting another when Bachy bring one out in malachite!
The Hornby Schools are monsters They are so ridiculously heavy, and then on top of that, the driving wheels have traction tyres. I think they most i've had behind one was 16 coaches, made up of maunsells and pullmans - I only stopped because I ran out of coaches!
Thanks Chris, I need to give Lacquers a go, I'm running into the issue of paint not really enjoying being handled - Often even after it's been varnished! Which one would you suggest for brass?
I've managed to get a few more wagons to the final stages, they just need bits here and there, mainly the running gear painted black and numbers/lettering

I have another load of Cambrian wagons, as well as some RTR stuff arriving for repainting soon, I've also been lucky enough to get my hands on 13 David Geen kits, which (for now) will go in the 'Round-tuit' pile, until I feel I can do them justice.

Excuse the 'in-progress' shot, hoping to get these bolsters detailed and then finished off. I'm not sure which wheels are accurate though, is anyone able to shed some insight? SECR Wagons illustrated has photos of them with spoked wheels, but I can't tell if they're open spoke or not - i'm fairly sure that disc wheels are wrong regardless though
Also worth mentioning, I managed to get a roll of 5g stick on wheel weights, used for car wheel balancing - i've been using these for adding weight to all my parcels stock and the kit-built wagons. I had been trying to find some locally, and finally managed to come across a roll of 1200 for $72 nzd! I can't imagine that i'll need any more (ever!)
Finally, here is another in progress shot of 853!
Progress shot of the Nelson looks great Jack! Out of interest how did you get the smoke box door of and where did you source a new Southern pattern one from? Did you glue it on once painted?
Regards Connor
-
 1
1
-
-
Hi Everyone,
Some recent jobs to peruse through. Rather cold here in South Australia at the moment so weathering has slowed a bit. The Website has been updated with some of these photos with a better background so have a look if you like.

A Heavy 4F.
.jpg.9d063611dc6b8ed8ef6afb904c867e5b.jpg)
A Heavy 9F.

A Medium 9F.

A Lightly weathered Hall.
-
3
-
-
After:


Regards Connor
-
2
-
-
Hi Again,
Next job: A Heavily weathered Ex LNWR G2A.
Before: The client had attempted some prior weathering on the under-frame.


I took some inspiration from this photo with the streaking, after photos in the following posts due to the photo size:

-
G'day Everyone,
Back with a recent job: A Hornby Black 5 done to a Medium Weathering.

Before: Side On

After: Side On

Before: Front

After: Front

After: Top.
These photos will eventually be included into the website as the background allows a better contrast but I have more locos to do at the moment.
Keep your eyes posted on this page for more soon!
Regards Connor
-
3
-
-
On 23/05/2019 at 04:28, Georgeham said:
Hi All,
thanks for all the kind comments and likes - it is much appreciated.
Connor - I used the express models lighting kits - I have been experimenting around with a few types of lighting kits - but I do like the effect of the Express Models ones. The key thing is to make sure the gap between the roof and coach sides is filled in and blacked out to stop light bleed.

Thanks Very Much. Are you DCC, do you power it from the track?
Regards Connor
-
1
-
-
Looks Great! What did you use for your coach lighting?
Regards Connor
-
On 27/04/2019 at 03:22, 9793 said:
I've just finished working on 24081 for a client. Bulled up to the nine's as requested! I've enjoyed researching these locos over the past few weeks. Maybe able to get away with a green one on my own layout!
The sound in these things is in particular stunning!

Great Effort Tom, like the weathering. Out of interest how do you take the photos/what equipment do you use for photography?
Regards Connor
-
1
-
-
Looks Good to me Tony, I especially like the shot of the K3
Regards Connor
-
14 hours ago, St Enodoc said:
You are Connor from South Australia and I claim my $5...
Seriously, with regard to the C36 does the preserved 3642 not help with the colours?
Yes, it certainly is John.
")
I did have a look at 3642 and it did help a little, especially the tender with the bunker and so on but they still keep 3642 cleaner than my 3635.
Cheers Connor
-
1
-
-
Hi All,
I thought I would start a thread detailing the happenings of my weathering. I have recently started a business known as 'CC Weathering Services,' the website can be checked out by clicking on the tab in my signature bar.
The latest project was a HO NSWGR C36 class. A bit challenging to find a reference photograph as they all had a Belpaire firebox and were painted black by the time colour photos of them were around.

Before: Front View

Before: Side view

After: Front View

After: Side View

After: Top view, note I made sure the coal was diminished slightly.
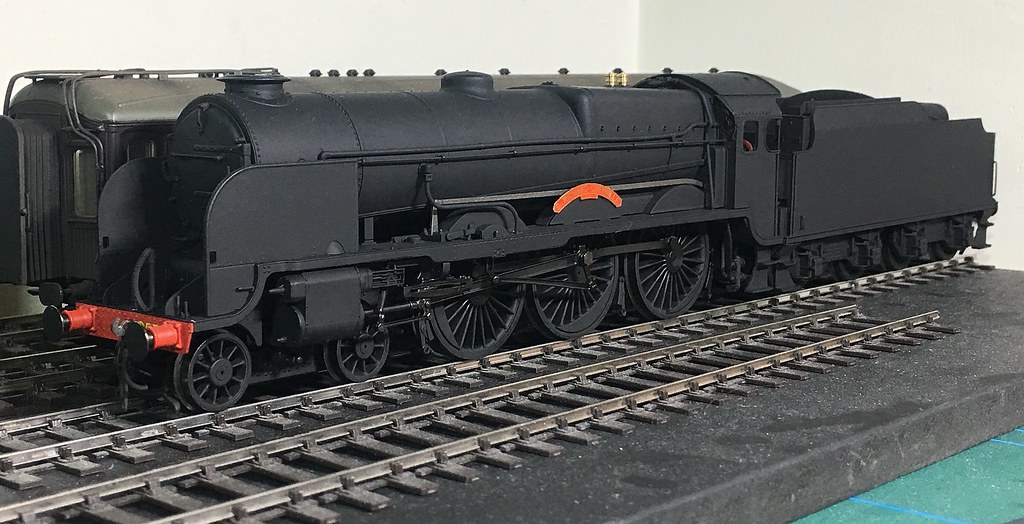
I also did my first Respray recently- a GWR 4575 class as we had two of the same model and as we don't have too many GWR Wartime black locos I thought I would paint it into that colour. As can be expected from a first attempt there are a few rough edges but from a normal layout viewing distance they aren't too noticeable.

Before: 5513, the extra was repainted to:

After: 5533, I'm not sure if this loco ever appeared in black but on my layout it will. Obviously a few rough edges but it will do for me.
Hope you enjoy and there should be more stuff put up in the future.
Regards Connor
-
4
-
-
2 hours ago, Nigelcliffe said:
The point motor changing in DCC Concepts manual is trivial, it will work with a Lenz BM1, or a home brew DIY device. Diagram below.
If the contacts on the switch are made, then the brake module is bypassed, and normal DCC arrives in the "brake zone", so trains don't stop. If the switch is open, then the DCC signal goes via the brake module.

The Lenz modules do not need Lenz decoders; ABC stop is common to all the decoders which support it: Lenz, Zimo, ESU, DCC Concepts new model, some CT, and others. ABC slow-approach varies by maker as per my comments.
The parts which are maker specific is the auto-shuttle stuff, though that is, primarily in the decoder, not the track-side device. Lenz and DCC Concepts offer that in their decoders.
- Nigel
Thanks Again Nigel, it seems Hornby Magazine was a little vague or my understanding was. I now understand what the role of the point motor is in both the Lenz and DCC Concepts systems- to bypass the brake module. I thought reading the article that for example that a train could enter track 'a', stop, the point would change and then a train in track 'b' would start and vice versa. I shall keep looking into things. Thanks for the pointers.
Regards Connor
-
15 hours ago, Nigelcliffe said:
A quick read of the DCC Concepts manual, and they appear to have implemented Asymmetric Diode Braking, sometimes called "ABC", or "Lenz Diode Braking". As used by Lenz, Zimo, ESU, CT, and numerous others.
If you want a braking module off the shelf, then a Lenz BM1 will do. If you want to make your own for 30p (could be less if you shop wisely!), then you need five (or maybe six, depends on decoder brands) fast-recovery rectifier diodes with enough current handling for your any loco in the brake zone (1A should be enough for most, but 3A or 5A would be super-safe). That will give you automated stop for any decoder supporting Asymmetric Diode Braking. Add a bypass switch if you want to turn the brake module off manually.
The slow-approach method DCC Concepts appear to have adopted is very different to that used by Lenz, Zimo and ESU. So, don't expect decoders from the Lenz/Zimo/ESU camp work with the slow-approach adopted by DCC Concepts. And a DCC Concepts decoder will ignore a Lenz slow-approach module.
The Lenz/Zimo/ESU method uses a circuit to generate an varying amount of asymmetry in the DCC signal (one pulse symmetric, next asymmetric, next symmetric, etc..). The DCC Concepts approach appears to be to "reverse" the asymmetry (ie. apply the signal which would normally be used to stop a loco travelling in the other direction). So, DCC Concepts slow-approach module would be either ignored, or would stop locos going in the reverse direction when using a Lenz, ESU or Zimo decoder. This has consequences for operation which I'm reasonably certain must happen when using the Zen-Black decoder, but as I don't have one to test I don't want to get into that yet.Its possible that DCC Concepts might have implemented the shuttle feature better than Lenz, so that might be a reason to use the decoder.
- Nigel
Thanks Nigel. I have looked at the Lenz option as I have a Lenz system. I haven't looked at the Zimo and ESU systems but I know with the Lenz BM1 and other Lenz modules you still need a Lenz Decoder in the loco to run the system. I think I will hold out to the DCC Concepts system mostly due to the extra point changing feature with a Cobalt motor.
Regards Connor
-
7 hours ago, WIMorrison said:
They had the first production sample at Ally Pally - just
Cheers, it seems they may be a while yet then.
-
Hi Everyone,
After finally getting the latest issue of Hornby Magazine today and reading the article on the DCC Concepts Zen Decoders and associated braking modules I became very tempted but I can't find anywhere that sells them, even on the DCC Concepts site, which has the Zen Black Manual but none of the associated hardware. Does anyone know where I could obtain them?
Regards Connor
-
6 hours ago, phil-b259 said:
Just be awere that if fitting smoke deflectors to Hornby’s E903 Charterhouse / E907 Dulwich, you will also need to alter the position of the lamp irons attached to the smoke box.
As the real Southern Railway discovered, the inwards lean of the deflectors meant there wasn’t space for the discs / lamps to be added unless the lamp irons were moved from their original position on to the smoke box door.
Not a particularly hard job but one that needs doing to complete the true ‘face’ of said locos with deflectors.
More generally however it’s most frustrating that Hornby have yet to offer a Maunsell liveried example with deflectors (and smokebox door mounted lamp irons) and I did raise the point with the Hornby rep at the Ally Pally show on Sunday. He did blame it on the previous management of the company, it I am not entirely convinced that it’s as simple as that.....
Whether Hornby respond (and my moans about the lack of variety in configuration terms of the most recent N15 Olive releases) remains to be seen.
Thanks for that, yes wanting to convert 907 to 900 and completely forgot about the lamp irons, where would I find them from?
I have an old Bachmann Nelson with deflectors, would it be worth nicking those off and putting them on the new Hornby model or would they be to chunky?
Regards Connor
-
Hi Everyone,
Does anyone know where I could obtain some smoke deflectors for Hornby Lord Nelson and Schools classes. I want to forward date and couple Southern models we ahve. Whether that be brass or plastic I don't mind. I have looked on Peter's Spares and they only have the left hand side deflector for the Schools and don't stock the right hand side one- weird.
Regards Connor


.jpg.9d063611dc6b8ed8ef6afb904c867e5b.jpg)


")


Borderton: Victorian and South Australian Railways in HO
in Layout topics
Posted
Nice! Have you/are you intending on motorising and operating it by DCC?
Connor