


Justang
-
Posts
87 -
Joined
-
Last visited
Content Type
Profiles
Forums
Blogs
Gallery
Events
Exhibition Layout Details
Store
Posts posted by Justang
-
-
I have brushed some red paint on the saddle tank. I doesn't look great, but looks alright from a distance.

-
 1
1
-
-
I've put more milliput on the saddle tank
Here's how the loco looks with all the loose parts attached:

Now, the Wellsworth & Suddery Railway needs carriages. Because I already have too many projects going on at the moment, I have decided the carriages will be 4-wheel standard Hornby carriages with a ratio GWR brake - all in blue with yellow lining. I have assembled the brake coach and will begin painting when i have the time to.

Because it is taking me a long to complete the Great Bear, I have taken on another side-project. This time, it's a Star atlantic 4-4-2. My plan is to use a lot of the same parts for the projects as much as I can. I recently purchased the body of a Hornby Saint, but it had been modified quite extensively. One of the modification made by the previous owner was to remove the safety valve bonnet. I hacked off one from a castle body and removed the top feed. The new safety valve bonnet has been stuck on to the saint body with filler and poly cement.

Now all I need is a castle chassis and City of Truro kit for the buffers and tender.
-
I haven't uploaded on here in a while, so I though I would make an update on progress.
I finished the cab.

I assembled a saddle tank by cutting out the parts I needed (quite inaccurately) and filling the gaps with miliput. This is a crude method, but it saved time and required less effort.


I added buffers to the rear bufferbeam (the buffers were from my dad's old City of Truro Airfix kit). One of the buffer housings had the buffer broken off, so I made a new buffer from soldered wire, superglue and miliput.

I made the footsteps next

The saddletank was uneven, so i covered it in miliput to be sanded down. I cut away the dome from the donor 3F and put it on the saddletank with miliput and superglue.

At this point my laziness completely took over me, so I just made sandboxes from miliput and stuck them on the splashers with superglue. I sanded down all of the miliput on the body i didn't want and I stuck on the footsteps with araldit. I also put a handle on the smokebox.

I made a filler cap for the saddletank and soldered together a safety valve from brass rod and wire.

This is how it looks so far. Still a bit of work to do

-
1
-
 2
2
-
-
6 hours ago, LNWR18901910 said:
Thanks. It's a shame about the RLOT website.
I agree, I hope the SIF team can move it to their new website
-
Sounds like an awesome plan!
On 23/03/2018 at 01:09, LNWR18901910 said:Remember when I intended to use the Bachmann Tidmouth Sheds? I decided to go back to the early RWS books and try and interpret the original Tidmouth Sheds as it was originally. I was thinking of using two Bachmann 4-road engine sheds stuck together at both sides. I would be using original pics of the Reverend's layout as references except that the Real Lives of Thomas website has been offline so I'll have to rely on the illustrations instead. What do you think?
https://hattonsimages.blob.core.windows.net/products/44-050_27143_Qty1_1.jpg
If you are referring to 'The Real Lives of Thomas' area on the Sodor Island Fansite, the Sodor Island Fansite has recently closed down its original website and has moved to a new wix site. I wasn't sure whether you knew or not, but I thought I would mention it in case you didn't know.
If there was information on the page that was important, here is a link to a web archive of it:
http://web.archive.org/web/20180715044038/http://www.sodor-island.net/railwayseries/tidmouth.htm
Unfortunately images are not accessable via the web archive as they were not saved on their records.
Hope this is useful for you
-
1
-
-
On 02/04/2019 at 23:50, Corbs said:
Now that is a cool idea! Reminds me of some of the Lambton, Hetton and Joicey Colliery Railway locos which were converted to tank locos from old 0-6-0s, including an 0-6-0PT that began life as a 2-4-0 tender loco!
Keep up the good work
")
How have you got on with the Great Bear?
Thanks! I was actually inspired by your saddle tank projects. Those colliery locomotives do seem quite interesting. Thanks for telling me about them. I think they could be good inspiration for future projects.
With the Great Bear, I haven't done much at the moment. It is a long project, and I have recently preferred doing smaller locomotives that are quite freelance. But I will get back to it, because it is my favourite locomotive.
-
1
-
-
In my universe, the W&S bought James as a L&YR class 27 in the 1890s - 1900s. He was fitted with a saddle tank and bunker, similar to the L&YR class 23, for various reasons - such as cost efficiency and to fit on smaller turntables. My donor locomotive for this project would be the Triang 3F, as it has similar dimensions to the class 27. I first had to disassemble the 3F.

Next I constructed the cab and bunker.


Now I only have to built the rear plate and roof of the cab and make the saddle tank.
-
5
-
-
The BR 08s had 5'9" + 5'9". Could a Lima 09 be rewheeled with 3' wheels?
-
I found these smoke deflectors after a quick search. I have never bought anything from the site, however their products do seem to be of a high-quality.
https://www.phoenix-paints.co.uk/products/jedetail/deflectors/jek07
-
The dome, chimney cap and bufferbeams have now been painted.

-
3
-
-
I have added window frames and a Ramsbottom safety valve. The window frames were pieces of wire wrapped around the handle of a round file. The safety valve was made by soldering 2 brass rods to a piece of wire.


I have also painted the running plate, chimney, smokebox and cab roof black.

-
1
-
-
On 12/03/2019 at 18:15, Knuckles said:
Well I can and I can't.
I tried 'bunging one in' but it's too big, same for full A0 shells, so the only way is to chop them somewhere around the firebox front and do a cut and shut job with two separate prints.
Can't see that being popular, but it can be done.
Ok, thanks for letting me know. I think I might scratch build the running plate and use the smokebox, boiler and firebox from a Hornby A1 if I end up making a Gordon.
-
1
-
-
Three of a kind!

-
1
-
-
That coach side looks nice!
Are you able to photon print A0 running plates, or are they only available on Shapeways?
-
1
-
-
I might not update on The Great Bear for a while as I am lazy and there is so much to do to complete it. However I will probably get around to it at some point.
-
Recently I have been really interested in Awdry's Railway series. I have seen users on this platform making amazing models based on his characters and have thought it would be fun to also try this. To plan how I would do so, I have worked out what I would make as the basis for each character:
Thomas - Freelance design, based on Reverend W Awdry's model
Edward - Sparkshot K2
Henry - Scratchbuilt Raven A2
Gordon - Sparkshot A0
James - Sparkshot class 28 mogul
Percy - 2-A-Rail Avonside Tank
Toby - Scratchbuilt Y6 from Rev W Awdry's drawings
Duck - GWR class 1661 - built from Hornby 2721
Donald and Douglas - Caley 812s - made from LSWR 700 class locos, without superheaters
Oliver - GWR 455 class - made from airfix 14xx
For those who don't know, before the North Western Railway, there were 3 major standard gauge steam-operated railways on Sodor: The Sodor & Mainland, Tidmouth Knapford & Elsbridge and the Wellsworth & Suddery. In my continuity, Thomas was a freelance built for the W&S in the 1880s-1890s. My model of him is to be built from a Triang Jinty and he is to be painted in a red livery with gold lettering and lining. Work has already been began on him.

Sandboxes have been added to the splashers and the cab has had a new front and roof. The smokebox still looked too Fowler, so I removed the handrail on the door, shortened the hinge straps and filed away the numberplate. I made a smoke box door handle with pliers and a soldering iron using the technique explained in this post:
-
Here are the paper templates for the body for me to stick to plasticard and cut out.

I have decided that the chassis will have 6 wheels and a jackshaft driving to the centre pair of wheels.
-
2
-
-
My grandad is a volunteer for a museum. At the museum, there is a layout with two railways on it in G scale. The bigger railway is G gauge track and is run my my grandad's friend and fellow volunteer. The smaller railway is O gauge (narrow gauge for 16mm G scale) and was made by my grandad. He had recently told me that he is looking to get a new locomotive for it, and with his birthday coming up in May, this has opened up an opportunity for a project.
My plan is to make a small 0-4-0 diesel to give to him as a birthday present. The final product will be made primarily from plastikard and it will be battery powered with a simple electric circuit to power the motor.
To start the project, I have made a mock up of the final product from cardboard so I can visualise whether the design is suitable and whether further improvements will have to be made.

For the mechanism, I have ordered this motor and wormdrive set:
I already have a metal rod for the rear axle. I need to get some poly cement to start building and wheels to be able to make it run. I am not sure whether to give it coupling rods or leave it with only one driven axle. If there is an alternative I am open to suggestions.
-
3
-
-
Here is Awdry's model of a Y6. Made from the same drawings as Gibbo's.

-
8
-
-
On 16/02/2019 at 20:56, Martyn T said:
I am following this with great interest, it is a project I have been mulling over for a while now. Well done, I look forward to the next instalment.
Thanks mate. It means a lot! It's great to hear that people are interested.
On 17/02/2019 at 11:34, Trainspotter395 said:This project has given me motivation to build a L&Y class 8. Can't wait to see the next installments!
That's awesome! Thanks. I really love the Lancashire and Yorkshire locomotives. The class 8 seems quite elegant! I would love to hear how you do on that. If you are interested in purchasing a tender, I bought one a while back and I am not sure whether to keep or sell it. I think it is kitbuilt or scratchbuilt, so let me know if you are interested.

-
Boiler bands go on.

-
5
-
1
-
-
Hi again! I thought I'd update on the Great Bear project.
The next thing I had to do was to secure the boiler and cab to the running plate with poly cement. I also attached the firebox from the Dapol castle and made it the right shape using plasticard and Milliput.


Another part to make was the smokebox door, so my dad found a 2p coin (which happened to be the exact right size) and traced around it onto the plastic, sanded it round and added the straps for the hinges.

At this point, the wheel spacing on the Castle chassis (which was different to the Great Bear's) had become quite noticeable, so my dad set out to make one which was more accurate together Great Bear. Originally, he used a tender drive Airfix Chassis, but the fact it was made of plastic meant it was quite flexible. Instead, he bought a Princess chassis for weights and a motor, and cut frames from brass. I was personally very impressed with the result, I think my dad did a great job.

The tender of the locomotive was another important item to make. The Great Bear had a non-standard 8 wheel bogie tender. My dad studied the drawings and cut from plastic the different panels and stuck them together.

He made the bogies from scratch and used wheels from A3 bogies. I drilled a hole in the top and held in a water dome with Araldite. I also used the Araldite to attach the water scoop.


On the locomotive, I drilled holes for the chimney, safety valve bonnet and whistle to go on.

This is all for now, so stay tuned for my next post on this topic.
-
9
-
 1
1
-
3
-
 1
1
-
-
Thanks for the N class advice!
-
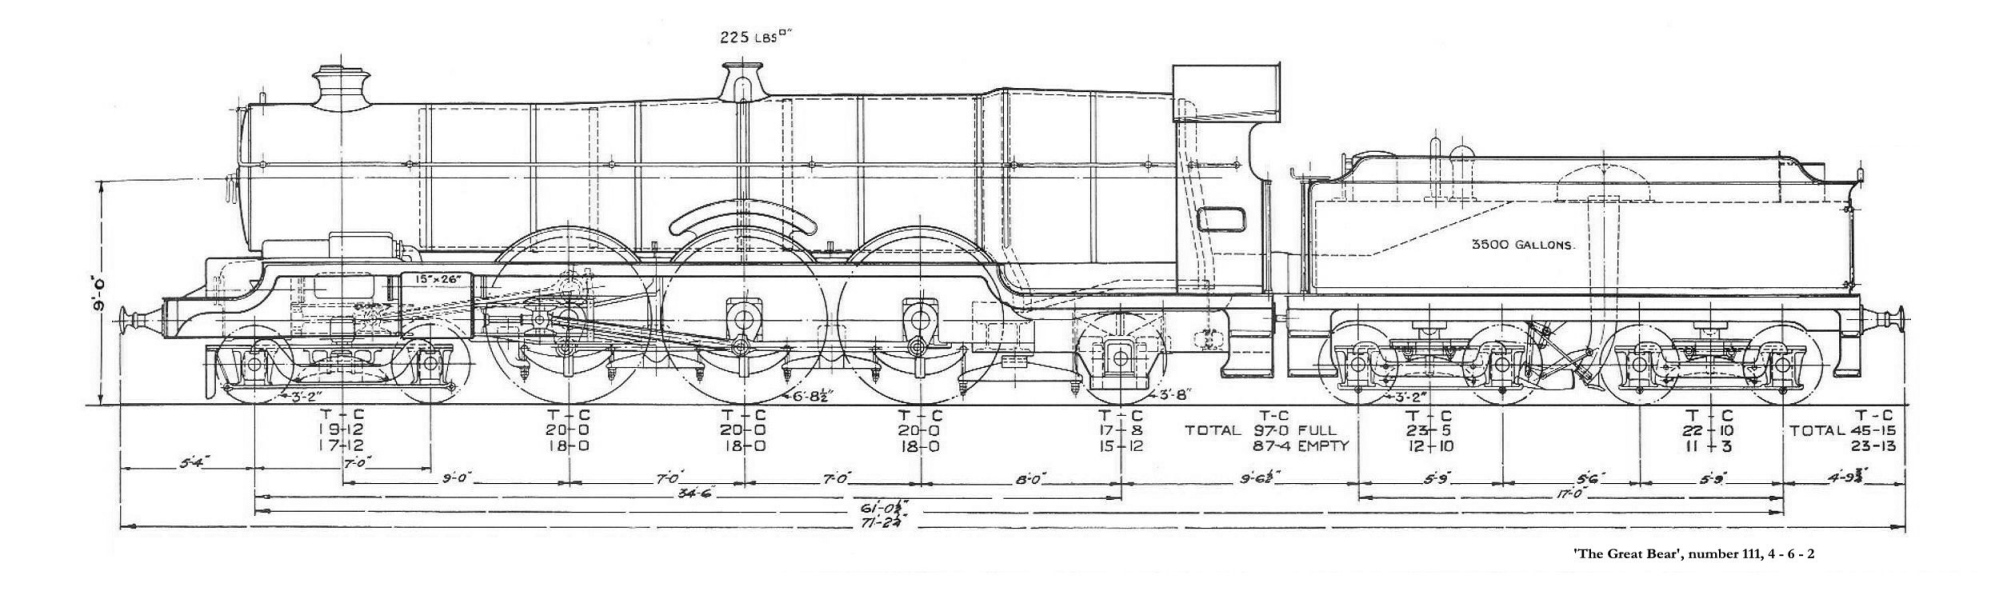
Recently, I have been interested in the GWR's locomotives and have decided to build the Great Bear (the first 4-6-2 to be built in Britain, and only to be built by the GWR). Here is a picture of it for those who have not seen it before: https://www.alamy.com/stock-photo-gwr-loco-the-great-bear-1934-7219559.html
The first thing I did was find a picture of its drawings ( http://www.greatwestern.org.uk/drawings/loco/loco151.jpg ), which my dad printed off to 4mm scale. At this point, I measured the boiler diameter at various points and produced a set of templates in paper to show the shape of the boiler.
I then used these templates to cut out the shape of the boiler's segments in plastic, and rolled these pieces into cylinders. I secured them together with polystyrene cement.


I realised, after doing so, that the shape of the tapered boiler was not perfect, so I covered it in Miliput filler, so it could be sanded down to the correct shape. Yes, it is a bodge job, but it worked!
My dad obtained a Dapol castle body to modify and make the rest of the loco from. The running plate had to be extended to accommodate for the large boiler and firebox.

Originally, I was going to use a Dapol castle chassis, however it is inaccurate to the Great Bear as the castle's rear driving wheels were shifted further back to accommodate a firebox above them.
My dad made a cab for the loco and the backhead from the castle was secured inside with poly cement.

More posts will be made about the project when I have the time to.
-
3
-
4
-


")


Imaginary Locomotives
in Modelling musings & miscellany
Posted
I know it's a bit out of scale as it's HO, but does anybody know how close the Bachmann Gordon chassis is to the GCR Pacific?