


Geordie Exile
-
Posts
235 -
Joined
-
Last visited
Content Type
Profiles
Forums
Blogs
Gallery
Events
Exhibition Layout Details
Store
Posts posted by Geordie Exile
-
-
...and everything in situ. Need to give my eyes a rest. Now to think about joining all the buildings together with the various conveyors.

-
 10
10
-
-
More fiddly washery bits. The access platform for the spoil elevators, an access ladder to the slurry cone, and an access platform to access the access ladder. An excess of access.

-
5
-
 3
3
-
-
- Popular Post
- Popular Post
Hi folks. First post in this thread, as I haven't dared to add the "FS" suffix to my work yet.
I'm slowly creating a copy of a north east colliery, that started out as a generic "based on" pit, and has ended up as a project in brick-counting. I've been persuaded to try Code 40 trackwork with it (all 120mm that I have far) and I suspect I'm going to end up going down the FS route. So far, I only have buildings, so the final decision has yet to be made (yeah, right!).
Anyway, I've been posting in the Industrial Railways bit (Fenwick Pit), but here's progress so far...
-
24
-
6
-
The washery and slurry settling cone are now painted, and I'm building up the external detail in stages: add, paint before it's inaccessible, add some more, repeat! It's a tight fit to get the loco under the spoil chutes and between the legs of the cone, but that tight fit is happily prototypical.
Here's what it's supposed to look like, sort of; there were significant changes to the facing gable end by the time I'm modelling around 1970 compared to the as-built 1926 version. I'm struck that the bucket conveyor feeding into the gable and the two emerging from the washery machinery look to have been afterthoughts, as the lovely brickwork is then cut into to allow entry/exit.
(Photo credit: J Tuck Collection, from "Backworth: An Illustrated History of the Mines and Railways" Elliot & Charlton, Hilton Iron Works (Houghton le Spring) 1994)
And here's progress on the 2mm version.
I've got the angles of the spoil conveyors wrong, but it's too late to go back and change it now. I'll add those wheels when I find appropriate candidates - I spent a frustrating few hours today trying to make them myself by grinding out metal washers and playing with thick plasticard, but neither method got even close! Next steps are the exterior pipework and the access platform at the top of the building.
-
10
-
-
That's me done for the night. The slurry settling tank is structurally complete, but a lot of detailing needed. Pleased with the results.
(And Doilum, you can tell the difference in terms of translucence: the washery is painted black inside; the cone, well...)
-
7
-
-
4 hours ago, doilum said:
Frydale has a settling pond. After painting the bed it was overlaid with 3mm perspex. This had been lightly sanded and lightly oversprayed Matt black. When dry, much of this was scrubbed off with a skotch pad. Once installed a layer of clear resin sealed the edges and was finally finished off with several applications of dirty varnish. The aim is to give an impression of depth to something you wouldn't be able to see through.
Thanks, Doilum. I'll play with these options - I just need to make sure I don't dissolve the thin plasticard that makes the cone.
-
Thanks guys. (Hmm, that's an assumption on my part!) OK, black gloopy liquid filling it is. Somehow.
Photo to show progress on the tank, supports mocked up to get a sense of proportion with the washery:
-
6
-
-
Question, oh knowledgeable folk of RMWeb. I'm now doing the slurry settling cone. Did these things have a lid on? There's an inspection platform which makes me think not, but maybe it was to allow access to the pipe feeding in at the top.
(Didn't the people who took these really useful photos realise that our models based on them are almost always viewed from above? Option 2, of course, is build the entire layout at eye level...)
-
22 hours ago, doilum said:
Looking good. Stick with clear glazing and don't forget to take out a few random panes and break a few others. Black is an unrealistic colour and needs a light overspray with track dirt. If possible, try and fix it so it doesn't quite touch the back of the glazing. This is extra work but your building deserves it.
Thanks for this, Doilum. It's too late in the case of this building, but there are a few more to go so I'll give this technique a go. I'm using a thick (1mm) super clear acetate for the glazing, which gives a really good reflection when painted on the back, so the effect is still decent, but I like the idea of giving it more depth.
And there's no way I can remove any panes - they're just over 1mm x 1.5mm and I'll just destroy the frames in the process (although prototypically I've not seen a single broken/missing pane in any of the photos, so I'll claim that as the reason rather than the difficulty in modelling it!).
Richard
-
14 hours ago, nick_bastable said:
Richard
modern n should run through code 40 without issues
code 40 v peco
worth the effort with your building skills
Nick
you updated during my post I will retire for the interim
Hi Nick
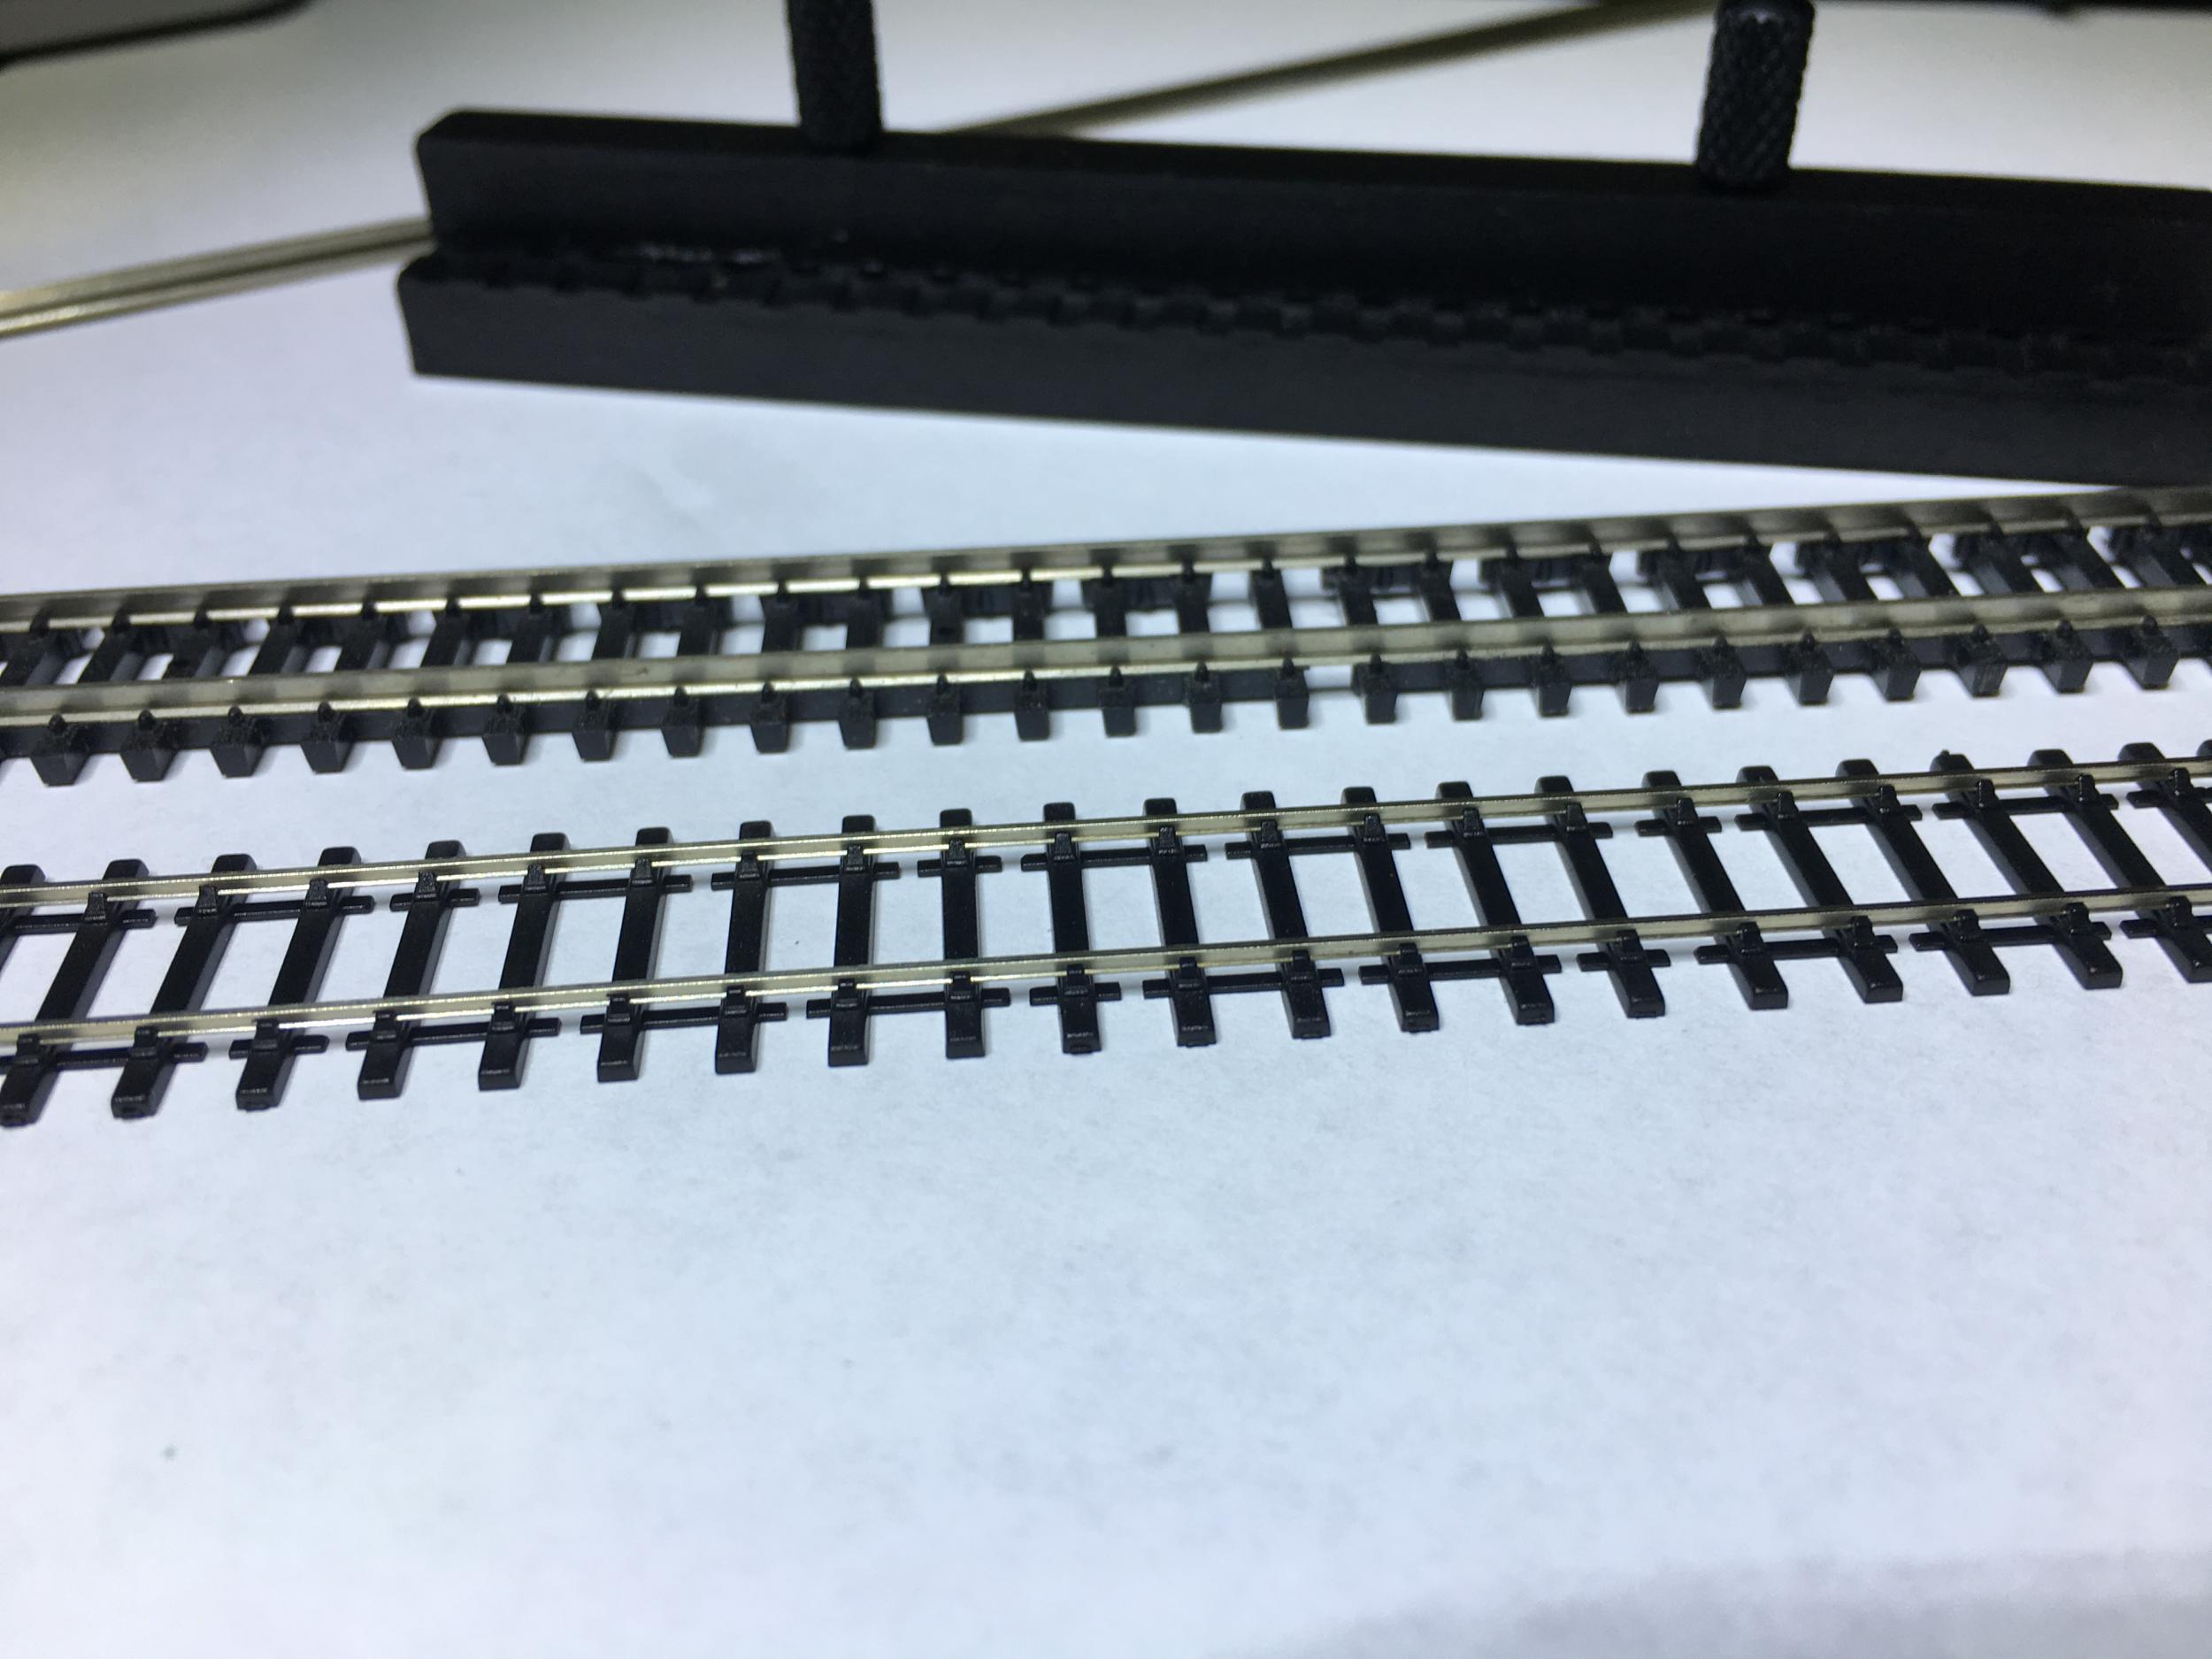
I'd forgotten I'd picked up a Wagon & Track Sample Pack from the 2mm FS stand at Perth last summer. I've put the track together, and it does look so much better. Fortunately I've still got lots of building work to do before I have to decide.
Somewhere earlier in this thread I commented that my original plan was to recreate a reasonable facsimile of a generic North East colliery, and I've ended up counting bricks, disappearing into the rabbit warren of the internet for photographs so I can reproduce Fenwick Pit as closely as I can! I suspect I know which way I'm going to end up going...
R
-
5
-
-
19 minutes ago, nick_bastable said:
lovely buildings but please consider swapping to finetrax or better still easitrac
Nick B
Hey Nick. When I do (eventually!) get to the track, my plan is to use Code 55. I'm not intending to use any of my existing, 20+ years old rolling stock so shouldn't have any problems with flange sizes. The settrack in the picture was just to make sure everything still fits. I've not heard of finetrax or easitrac - will pay a visit to Google!
***Edit: dammit, both look better than Peco's offerings, so yet another decision to be made! ***
Richard
-
1
-
-
Another good day's progress, and I'm quite pleased with the results so far.
I've got a lot of desk-clearing next with so much scrap plasticard! The plan is to black out the backs of the glazing, so there's still a reflection but the lack of internal detail won't be visible.
-
8
-
1
-
-
I've made some pleasing progress on the washery today. Having marked out the plan on the plastic card, I then removed the window and door apertures, followed by the inset brick panels, and finally the outer walls themselves.
(Hadn't realised how blurry that photo was - too late, I'm not doing all that again)
All of the edges of the apertures for the recessed brick panels were then lined with microstrip (miles of it - going to have to order some more!) and the panels glued in place.
I'm now adding the window frames, again using very thin microstrip, and adding some depth to the arches. They'll be visible from all angles, so I've got to create the impression of really chunky arches supporting the rest of the building. That's one wall finished, and I'm knocking it on the head for tonight.
-
9
-
-
After several months with my attention elsewhere, I've had a week or so to focus on converting photos of the washery into plans on brick-embossed plastic card. The craft knife comes out tomorrow...
-
7
-
-
This is the next building, viewed from the southwest, and it's looking more complex than the other three completed so far. I've spent this afternoon reading up on how a washery works: it may not make a difference to the model, but I've found the research as satisfying as the modelling itself.

The amazing online archive at Durham Mining Museum has thrown up this article which describes in detail the operation of a similar washery in the Durham coalfield, complete with contemporaneous diagrams and photographs. I now understand what happens to the coal when it enters top left (the period I'm modelling has a different conveyer but the theory is the same), passes through the first screens on the top floor, then into the Baum washer below. The shale leaves the building via the two bucket conveyors onto the shutes, to be dropped into waiting wagons. Meanwhile, the slurry is piped into the centre of the cone at the top, usable coal dust returns to the dryers, water is recycled back to the washer, and the shale/clay slurry extracted to... where? Still have to figure out where that bottom pipe runs. (Another photograph shows it reentering the washery in the northern gable end. I suppose I don't really need to know how it was managed after that, but...)
So, the challenges: arched windows, dammit; the three-dimensional arched support columns; the slurry cone itself and all its associated steelwork; the exterior pipework; and a working assumption that the cone is roofless, and therefore I need to fill it with manky black liquid!
It also raises another question: I've thought of the third building I modelled as "the screens", but now I'm wondering whether "picking belts" is more accurate, as a diagram of the output from there refers to "best", with "trebles", "singles" and "small" being loaded from the washery.
(The picture shows the washery when built in 1926: credit "Backworth, An Illustrated History of the Mines & Railways, Elliott J & Charlton D, Chilton Iron Works 1994)
-
1
-
-
B*gger! Opened the desk drawers today after several weeks of not modelling, with the intention of playing and starting the washery. Found that a mouse had nibbled through a small glue container in the middle drawer, and a large bottle of PVA in the bottom drawer! The combination of several weeks' worth of seepage, plus glued-in mouse poop, was a thoroughly unpleasant discovery. It's daft - I know the shed where the railway will end up is completely mouseproof, but it turns out the study in the house isn't!
The pics don't really show the extent of the leakage, as it's mostly dried clear!


-
 1
1
-
-
Oh, and I went with Mike @maridunian's suggestion of 3D printed sheaves from Shapeways. The chap came up with a 28mm diameter version which fit beautifully, so I ordered them as my Christmas present to myself!

-
6
-
-
This thread is fast turning into an archive for future reference when the layout is started. No doubt it'll be years in the making, but hopefully 2020 will actually see some track laid.
Thanks to everyone for your encouragement, feedback and photos.
Richard
-
1
-
 1
1
-
-
Thanks, @Les1952
Those photos are really useful, much appreciated. They kept their locos clean, though but! (I'm almost disappointed. If anything shouts "toy trains" it's unweathered rolling stock, so I may - eventually - give mine a gentle dusting.)
I've seen a couple of pictures that hint at different levels of track, but the third photo above really shows it, which explains why the clearance of my own wagons under the screens seems so tight. The pictures will also really help when I come to ballasting. There's another recent thread on industrial track which ties in neatly with this topic. I almost don't need to bother with sleepers.
Thanks again. Have a cracking Christmas.
Richard
-
OK, that the screens done. I'll not connect them to the pithead with conveyors until they're all embedded in the layout. (What layout? The one in my head at the moment.) The picture seems to overemphasise the weathering; it's a lot less harsh in better light.

And this is how the winding house, pithead and screens look in context:

So - on to the washery. It's lurking in the back of the photo on the PC in the previous post. The slurry settling inverted cone thing with its latticework is going to be fun.

-
9
-
5
-
-
Main shell of the screens complete. The windows are glazed, but interiors are blackened. Obviously lacking a roof (so not liable for council tax at this stage), plus some detailing and lick of paint...

-
10
-
1
-
-
Gosh - 6 weeks have gone by, and real life has sort of got in the way, but I've made a start on the screens. This is the prototype:

The screens were made up of three elements; two in the same orientation as the heapstead, with the third at 90 degrees and feeding the washery. I'm doing one building at a time - they're made more challenging by the clearly indented I-beams with the brickwork sandwiched in between. I've not managed to track down any photos of the northern aspect, so I've assumed they're the same on both aspects (although the middle building is set back, but appears flush with the northern side, if that makes sense).
Anyway: two walls complete...

The "stilts" are deliberately oversized - I can trim them once I get a sense of how the whole building relates to the height of the heapstead.
-
9
-
1
-
-
That'll do for now. Will add a walkway & access ladder for the headgear, but otherwise that's pretty much it. The thread will probably go quiet for a bit as I've now got to convert the photos of the screens into plans, somehow.
And I really ought to walk the dog.


-
14
-
4
-
-
1 hour ago, Mark Saunders said:
In order from loco, 2 Backworth, 1 CR 16t, 1 Backworth, 1 CR 21 ton, 1 SRW 19t all timber, 1 Backworth.
The Charles Roberts 16 ton ones are an uprated and heightened 13 ton hopper and both are almost identical to the BR one that is due from Parkside; the difference is independent brakes rather than Morton with blocks on one side only and different stanchions bases at the sides!
Mark Saunders
Hmmm. Do I google "stanchion bases" or do I ask...?
") At the risk of sounding like Donald Rumsfeld, there's a whole list of unknown unknowns in the world of rolling stock. Meanwhile, I'm still counting bricks on my heapstead...
At the risk of sounding like Donald Rumsfeld, there's a whole list of unknown unknowns in the world of rolling stock. Meanwhile, I'm still counting bricks on my heapstead...
Fenwick Pit: a North East Colliery in 2mm
in 2mm Finescale
Posted
Thanks, Paul. I'm aiming for 1965-1973, but still need to do some research. I want steam in there (of course I do!). The 1973 date is set in stone, as that's when the pit was closed, exactly 100 years after the first shaft was sunk.
I've a bunch of plans for the buildings that survived the first wave of demolition (baths, office, turbine house, storage sheds) but very few contemporaneous pics of those buildings. They'll increase the footprint significantly, but now I've got this far...
Richard