


Pierview
-
Posts
177 -
Joined
-
Last visited
Content Type
Profiles
Forums
Blogs
Gallery
Events
Exhibition Layout Details
Store
Posts posted by Pierview
-
-
Although I hadn't intended to start another loco project for a few months, the poor weather in early May put paid to my intended garden work and gave me some unanticipated extra modelling time. The subject that finally worked its way up the priority list was my Craftsman LMS 1P kit that I purchased back in 2010 at the height of my Somerset and Dorset phase. Although I purchased the wheels and some other components I never got round to starting the build, probably because of lack of confidence with a largely etched construction. However, a dozen or so years later, with a few etched kits under my belt, I was ready to have a go. The Craftsman kit is something of an old stager now although it is very well thought out. The biggest drawback for the present day modeller though is the fact that the chassis is designed for an X04 type motor which intrudes into the cab. My original thought was to modify the chassis frames and upgrade with a High Level gearbox and a more modern motor but in the end I made use of a spare Anchoridge D11 motor which arrived with a DJH 1366 kit last year and a Branchlines RU gearbox which I had to hand. With no fixing holes for the motor I merely soldered the gearbox front in place and to my delight it ran very sweetly. This is one of the many tips that I have picked up from others on this forum. The smaller motor is no where near so intrusive in the cab and is barely noticed with a crew in place.

I will not go into detail on the actual construction as I am aware that this kit has been covered in the past by more skilled modellers than myself and that it has been the subject of some refinements. Mine I am afraid is more bog standard!
I didn't find the need to add much extra detail but the push pull gear was not provided in the kit. I therefore cobbled up a representation from scrap bits and pieces. Needless to say, the smokebox needed to be packed with plenty of scrap white metal to achieve the correct balance, but on the whole the loco runs tolerably well.
The prototype that I chose was 58086, which was the last survivor on the S&D. It also had the advantage of being in unlined BR black rather than the lined livery carried by other class members.
Barry
-
 14
14
-
-
The crane tank was completed earlier today and here it is. I have portrayed it in its final livery with Bulleid lettering but I fear it is rather too clean. As weathering is not one of my strong points, however, I will leave it as it is for the moment. With the improvement in the weather the garden now beckons......
Barry
-
13
-
 1
1
-
-
18 hours ago, melmerby said:
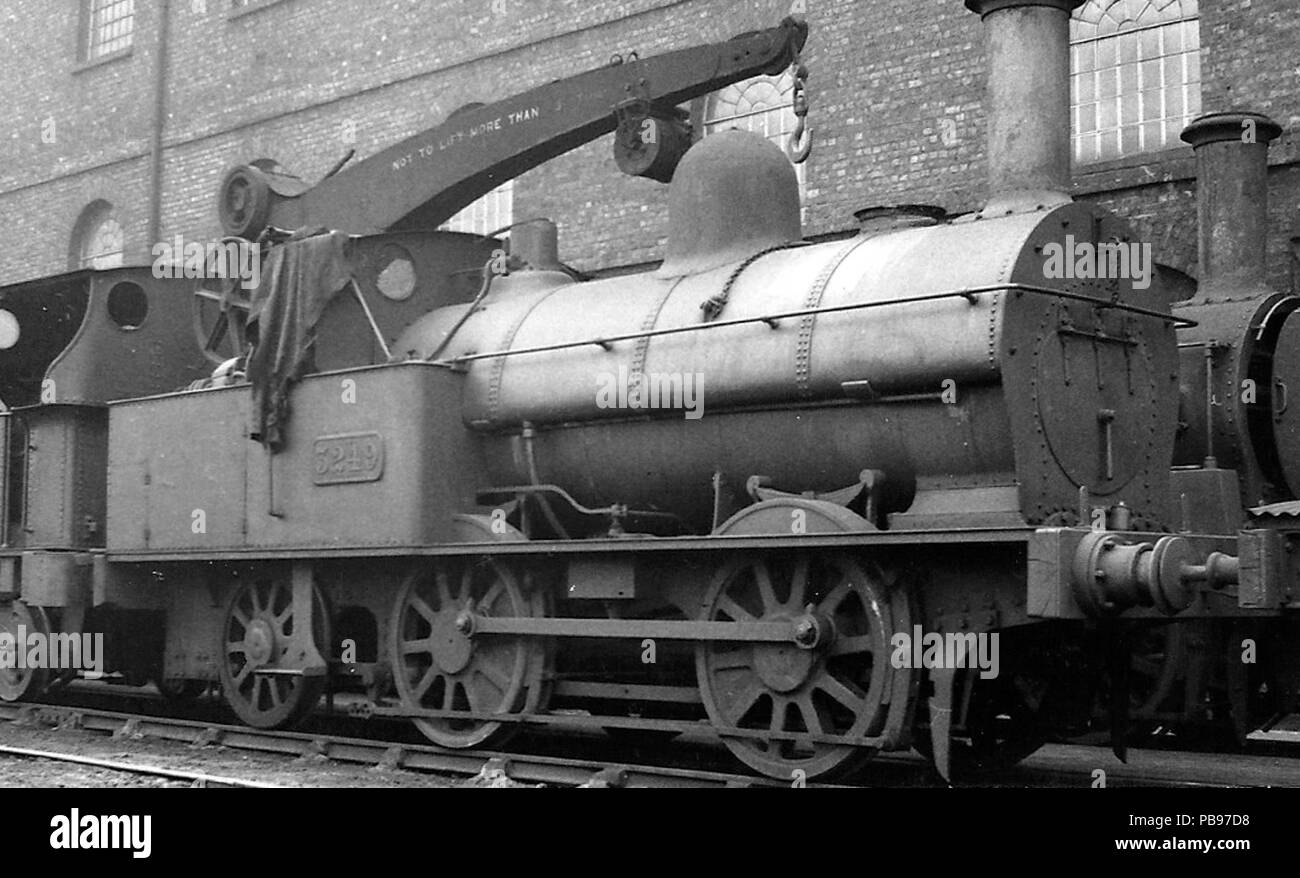
The smokebox always strikes me as an odd place to mount a crane.
The GWR adopted a differnt approach
As did the LNWR:
It was a standard Neilson design of the day but presumably was only feasible on very small locomotives. It is interesting that a similar locomotive, "Snipey" (Neilson 4004) is preserved but I haven't seen any photographs of other smoke box mounted cranes. The examples you show are much bigger locos and I have to say that they look rather more stable!
Barry
-
4 hours ago, Graham_Muz said:
Nice.
Excellent. That is the livery mine is intended to carry.
Barry
-
1
-
-
31 minutes ago, melmerby said:
Nice job.
One comment, the picture (Longhedge 1946) of 302 in Russell's "Southern Locomotives" shows a chimney a bit taller than that.
Well spotted! The chimney top is a separate casting which I didn't put in place for the photos. It will however be fitted after painting and final assembly.
Barry
-
 1
1
-
-
After finishing my Beattie well tank kit I looked around for a quick project before I began gardening and other jobs. My South Eastern Finecast SER crane tank kit was next on my "to do" list anyway, and as it was a relatively uncomplicated model it fitted the bill . this quirky little loco is a bit out of my modelling period although it did survive to pass into British Railways stock on nationalisation. It never carried its allotted number (31302) however and went for scrap in 1949. I've always liked industrial locos and find crane tanks fascinating so I had to find room for this one in my stud.
The chassis was quite straightforward and I fitted Markits wheels and a High Level "Lo Loader" gearbox with 120:1 reduction. I also fitted one of the HL budget motors but purchased the larger 1020 when clearly the 1015 would have been the better bet in view of limited space. I managed to get it all in but had to cut a small arch under the boiler back head to clear the motor shaft.
Assembly of the body was very straightforward and I added just a small amount of extra detail. For some reason the front sandboxes were too long when compared with photographs of the prototype so - I cut them down to their correct dimensions. Inevitably the finely cast cab brake column was a casualty (I always manage to snap off the handle) and was replaced by a more robust home made one as explained by Iain Rice in one of his books. If modelling the later type enclosed cab it is essential to weight the front of the boiler to prevent any tendency to do "wheelies" !
The loco was primed today and will receive its black coat tomorrow. It will have to be Southern livery as I don't want to do a fictitious 31302. Transfers are on order and I hope to have the little fellow finished soon.
Barry
-
11
-
2
-
-
I have now completed 30587 and here she is.
This is the second of my Beattie well tanks which will now join 30586 which I built a few years ago using Jidenco etchings.
That leaves 30585 to be added to complete the trio. I have a Kernow RTR model for this one which will only need slight titivation to bring it into service. Perhaps i will do that one next!
Barry
-
4
-
2
-
-
John
I have sent copies to your home e-mail address. Can you confirm that you have received them?
Barry
-
3 hours ago, hayfield said:
Barry
I have very fond memories of visiting Puffers of Kenton weekly in the late 60's/early 70's. Down stairs was the finescale department and Puffers took over the Westward range. I could never afford these kits only the cheaper K's
Over the past couple of years I have been slowly building up a collection of their locos and GWR railcars. I managed to but a part built one of these with a small Mashima motor. I need at some time to widen the chassis to EM gauge.
It did not cost me much (£53) especially as its got wheels motor and gears, but I am missing most of the instructions. A few of the smaller etched parts are also missing. but as I said the wheels and motor if bought new would cost me more than what I paid for everything. I do have a Roxey Mouldings 7mm kit which I can use as a guide
I look forward to see you finish it
John
I could never afford them at the time either! If it is of any help to you I do have the instructions for this kit and can copy all or whatever pages you are missing.
Barry
-
 1
1
-
-
For my final project of the winter season I have been building a Westward Models Beattie well tank kit that I acquired in 2021. I never managed to see the renowned trio of 0298's in BR service but I have enjoyed seeing and travelling behind the two surviving locos on preserved lines.
The Westward kit is well thought out and has some quite nice castings. Unfortunately the fire box bottom on the RH side was incomplete and must have been a faulty casting. I got round this by fusing on a suitable piece of scrap white metal before filing to shape. I was fortunate in that the kit as purchased also included a set of Gibson wheels and I added a High Level RR+ gearbox with HL1020 motor. I have used about 6 of these little budget motors to date and have been very pleased with them. The kit instructions were a little vague in places, particularly where the crossheads were concerned. The latter were produced from a fold up etching which didn't work for me so I filed up my own replacements from brass.
The body didn't require much in the way of extra detailing but I have fitted RT models LSWR lamp brackets and a Markits whistle, although the latter is not shown in these shots.
The model has since been painted and is now almost complete. A final update in a day or so.
Barry
-
11
-
-
Looks like 1361 must have had a replacement saddle tank with different rivet detail at some point.
I tried all the usual sources for a longer chimney and couldn't find anything. in the end I came across something in my spares box that seemed a reasonable match. It possibly came from an SEF kit but unfortunately I can't be sure which one. Here's my effort which was built from a Nucast kit about 20 years ago. I need to replace the Gibson safety valve bonnet which isn't quite right.
Barry
-
3
-
-
Well done on progress so far. It looks like being a comprehensive rebuild of the old K's kit. You are correct about the chimney and it took me a long time to find a taller replacement. It is also worth checking the saddle tank rivet detail against your chosen prototype. I found that it was incorrect for my model of 1361 in 1960 but as I had no way of replacing it (this was before Archer rivet transfers) I decided to live with it. I suspect K's worked from an original GWR drawing and the kit does therefore not reflect subsequent modifications.
Barry
-
John
Here you are
Barry
-
John
I will be interested to view your progress as the build proceeds. If it is any help I described my build in OO of the Nu Cast Partners version last year. No doubt a little trickier in EM but it is a nice little kit.
Barry
-
On 24/03/2023 at 08:56, sagaguy said:
he trick with Fox lining,especially tender lining is to cut it into quarters or more and apply one piece at at a time teasing it into position with a small brush and water.This is an 0 gauge DJH Fairburn tank loco that i lined using Fox lining transfers.
Ray.
Yes, that's definitely the technique to use and I did the same with this model. Last year I messed up a lining set by being impatient and trying to apply sections that were too large. Inevitably the transfer curled up on itself and could not be untangled. They are excellent transfers but need to be applied with care.
Barry
-
 1
1
-
-
Over the last year I have acquired a number of kit built locos which had seen better days but all lent themselves to restoration, albeit some requiring more work than others. This Craftsman Lord Nelson kit is the last of the batch to be rebuilt and was a fairly quick exercise this month. The result cannot compare in any way with the superb build of a similar kit currently being described by DLT but it has been a quite rewarding project and a cheap one as well! The first photos show the model as acquired.
The original builder had made a very neat job of assembling the etched brass components but the white metal cab did not sit square. There was damage to the front end with the buffer beam adrift and damage to the LH valve gear, including a missing piston rod. The Bulleid era paintwork was quite attractive but perhaps a little heavily applied. Obviously quite a lot of work to be done but as the loco only cost me £30 I thought it a worthwhile project.
Inevitably everything needed to be stripped to component parts and I began with the chassis. I expected to have to re-motor the chassis as the seller had doubts that the MW 5 pole motor was still working. To my surprise this proved not to be the case and I found that it still had plenty of life left in it. As I had spare motors of this type in stock I decided that I would retain it. The chassis was stripped and the wheels repainted from Malachite Green to black. On re-assembly I repaired the damaged valve gear and brake assembly and added a replacement piston from a piece of brass rod fitted into a hole drilled in the surviving white metal crosshead. The pick ups were made good and the chassis runs tolerably well , albeit inevitably not up to the standard of modern motors.
The locomotive and tender bodies were then submerged in a bath of Dettol for a few days which did the business admirably in both removing the paint and breaking the glue joints.
Re-assembly included replacement of all the handrails and piping and a small amount of extra detail, including the diagonal pipe runs on each side of the boiler. I was not convinced by the kit Lemaitre chimney so I treated myself to a Markits one and also added clack valves by the same maker.
The final finish is in early 1950's BR livery with lining transfers from Fox. I found that they were a little tricky to apply but I am pleased with the effect.
So there you have it. Not a masterpiece but at a total cost of about £56 a very economical exercise so far as I am concerned!
Barry
-
15
-
-
Does anyone know what is happening with Modelmaster? The website indicates that some form of re-organisation is under way and that negotiations with others are on-going, but at present the company seem uncontactable! The given telephone number does not work and there has been no response to my e-mail. A bit annoying as I have had a set of name plates on order since before Christmas!
Barry
-
Does this help?
Here's how mine turned out.
Cheers
Barry
-
3
-
-
Thank you Gordon, that's extremely helpful and I have passed on the information to my friend.
Barry
-
A friend has two Jouef SNCF 141P models,both of which have the same number, which appears on small plates on the cab sides and is also displayed on the buffer beam. He would like to give one of the locomotives a different identity and has asked me if there are suppliers who may produce the necessary plates or transfers. I am unable to advise him as I model UK prototypes and in consequence have no knowledge that may assist him.
Can any one help? Forgive me for trespassing on your forum but I thought that I had better ask the experts!
Barry
-
My 4575 loco project is now finished as shown. I chose 5504 as my prototype, a Taunton based engine that I saw in my spotting days.
With a High Level RR + gearbox, Mashima 1420 motor and flywheel this loco runs very smoothly and the weight of the cast metal kit helps considerably.
I 've completed 4 GWR locos this month - all the result of frenzied E -Bay activity both before Christmas and early new year. This is the last one ,which is a Cotswold 16xx pannier tank. I only saw a small number of these engines in service but I have always wanted a model version. This kit came assembled but undetailed and had been put together quite nicely. The down side was that the chassis has old style Romford drivers and the non - insulated ones were plain without any nickel tyres. The motor is a Tri-ang X04, albeit with Romford gears. Very old school and redolent of the early 1970's ! I deliberated for quite some time about this model before deciding to go for it at a price a little more than I really wanted to pay. After a bit of tweaking and a pick up rebuild I got thechassis running quite well, even if it was rather noisy, and I decided that I could live with it. Fitting a more modern motor and gear box to the massive milled brass Cotswold chassis was not really an option, and complete replacement with the NuCast Partners etched chassis plus wheels, gears and motor would cost almost as much as the RTR model. I decided that I didn't want a 16xx at any price so set about improving what I had. To my mind, the biggest fault was the lack of brake gear on the Cotswold chassis so I managed to drill into the solid brass for brake cross rods and then added the hangers and connecting arms from the invaluable Mainly Trains etches. I don't think it has turned out too badly. The body was completed using the parts that came with the kit and I added a small amount of extra detailing .
Well, after a wholly unexpected GWR diversion over the last two months it's time to return to the Southern and tackle a sorry looking "Lord Nelson" that I rescued from the clutches of E bay last year. Where's the Dettol?
Barry
-
3
-
-
Here we have all 6 of them!
Mad or what?
Barry
-
3
-
 1
1
-
-
After a concerted effort over the last couple of weeks the 1366 twins are now complete.
I should have liked to provide a few more subtle detail differences, such as different BR crests, but as it was these two only ever carried the early "cycling lion" emblem.
The DJH kit makes a good representation of the prototype and I think it is one of their better kits.
So I now have the complete class!
Barry
-
2
-
-
Many thanks for the gen rogerzilla. Just ordered the last one!
Barry
2023-05-1Pbuild.jpg.bab5086283cc1f239fdb65f220f31017.jpg)
2023-05-1Pbuild.jpg.05db532e5e25abdce3bc55bd72d0dc71.jpg)
2023-05-1Pbuild.jpg.f49365205fab4c52530495f002673ec1.jpg)
2023-05-1Pawaitingprimer.jpg.fc247c26b09dbb58c31ede4c2d36b0ed.jpg)
2023-05-1Pinprimer.jpg.a9c9c7baa4d132d91cdb5d7c8864789e.jpg)
2023-05-1P58086complete.jpg.64b779aa0c62ba84542214af5b07717d.jpg)
2023-05-1P58086complete.jpg.ef69d52589e27a5ff85c8dc0a7f8d6a5.jpg)


2023-04SERcranetankchassis.jpg.f8040a4212c8620a1957c31eb5fa26a3.jpg)
2023-04SERcranetankcompleted.jpg.ee1c75a9a6e7a9e5e4c5798e5afdfe7a.jpg)
2023-04SERcranetankcompleted.jpg.dd64395fc5991d4807d94ea846600089.jpg)


2019-0330586complete.jpg.400fa681b44ac9669b9969c0161307cd.jpg)

2023-03BeattieWelltankbuild.jpg.be1656885910022311af3cb7771bf407.jpg)
2023-04-30587awaitingprimer.jpg.d81e3a855c26a230e6f07a611eedfa68.jpg)
2023-04-30587awaitingprimer.jpg.d59d63c0f7f1c62aa9dc6bc9d9342ba2.jpg)


2023-02LordNelsonclasslocoasacquired.jpg.90480f1c9897d4bcdb9835d4a0dd4f3e.jpg)
2023-02-LordNelsonclaslocoasacquired.jpg.a0da1012f49184506706af646840647d.jpg)
2023-03LordNelsonlocorebuildunderway..jpg.cf5f2cbf12148d3f2e681d6859f38e09.jpg)
2023-03LordNelsonlocoinbits.jpg.daedd72e9b13b884d672194ae7435747.jpg)
2023-03LordNelsonrebuildawaitingprimer.jpg.8f68ac8ab3fb1b0d4dcf722e93be4997.jpg)
2023-03-LN30864completed.jpg.cd6c5827730aa783a2fc7922fdf73663.jpg)
2023-03-LN30864completed.jpg.38edec76461aca2fbc2e94c60f32ba23.jpg)


2017-03Caleypug56035complete.JPG.025967361c5ff3843e995f8f7d88ba4b.JPG)


.JPG.dc1ed7b7bd30390f1446510dfddaac76.JPG)
.JPG.885c7441e55036b63843c3d76ad3c60c.JPG)


.JPG.0468318b7d52d62e68399667a8d61eb1.JPG)
GEM 00n3 Isle of Man no 11 "Maitland" loco instructions
in Kitbuilding & Scratchbuilding
Posted
John
Branchlines produce a replacement etched chassis for the old Gem IOM 2-4-0T kit. You might consider one of those with a decent modern motor and gearbox.
Barry